


Scot,
Sounds like you are moving right along! That's a lot of turnouts!
Dennis said:
Well, nothing much to the layout other than run the train I am working on. Been restoring a set of 600/601/602 Prewar passenger cars and a 249E/265T in the Lionel Corp colors. Photo's of the cars before and during.
Hey Dennis,
Great job on your restoration. I admire people who can take a rusted, beat up, mistreated item, see past it's problems and bring it back to life.
Again, great job,
Jim
I actually got some work done today.
I secured the camera system power strip and got some of the wires tied up.
I mounted the fifth camera.
Now I can see the entire yard from the control panel area.
I got a good start on my train board. The numbers are the TMCC channels assigned to the engines, and represent their location within the yard. It is just a bookkeeping measure. This way when a train leaves the yard, I can advance the remaining trains on that track without having to run all over. In a perfect world, the computer will do this.
I just need to add a couple rows of number storage for the remaining engines on the layout, then paint it.
Attachments
Images (4)
Elliot,, How many of you are there??? I am constantly amazed by the size and amount of everything your putting into that monster! It is great to see your updates, I am sure I have learned a few things or been reminded of various ideas just from seeing your (and your helper/teamates) efforts. Keep it up man!! ![]()
I photographed the junkbox cabooses described above, and then went through a book
on the old, abandoned Colorado and Southern standard gauge the used to run east
out into the prairie between Denver and the south, until I found a side door caboose
that looks very much like one of these. I then dug through my decal stash until I
found C&S decals for it. Next: to restore it.
long weekend. yard wasn't long enough. my helper last weekend wasn't the carpenter he led himself to be. but free can't complain thought I could live with some of the mistakes he had made nope couldn't wanted it correct. so the middle level plywood came off replaced what he had left of the 1/4 so the whole level is now 1/2 mdf added a curve in the yard on all 3 spurs so now I can fit more under there also could add shorter lines between on on the outer edge then spent the day with the shop vac cleaning up the mess. then ran my hopper train with a total of 10 hoppers now. I really like watching that one run around.
I have been hard at work designing a new trackplan for my new layout. The old one will be torn down sometime this fall and construction will start after the new year on the new layout.
The new one will be an around the room design.

Attachments
Images (1)

Originally Posted by Dennis Holler:
Elliot,, How many of you are there??? I am constantly amazed by the size and amount of everything your putting into that monster! It is great to see your updates, I am sure I have learned a few things or been reminded of various ideas just from seeing your (and your helper/teamates) efforts. Keep it up man!! ![]()
Patrick, Matt and Jon are my crew. Patrick has been with me for a little over a year and a half, and has by far the most hours of anyone other than myself. Matt has been coming over for almost a year, and Jon about 5 months.
We employ some unusual techniques in the construction of the layout. Some are carried over from enterTRAINment, others are new and unique to this one, and many are things "normal" people wouldn't need or even consider. But every once in a while...
The Razorback Traction Company made a guest appearance Sunday at the Fort Smith Trolley Museum open house...

Note that, yes, one CAN use FasTrack on a prewar Standard Gauge bridge! This entire rig breaks down into a series of duffel bags and fits in the car...

The kiddies enjoyed the show, too!
Mitch


Originally Posted by jhz563:
What did I do today? I started!!!!
Wisdom from mu Mother-in-law:
"When you begin, you are half way finished.'
Congrats, you're well on your way!
Well the other day I started to pull wire. And today I posted in the Electrical Forum Asking if I was pulling enough wire. I know I may need some assistance with the wire I am pulling. So I figured this will be the place to ask. I spent almost 25 years as a sound Tec Pulling wire for 8 story buildings and my main thing was Fire Alarms. But 1 thing I am not sure of is what do I need to pull for the Layout? Am I pulling enough Wire? My body has been thru enough surgeries Loosing my right leg was the worst thing I went thru. Sometimes I cant think of the proper wires needed to complete this layout. Any assistance would help. Thanks Guys Scot
my wifes prr cars showed up today.
I got my train board painted and hung.
The trifecta is now complete: power and switch control, video monitoring and a way to keep track of which train is where.
I'm anxious to see Patrick tomorrow, it's been over a month.
Attachments
Images (2)
Looks good Elliot. More backdrop tomorrow?
That's the plan. I need to get that peninsula ready for track to stay on schedule. I already feel like I've fallen behind.
Hold Patrick hostage until he get's it done.![]()
I'll just chain him to the layout, and bring his dinner down to him.![]()
Don't forget the chamber pot
I had to run trains this morning for some out of town visitors. they all had a good time as did I. I need more visitors anybody want to volunteer?
Clem k
I can anchor him to the small helix with 60' chain, that should allow him to go anywhere in the train room and still reach the bathroom. I have this all figured out.![]()
Originally Posted by clem k:
I need more visitors anybody want to volunteer?
Clem k
I hear ya Clem. I've got some coming next week.
Good plan
I ran trains for three or four hours while I cleaned up. Tested some new 'Streets stuff.
I am building a new cupola to bring this junk box caboose into a close match of C&S
#204, and knew I'd seen but could not find some large block letter decals for it, so
spent most of two days hunting for and trapping my decals in one place. I finally
found that Clover House had been my source for those, and that they had moved from
Calif. to Washington, and are on the web with about 400 odd ball, and some common roads, dry transfers listed.
![20140716_140034[1]](https://ogrforum.ogaugerr.com/fileSendAction/fcType/0/fcOid/12129987997660671/filePointer/32683976986679579/fodoid/32683976986679560/imageType/LARGE/inlineImage/true/20140716_140034%255B1%255D.jpg "20140716_140034[1]")
![20140716_140034[1]](https://ogrforum.ogaugerr.com/fileSendAction/fcType/0/fcOid/12129987997660671/filePointer/32683976986679579/fodoid/32683976986679560/imageType/LARGE/inlineImage/true/20140716_140034%5B1%5D.jpg "20140716_140034[1]")
Ran the track cleaner cars and tided up as I always do at mid-month: everything gets cleaned and dusted whether it needs it or not.
Patrick's triumphant return!!! ![]() It was so nice to have him back, and we didn't waste any time.
It was so nice to have him back, and we didn't waste any time.
He finished the backdrop behind Red Wing, then we put the buildings back.
That freed up space to put down the end piece of fiberboard.
The two curved corner pieces need to be trimmed and secured.
One filler piece is needed to complete this section. After that the center lines get drawn. Then it's track time!
Next time the backdrop goes up.
Attachments
Images (4)
Hello Big Boy 4005
Thanks for sharing these photos. It tells the story of all the objectives for this layout. This is my favorite part of the OGR Forum. Model Railroaders showing fellow members photos of their layout or things they are building on their benches. The old saying a pictures tells a 1000 words or something like this.
Cheers from Michigan
Been working hard on a trackplan for my new trainroom. As stated before in my other thread I am designing this one for operations that will be done with a car/card system. I plan to be able to hold an operating session for 1 to 2 people.
I am pretty set on the this plan. It has 3 industries plus a gang track next to the grain elevator. It has the Great Lakes car ferry and small yard to service it. Most of the operations will be around the car ferry and it will have to be loaded correctly based on the weight of the cars and length. Don't want the ferry to be listing to one side because it is loaded incorrectly.

Attachments
Images (1)

finally got all tracks running correctly ran 3 trains 2 passenger 1 freight all power came from a single 135 watt brick 2 engines are tmcc one is dcs boring video but I didn't care it was nice having 3 run again.
My benchwork construction has been seriously moved back for various reasons, mostly my wife adding new, "you must do this first" tasks ahead of it, and coordinating with a local guy who said he'd help me build all of it.
SO, last weekend I spent almost all my free time building a large shelf system in our shed for my wife, which I used the same materials I planned on using for my layout benchwork (1X4s mostly). So, at least that gave me some idea of building box frames in that material. When we were done, it made it really clear that the benchwork was next and that comes first before anything else she comes up with (I'm now over a month behind where I wanted to be). The guy who was going to help is going on a 2-week vacation, so I told him I'll build all the benchwork and lay playood, and he can help me lay track and wire the thing for DCC once he gets back (which is the part I'm really going to need help with).
My layout will be in sections, like a odd module setup, for the benchwork. That way if I ever need to move, I'll just need to dremel the rails and run a knife through the gaps to cut apart the scenery at the seams. Even the wiring will have plugs at the end of each section.
The idea is I'll take the completed bench work sections over to that guy's place, we'll lay the track and do all the wiring, then I can cut out any depressions in the ground I want for the landscape, then install the whole thing in the room for the layout, hook it all up, rest run some trains, then get started on the scenery.
So anyway, that's my plan for this coming weekend.
![]() hooked up my Dumbo pylon and put the on/off button within easy reach for my grandchildren. Also ran all of my engines to make sure they'll have no issues when the children "play trains" with Grandpa.
hooked up my Dumbo pylon and put the on/off button within easy reach for my grandchildren. Also ran all of my engines to make sure they'll have no issues when the children "play trains" with Grandpa.
I will be running trains on it for the last time tonight then start dismantling it over the weekend. There is a lot on this layout I will not be using for the next layout so things will go up for sale on the forum this weekend.
Originally Posted by Jdevleerjr:
I will be running trains on it for the last time tonight then start dismantling it over the weekend. There is a lot on this layout I will not be using for the next layout so things will go up for sale on the forum this weekend.
Out with the old, in with the new. May be new for someone else.
Former Member
Got the hole cut for the cinder/ash hoist, and repositioned both the inbound and outbound tracks for the TT. Had to get better spacing for the coaling tower, water column, and sand house.

Attachments
Images (1)
Originally Posted by Laidoffsick:
...Had to get better spacing for the coaling tower, water column, and sand house.
I really like how you have that RR facility landscape totally meld with that background, all of it working together as a unified whole panorama. Congratulations on your artistry, sir!
FrankM
Last night I ran the last train on my current layout. I ran my Legacy PM 1225 with freight train around for about an hour. Tonight starts the disassembly. I hope to have all the Fastrack put up for sale by the end of the week along with several buildings.
I also changed out the hoses on my laundry machine last night to stainless steel braided hoses. What does that have to do with trains you may ask? Well the laundry room is right over the room where my new layout will be. I plan to replace them every 3 years.
The assistant engineer and I ran some trains outside.

Attachments
Images (1)

Al; looks like he's having a good time.


Originally Posted by Spence:
Al; looks like he's having a good time.
I think he is the equipment safety inspector! It's great!
Originally Posted by Al Galli:
The assistant engineer and I ran some trains outside.
If I may ask, Al Galli, does the boy know how to put the trains on their tracks? How does he do it - does he just plop them straight down on the tracks and then wiggle the trucks around until he gets all the wheels on the rails (like I do), or does he lay a car (or locomotive) slightly on its side, with the wheels of one side lined-up along one rail, then right the whole unit up onto both rails (like my father taught me decades ago) ? ![]() FrankM.
FrankM.
Hi Moonson
I feel certain you and most know about this plastic Lionel railer. Maybe it will be news to some. It is almost child proof. I keep several around to make it so easy to place stock or trains on track. I actually think you can make one very easily with a small piece of wood and a router.
Larry


Attachments
Images (2)
Originally Posted by Moonson:
Originally Posted by Al Galli:
The assistant engineer and I ran some trains outside.
If I may ask, Al Galli, does the boy know how to put the trains on their tracks? How does he do it - does he just plop them straight down on the tracks and then wiggle the trucks around until he gets all the wheels on the rails (like I do), or does he lay a car (or locomotive) slightly on its side, with the wheels of one side lined-up along one rail, then right the whole unit up onto both rails (like my father taught me decades ago) ? ![]() FrankM.
FrankM.
Frank, I put them on like you, and sometimes struggle. I will have to try the way your father showed you.
Larry,
Thanks for this! I'm still young in the hobby and hadn't heard of this. Does this work on other track types, too or just FastTrack?
Originally Posted by Larry Sr.:
Hi Moonson
I feel certain you and most know about this plastic Lionel railer. Maybe it will be news to some. It is almost child proof. I keep several around to make it so easy to place stock or trains on track. I actually think you can make one very easily with a small piece of wood and a router.
Larry
JohnD
I'm not sure. Here is a few pictures of the sides. It's plastic and probably by cutting the small legs off fit any track. I'm going to guess that the other track manufactures would have something similar. I don't have any other track to test it with. It certainly by eyesight seems it would work. Maybe some one will chime in about you're question.
Larry


Attachments
Images (2)
Originally Posted by John D.:
Larry,
Thanks for this! I'm still young in the hobby and hadn't heard of this. Does this work on other track types, too or just FastTrack?
According to this, it works with regular O and O-27 track:
http://www3.towerhobbies.com/cgi-bin/wti0001p?&I=LXGJM2
Mitch
I'm spending the weekend painting the outer rails of my FasTrack rusty brown to improve the look. I may also ballast the track once I put it back in place. I also laid down some Woodland Scencis Readygrass. It's a bit too evenly green but I plan to move the layout in another year or two and didn't want to invest too much time in landscaping. I'll probably add a different color of turf in places to help break it up. The Readygrass is a distinct improvement over the paper based grass mats I remember using in my youth.
cleaned my track the old fashioned way and ran my new MTH premiere allegheney.
I decided to finally get around to re-lettering a weathered Long Island pacific that I recently bought to A&WP 290. I ended up having to take the paint off the to get the decals off. I think that I did a decent job matching the paint and weathering on the cab and tender. Letters should be coming in this week.
Attachments
Images (3)


The last piece of sheetrock is up,![]() the framing and electric is done, the Drop ceiling is next. THEN THE LAYOUT!!!
the framing and electric is done, the Drop ceiling is next. THEN THE LAYOUT!!!![]() YYYAAAAAAA!!!!!20'x30'with an 20x20 add on to make it L shaped.
YYYAAAAAAA!!!!!20'x30'with an 20x20 add on to make it L shaped.
I ran an accessory buss wire beneath the layout and tested a couple of z-stuff relay/switch machine installations on the bench. Then it occurred to me I only have 3 weekends left with my last college-bound daughter. I immediately dropped work on the layout in favor of taking her to a movie.

Len B. You did the right thing by going out with your daughter. The trains could wait even if it is 3 weeks.
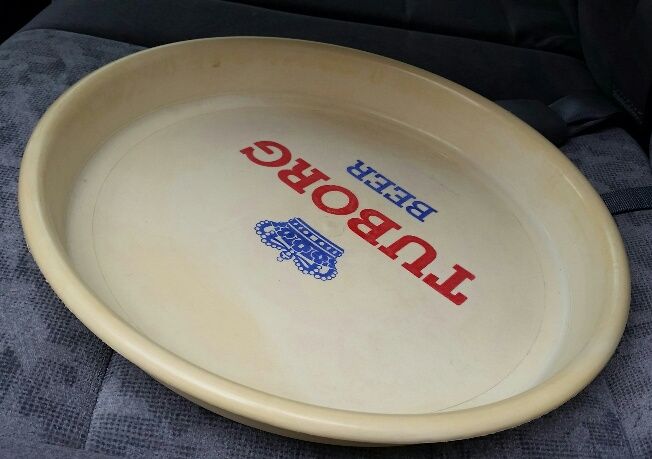
I moved the last of the furniture around my 'toy room' to make room for the layout. I also went to the hardware place and bought a lot of board feet in 1X4s, 1/4" plywood and 2X2s for support legs. I also found a plastic bar tray I can use for the home-built turntable I was planning, for less than 5 bucks!
My original plan was to start sawing wood this weekend, but I just wanted everything in the room ready for when the sections are done, so when I have the benchwork done I can assemble it in the room to be sure it'll fit right, before taking them over to a friend's house who has volunteered to help me lay track and get all the wiring done.
Originally Posted by p51:
I . . . . I also found a plastic bar tray I can use for the home-built turntable I was planning, for less than 5 bucks!
I love it! Projects that use stuff like this are so much fun. A Tuborgturntable!
Noting compared to others on this.
Removed a troublesome Y switch and replaced 060 with 072 curves leading into the newly reconfigured siding.
Placed a warehouse where the fifth siding was
Set up a test track that doubles for a place to park idle engines
Finalized final shape of my son's N Gauge layout that will double as park kiddie ride. Now to add a double mainline and add a small yard.
Work continues of converting MTH Steel Sided caboose into a CB&Q waycar last three pics.
Like I said nothing compared to the rest of you.


Attachments
Images (8)

Been very busy lately.The trains have been calling to me from the basement faintly. I'll pay attention to them tonight.
Mike Maurice
Originally Posted by sp2207:
Len B. You did the right thing by going out with your daughter. The trains could wait even if it is 3 weeks.
That is for sure. Both of our daughters are back home from college, but one is getting married in October, and the time seems so short. If the other daughter's boyfriend finds suitable work in his field, I could see them marrying next year. It seems like yesterday, they were the age of Matthew G's 2-year old.
Originally Posted by Larry Sr.:
Hi Moonson
I feel certain you and most know about this plastic Lionel railer. Maybe it will be news to some. It is almost child proof. I keep several around to make it so easy to place stock or trains on track. I actually think you can make one very easily with a small piece of wood and a router.
Larry
I have a similar device from my HO days. Cars went on track slicker than pigs in slop! I will have to get one or two of the ones you show in your photos.
I mostly finished the interior of my plasticville supermarket and installed LED lights. Not a great picture, but you get the idea if you click on the picture to open a larger view. Terry

Attachments
Images (1)
Easton
Great job on the supermarket.
Al
Originally Posted by EastonO:
I mostly finished the interior of my plasticville supermarket and installed LED lights. Not a great picture, but you get the idea if you click on the picture to open a larger view. Terry
What a nice job on the interior.
Huge improvement in the supermarket.
Art
Former Member
Did some cleanup in the train room and changed some main line trains to get ready for a summer outing this coming Saturday. We are expecting about 30, so we want to get the layout in tip top shape.
Lots of fun and work to entertain a group this size, but most who are coming have never seen our payout before. So between good conversation, good food, trains, and boat rides, it should be fun.
Originally Posted by Randy Harrison:
Originally Posted by EastonO:
I mostly finished the interior of my plasticville supermarket and installed LED lights. Not a great picture, but you get the idea if you click on the picture to open a larger view. Terry
What a nice job on the interior.
Great job, Randy! I'll gladly pay 5 cents for a Pepsi today. ![]()
last night I cleared off the tools and other miscellaneous stuff from top of the bench work and started to install the foam board. I discovered I need one more 4X8 piece to finish. I plan to go to Lowes after work tonight. I’m hoping they will cut it down to size so it will fit in my car. If so that will make short work to finish the foam base layer and I can move on to hard shell.
On the drive home form up north last night I found the perfect photograph for me to take to turn into my new layout backdrop. The clouds and sun were just perfect! I still have to edit them into a pano but I think it will complement the photo I that plan to use for the harbor scene perfect.
Originally Posted by jmiller320:
last night I cleared off the tools and other miscellaneous stuff from top of the bench work and started to install the foam board. I discovered I need one more 4X8 piece to finish. I plan to go to Lowes after work tonight. I’m hoping they will cut it down to size so it will fit in my car. If so that will make short work to finish the foam base layer and I can move on to hard shell.
I do alot of work with foam board. When you go to Lowes or Home Depot, take with you a utility knife, metal straight edge, pencil and a tape measure. I buy the entire piece, take it outside, measure the length to which I want it cut, mark it with a pencil. Use the metal straight edge to guide your utility knife while deeply scoring the foam and break the foam at the scored line. When the foam breaks, it sounds like a gun shot, so, don't be startled.
I put some street lights in and made a dump truck scene.

Sure like the shot of that Geep!
My layout fills a 15' X 28' area and I have cut a lot of foam. I'm looking to pick up a 4' X 8' X 2" panel. I plan to have it cut in two to 36" X 48" pieces. I'm hoping I can talk them into cutting it on their panel saw.
Former Member
For a couple of months my third loop has had a short that rendered it inoperable. Elusive little gremlin. I would almost have it isolated when it would disappear, and only re-emerge when things were all re-assembled.
Last night I found it. Fixed it. Had a beer.
Life is good.
Originally Posted by Randy Harrison:
Originally Posted by jmiller320:
last night I cleared off the tools and other miscellaneous stuff from top of the bench work and started to install the foam board. I discovered I need one more 4X8 piece to finish. I plan to go to Lowes after work tonight. I’m hoping they will cut it down to size so it will fit in my car. If so that will make short work to finish the foam base layer and I can move on to hard shell.
I do alot of work with foam board. When you go to Lowes or Home Depot, take with you a utility knife, metal straight edge, pencil and a tape measure. I buy the entire piece, take it outside, measure the length to which I want it cut, mark it with a pencil. Use the metal straight edge to guide your utility knife while deeply scoring the foam and break the foam at the scored line. When the foam breaks, it sounds like a gun shot, so, don't be startled.
I've been seen in the Lowe's parking lot cutting foam board.
It has been 8 days since I posted here. It has been a kind of slow month, but things are still moving forward.
Monday Matt and Jon were here. Matt has been working on engines to improve TMCC performance. He got another 5 tuned up and ready to join the fleet.
Jon got a bunch more lights installed. Maybe another half dozen, and all the lower level lighting will be done. I have to clear all that junk away so we can finish. We tried to start hanging the track lighting, but apparently, I bought the wrong fittings.![]()

I didn't work Tuesday. BandO Bill was in town and we to the Twin City Model Railroad Museum. Wednesday he came out to the house to visit.
Patrick was here today. The superstructure for the backdrop is nearly done.
I'll try to hang the electrical boxes for the lighting before he comes back next week.
We are ready for Masonite next week.
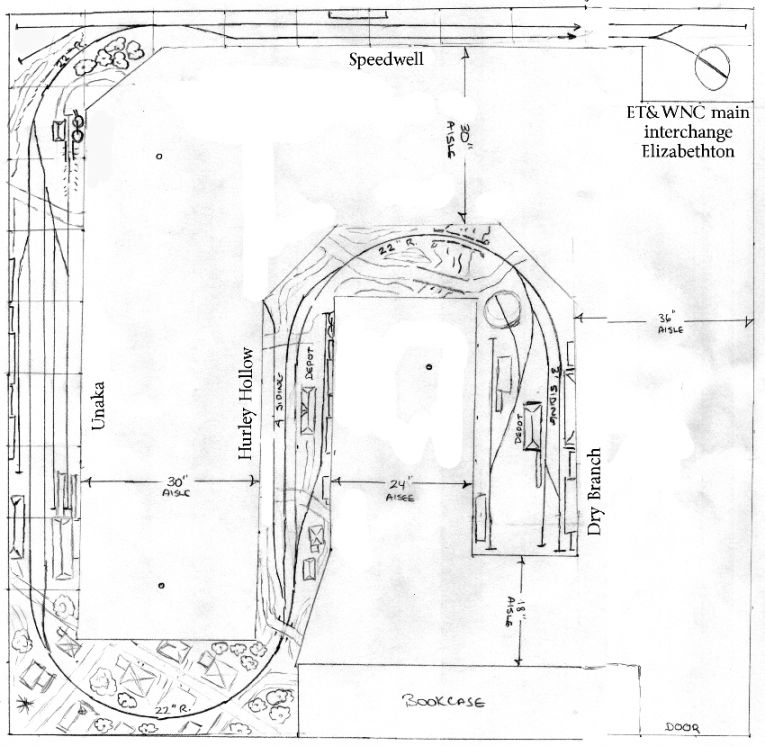
Here's the track plan I'm currently working from. There will be changes as I lay things out.
I'm having a little trouble with my left foot, and need to stay off it. I may have to switch gears, and go back to wiring or some workbench projects. It all needs doing.
.
Attachments
Images (6)
I went to Lowes and purchased a 4'X8'X2" panel and they cut it into two 36"X48" pieces with a 24"X48" piece left over. I just installed it on the bench work and covered it with the fiberglass mesh tape so I can start the hard shell stucolite layer.
Nice progress today, Elliot. You must be completely out of gas for the week by now, give those feet a rest.
tried a new method for rock cliffs that I have seen on here not sure I like it yet maybe did something wrong what do you think it's pink foam stacked then used a tippi for carve it a little then paint and put ground cover on. here's pics of it and a video of the santa fe yellowbonnet running by it .


Attachments
Images (6)
Thanks Jon, and yes I am. I have no reason to get up in the morning. I expect to sleep well and long tonight.
How are you doing after yesterday's adventure?
Originally Posted by Big_Boy_4005:
Thanks Jon, and yes I am. I have no reason to get up in the morning. I expect to sleep well and long tonight.
How are you doing after yesterday's adventure?
To employ the vernacular of the adventure, I'm still a bit stupefied! Since I didn't have a work session on your railroad empire today, I'm nearly recovered. Yesterday was a great day and I thank you very much. You are the ultimate tour guide and a gracious host.
Former Member
Looking good Elliot!!!
Former Member
Worked on a few repairs and knocked them out, more importantly I got some RA's done for some defective choo choo stuff Ive been putting off
What'd I do today?
A LOT.
I went to a hobby shop to buy a lot of ballast and some other things.
Then, I went home and started the benchwork. Finally.
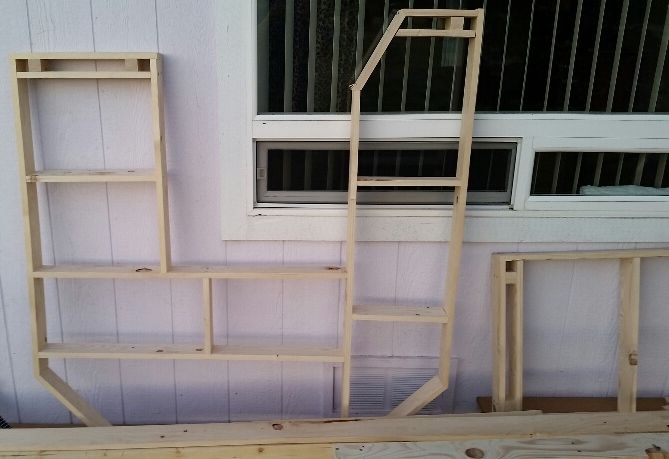
You're seeing part of it, it'll be in 4 sections. This is the center section on my trackplan, just upside down.
I only have one long section to go, cover it all with plywood, then get ready to lay track. Once I've done that, I'll be cutting out sections on the tabletop where there'll be depressions in the landscape.
Everything should be done by tomorrow afternoon, benchwork-wise that is.
Finished double-gauging my old Lionel 104 bridge for both Standard and O gauge! <3

Mitch
Attachments
Images (1)
Originally Posted by p51:
What'd I do today?
A LOT.
I went to a hobby shop to buy a lot of ballast and some other things.
Then, I went home and started the benchwork. Finally...
You're seeing part of it, it'll be in 4 sections. This is the center section on my trackplan, just upside down.
I only have one long section to go, cover it all with plywood, then get ready to lay track. Once I've done that, I'll be cutting out sections on the tabletop where there'll be depressions in the landscape.
Everything should be done by tomorrow afternoon, benchwork-wise that is.
Looks like you're off to a great start, Lee! Keep us posted, and keep the magazine in mind if you might like to do one or more articles for our readers. You'll earn some $, which will also help defray the costs of layout building. Just shoot me an e-mail if you're interested and I'll send you the details regarding what is needed.
Originally Posted by p51:
What'd I do today?
A LOT.
I went to a hobby shop to buy a lot of ballast and some other things.
Then, I went home and started the benchwork. Finally.
You're seeing part of it, it'll be in 4 sections. This is the center section on my trackplan, just upside down.
I only have one long section to go, cover it all with plywood, then get ready to lay track. Once I've done that, I'll be cutting out sections on the tabletop where there'll be depressions in the landscape.
Everything should be done by tomorrow afternoon, benchwork-wise that is.
That is a great start to what looks to be a fine layout. Keep the progress photos coming.
Got some track just half to wait for the rest come in the mail to get done with the yard.
Former Member
We hosted a summer outing yesterday for about 25 folks, and part of the festivities was a tour of our layout. Lots of fun. Good food, good conversation, boat rides, and layout tour.
I finished off my subway station and put in led lighting.

Brian - That sounds great! I know that you and Elizabeth know hope to throw a great party, I wish I could have been there. I'm anxious for someone to post some pictures.
Art
Originally Posted by Jhainer:
Here is what i am working on.


What a nice looking trestle!
Originally Posted by Allan Miller:
Looks like you're off to a great start, Lee! Keep us posted, and keep the magazine in mind if you might like to do one or more articles for our readers. You'll earn some $, which will also help defray the costs of layout building. Just shoot me an e-mail if you're interested and I'll send you the details regarding what is needed.
I doubt you'd want anything on my layout, it's going to be On30. I Assume you don't go much in the magazine on that gauge?
As for the status. I just finished the last section. My arms feel like they're gonna fall off, so I'm taking a break for an hour or two. Then I'll go cut and nail down the plywood, which I've already marked for cutting. As far as benchwork goes, I have the heavy lifting done already...
Former Member
Still playing in the dirt............

Attachments
Images (1)

Originally Posted by p51:
What'd I do today?
A LOT.
I went to a hobby shop to buy a lot of ballast and some other things.
Then, I went home and started the benchwork. Finally.
You're seeing part of it, it'll be in 4 sections. This is the center section on my trackplan, just upside down.
I only have one long section to go, cover it all with plywood, then get ready to lay track. Once I've done that, I'll be cutting out sections on the tabletop where there'll be depressions in the landscape.
Everything should be done by tomorrow afternoon, benchwork-wise that is.
Lee,
looks like you have been busy. Good work. I am interested in On30 also, but just plan an On30 logging branch up the mountain from my hi rail O gauge main layout. I'll look forward to seeing your progress.
Laidofffsick that is a most excellent scene. The scale of the model blends well with the backdrop. Nice work!
Today, hmmm. Installed a temporary plywood span over a river cutout that will eventually be spanned by a Silk City Truss. Wired the lift gate section of my second main line and added the second of four power drops on the main section of this same line. Shot a GN scene for another message thread. Now it's business travel, vacation for a a week and then college moves. I've tentatively penciled in Labor Day weekend as my next layout engagement.


Add Reply
Sign In To Reply
