A quick vid of the completed rotating beacon tower in operation!
Note towards the bottom that I used the factory shaft to hold the power contact in place; the wires for the light and coil are soldered to that. ![]()
Mitch


|
|
A quick vid of the completed rotating beacon tower in operation!
Note towards the bottom that I used the factory shaft to hold the power contact in place; the wires for the light and coil are soldered to that. ![]()
Mitch

My Dad finished the rock work and got some color on them. They look great. Now I'm trying to add some color and vegetation to the area, but I really really suck at doing scenery. I hate it. I need Dennis Brennan or Jim Elester's help.


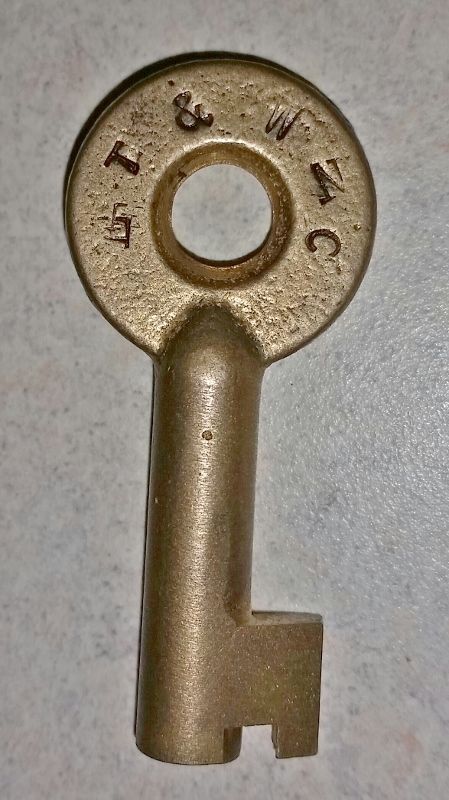
Made a fake ET&WNC switch key out of an old steamer trunk key I got off eBay and an original 1940s metal stamp set. Didn't turn out perfect but the originals never did, either:
I also completed decals for the new tank car, gonna weather it now:
I reworked 2 lightweight straight modules that I use for 1 day outings.
They use Lionel tubular O Gauge track
They are very simple straights 2 main lines at 4.5 centers, 80 inches long. Made up of four 40 inch straights placed on a piece of luan 80x8 inches. The Luan is painted green
Previously I had tried to attach the track with small screws but the luan does not hold that so well. So this time used some black cable ties and small holes to tie the track down. So far seem much better.
I have 3 of the 4 straights converted. One more to go.
Then I am going to tackle the curves.
Originally I made them 180 degree semi-circles with an inner O72 and outer O81. I now plan to cut those in half to 90 degree turns. At the same time I am going to cut out the O54 inner semicircles and save them to make new O54/O42 half turns for smaller carpet layouts
I sacrificed the top two shelves below the layout to mount four 1033's on their sides, against the shelves back wall, with the controls facing to me. I may finish my wires finally tonight.
I'm not familiar with the term NF alcohol.
Denatured has ingredients added to detour people from consuming it, that just may have an adverse effect on some metals.
But alcohol as a cleaner is used regularly in the electronics fields and I've never heard of its causing issues on sensitive connections, and need to read the exact reasons stated for discouraging its use.
The only thing I can think of, is a tiny bit of oil is very good for the metals surface condition long term.
One thing it would do is leave the track bone dry. Its a great cleaner and degreaser.
Just received (2) BIG boxes from my mail lady..
I just love Box Days..
One is filled with Scenic Express Trees. Most are for the Hobo Village.
The other is a Soft Light Box Kit to take better pictures.
Got 2 of them for $74.00 on the bay with bulbs carry cases and light stands. Whatta a deal..
Once I have everything set up pictures will follow.
Day out today. "fun day" My wife's birthday..
Oh yes..we will stop at my local hobby shop on the planned route.
Either way we win..
Brian
Thanks for your post. Very nice work.
JH, you are making me anxious for the Yellow Warbonnets.

The el is up and running and smokes flowing again after figuring out the wire changes for constant 1033 power to the AF talking "factory" mech.
I think Im going to give the mech a little 25w transformer of its own though so I can vary the stop time better.
Sprayed Scalecoat I GN Empire Builder orange on six LIONEL 15" aluminum cars. I'll do the two PW F3 A shells tomorrow.
Today while working outside I got my band saw out and cut a bunch of 3/4" X 3/4" X 8" firing strips to glue on my 2/4's holding the brackets for the upper level Then I can be ready for the Luan board. Still deciding whether to do mural scenes or backs of building along the back.................Paul
As feared, close scrutiny equaled another detail. The Great Western #60, an Alco,
has a smooth cab roof with one center ventilator, while the Lionel starter set 0-8-0
is probably modeled after a Baldwin, and has sliding ventilators for both crew, and many rivets. Some other details on the Lionel "Baldwin?" are very similar to this Alco. I have glue drying on a new styrene roof skin for the casting. Another compicuous detail are those front steps. Styrene would be much easier, but do not think life span in handling, much less operation, would be long. Brass and solder are intimidating, but maybe the only option. Time to quit procrastinating and do something.
Thanks for your post. Very nice work.
JH, you are making me anxious for the Yellow Warbonnets.
I also have the Williams F3's A-B-B-A yellow bonnets ![]() upgraded with ERR board. they were new when I got them and haven't seen much time for some reason there not the best runners I have been kicking around the idea of sending tehm to legacy station for a tune up see why they are finicky.
upgraded with ERR board. they were new when I got them and haven't seen much time for some reason there not the best runners I have been kicking around the idea of sending tehm to legacy station for a tune up see why they are finicky.

I just received an order from Scenic Express of "Jug Band" figures. They have now been incorporated with others into a mountain scene.
A fabulous scene, nicely designed and built building as well as great photography. One suggestion to take this scene to the next level is to spray your Woodland Scenics people figures with Testors Dull Coat so the won't shine under photographic light. Again, a nice scene.
On the outdoor O 3-rail Bark and Spiders layout, I placed 3,300 pounds of retaining wall blocks in the last week to complete the track laying upper portion and grade between levels, I installed the second Atlas Truss bridge today and began some wiring.
This next portion of the layout, final wiring, alignment, rail cleaning will probably take the next month...but you know? It is kinda like eating an elephant. How do you do that? One bite at a time.
?????
I GOT to get those. Absolutely perfect for an old country mountains scene. So funny.
Larry![]()
Just finished tuning up a 2354 NYC F3 for a chum:

Nothing quite like the sound of two freshly serviced Pullmors at full voice! ![]()
Helpful hint: The best way to perk up a Pullmor is fresh commutator brushes! I always keep a dozen or so spares handy... ![]()
Mitch
Suzie and I finished moving boxes of trains from our Dining Room into the Living Room layout area and neatly stacked them here and there under the layout support tables.
The main level of the layout will consist of a double-track mainline. Code 072 track on the outside-- Code 054 track on the inside loop... Already have sixteen 072 curves in-stock. Received TEN Code 054 sections on Friday in the mail. Six more should arrive on Wednesday. Code 031 and Code 042 will be used for most everything else.
Depending on the radii required !We're talking about PW tubular track here-- 90% new condition... Anticipate my long delayed track laying to start Wednesday or Thursday !
Cheers.
KRK
Did a little switching on a simpler track configuration on my 4x8. Much easier on my nerves than the previous complication. Simple plan for a simple guy.

Here's the view of the whole layout in early stages.

Went to a small train and toy show at the Roxana Delaware Fire Department yesterday. Only $4.00 admission and it supports the Fire Department. The show is being put on by the Delaware Seaside Railroad Club. Nice little drive and it's close to Fishers Popcorn. I found two MTH Premier train cars. One UP 50' single door boxcar and a SP 40' Reefer. Also picked up a O-scale size Jeep Liberty and a close to O-scale Jaguar. $40 for both train cars, $3 for the Jeep and $2 for the Jag. Also found a n-scale building for $2. You never know what you can find at these little shows.
I'm not gonna push myself this time. I got all four lines running, hooked up two street lamps, and said "that's enough". And you have no clue how hard it is for me to do that. Normally I like to complete things this close to done. I still need to run a constant power and 2-#90s to a culvert unloader, flagmans shack, railcar post office, and a semaphore.
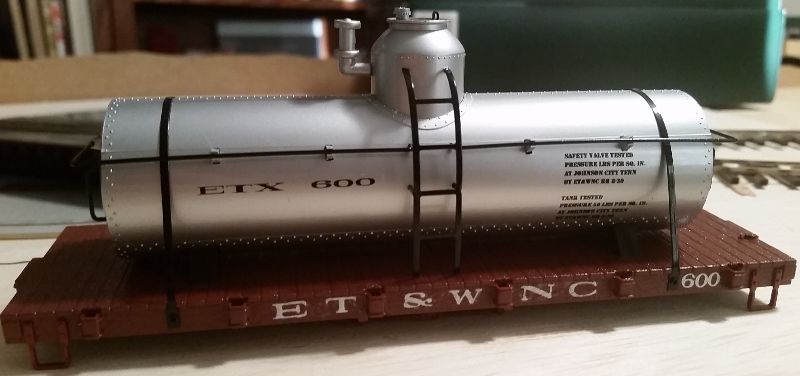
I just got a second On30 tank car, which will soon look like the other in this photo, and will be a representation of gas tank car # 600. The RR I model only had two of these on the RR by the WW2 era.

Yeah, they're not perfect models of the original cars, but Bachmann's tank cars aren't that far off for the real ones, as seen above. Someday, I'll be replacing a lot of these cars I currently consider, "representational" of the real ones...

Here is tank car 600 now completed.
I only have an AMS coach left to turn into Linville River # 4, and then I'll be officially over with the rolling stock...
That is, until someone makes an ET&WNC hopper in O scale.
?????
I GOT to get those. Absolutely perfect for an old country mountains scene. So funny.
Larry![]()
Thanks, Larry. I like mountain music, and I think those figures are just a hoot. The musicians are WD2743 "Jug Band".
The dancing couple are CG0032 "Kissing Girl" and CG0306 "Mr. McFlea Dancing a Jig".
The reclining chap with the jug is CG0305 "Cousin Clem with Corn Squeezin'". The guy beside him is just one of the cheap eBay figures from Hong Kong.
Pulling wire, mounting toggles, should of gone battery/RC. Pulling wire, mounting toggles, should of gone battery R/C. Pulling wire...............
Repaired the cupola to Ivor's shed. It's cardstock and occasionally comes unglued. Shimmed a 027 curve that occasionally derails Ivor. We'll see if that works consistently...
Did a little switching on a simpler track configuration on my 4x8. Much easier on my nerves than the previous complication. Simple plan for a simple guy.
Here's the view of the whole layout in early stages.
Sometimes simple is the most fun. That is what model railroading should be, fun and relaxation, not work. You have a nice layout.
Thank you, Randy! It's a start. It gives me a place to run trains until our last daughter moves out.
Tonight, I'm going to make up some 'employee passes' for my layout for the first op session. I can only have 2-3 people running trains in there at the most anyway.
I'm also currently putting together a operator's guide that'll look like an employee timetable with info on running the layout as well as the origins of the concept and dates the work got done.
Just something I've always wanted to do if I had a layout...
Pulling wire, mounting toggles, should of gone battery/RC. Pulling wire, mounting toggles, should of gone battery R/C. Pulling wire...............
Forgot to charge the controller, gotta wait now....forgot to charge the battery, gotta wait now. Didn't drain and recharge properly gotta by another battery pack. Had a short that toasted the battery and wires gotta buy a battery plus......
The grass in always greener, your problems always meaner![]()
Be glad its not a big boat![]()
Both work great.![]()
If your in the garden...well batteries are underrated there for sure.
But eventually you almost always have to run wires for lighting, and accessories inside anyhow ![]()
I ran my trains after sorting through some family photos that included some surprise snapshots of my Grandpa's PW layout with only one loop, The "track try outs"-Three or four brands to determine final purchase(GarGraves), The Christmas General, photos of the gunfighter car I gave back to him many years after it was given (It completed a General set[really Grandmas![]() ]) I did get it back when he passed, and pull it regularly but with double headed chrome RI&P Generals. I chose RI&P for the "R.I.P"
]) I did get it back when he passed, and pull it regularly but with double headed chrome RI&P Generals. I chose RI&P for the "R.I.P"![]() and over the PW just to avoid squabbles. It didn't work
and over the PW just to avoid squabbles. It didn't work![]() Grandma got p!$$ed oƒƒ and sold the rest
Grandma got p!$$ed oƒƒ and sold the rest![]()
![]()
![]()
![]() . But my sister still has that General set.... I think. Hard to say really, she tends to give everything to the church.
. But my sister still has that General set.... I think. Hard to say really, she tends to give everything to the church.
Today was a short work session. I managed to close in one open spot behind the bridge. I kept the area on the small side because this table will have the town and a road from town will go by here to cross the lower mainlines. A couple of pics of the work so far........................Paul


I started swapping out the window, getting rid of the mayhem for a more idyllic, pastoral display! Also I can get to run my new Canadian Pacific passenger cars.

I'm also currently putting together a operator's guide that'll look like an employee timetable with info on running the layout as well as the origins of the concept and dates the work got done.
Just something I've always wanted to do if I had a layout...
I finished that last night and printed out the pages to make the copies of. I have it in PDF format but you can't post that here, so there's no way to show anyone what it look like... YET.
Hi Everybody-- Well, I'll probably get Mark Boyce all excited because I'm finally getting some track on my plywood. I am just throwing some sections on the tables to see what fits and what doesn't. Looks like I can get in an 072 loop. I want a second loop inside the first. Will 072 fit ? Don't think so. Might have to use 054 curves and some half straights to parallel the outer loop. What was going to be the Engine Terminal is now the Trolley Yard. Suzie's idea. Good idea too.
On the attached sketch (very quick and crude)), an 027 loop will run around in a half circle at the end of the module because the trolleys can negotiate the sharp radius.
Yard tracks for trolleys will be inside the turn-around loop.
Dotted line to the right side of the big island will start the climb to the 2nd level.
------
Decisions, decisions...
The cork roadbed will be held down by a small bead of clear silicon. Black roundhead screws: # 4 x 3/4" will fasten track to cork. Advantages: No fumes from contact cement or other, including Super 77 Adhesive. My buddy at Ace Hardware said to go the clear silicon route ! Anyway-- more tomorrow.. Bye!
KRK
Yay, Ken is getting some track on his plywood!! ![]()
![]()
Your drawing is better than mine. I don't have one. Thanks for sharing.
I'm glad to read you are at that point! I did the same thing with my 4x8. I started with a plan, but it was too complicated for such a small space, and such a slow operator as myself, so I took it up and now have a simpler plan. I didn't fasten any track down yet. Kind of trying things out, track and buildings.
On the attached sketch (very quick and crude)), an 027 loop will run around in a half circle at the end of the module because the trolleys can negotiate the sharp radius.
Yard tracks for trolleys will be inside the turn-around loop.
Hooray for trolleys! ![]()
In related trolley news, one of mine is now off the Dlsabled List after several years:

This particular car ran for ten hours a day, five days a week, for a month or so, for three consecutive years around the company Christmas tree, logging the equivalent of roughly 528 scale miles every day...so it's not surprising the can motor eventually grenaded! ![]() Apart from that, it went through one pickup assembly, but that was about it. Anyhoo, recently picked up a donor chassis on eBay (apparently, the green "Happy Holidays" shell is rather fragile; this is the second case I've heard of where it shattered when dropped) and now #209 is back in action!
Apart from that, it went through one pickup assembly, but that was about it. Anyhoo, recently picked up a donor chassis on eBay (apparently, the green "Happy Holidays" shell is rather fragile; this is the second case I've heard of where it shattered when dropped) and now #209 is back in action! ![]()
Mitch
Not me, but Elizabeth was busy on the layout yesterday and today. We decided to add an additional 200 elves, so she had paint brushes in hand adding her special touch.
This should be some sight when they are added to the other elves in our Center of the North Pole.
I'm also currently putting together a operator's guide that'll look like an employee timetable with info on running the layout as well as the origins of the concept and dates the work got done.
Just something I've always wanted to do if I had a layout...
I finished that last night and printed out the pages to make the copies of. I have it in PDF format but you can't post that here, so there's no way to show anyone what it look like... YET.
I finished the ‘timetables’ for the layout today, though they really have more operating instructions than anything else:
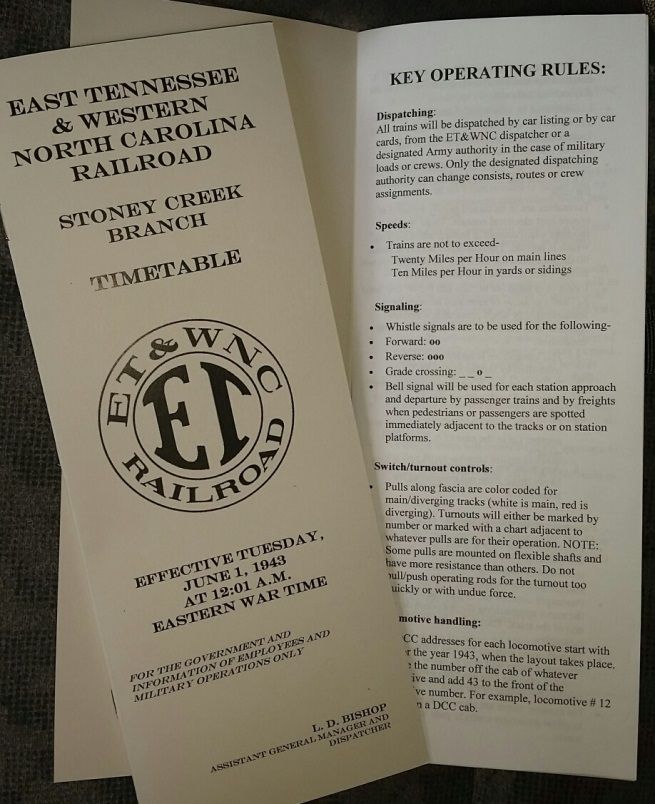
The backs have a bunch of patriotic slogans as you’d find in any document from the mid-WW2 era.
Building a slide out control panel with Dallee and DCS power feeding multiple 50-1020 PDBs .
Not me, but Elizabeth was busy on the layout yesterday and today. We decided to add an additional 200 elves, so she had paint brushes in hand adding her special touch.
This should be some sight when they are added to the other elves in our Center of the North Pole.
Sounds fabulous, Brian. Can't wait to see the finished product.
Art
On the attached sketch (very quick and crude)), an 027 loop will run around in a half circle at the end of the module because the trolleys can negotiate the sharp radius.
Yard tracks for trolleys will be inside the turn-around loop.
Hooray for trolleys! ![]()
Mitch
Horray for trolleys is right! I love 'em, esp. having grown-up in the Pittsburgh of the 40's and 50's. I'd have had more trolley lines on the layout but opted to spend the available space on ten individual, closed train loops instead.


The one I have in this part of the township is an excellent model of a trolley my grandfather motored around the McKeesport, PA area when I was a boy. I can still remember, being a passenger, touching the metal bars across the bottoms of the windows.
FrankM.
Moon Township
I received my TIU back from MTH warranty repair last evening. Here is a little video showing it controlling my new to me Premier B&O Atlantic. I am sorry the video isn't the best, I took it with my iPad. I purchased the Atlantic a couple weeks ago from a local Forum member. The TIU and the Atlantic run great!!
Today I got the second bridge abutment closed in. This is the bigger table so I went longer and higher. Tomorrow, hopefully, I will plaster both. Some pics of the second .....Paul


Trolleys rock !! I remember them well in Pgh. Riding home from work the swaying would put me to sleep. Saving room for a trolley line on my layout.
I received my TIU back from MTH warranty repair last evening. Here is a little video showing it controlling my new to me Premier B&O Atlantic. I am sorry the video isn't the best, I took it with my iPad. I purchased the Atlantic a couple weeks ago from a local Forum member. The TIU and the Atlantic run great!!
I made a stack of these last night:
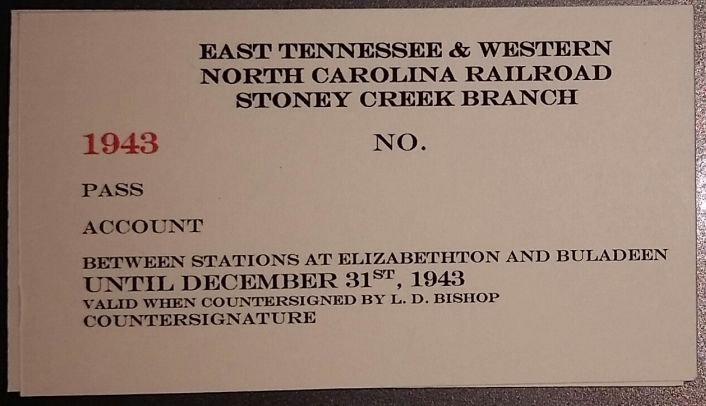
Yeah, I know in this internet era, model RR passes are, pardon the pun, passé, but it's something I always wanted to do once I had a real layout.
As small as my layout is, these will go to anyone who does an op session there. That number will be really low, so it'd be easy to keep up. Each one will be stamped with a 1930s number stamp, and the name will be typed on a 1938 Underwood typewriter.
Pass #s 1 and 2 will go to my parents as the layout is really to honor them and all they did for me as a train fan growing up. The layout takes place in the valley they both grew up in, in a timeframe when they would have been 6 or 7...
Here is the embedded video of my repaired DCS controlling my new to me Premier B&O Atlantic from yesterday's post. Corry (Goshawk) showed me how easy it is to embed on another topic. Yes, I realize the drive rods need lubed. I just got the engine and the TIU and wanted to try them out. I'll not run it again until it gets a pub job?
That's pretty cool Lee.![]()
Larry
That's pretty cool Lee.![]()
Larry
Thanks!
I know that swapping of passes used to be a big thing within the hobby. I read about it all the time in MR and the Walther's catalogs used to mention it as well if memory serves. That would have been in the 80s at the latest, I think.
I'm not sure when it stopped being a thing, because pass swapping seems to have stopped being a thing long before the internet.
I look at it this way, my layout is pretty small and if you get invited to run on it, I'll have already known you as I'm not big on random strangers coming over (my layout will never be on a tour for a local NMRA convention), so I can focus on stuff like this with minimal effort. I have made 40 of these passes (half of them are totally b/w on grey card) and it'll probably take a long time to go through them.
Heck, I haven't had my first op session yet. I was going to have it on this Sunday, but the two guys I invited kept changing the times they were available that day, so much so I got tired of changing the times and said to just forget it. What I'm going to do is announce to them the date and time and if they can't make it, I'll invite one of the guys who's already invited me to op sessions on their layouts already.
Day worked out well. Got the plaster wrap on. Tomorrow I'll get some plaster on. Couple of pics. Two with the overhead light on and two with the light off..............Paul


here's a short video of trains runnin
Very nice, jhainer! The proof of the pudding. I like your ballast and scenery in some photos. Great job, and thanks for posting!
slowly working on it theres another video that I can't seem to post for some reason but can play it on you tube but can't embed it. its 2 up's running around the main level. here's the link to it I even make a small appearance in it . thank you I am still learning
I did a little again tonight getting over a cold so I have been a little slow. but wired up a signal. video is in another post about signals. and then I painted my first flatcar. picked up a 1/43rd scale car for 2.00 at dollar general car looks a little off but size is about right probably would work as a filler car in a parking lot they had some others but just picked up one just in case it looked real stupid. also painted a linex tank. white plan is to put some ladders on it and try my hand at making a Sunoco decal on decal paper. Also picked up a new bridge should be here in a week or so.


Ah, yes, as P51 has put it mentioning his tank cars, "representational". I have several
publications on the Great Western RR, whose #60 I am kitbashing out of a Lionel 0-8-0, but none of the photos of #60 in any of them, operating or in storage between
"beet campaigns", show good shots of certain details, such as the long round tank that
is horizontally mounted across the top of the pilot plate under the overhanging smokebox. I wonder where the real #60 is now...I think it survives...I have made
a tank, but the ends and piping are not clear in any photo I have.
The speaker in the Giraffe-G-1 developed laryngitis last weekend, so I installed a fresh replacement from Radio Shack:

Note also the resonator I added, cut from the base of a disposable drinking cup. Makes the "G" that much throatier... ![]()
If you have a Lionel 71 lamppost or the like where the ground wire on the base has come off, simply run a ground wire to the spring, thusly:

I'll add a shade for this to my next order from Jeff Kane, and it'll be ready for service again!

Remember, SCROUNGE! ![]()
Mitch
Hum! I've got one of those P-51s knocking about my desk doing nothing, a stack of stripwood and a surfeit of Lionel flats also doing nothing! I think I've found a new project! ![]()
Mitch
I have the p-51 and the corsair I would like to do the whole set there's a hellcat redtail p-51, zero , spitfire, p-40 there made by testors and are 1/48 scale. I saw some on e-bay and the guy was asking a really high number for them so I figured I can do the same thing but cheaper so I started out with 2 and bought 3 more flatcars matching the one I had in mind for it. for a total of 4 flat cars 2 for wings and 2 for fuselage. plan has been to paint the flatcars flat black with wooden decks and the stands grey I have a chain to hold it down to the flat car it's just not on it yet.
Ah, yes, as P51 has put it mentioning his tank cars, "representational". I have several
publications on the Great Western RR, whose #60 I am kitbashing out of a Lionel 0-8-0, but none of the photos of #60 in any of them, operating or in storage between
"beet campaigns", show good shots of certain details, such as the long round tank that
is horizontally mounted across the top of the pilot plate under the overhanging smokebox. I wonder where the real #60 is now...I think it survives...I have made
a tank, but the ends and piping are not clear in any photo I have.

Mitch
Great idea. Something else for me to plagiarize. I have no shame.
Aligned track and added rail joiners and track power feeds to another 50' of track on the outdoor layout + found another soccer ball in the middle of the layout. This is going to get expensive to the kid and his father next door when they start taking out the Atlas bridges with those balls. Oh well, jr's father owns a hydroponics supply shop and seems to have plenty of money.
Replaced one of the 6-wheel trucks on my Atlas Trainman RPO car. The roller on the old one hadn't been making very good contact, causing flickering. Looking at it, I saw that it was somewhat crooked, and didn't seem to be pressing downward with much force. Thinking that I might try straightening it out, I applied a pair of needlenose pliers...
That's when I discovered that the rollers on those trucks are held in place by a small, fairly fragile, metal fork that's a cast-in part of the truck body itself. One of the fingers of the fork snapped off, leaving me with nothing to support the roller at all.
With the assistance of several helpful folks here on the forum, I ordered a new truck from Atlas, and yesterday was the first chance I've had to install the new one. With soldering iron and tools in hand, I removed the old, broken truck (it'll make a good gondola load, I guess), and set about putting the new one in its place.
It ought to have been pretty straightforward, but, like Lionel, it seems that Atlas never uses wires that are one single millimeter longer than they absolutely have to be. I had to splice in extra wire to have enough length to work with while wiring up the new truck, which made it a longer job than it would otherwise have been.
Eventually, I did get the new truck installed. Its roller has a slightly different design than the old one, and my flickering problems are fixed.
As an aside, while I was inside the RPO car, I saw enough of its innards to be favorably impressed with the quality of design and workmanship. Whatever Chinese artisans were involved are to be congratulated.
I put the bunker crew to work! They are having a day!
I started mine off by screwing up the paint job on a loco that I am restoring, will have to wipe it down and start over, at least I know the colour is a match.


well played some more after yard work. Outside grass yard work ![]() hired my daughter and granddaughter to go into the back yard and get some rocks for the layout. I wired up another signal for the opposite direction. then cut out a drainage ditch into the quiet brace and lined it with real Georgia red dirt also from the back yard. also took one of the SD90's I have apart it had no lights they were unplugged. must have been when the pervious owner had it and burned up the smoke unit I need to order a smoke unit for it and one ditch light led. but looks a lot better with lights now though. after all of that I just spent the rest of the night cleaning up my messes and letting a train run around. if you haven't noticed I am partial to Union Pacific. but tonight Santa Fe got a chance to run! in the video you can see the signal light of the opposite direction switching too. they both run off of the same controller.
hired my daughter and granddaughter to go into the back yard and get some rocks for the layout. I wired up another signal for the opposite direction. then cut out a drainage ditch into the quiet brace and lined it with real Georgia red dirt also from the back yard. also took one of the SD90's I have apart it had no lights they were unplugged. must have been when the pervious owner had it and burned up the smoke unit I need to order a smoke unit for it and one ditch light led. but looks a lot better with lights now though. after all of that I just spent the rest of the night cleaning up my messes and letting a train run around. if you haven't noticed I am partial to Union Pacific. but tonight Santa Fe got a chance to run! in the video you can see the signal light of the opposite direction switching too. they both run off of the same controller.


Today's work was something that can't be seen, but improves operation. We had slow-speed stalling on Ross #8 curved turnout. Problem is that we were losing the common connection on short locomotives because the closure rail on the 48" radius (O-96) part of the turnout wasn't grounded. Using the built-in relay contacts on the Tortoise motor (which I replaced because the original one was pretty old), I connected the closure rails in such a way that the unused rail becomes an extension of the hot lead while the closure rail in use (supporting the wheels) is tied to common. Our normal operating speed of 25smph was sufficient to get short locomotives past the gap, but now short locomotives can creep through at 5smph. Got it done just in time for next weekend's Open House.
Jeff Waldman and Dave O'Connor swapped out our Car Wash. The original SpeeDee had some sticking problems, so we installed a Bikini Car Wash in its place. That one began sticking. Thanks to Dustin's re-engineering on the SpeeDee Car Wash, it's now back in place and working well.
Howard "AGHRHowie" Packer made more trees for the narrow gauge area using our tried and true balsa wood/Ming Fern. The technique is time-consuming, but yields great results.
Mitch
Great idea. Something else for me to plagiarize. I have no shame.
Plagiarize,
Let no one else's work evade your eyes,
Remember why the good Lord made your eyes,
So don't shade your eyes,
But plagiarize, plagiarize, plagiarize -
Only be sure always to call it please 'research'.
-Tom Lehrer, "Lobachevsky"
![]()
Mitch
well lets see I seen it on an auction site made 4 cars Mitch you seen it here liked it might make some and Al Gallli likes it too and is gonna do the same did we start a trend ![]()
well lets see I seen it on an auction site made 4 cars Mitch you seen it here liked it might make some and Al Gallli likes it too and is gonna do the same did we start a trend ![]()
Could be the hottest thing since giraffes! ![]()
Speaking of which, May 9th was National Train Day, and the gi-raffes (plus one zebra) made their annual pilgrimage to the Fort Smith Trolley Museum!

Because of inclement weather, the crowds (and the consists) were somewhat reduced, but the kids that did show up enjoyed the show! ![]()
Mitch
Building long temporary fantasy bridges to connect all my modules.
Well yesterday was suppose to be the day for adding the plaster but outdoor work got the better of me. But today I got the plaster on, just barely. I just had enough Gypsolite to do both embankments. Looks like an order to scenic express will be in the next day or two. Anyways here are pics of plaster done. Now I can add coloring maybe tomorrow......................Paul


On one layout,I installed some terminal blocks for streetlights,the other one I did some urban renovation. removed one building and a water tower,covered it up with new grass.
A good day for the trains and layout. Stopped at a outdoor, small, flea market and bought a nice #450 signal bridge that I had wanted at a very affordable price. Later I was at my favorite antique store that had just gt in a Lionel loco. It was a 2065 but someone had changed the numbers with decals. I had some trade items so came away with the loco plus a Lionel passenger car NIB for very little $$. The passenger car is Tuscan but a wee bit smaller than the other two but it will work until I get the one I want. Then this new will probably be converted into a interurban car or an RDC. So the new loco gives me 2065s but you can never have enough power especially if it is a good deal.
today didn't do to much mothers day and all. but she wanted to relax today. so that gave me time to play a little. one end of the layout I still didn't like the route the trains took and scenery was going to be difficult. so what I did was redesign that end of the layout. then I took some night photos for fun.


Quiet day after the fuss of Train Day. Did a little light maintenance (new rubber fingers on my 3535 Security Car's revolving searchlight, glued the chimney back on a K-line caboose, that sort of thing).
Also resoldered the motor wires on one of my 44 tonners for the umpteenth time. I rather suspect that the 1950s vintage wiring has stiff insulation, which makes for excessive flexing of the wire at the solder joint and premature failure. Prolly gonna rewire the E-unit one of these days... ![]()
Did a little preliminary fitting of my P-51 Mustang onto my Lionel flatcars as well. ![]()
Mitch


Mitch
here's where I got the Idea. he's asking $99.00 for them.
Maybe it will give you an idea on the structures to hold them. mine I made out of balsa to fragile. need to remake the ones for the wings since they both broke and the wings now lay on there sides ![]()


My layout; progress vs. completion, is what would have to be described as "mature". I began this particular layout in 1998 and all of the track is in place, there is scenery on virtually every location and most of the wiring is done. Sure, I have some buildings that need more detail, the ground cover can stand some attention, I still add new details now and then and I still don't have every switch motor wired. Small future projects.
A few weeks ago, I had our usual Tuesday nite bunch over for one of our weekly evening sessions. But this time I promised the guys that my railroad was going to be "completely different" All new, I said.
I have always been a Milwaukee Road fan and virtually all the engines on my layout, plus all of the passenger cars, way cars, cabooses, etc. are all lettered and painted for the "Road". I take a lot of teasing from the guys around here, in the Cleveland area, because they are all NYC, Pennsy, B&O, Erie, etc. fans and most of them don't know "from Orange and Maroon". However, over the years, I have also collected a substantial number of Chicago and Northwestern (mostly Green and Yellow) equipment, but these items were generally left beneath the table in storage.
So, what I did to accomplish this "complete change" in my model railroad was to take ALL of the Milwaukee Road stuff off of the lay out and replace it with all Chicago and Northwestern stuff. So, now my railroad was completely changed, right? I mean, it was no longer Milwaukee Road but was now Chicago and Northwestern. How much more of a change can you have than that?
You know what? Nobody noticed! About 30 guys were here, soda and beer was available, snacks and desserts were provided and TRAINS RAN. But, nobody noticed the "complete change" until I pointed it all out. I even had arranged that on the double track section of the layout, the C&NW trains were running the left hand main the way the Northwestern functioned. Nobody noticed!
Man, what a disappointment! Went through that whole exercise of taking all the Milwaukee trains off and putting them away. Then hauling out all the C&NW stuff that hadn't been run for a while, charged up batteries, lubed axles and gears, tested out everything and nobody notices! Boy, doesn't that suck!!! (I think that, given the promise I had made, the guys thought that I had torn up the whole layout and started all over again. That ain't happenin'!)
So now, I'm gonna start the change back again. Cleaning, charging, lubing, etc, all the Milwaukee Road stuff and putting the C&NW away for another year (or more) Keeps a guy busy.
Paul Fischer
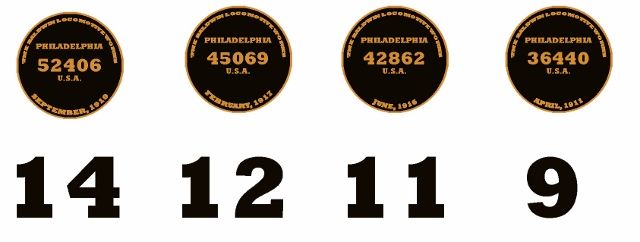
I never liked the way the Bachmann On30 4-6-0 number plates looked, so I'm in the middle creating my own. I'm not 100% sure how I'll attach them, either printing them on decal paper and putting them over the pre-existing plates (which are just bronze colored circles with the engine number in black, of course the opposite of what they should be and all Bachmann ten-wheelers have the same serial number on them).
I even have the right serial numbers for the locomotives I'm modeling, as well as the correct dates of delivery as would have been on the actual builder plates:
slow day in the office only a few calls. so I spent some time working with scarm dressing up the layout with buildings I have and ones I know I want. some I have had to add to the layout like the ogr tool and die building. some don't look just right because it's hard to make a sphere in scarm. added bridges and a river because of all the layers the drawing doesn't look just right like tunnels don't show up and sucj but you get a good idea of where this layout is going to go. a yard added to the lower level my transfer table added to the lower level things like that. everything on the layout I already have other than the tool and die building it's just a matter of finishing the layout and putting stuff on in the right spots. I still need to get about half of the track for the elevated level so here is the plan and as we all know they change as you go along.


here is the big bridge I waiting on hopefully to be the focal point of the layout


The speaker in the Giraffe-G-1 developed laryngitis last weekend, so I installed a fresh replacement from Radio Shack:
Note also the resonator I added, cut from the base of a disposable drinking cup. Makes the "G" that much throatier... ![]()
If you have a Lionel 71 lamppost or the like where the ground wire on the base has come off, simply run a ground wire to the spring, thusly:
I'll add a shade for this to my next order from Jeff Kane, and it'll be ready for service again!
Remember, SCROUNGE! ![]()
Mitch
"remember,SCROUNGE"
Mitch did you get that from Walt Hulsweder?
fresh from it's South Pacific island crash site, this Mustang has a lengthy restoration ahead...need to fab a proper cradle for it.

I like it
Man, there are a lot of P-51s on flatcars on layouts these days!
that's because that big 'ol radiator underneath had a big bullseye on it!![]() as for me...I'll take a Thunderbolt!(or a Corsair..air cooled all the way!)
as for me...I'll take a Thunderbolt!(or a Corsair..air cooled all the way!)
Didn't do too much on layout today, however, I cut some masonite on my table saw into eleven 1 1/8 inch pieces and five 2 1/4 inch pieces. These will be used as TIES under the 027 curve pieces comprising the reverse loop in the trolley yard so as to mate with the 031 O-gauge track... (height-wise) ...
And, the mailman brought me another 45-feet of 25-pair phone cable as well as that neat Rail King "Greyhound Bus Depot" with the dancing lights on the Marquee.
It is fantastic! Comes with a Greyhound Bus--but the seller also gave me a nice
Trailways Bus as well at no extra cost. Great price--Free Shipping... All the way from Maine !! Made the trip in good shape! But boy, that bus station takes up space !!
KRK


Mitch did you get that from Walt Hulsweder?
Vane A. Jones in the old Traction and Models Magazine. ![]()
Mitch
anyone else having issues posting photos
? never mind server went off line for a minute and now it works again. ![]()
another way hosted off of my server ![]() when I try to upload I get file processing error. this is what I worked on today just a tunnel opening and bridge abutment. but had more fun talking with my daughter as the train ran up and down the levels for over 2 hrs without a single hiccup. it was the first time she came in to see the trains run for any length of time. she just couldn't figure where the train was going to go the next time around
when I try to upload I get file processing error. this is what I worked on today just a tunnel opening and bridge abutment. but had more fun talking with my daughter as the train ran up and down the levels for over 2 hrs without a single hiccup. it was the first time she came in to see the trains run for any length of time. she just couldn't figure where the train was going to go the next time around ![]()

no p-51 here here's a corsair ![]()


What a weekend!
Only a couple days of running after the wiring was done, and I decided to tear some of the wiring off the four power supplies to move the layout to the other side of the room, so I could work on the backside, and remove the last of the carpeting we began pulling awhile ago. Pulling the 'table' from its 6'x10'nook, then turning the 4.5' x 9' frame, and then moving it across a room full of furniture, really required some Zen thought! And a little luck.
First two new legs had to be made. I used some scrap hardwood to replace the shelves it normally sits on, before the trip could be made.
At the halfway point the couch faced the layout. Someone sat on the couch asked me "Why did you build it so high up? I cant see". I had built it to fit shelves, it sat 39.5" up, and from far away, it didn't matter much. But they were right! It was a little too high up close, so I decided to cut the legs down since it was in the center of the room. And I put wheels on it, so I can move it by myself now to![]() .
.
It sits at 35.5" now, and will drop 2" more when I pull the wheels.
I will lose the top set of shelves to trimming too, but I'm also quite happy being able to reach everything much better now.
Tonight I finished another good chunk of the plateau's mine, permanently attaching the final track supports, and finishing much of the lower level rock face that is making up the crumbling base of the hillside. A side by side mine entrance got built instead of the single entrance shown.


Aligned track and added rail joiners and track power feeds to another 50' of track on the outdoor layout + found another soccer ball in the middle of the layout. This is going to get expensive to the kid and his father next door when they start taking out the Atlas bridges with those balls. Oh well, jr's father owns a hydroponics supply shop and seems to have plenty of money.
Oh that reminds me, what got me going inside, was rain outside.
I had checked the weather about 36 hours earlier, and laid 80' of tubular Lionel G gauge to run the old Gold Rush, an 0-6-0 Porter(?), and the quietest engine I've ever ran.
Anyhow right after I got it going the sky turned dark, and I quickly pulled the rails again. That gold, or brass plated tubular isn't very moisture friendly.
Finished the coloring of the areas around the bridge. Just have to add some grouind foam and a few trees in spots. Some pics................Paul


When I built my new layout in the dining room area I trapped a nice corner cupboard there with some memento type items in it. There was nowhere to put it at the time so last night I cleaned everything out and removed the cupboard-piece by piece. I had thought about some scenery or buildings but think I will lave it open for now. It gives me another angle to watch the trains.
Finished the coloring of the areas around the bridge. Just have to add some grouind foam and a few trees in spots. Some pics................Paul
IMHO, excellent!
FrankM.
Some days you plan for your layout, some days you work on the layout I'm not sure which category this falls into, but today I ordered more led lights for building flats and bought a second Lionel industrial tank that I've been looking for.
When I saw I was post 4999 I couldn't resist posting again to be number 5000!
i also sent off a Williams GP to have TMCC installed with lighting, sounds and electro couplers.
Had a new furnace and hot water tank installed in the utility room. Setting up my second of five work benches. Train Room, Utility Room, Darkroom, Garage and Shed. This room I have to share with the wife. This project is an example of, The best tool in my tool box is my check book.
Still working on the peg board. Debating the who's who of space on the peg board. See photo below. Click to enlarge.


Five workbenches!! The only one the ladies will let me have is the sawhorses and old door I set up outside on the patio when the weather is nice. My wife and grown daughter have so much stuff, that when I clear off a space to work, I come home to find more junk on it.
Access to this requires an OGR Forum Supporting Membership


