


Those little guys are everywhere you look these days! Now they are invading layouts! The kids will love them! Great idea!
My son and grandson are both automotive painters. I took a Plasticville fire station and redid it to a small paint shop. Jordan is my grandson. I have placed it in a corner of the Raceway part of the layout. Industrial park? The race track and cars at the body shop are 1/64.
Azgary


Attachments
Images (2)
Today I finished building a kit for the "Contention City depot", available from Andersen Model Kits here in California. It's a small wooden depot built in 1882. As the Arizona mining town went into a steep decline, the depot was moved to Old Tucson, a movie set & western theme park. Now I need to build it into my southwest desert scenery.


Attachments
Images (3)
On the club front, got the networking configuration squared away for the Legacy WiFi. Works well so far. Waiting for the MTH DCS WiFi interfaces to hit the streets.
On the home front, got part of Module #4 of the switching layout framing done. Should have it finished tonight when I get home. After I get Module #5 done I'll go back and start putting the fascia boards on and maybe put track down. Still need to figure out what I want to use for legs. I put the spine and end together Tuesday. Going to put the cross braces and track support in tonight when I get home.

Attachments
Images (1)

Built a new layout today. Actually my 3 1/2 year old grandson did most of the work - really. This is what I love about 3 rail o gauge. Kids can actually get involved young.
Al
Attachments
Images (1)

Originally Posted by AZGARY:
")
This caught my eye. I liked the Back Up Pick Up a little better though.
I liked the A-100 vans for the "real" weight capacity.
There are still some odd parts from a Purple slant-6 turbo race motor in the garage.
They where actually a detuned performance motor. That's one reason the early stock versions just don't die. Lots of work to "get there" though.
Originally Posted by AGHRMatt:
On the club front, got the networking configuration squared away for the Legacy WiFi. Works well so far. Waiting for the MTH DCS WiFi interfaces to hit the streets. fascia boards on and maybe put track down. Still need to figure out what I want to use for legs.
Fresh out? I'll be watching for your opinion as a user Matt.
I don't run command, but I like to read about it, and wouldn't mind at look at a new gui. The right one could flip me, you never know.
And your "reviews"![]() are nicely balanced
are nicely balanced ![]() .
.
I haven't really looked into it, because I didn't know it was done![]() .
.
Attachments
Images (1)
")
Originally Posted by Al Galli:
Built a new layout today. Actually my 3 1/2 year old grandson did most of the work - really. This is what I love about 3 rail o gauge. Kids can actually get involved young.
Al
That's great Al! Looks like he is getting into it!
AZGary, it's amazing what can be done with Plasticville, isn't it? Yours is quite unique.
Bob, that is just a lovely station. I like it - a lot!
Al, that is too cool.
Added a corn field.
Neal Jeter


Attachments
Images (2)
Finally got to run trains again. We moved, so I had to tear down my permanent layout. Set-up a carpet central tonight and ran my newly picked up Western Maryland H-9 #839 and WMSR #734.
Originally Posted by Lionlman:
Added a corn field.
Neal Jeter
Crops look healthy. GMO product from Cargill or Monsanto maybe... ![]() Love those hoppers as well. Nice scene. Can almost see it from Lookout Mountain.
Love those hoppers as well. Nice scene. Can almost see it from Lookout Mountain.
I used to love barn signs....I miss them, sigh.![]()
Minions![]() It will be quite a while before this gets old. If ever
It will be quite a while before this gets old. If ever![]()
Finished the back city wall on the right field side.
![DSC_0389[1]](https://ogrforum.ogaugerr.com/fileSendAction/fcType/0/fcOid/12129987997660671/filePointer/43524900336252724/fodoid/43524900336252720/imageType/LARGE/inlineImage/true/DSC_0389%255B1%255D.JPG "DSC_0389[1]")
Attachments
Images (1)
![DSC_0389[1]](https://ogrforum.ogaugerr.com/fileSendAction/fcType/0/fcOid/12129987997660671/filePointer/43524900336252724/fodoid/43524900336252720/imageType/LARGE/inlineImage/true/DSC_0389%5B1%5D.JPG "DSC_0389[1]")
I have the shell off the chassis on an RMT Budd car, and I cut the chasis in two behind one of the trucks, to extend it 1 5/8" to match the length of this LaBelle D&RGW gas electric kit's car body. There was a couple of companies in Wisc. that made kits for
prototype railroads to convert an old passenger car into a gas electric, and this LaBelle
kit is a model of one the Grande did. Since the frame has to be extended, so does the
wiring on the RMT chassis, so I have, so far, added two inch wire extensions, by soldering into eight of the wires. Two more, for the roof lighting may need to be done, to keep it. Tight squeeze and touchy job.
I spent some time today looking my video monitor. I had better explain. I recently purchased eight (8) video security cameras and a DVR for my subway loops. I ran a test on them all and it looked fantastic. I can now see my entire subway on the monitor. Now, I have to learn how to use the DVR. Man, am I getting computer illiterate lately? Maybe some day I will post some videos on here, once I figure out how to record it.
ICRE8
Originally Posted by colorado hirailer:
I have the shell off the chassis on an RMT Budd car, and I cut the chasis in two behind one of the trucks, to extend it 1 5/8" to match the length of this LaBelle D&RGW gas electric kit's car body. There was a couple of companies in Wisc. that made kits for
prototype railroads to convert an old passenger car into a gas electric, and this LaBelle
kit is a model of one the Grande did. Since the frame has to be extended, so does the
wiring on the RMT chassis, so I have, so far, added two inch wire extensions, by soldering into eight of the wires. Two more, for the roof lighting may need to be done, to keep it. Tight squeeze and touchy job.
I've been eyeballing LaBelle & looking for others with Pre-WWI kits too.
Originally Posted by kjwald:
The grandkids must have left some kind of portal open as we were inundated with rowdy minions.
Where did you get these guys? They look pretty much to scale. I found some in a game in a toy store. On the back of the packaging it shows a whole set that only comes with games (Monopoly, Operation, etc). Those were for Despicable Me 2. Yours are from the Minions Movie! Where can I get some?!
Originally Posted by John D.:
Originally Posted by kjwald:
The grandkids must have left some kind of portal open as we were inundated with rowdy minions.
Where did you get these guys? They look pretty much to scale. I found some in a game in a toy store. On the back of the packaging it shows a whole set that only comes with games (Monopoly, Operation, etc). Those were for Despicable Me 2. Yours are from the Minions Movie! Where can I get some?!
John, They are Walmart exclusives. They range from about 1" to 1" & 3/8"
Kevin
Originally Posted by kjwald:
Originally Posted by John D.:
Originally Posted by kjwald:
The grandkids must have left some kind of portal open as we were inundated with rowdy minions.
Where did you get these guys? They look pretty much to scale. I found some in a game in a toy store. On the back of the packaging it shows a whole set that only comes with games (Monopoly, Operation, etc). Those were for Despicable Me 2. Yours are from the Minions Movie! Where can I get some?!
John, They are Walmart exclusives. They range from about 1" to 1" & 3/8"
Kevin
"Exclusive"? As in "gone & good luck" or as in, if I go into any of the 10 million Wally Worlds I'll find them? I don't frequent Walmart. Long story of a boy who grew up in Arkansas....
Originally Posted by John D.:
Originally Posted by kjwald:
Originally Posted by John D.:
Originally Posted by kjwald:
The grandkids must have left some kind of portal open as we were inundated with rowdy minions.
Where did you get these guys? They look pretty much to scale. I found some in a game in a toy store. On the back of the packaging it shows a whole set that only comes with games (Monopoly, Operation, etc). Those were for Despicable Me 2. Yours are from the Minions Movie! Where can I get some?!
John, They are Walmart exclusives. They range from about 1" to 1" & 3/8"
Kevin
"Exclusive"? As in "gone & good luck" or as in, if I go into any of the 10 million Wally Worlds I'll find them? I don't frequent Walmart. Long story of a boy who grew up in Arkansas....
Supposedly only made for Walmart. I found them online.
On this frame from the Ready Made Toys Budd car, that I am extending, there are support L-shaped rails down the sides. I drilled new holes and put in screws to solidify
the frame last night, and then taped the top wiring that had two inch extension connections soldered in. On the bottom, with another four wires to the truck in a very tight space, for insulation, I covered all the wiring solder joints in two part expoxy before next attempting to tape those exposed connections. That looks like a tweezer
job.


Having soldered the wiring on the extended RMT Budd car frame, I tested it, and...
it still works! I do like these kinds of surprises. Then began the wooden sides of the
LaBelle D&RGW gas electric kit that will be mounted on this chassis. That is tedious,
with many small wooden window parts such as mullins and other details. This kit
includes NO metal parts, such as headlight, bell, or even wire handrails, so those
will have to be scrounged. Maybe some from Wiseman, I have a few in my parts box,
but not enough...the instructions list what are needed, but no sources, and I am sure,
some, like the underbody motor carriers, do not exist as castings and will have to be
scratched. Definitely a kit for the creative modeler.
I haven't been downstairs yet today because Matt had to cancel. Yesterday, I got all the new fascia filled, sanded and painted, under the assumption that he would be here. Oh well, it's done and ready for when he does show up.


Now that it's painted, I can see there are a few small spots that need a little more filling.
Time to polish off that last bit of ballast so I'm ready for Patrick's next visit (whenever that is). Then I can get back to the "A" Yard ladder and a lot of vacuuming.
I'll be off for a couple days this week, going to visit my son. Beside, my right shoulder could use a break. Right now, it looks like Friday with Joe.
Attachments
Images (3)
Max and I continued wiring....we ran about 70' of 18 gauge stranded for our 14 volt accessory circuit.
We decided to put push buttons around the periphery of the layout for easy access and visitor participation....
Here's Max....we were about 2/3's through the wire run at the time.....I think he's anticipating a treat for a job well-done!

The 1st accessory we hooked up was a Lionel #30 Water Tower.
Peter
Attachments
Images (1)
Peter, meet Bella......looks like you have a Wheaton Terrier also. Bella also helps me run trains and is very good retrieving things that drop under my layout! Today she rested while I hooked up some led lights.

-Pete
What did I UNDO today? Well, following the HO sized instructions, I glued the sides
of this D&RGW gas electric to the front, and it didn't look right. So I fished out one
of the Keilty books, "Interurbans Without Wires", which has a section on the two companies that sold or installed these kits in railroads' old coaches. A good front
photo on this car,#592, shows the front fascia board extending the width of the car....
not with the sides covering the ends of the board. A little Xacto surgery, some modifications to ends and sides, and glue is now again drying. The Grande apparently
installed this kit in their 1898 combine in 1927 but only ran it until 1930, when it
apparently sat until turned into a trailer in 1938. Their kit was from Railway Motors Corp, of De Bere, Wisc. just south of Green Bay where the other kit builder for these,
Oneida Mfg., was located. Oneida did some conversions in their own shops, but only
did six, while RMC provided ten kits to several railroads. The railroads provided
old, heavy coaches which the two 100HP engines had trouble moving, and the
location of engines under the car made maintenance difficult, so most had short
service lives. An exception was two narrow gauge RMC ones on Oahu which had long lives.
As for pooches, I have a dachshund. Charlie is a great little pooch but he'll never get anywhere near anything on the layout other than the legs, unless someone picks up the 13-year old pup and shows him...
As for what I've done today, I drew freehand outlines of the track and spurs with turnouts in the three places where there would be the most confusion over which turnout pull is for which turnout. I put the scans through photoshop, changed the colors, put in lettering for the station names and turnout numbers, then printed out numbers to place over the caps where the pulls are. This afternoon I printed then on photo paper and mounted then with good double sided tape. I think they worked well. I originally was going to mount plexiglass sheets over the diagrams, but as nobody's gonna brush against them where they are, I cut the plexi but won't mount them unless I have to.
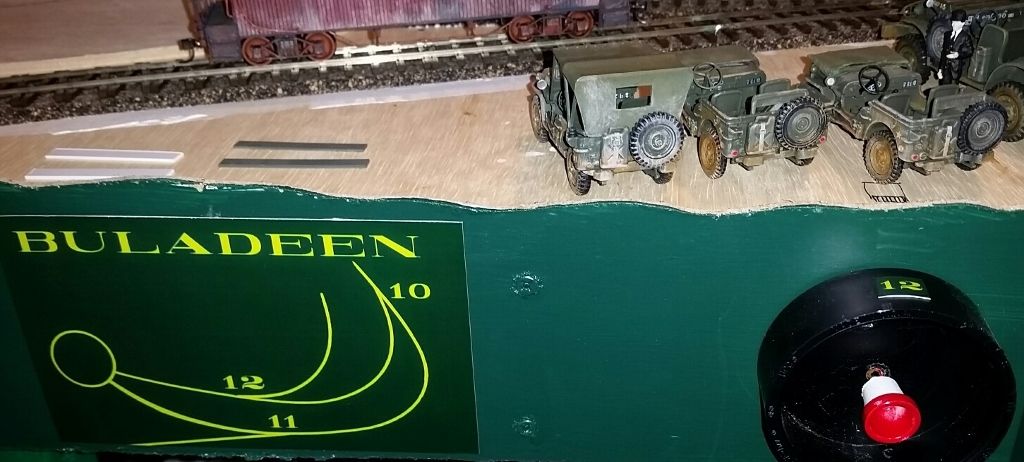
Yes, I have a depot name Buladeen. It's a real place. My parents grew up within sight of it: http://roadsidethoughts.com/tn...x-carter-profile.htm
Got the base and frame of Module #4 of 5 finished today. Here's a test fit against Module #3. I'm going to try to get Module #5 done and start cutting and installing the fascia boards. Then I'll put in the scenery support material and start laying the track (ScaleTrax).


Attachments
Images (2)


Installed 175 pounds of Brennan's Better Ballast.
Attention turned to the new work bench. Leaving the nearly flawless vintage desk top exposed to my brutal bashing would be a shame so I started with an 1/8" plywood covering. Another necessity was increased work area lighting which required extra framework attached to the shelving assembly. Here I used 2 smaller versions of the same LED's that light the room

The shelving is of cedar decking. After it was screwed to the plywood base I glued some foam core board to the bottom for added protection against scratching the old desk. I will finish the front edge with extruded aluminum "L".

Roughed in one wall using the same engineered plywood. Comes already colored in a mahogany like tone. Now the speakers have a permanent home and those switched outlets will power additional lighting.

So endeth the long weekend.
Bruce
This is my first ever entry into this long running show. So here goes
Just completed some track radius testing with tubular track on the Living Room floor seeing how my Lionel M7 looks on curves of O31 (lights off), an O31-42 Blend (lights on), and O42 (lights on, doors open). The O31-42 blend consisted of 42-31-42-31-42.


Naturally the O42 looked the best, but that wasn't my goal, it was just to see the difference.
Then the best part was turning off the lights in the living room and watch my passenger train roar through the night sky on a 42x122 loop for over half hour straight, non-stop which I just completed.
Very hypnotic, very monotonous ![]() , very relaxing, and I enjoyed every minute of it.
, very relaxing, and I enjoyed every minute of it.

I might have to look into painting the interior ceiling black to prevent the bleeding of the cabin lighting through the roof of the cars.
Yes, to pay homage to another thread that I started (https://ogrforum.ogaugerr.com/t...26#43524901912281226), those are Realtrax and FasTrack tracks running alongside my tubular rails. The Atlas O is not shown in the photo.
Good night!
Attachments
Images (4)


This past weekend, the Razorback Traction Co./Gi-raffe Express made an appearance at GlitchCon, a local SF/anime con here in Springdale. I was doing a bit of outreach to a slightly different fandom, with great success! The dealers were charmed with the trains; a couple of 'em loved the gentle roar of the Lionels going down the tracks, comparing it to surf or a white noise machine...


Naturally, since this was an anime con, an anime presence made its way onto the line:


A quick vid of the line in action:
This was also a rather stressful test of the vintage RTC equipment. Most train shows around here are Saturday only affairs, with operation from 9 to, say, 3 or 4 in the afternoon. Glitchcon operations ran Friday from 1-7, Saturday from 10-7 and Sunday from 10-3!
Casualties included the gear train from the Polar Gi-raffe Express Berkshire (leave us face it, Lionel simply ISN'T building 'em like they used to; when I tore it down, the ten year old loco's worm gear was nearly worn smooth and the axle gear was cupped! Fortunately, Lionel's crack parts department is on the job; I ordered a replacement motor and axle on Sunday night and got a shipment notification by 10 AM Monday morning!), the electronics from the Gi-raffe-G-1 (no horn all weekend, and a short circuit may have effected the bridge rectifier and capacitor rig), the ZW getting warm and declining to reset the breaker and various minor things like the GX caboose losing its third rail pickup (causing the aforementioned short)...
All in all, a successful excursion and we have been invited back next year! I'm actually considering a purpose built anime train, with various cute girl figurines lounging on flatcars... ;-)
Mitch
Attachments
Images (7)
Videos (1)

Mitch,
GoodShow! One of my grown daughters, an artist, draws some Anime among other forms of art. She loves my giraffe car! It's nice they asked you back for the next show! Sorry to read you had so many equipment problems.
A quick additional post to my one last night above for the reasoning of my "radius testing".
I should mention that in all of my various temporary layouts, I have always only used O31 (RealTrax + Tubular) and O36 (FasTrack + Atlas) track due to space considerations. Space was never an issue on the floor, but I wanted to to have track that I could use both on a table and the floor. So this was my first foray in O42 world and the blending of track radiuses. I went to one of my LHS's at lunch time and bought a circle of O42 track.
I made a couple of bridge piers for my Atlas Pratt truss from 3/4" MDF and sprayed them with textured paint. They look pretty good at least until I can make stone piers but that is well down the road as there are a lot of other things to get done.
Al
Finally got TMCC to work! Listened to my Hudson's TowerCom and had a ball.
Originally Posted by Amfleet25124:
A quick additional post to my one last night above for the reasoning of my "radius testing".
I should mention that in all of my various temporary layouts, I have always only used O31 (RealTrax + Tubular) and O36 (FasTrack + Atlas) track due to space considerations. Space was never an issue on the floor, but I wanted to to have track that I could use both on a table and the floor. So this was my first foray in O42 world and the blending of track radiuses. I went to one of my LHS's at lunch time and bought a circle of O42 track.
It is almost essential in discovering the many configurations of radii during planning to have a good stock of all the different curves on hand. Spend an afternoon familiarizing yourself with different combinations so that you can envision the end results even before you start connecting. Try using wider radius curves as easements...not only more realistic but the smooth transition gives you better throttle control. This practice in 3D pre-planning is especially handy when dealing with small layout dimensions. Half the learning curve is finding out what can't be done practically as well.
Bruce
Just got back to the layout. Took the weekend off to go up to Buffalo and take the 765 excursion on Saturday. It was yard work before I left and catch up yard work when I got back. But today I drilled holes and ran wire to under the table for the station. Also got out some peel and stick road way to place by the station. The road is not tacked down. It is just sitting there. The two uncoupling tracks I put in will have to be moved to allow the cars I want on the sidings. I changed my mind about putting a uncoupler on the track in front of the station Here are a few pics...............Paul


Attachments
Images (2)
Well not today but over the weekend, I finally started my bench work.
One section cut and assembled, about 9 more to do.... then I can start running wires and placing track.
Has been almost 3 years in the making, but it has begun!
Originally Posted by paul 2:
Just got back to the layout. Took the weekend off to go up to Buffalo and take the 765 excursion on Saturday. It was yard work before I left and catch up yard work when I got back. But today I drilled holes and ran wire to under the table for the station. Also got out some peel and stick road way to place by the station. The road is not tacked down. It is just sitting there. The two uncoupling tracks I put in will have to be moved to allow the cars I want on the sidings. I changed my mind about putting a uncoupler on the track in front of the station Here are a few pics...............Paul
Looking good. Love that Minneapolis, Northfield & Southern boxcar on the far track. Many moons ago I lived about two blocks from their line.
Ran my FEC GP-40 (PS3) with 50ft red OB boxcars, fairly prototypical from the 1990's........
I am still painting my track in places where I have already installed it. I am painting it with Rustoleum Camo Earth Brown in rattle cans. Here are a couple before and after shots of the right hand end of my Proviso freight yard.
First two before pictures. Hopefully you can see how shiny the sides of the rails are.


Here are two after pictures of basically the same area. I like how the rail tops are still shiny, but the sides are not. I think that it also helps tie the rails and ties together more like real track that gets oil, dirt, and weather on it on a daily basis.


I can't wait to get started ballasting it to finish the look.
Art
Attachments
Images (4)
Hello Everyone I am painting the floor in the breezeway now. or at least I will finish it after I pick some Rust-Oleum Concrete Etch. on Thursday when I have an appointment with the Pump DR. So I figure why make 2 trips. Its taken me some time but at least I still have my plans.


Attachments
Images (4)
Working on my Pool Hall, slow, but getting there.


Originally Posted by josef:
Working on my Pool Hall, slow, but getting there.
What a wonderful interior! It reminds me of a place where I used to play. Bravo!
Looks great ,Josef ! Is this the River Leaf kit ?
Mike
Mike
I made no progress today on the layout but did pass a track inspection by Chaz Harrison, the great Northeastern Railway's Chairman of the Bored. Following are Chaz's official portrait and photos of his inspection tour.


Attachments
Images (4)


Originally Posted by Mike welkie:
Looks great ,Josef ! Is this the River Leaf kit ?
Mike
Mike
Yes it is. After it came, I had some interior items that this building was crying for.
Originally Posted by Randy Harrison:
... inspection by Chaz Harrison, the great Northeastern Railway's Chairman of the Bored. Following are Chaz's official portrait and photos of his inspection tour.
I love how cats seem to feel obliged to inspect our layouts. I'll bet there isn't a cat anywhere who hasn't inspected his owner's layout. I could always detect when our Noel visited our layout by the tufts of fur stuck to the utility poles and roadside trees, which I removed easily (almost happily, not minding the visits at all) with a little swatch of Gorilla tape. And they always seem ready for their close-ups.
Pool hall and inspection cat is great! Terry
Originally Posted by josef:
Working on my Pool Hall, slow, but getting there.
Great job, but you need to weather the walls badly. No pool hall was ever that clean after its first day in business...
Originally Posted by josef:
Working on my Pool Hall, slow, but getting there.
Looking good.
But the first thing I look for in a pool hall, well besides any attractive women![]() , is the chalk rub for your hands.
, is the chalk rub for your hands.![]()
It may be as simple as a pile of baby powder on the stick rack, shelf, or counter![]() .
.
Took a break from the baseball field and went to work on my first River Leaf Model kits. Added a few extra parts to it including the lamp above the Scuttlebutts sign and a white LED behind the dancer silhouette . Added a feature dancer poster and upcoming dancer marquee to the side of the building. Also using photo shop was able to put in a club interior.


Attachments
Images (5)
Bryan; very nice. ![]()
Looking for material to make a Woolworth awning, painting doors and roof, trying to find suitable pictures for interiors.
Still working on turning a Pegusus Hobbies gothic building into a college "old main" structure.
https://www.youtube.com/watch?v=iMA_I2EaRXQ
I finally finished working on installing feeder wires on the layout and got some new tracks installed. Still have three more switches to install before everything is good to go, but it's coming together well!
Here is my newest BLOG video about all that I have done.
Hey forty rod. For the Woolworth awning, I found some red striped scrapbook paper at Michaels. I am going to do a Woolworths store as well and found some suitable paper there. Now I need to get some of those nifty
laser cut signs !
Mike
laser cut signs !
Mike
Bryan, nice job on the building. Your red light district is expanding pretty quick. Maybe the next building should be a police station LOL...........Paul
Send me an email when your ready for that sign!
Thanks
Thanks
Originally Posted by Mike welkie:
Hey forty rod. For the Woolworth awning, I found some red striped scrapbook paper at Michaels. I am going to do a Woolworths store as well and found some suitable paper there. Now I need to get some of those nifty
laser cut signs !
Mike
laser cut signs !
Mike
I continued to make progress on having an operational layout.
I'm still looking for a few more MTH 30-9006 passenger platforms to provide as much covered area for passengers as possible.

Menards Dakota factory and UFO restaurant

Main street is getting populated with Menards, MTH and Lionel buildings


Transfer table and in the background the Lionel Steam and Wheel Grind and Menards Seed and Feed

Lionel MiJack and in the background a couple of MTH buildings

In testing DCS on the layout I was having a lot of out of range errors. The TIU's were mounted below the table. I raised them so they are higher than the table. I'll be doing some testing tomorrow.
Of course none of the buildings/accessories are wired yet. My priority is to have my 3 mainlines operational in the next few days.![]()
Attachments
Images (6)
Finish editing & publishing a new You Tube video.
RailKing's Southern Pacific - Cab Forward
See the action and hear all the sounds.
Gary
I added a Lionel station platform. It didn't have light's so I went to Ryder's Hobby in Grand Rapids, MI and bought some LED lights and a Woodland Scenics figures to put on the platform. Plus I took more pictures. The station is on the left on the top picture and on the right on the second picture.


Attachments
Images (6)
Hopefully this means I've unfollowed this. Nevertheless awesome station there DennyM!


Originally Posted by Gregg:
Today?? yep we did a little bridge maintenance on the big bascule. Tightened the belt and it's so much smoother.

Absolutely stunning, Gregg! Sorta puts the old 313 to shame, huh? Could you share some particulars about it?
Bruce
Got an email saying my Menard's feed mill is at the store for pickup. Also got in a Marx spoked driver I needed for a Marx motor I am going to use to power a project.
Today I added visors to windows (not shown in kit) but are in photos of the D&RGW
gas electric, cut a slot at the back of the body to fit the frame of the Ready Made
Toys chassis, and drilled the chassis for screws to mount the body when I get there.
Also began to shape the ends of the kit's milled clerestory roof. If you are familiar
with Walther's O scale kits, this is similar and always leave me wondering why none
of these kit mfrs. milled the ends on these stupid roofs. I tried other milled roofs
such as J-C, Rail Chief, other Walthers, and All-Nation hoping for one with a better
contour per the prototype photo I have. The sides are too thick on this one, and
others do not have the interior milled out for clerestory windows as does the one in
the kit. So I am stuck with it, and began the rasping and sanding to shape the ends.
Rail Chief, but the way, does have the ends milled.
Doesn't really count as "today" but I wanted to get this in.
Over the weekend, I removed one of my Woodland Scenics Mod-U-Rail Corner Modules as part of the transformation of my layout. Gave it to my son so that he could create an "8-acre" property (technically 7.8 sq ft, LOL) for his Hamster. He took part in the construction and enjoyed it.


Attachments
Images (2)


Well not so much as working on the layout. Today I have to start cleaning up the mess from working on the layout. Next month I host my small local round robin group. Once I get the open area for moving around clear I can go back to working on it again. So for the time being I'll run trains while I cleanup and hopefully I can get er dun fast as Larry the cable guy says...................Paul
I finished shaping the wooden clerestory roof for the D&RGW gas electric. I don't have
all the roof appliances...need to get some of those in, bell, headlight (I have some but
want better ones) This car had round fuel tanks on its roof. Some of these roof
appliances are similar to those Brother Love just used on his excellent model of the
L&N doodlebug in his thread. If sanding the shape to the roof was not boring enough, I began to impress rivets into the vinyl "plate" that runs from front of car sides back past the baggage door...
Not so much working on the layout but cleaning up the floor area. Been making my way to the front of the attic. The area in front of the transformers is suppose to be an open area. Looking at my own pics I feel like a hoarder with narrow aisle ways to get through.................Paul


Attachments
Images (2)
In reply to Elliot's suggestion, here are a couple pics of my start on my 26 X 28 ft layout in my trainroom. Doesn't look so neat right now...LOL!! Will see about more pics later when I have cleaned up a little, put some empty boxes and totes back into the attic.


Attachments
Images (3)
Originally Posted by texastrain:
In reply to Elliot's suggestion, here are a couple pics of my start on my 26 X 28 ft layout in my trainroom. Doesn't look so neat right now...LOL!! Will see about more pics later when I have cleaned up a little, put some empty boxes and totes back into the attic.
Very nice, and nobody here cares about the mess. We all know too well that it's part of the process. Great space! Large but manageable. Keep up the good work.
Matt will be here in a few minutes. I'll report back later.
I just cleaned the yard, the deck and the patio where the suspended layout is. A friend, her husband, daughter and father are coming over this evening to see the trains. She had hip surgery last November, and fell shortly after. The replacement didn't fuse, so it had to be re-done. after the second surgery, an infection set in; she had to have the replacement removed, and have an antibiotic spacer inserted, and a six week regimen of oral antibiotics. She was finally cleared for a third replacement surgery, and has been recovering at home for about three weeks. She is finally able to come over to see the trains.
Don


Matt was here this afternoon, and continued working on what he has begun calling "Amish throws". I didn't ask him why he gave them that name, maybe it is the way they look, very plain. Or perhaps it is the simple wooden knobs they use.
Anyway, today he finished 7 and started another batch. Here he mugs for the camera.

The reason he didn't get more done was he ran into a difficult install on the double slip. The problem was it ended up on top of a structural support. After a bit of head scratching, he figured out a way to get it done.
You may be wondering what the colored tape on the rails is. Those are electrical reminders, indicating what color bus those track segments will be connected to.

While he was working on that, I was doing the final fitting on the ladder for the "A" yard. The hard part is done, but there is still a lot of work left.

As Matt was setting up to start the next batch, he discovered a broken throw bar on this switch. I've replaced plenty of these, but never one that had been secured to the layout. Let me tell you, it is much easier on the workbench, but after a fair amount of cursing, I got it.

I've always been confident that I could repair these in place. It probably took about 45 minutes to do. I learned a few things along the way.

Attachments
Images (5)
The painted floor looks great Scott!
Originally Posted by sp2207:
First coat of paint today. Tomorrow hopefully the 2nd coating Right now I am not sure I just took 3 Tylenol Extra Strength ![]() my body hurts.
my body hurts.
A day of rest maybe ![]() Sure looks like you've earned it
Sure looks like you've earned it ![]()
Originally Posted by Amfleet25124:
Doesn't really count as "today" but I wanted to get this in.
Over the weekend, I removed one of my Woodland Scenics Mod-U-Rail Corner Modules as part of the transformation of my layout. Gave it to my son so that he could create an "8-acre" property (technically 7.8 sq ft, LOL) for his Hamster. He took part in the construction and enjoyed it.
What gauge is the hamster? ![]()
Mitch
Adriatic Well you are right. No work on the train layout today. After the drive home from the Dupage train show today my Legs just hurt so much. Time for some more Tylenol. I hate to take anything for pain but this is one of those times I need to. We will see if I work tomorrow or not.
Originally Posted by M. Mitchell Marmel:
Originally Posted by Amfleet25124:
Doesn't really count as "today" but I wanted to get this in.
Over the weekend, I removed one of my Woodland Scenics Mod-U-Rail Corner Modules as part of the transformation of my layout. Gave it to my son so that he could create an "8-acre" property (technically 7.8 sq ft, LOL) for his Hamster. He took part in the construction and enjoyed it.
What gauge is the hamster? ![]()
Mitch
Mitch,
That's a good question! I am waiting for Amfleet's answer. ;-)
Our older daughter had 10 different hamsters while growing up. I have 10 little graves out under the rhododendron with flat stones from the creek as markers. No the markers aren't headstones, they are just there so I know where they are, so I don't dig one up when I bury the next one.
Hers were all dwarf hamsters, I would say they were HO. If I was a better electronics engineer, I would have tried generating electricity with their wheel. It seems some of them will run the whole graveyard shift until they get old!!
Question on of the day. How many hamsters does it take to power an O gauge GEVO??
Elliot,
A fine photo of Matt hard at work! Although the looks a little too happy to me. Is he losing his mind with the number of these he has to do or has he been sniffing that glue he is holding in his hand?
On a serious note, you fellows in the Twin Cities area are really doing a great job!! I am surely impressed. Too bad, I am taking an early "retirement" from work! I won't ever have the chance to get a trip on the company to the Land of a Zillion Lakes, where my manger is located. I'll have to make a trip on my own dime! ;-)
Hi Everybody-- Yesterday and Today, I have been wiring my toggle switch control panel as shown in the attached photo.. More darn wires needed than one is to believe.
FIVE toggle switches will apply power individually (14 volts) to the Oil Derrick, Sunoco gas storage tank "Yard Lamp", Sawmill, Railking interlocking tower, and the BIG Greyhound Bus Depot. That unit takes up a lot of real estate on one's layout!
I fulfilled my childhood days growing up in Oakland, CA by having the THREE buses in the loading zone in this bus depot that I fondly remember: Greyhound, Trailways and Peerless. They look pretty sharp sitting together awaiting their passengers.
Other toggle switches on this control panel apply power (individually) at 18 volts to the Santa Fe passenger yard display tracks; the CSX SD-70ACe diesel loco display track; the Millenium Business Car display track, and the SP 4-8-8-2 AC-12 Cab Forward display track.
The cabling from the 022//072 switches has been run to Jones-type terminal strips at control center. Using Red, Yellow, Green wires in phone cable. Yellow equates to the Center post of the switch motors. There are about five (5) Lionel 153 block signals (so far), hooked up across some of the switches to indicate switch position.
I've been doing all this WITHOUT a wiring sketch-- but after almost FIFTY years working in the switching department of various central offices of the old Bell System, I think I got it down pat !! (grin)
More later.
KRK


Attachments
Images (6)


opps forgot a lot of things I also put grease in the gearbox of my Williams f3's runs much better. planted about 20 trees then made the hill plastered it then painted it then put ground cover on, the hill is on the ramp up to the main level. then did the railing after I painted the edge black. then on the upper level also did some railing. then back to the lower level I did the ground cover along one side then put trees and rocks down. also had trains running while I did all that. noticed the tmcc feature wasn't working on the dcs found out I plugged the cable in backwards now it works fine again.
so I actually did a lot ![]()
jhainer
Nice pics. What did you use for the side of the elevated section in the first picture?
Al
Originally Posted by Al Galli:
jhainer
Nice pics. What did you use for the side of the elevated section in the first picture?
Al
http://www.twtrainworx.com/els_R41.html
Originally Posted by Mark Boyce:
Originally Posted by M. Mitchell Marmel:
Originally Posted by Amfleet25124:
Doesn't really count as "today" but I wanted to get this in.
Over the weekend, I removed one of my Woodland Scenics Mod-U-Rail Corner Modules as part of the transformation of my layout. Gave it to my son so that he could create an "8-acre" property (technically 7.8 sq ft, LOL) for his Hamster. He took part in the construction and enjoyed it.
What gauge is the hamster? ![]()
Mitch
Mitch,
That's a good question! I am waiting for Amfleet's answer. ;-)
Our older daughter had 10 different hamsters while growing up. I have 10 little graves out under the rhododendron with flat stones from the creek as markers. No the markers aren't headstones, they are just there so I know where they are, so I don't dig one up when I bury the next one.
Hers were all dwarf hamsters, I would say they were HO. If I was a better electronics engineer, I would have tried generating electricity with their wheel. It seems some of them will run the whole graveyard shift until they get old!!
Question on of the day. How many hamsters does it take to power an O gauge GEVO??
Benchwork practice. Built the 2nd of two shelves for the basement out of 8' long 2x4s & plywood.


Needed to clean up the basement as my wife & I try to slowly but surely consolidate two houses after getting married last fall. Getting stuff off the floor is step one. Further consolidation will then be necessary.
This half of the basement will be where the main body of the layout ("Phase 1" - here's a link: https://ogrforum.ogaugerr.com/t...to-the-drawing-board) will reside. My space is from the support post back - the wife gets the front half of the room for her area. ![]()

After getting stuff onto the shelves all the stuff we keep from this room will need to be taken into the other room, the nasty carpet torn up and disposed of, and the godawful tiki beach walls painted over & paneling stripped. We'll then clean the floor & use garage floor pain or some other sealer to make it nice.
Once that's done, we'll move the remaining crap into this side and do the floor of the other room/half of the basement.

After that, then I'll finally be able to begin Phase I construction. Phase II will come through the boards dividing the two halves of the basement & run along the wall to the left. The turn-around loop will extend to the support posts. Haven't told the wife about Phase II yet, though. At least, not seriously.... ![]()
Attachments
Images (4)


Adriatic And the rest of the group I cheated I moved the what seemed to be the 300lb step back into place today. Then I just painted the remainder of the floor. Who knows if I will be up to painting tomorrow? One thing you really notice is the entrance to the house. So now I need to resurface the door and repaint it ![]() more work
more work ![]() . Oh well
. Oh well ![]()


Attachments
Images (5)
What did I do today?
Finally decided on a format for my permanent layout* ![]() It’s going to be a 36x80 HCD and eventually 2 HCD’s in a L-Shaped Format, but I need to get the trains running!
It’s going to be a 36x80 HCD and eventually 2 HCD’s in a L-Shaped Format, but I need to get the trains running!
Placed the HCD on top of the two 18x36 Mod-U-Rail modules that I had. Biggest deterrent to me doing a permanent layout was my obsession with having passenger trains continuous running (on O36 or wider) in addition to switching on the same layout but trying to squeeze it in a 36-inch wide layout.


I then created a 3x6 layout from the MTH 3x6 Action and ThorTrains MTH Door layouts with a few accessories as my beginning track. With the second HCD on the “L”, will probably use this one to fit in the Inglenook Sidings that I like very much.
")
")
Took a few photos of a potential setup. Yes, the track types are all different, but I did that on purpose so that I could see the spatial differences myself instead of an electronic image. Also the layout in the photos is missing the 5.5-inch tracks on the straights. Will be using ceiling tiles on top of the HCD for sound insulation.
My plan is to have the control panel on the long side. When I used the 3x6 carpet on the door for effect, it left an empty space on the end that by default just screaming to be the control area. Don’t know yet, because that extra length can make all the difference on a small layout. Plus, I’m not sure about operating a layout from that vantage point.


*-My weekender 6x11 carpet on the tiles layout will still remain and get laid out each weekend. This is where I will get my fix for continuous running for my passenger trains. With my joining a club in June, I can get my fix of watching the passenger trains run through scenery.
Attachments
Images (11)
")
")
I really screwed up today. I had unplugged one of my transformers and then plugged it back in with the plug reversed. So, out of phase and the smell of something burning. ![]() One of my transformers is the MRC Pure Power Dual, and it does not have a polarized plug.
One of my transformers is the MRC Pure Power Dual, and it does not have a polarized plug. ![]() It does now. I took one of those 3-prong to 2-prong adapters (which has a polarized plug) and used some gorilla glue to secure the adapter to the plug of the transformer.
It does now. I took one of those 3-prong to 2-prong adapters (which has a polarized plug) and used some gorilla glue to secure the adapter to the plug of the transformer.
At first I thought I had fried a TIU. I opened it up, checked the fuses, and looked for any discolored section of the PCB or burned components. And, of course, I did the smell test. The smell was coming from around the TIU, but it turned out I fried a couple of TVS's. I use TVS-4's from Scott's Odds and Ends (now TrainElectric).
I ordered a few TVS-4's from TrainElectric (after my order he will only have 2 left).
The good news is that I got my Lionel lift bridge permanently mounted on the layout today.
Former Member
Holy buckets Scot, looking great
Originally Posted by Mark Boyce:
Originally Posted by M. Mitchell Marmel:
Originally Posted by Amfleet25124:
Doesn't really count as "today" but I wanted to get this in.
Over the weekend, I removed one of my Woodland Scenics Mod-U-Rail Corner Modules as part of the transformation of my layout. Gave it to my son so that he could create an "8-acre" property (technically 7.8 sq ft, LOL) for his Hamster. He took part in the construction and enjoyed it.
What gauge is the hamster? ![]()
Mitch
Mitch,
That's a good question! I am waiting for Amfleet's answer. ;-)
Our older daughter had 10 different hamsters while growing up. I have 10 little graves out under the rhododendron with flat stones from the creek as markers. No the markers aren't headstones, they are just there so I know where they are, so I don't dig one up when I bury the next one.
Hers were all dwarf hamsters, I would say they were HO. If I was a better electronics engineer, I would have tried generating electricity with their wheel. It seems some of them will run the whole graveyard shift until they get old!!
Question on of the day. How many hamsters does it take to power an O gauge GEVO??
Just noticed your posts Mitch & Mark. LOL.
The Hamster's Name is Apollo and I will guess that he is "H" Scale. ![]()
He spent his "day" at the ranch sleeping, of course.
Well, I got the framing for module #5 of 5 for my corner switching layout done. Also put the fascia boards on for additional rigidity. Unfortunately, the 1/4 ply isn't quite flexible enough for the front taper and cracked so I'll probably get a sheet of luan for the tapered modules.
Going to put the fascia boards on the other modules this week, then try to start on the scenery base material next week.

Attachments
Images (1)

This nice MTH Gondola turned up in the mail today and as soon as it was unpacked I converted it to the Dark Side.
Kadee couplers, Weaver Trucks, Intermountain wheelsets and I made my own truck spacers on the lathe.
Now I have to weather it and it's finished but I might run it for a while because I like it looking new.
Roo.

Attachments
Images (1)
Finding a new pace, is harder than one might think.
Too much, is just too easy, when you've had a life of go-go-go, then, pow, nothing ![]() .
.
I haven't done much of anything for myself in about a week as I've been helping with a sick dog in isolation. It appears he missed his parvo shot![]() .
.
I spotted signs, and sure enough, 4 days worth of antibiotics and I.V.s were in his future.
Not really my dog, but he wouldn't eat, drink, or defecate when I left, so I went back and spent much of the last week relaxing quietly in a vets cage with him![]() .
.
Least I can do for the dog that pulls out those loose layout wires for me![]()
![]()
![]()
He's been "out of jail" for 3 days now ![]() . Gaining weight fast, and dying to help under the layout as soon as I started again
. Gaining weight fast, and dying to help under the layout as soon as I started again ![]()
![]()
![]() ......
......
..... I took the single mth flashing LED crossing light I ended up with, added a diode(MTH=DC), and added it to the Lionel crossing gate circuit I had going with a #90 button.
A bit mismatched, but it was as much about adding red light and shadows as it was about working. I'll separate them eventually, and pair them with better matching sizes.
Mismatched, but it did work; so never being one to leave well enough alone, I swapped the #90's input power to common, and moved the un-switched gate wire to constant hot.
Now my #90 for the gate & MTH-lights, has a switched common.
So what? Well...
That allowed my to test a 154c spring clamp isolated rail add-on; a 145c and 153c weight contactors out.
The 154c just needs a new blade rivet due to poor contact, no biggie..
So here's what I'm thinking....
I'll have two-3 track street crossings, on a small 4.5x9 oval, that need lights &/or crossing gates.
On one side of the layout will be one "scale" gate, but only flashers on the other side of the 3 tracks. It will likely spend most or even all of the time down, so I might look into a slow, solenoid operated gate.
On the other side of the layout, I want random crazy action!
I'd like each track to have its own set of signal lights, 3 different types.
The two outside tracks I want to have gates.
But I want them all triggered separately, by different tracks.
The idea being, with three trains looping, the different lights go on and off, gates go up and down (one will bounce off a car hood each time![]() ), but the road will always be blocked by at least one signal
), but the road will always be blocked by at least one signal ![]() .
.
That way I can line up automobile traffic, bumper to bumper the whole layout![]()
![]()
![]()
Former Member
We had a great time running trains with our guest George and his wife Pam.
Add Reply
Sign In To Reply
