
cabinet Bob posted:
Mark Boyce posted:
cabinet Bob posted:

I tore down Menardsville #1 and started  a new layout. I'm still thinking what to do, but I'm sure it will be all industrial. Time will tell..

Bob, so is Menardsville #1 the one you have been posting with all the building additions that I have commented it should be Menards City?  This layout looks smaller, but it could be just that with buildings removed the table looks smaller.  I'll look forward to seeing the new layout take shape!!

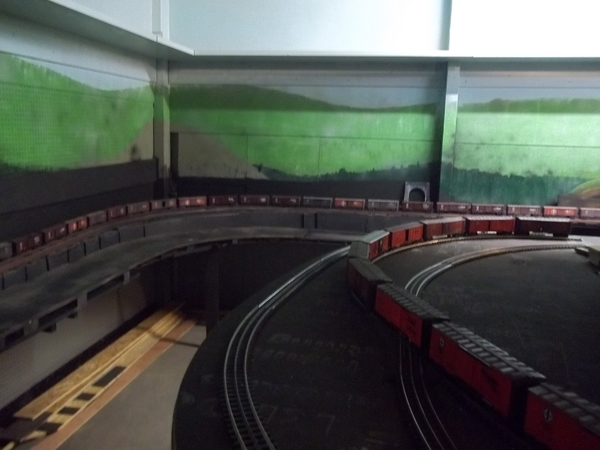
Mark: This is the original Menardsville that was pictured in the Christmas Catalog 2 years ago. it become a hodge podge of different scenes that I didn't like, so out with the old and in with the new.. I'm designing as I go..I'm maybe thinking of a lift bridge between Menard City and Menardsville. the only problem is I need to cut a hole in the wall... time will tell..

Bob, Ah ha!  Now I get it!!  Thank you!!  Yes, time will tell is what I say too.  What I plan usually gets changed as we go!

Mark Boyce posted:

Looks good, Ray.  So where is the hotel facade going to sit?  I see it now blocking the air conditioner and know that is just temporary.

Mark,

That is where it is going, the AC will just have to blow above it, but I have a split system downstairs and am only using 2 of the 3 unit connections so thinking seriously of running the 3rd one up to the train room, this will give me heat and AC. Right now using electric baseboard for heat. Don't like a window unit anyhow.

Last edited by sidehack


               went out to the train room and started cleaning up,

                                           and to see where I left off working on the layout...


             Izzy is inspecting frame work for the second level...


                 she is standing in the lower level return loop peninsula,

                                            which will have a lot of tracks for staging trains...


           here you can see that trains will be constantly climbing a 1-2% grade up...

                                         the top shelf is the upper level...

                      there will be another main level between these levels...


Attachments

Images (4)
  • mceclip0
  • mceclip1
  • mceclip2
  • mceclip3
Last edited by briansilvermustang
cabinet Bob posted:

I tore down Menardsville #1 and started  a new layout. I'm still thinking what to do, but I'm sure it will be all industrial. Time will tell..20200219_181301

Hi Cabinet Bob, That much available real-estate is creatively exciting to see. Are you fired-up for the adventure of it?

Its been a while since I dove-in and changed any significant area of the layout>>>IMG_5405IMG_9787photo 3

FrankM

Attachments

Images (3)
  • IMG_5405
  • IMG_9787
  • photo 3
Last edited by Moonson

Frank, always great scenes of your work.

Matt, nice video.

Ray, your hotel and elevated line are coming along great. Let me know when you finish so I can book a hotel room and got to sleep with the passing trains.

Cabinet Bob 9 (Dad), I knew it was only a matter of time before the real estate boom would come to an end. I am doing the same thing with my basement layout. But I also am including a single track loop for a little mainline running.

Mark, you are doing a nice job on the building. Sometimes it comes down to trial and error when it comes to paint color.

Today a late start but this afternoon I now have the loading docks glued into place. Also got a coat of aluminum paint on the roof. Once that dries and looks okay I'll glue it over the wooden dock. Not doing a roof over the other loading dock. Pics................Paul 2

DSCN0087DSCN0088DSCN0089DSCN0090DSCN0091


Attachments

Images (5)
  • DSCN0087
  • DSCN0088
  • DSCN0089
  • DSCN0090
  • DSCN0091
paul 2 posted:

Frank, always great scenes of your work.

Matt, nice video.

Ray, your hotel and elevated line are coming along great. Let me know when you finish so I can book a hotel room and got to sleep with the passing trains.

Cabinet Bob 9 (Dad), I knew it was only a matter of time before the real estate boom would come to an end. I am doing the same thing with my basement layout. But I also am including a single track loop for a little mainline running.

Mark, you are doing a nice job on the building. Sometimes it comes down to trial and error when it comes to paint color.

Today a late start but this afternoon I now have the loading docks glued into place. Also got a coat of aluminum paint on the roof. Once that dries and looks okay I'll glue it over the wooden dock. Not doing a roof over the other loading dock. Pics................Paul 2

DSCN0087DSCN0088DSCN0089DSCN0090DSCN0091


Paul

your loading dock is shaping up nicely 

Canadian Pacific Observation

Wow.  I had to do several things to the Dome Floor in order to add Preiser 65602 Seated People.  1.  The Dome Floor is installed in the wrong direction.  I had to unscrew light bars and Dome Floor, and then rotate the Floor 180 degrees.  It is properly manufactured, but installed improperly.  2.  The Seats are too high.  I had to break off the seats and then grind the lifter post off the bottom of the seat,  I then re-installed the lowered seats with Krazy Glue.  I left one side of the original seats in place, until I had aligned the lowered seats with the original seats.  I then did the remaining side and aligned the lowered seats.  ( I will need to do this to the Vista Dome Car too.  It will make the Dome cars match.)

I cut the Bar-Lounge wall lower, to allow a view into the Lounge from the left side of the car.  This Observation has four staterooms, the Lounge and a rear sitting area.  The left side is 3/4 hallway wall and not very interesting.

I still need to install people in the staterooms and rear sitting area.  I included pictures of the Dome Seat alteration.  The pictures show the Preiser 65602 Seated People that have also been ground down to sit lower in the newly lowered Dome Seats.  They are missing feet and ankles.

Have a good evening.

Sincerely, John Rowlen

IMG_1608


Attachments

Images (21)
  • IMG_1608
  • IMG_1609
  • IMG_1610
  • IMG_1611
  • IMG_1612
  • IMG_1613
  • IMG_1614
  • IMG_1615
  • IMG_1616
  • IMG_1617
  • IMG_1618
  • IMG_1619
  • IMG_1601
  • IMG_1602
  • IMG_1603
  • IMG_1604
  • IMG_1605
  • IMG_1606
  • IMG_1607
  • IMG_1612
  • IMG_1608
Last edited by John Rowlen

Well today I started drilling out the new control board that arrived yesterday.  Still not 100% sold on having the grids, but it will be nice to have something to play with as I continue the build.  Also started working on a tunnel.  Had to remove the ceiling will likely use some thinset as the husky stacks are cutting it too close for comfort.

Attachments

Images (2)
  • New Control Panel: Likely wont be the final product, but Sings.com under $30.
  • New Tunnel

Just got done painting the roadbed on a new Forbyate Railroad.  Gonna let the paint dry tonight and put the track and ties down tomorrow & wire it up over the weekend.  Going for a classic Lionel store display layout-like look for this one.  I’m really enjoying the simple time I’m having putting this together.  Ignore the placement of the buildings and such, I’m getting brainstorms as I put this together on the fly.  No real plan here except to enjoy myself.  Half the fun has been hunting down the accessories for it.  My last layout had none.

10B2E36D-9EB8-44CE-A90C-1F1E9E2CC6EA

Attachments

Images (1)
  • 10B2E36D-9EB8-44CE-A90C-1F1E9E2CC6EA
TACOROG posted:

Well today I started drilling out the new control board that arrived yesterday.  Still not 100% sold on having the grids, but it will be nice to have something to play with as I continue the build.  Also started working on a tunnel.  Had to remove the ceiling will likely use some thinset as the husky stacks are cutting it too close for comfort.

The panel looks good.  What material did you line the tunnel with?  It looks like stones molded or cut into the surface.

As we all know, finding a clever name for a project is half the battle. 

So, since this particular offense against the laws of Nature is part Atlas and part Rail King,  here's a progress report on the "Ratlas"...  

You may wonder what's with the masking tape? 

GEDC1830

I'm doing further mockery, er, mocking up.  

GEDC1831

Turns out that if one attaches the Atlas bumpers to the Rail King chassis, one gets bumpers of the correct overall length that actually work as per specifications!  Win!   

I will be trimming off the Atlas actuator bars; the tape is just to hold 'em while I mock up the layout.  

Next up:  Rigging the Railking reversing headlights to play nice with the Atlas shell...  

Mitch 

Attachments

Images (2)
  • GEDC1830
  • GEDC1831
Mark Boyce posted:
TACOROG posted:

Well today I started drilling out the new control board that arrived yesterday.  Still not 100% sold on having the grids, but it will be nice to have something to play with as I continue the build.  Also started working on a tunnel.  Had to remove the ceiling will likely use some thinset as the husky stacks are cutting it too close for comfort.

The panel looks good.  What material did you line the tunnel with?  It looks like stones molded or cut into the surface.

Hi Mark, 

   I used a latex mold from bragdonnet.  Then did a coat of white resin followed by a coat of 610 foam all from alumilite.  Took a while to get the combinations correct.  If anyone goes this route I highly reccommend using alumilite UMR for a mold seperator.  Here are some photos of the beginning of the other mountain.Innter with Rockshell 

Attachments

Images (2)
  • shell: Made from Poly porch screen and 610 foam
  • Innter with Rock: This is before the painting and shadowing.  Ill get some photos of the completed project this weekend
TACOROG posted:

Well today I started drilling out the new control board that arrived yesterday.  Still not 100% sold on having the grids, but it will be nice to have something to play with as I continue the build.  Also started working on a tunnel.  Had to remove the ceiling will likely use some thinset as the husky stacks are cutting it too close for comfort.

Alex, when I built the control panel I wanted it as small as possible but still have everything needed so like many of us I used a schematic rather than an actual copy of the layout. Yes you need to get used to it but that doesn't take very long. It is just big enough to hold all the switches and light bases in the back. Then made smaller ones for some other locations. Used a piece of leftover masonite and autyo pinstriping tape to color code it. The panel is mounted with a piano hinge so as can flip up to work on.

Just to give you more to think about.

IMG_8704IMG_8707

Attachments

Images (2)
  • IMG_8704
  • IMG_8707
Last edited by sidehack
sidehack posted:
TACOROG posted:

Well today I started drilling out the new control board that arrived yesterday.  Still not 100% sold on having the grids, but it will be nice to have something to play with as I continue the build.  Also started working on a tunnel.  Had to remove the ceiling will likely use some thinset as the husky stacks are cutting it too close for comfort.

Alex, when I built the control panel I wanted it as small as possible but still have everything needed so like many of us I used a schematic rather than an actual copy of the layout. Yes you need to get used to it but that doesn't take very long. It is just big enough to hold all the switches and light bases in the back. Then made smaller ones for some other locations. Used a piece of leftover masonite and autyo pinstriping tape to color code it. The panel is mounted with a piano hinge so as can flip up to work on.

Just to give you more to think about.


This is a very very good point that soon I will need to start to think about.  The printout ended up quite a bit larger than expected 23"x12".  While building the layout it isn't getting in the way to much once everything is done it will likely be a bit of an eye sore also its made of some sort of lightweight acrylic so will need a lot of reinforcement.  Im sure like most things I do it will be done twice more.  First for concept, then I improve it, then I restart it and do it a completely different way.

Matt Kramer posted:

Just got done painting the roadbed on a new Forbyate Railroad.  Gonna let the paint dry tonight and put the track and ties down tomorrow & wire it up over the weekend.  Going for a classic Lionel store display layout-like look for this one.  I’m really enjoying the simple time I’m having putting this together.  Ignore the placement of the buildings and such, I’m getting brainstorms as I put this together on the fly.  No real plan here except to enjoy myself.  Half the fun has been hunting down the accessories for it.  My last layout had none.

10B2E36D-9EB8-44CE-A90C-1F1E9E2CC6EA

Matt

that is a very neat and tidy layout you have and a great idea 

Morning everyone, sure has been a lot of great work being done. I sure sucks not checking things out for a couple of day as it takes a lot to get caught up on things! LOL

Paul 2 your loading docks sure turned out wonderful!

Super Chief Nice job on the road! I sure like the scenery of your layout!

Alex, that sure is some great looking wiring and the top of the layout looks interesting also!

Lee, D, Great work! I love the 

Bob, thanks for the tips on lighting! I know for me if I don't like it I just turn the lights off! LOL

B&O Fan, Outstanding job on the Men's Clothing store!

DAD, WOW! What an undertaking! I sure hope things go smooth for your rebuild and that you post photos as you go along!

Ray, Things sure are looking great! The elevated track system is great and your looking good on the hotel!

Brian, It sure is nice to see you and Izzy back to the layout! Its going to be fun fallowing you as you continue on your build!

John, as the norm for you Outstanding work! You must have enough cars to move everyone from the east to the west coast !

Well I figured out that if I get up at 2 or 3 AM it gives me a couple of hours to work on quite things in the train room before its time to make noise in the house! I have run into a problem with my sidings as when I go across the second switch from my crane siding the engine looses power. I have power to the switches, but only one side is showing a ground. Then when I do get out and come around it looses power entering the siding and the track in that area has the same problem. If I check power from center rail to one outside rail I have 18v if I check it on the other outside rail I only have like 5.3v. I don't know if it matters but it has my brain fried! LOL

Well either way I hope everyone has a great Friday and upcoming weekend! Don't forget to find time to have fun on your layout and with your trains!

Larry, Great video and what an Amazing layout! Thank you so much for sharing! Worth watching a couple of times!

Ok Guys I need some help here, I went out to try and figure out whats going on with my layout and for some reason I have continuity between the center rail and the outer rails. If my brain is correct that should not be happening! Can someone explain it to me?

Thank you so much, actually there was a video crew from a local TV Station, CDE TV, a local cable channel featuring my model railroad for a TV show. So, while they were doing their work, I tried my I-phone 10R to see what might happen as it accidentally became a video instead of a simple picture. I need a lot of practice. Mike g, SIDEHACK, your layouts are super to. Happy Railroading 

mike g. posted:

Larry, Great video and what an Amazing layout! Thank you so much for sharing! Worth watching a couple of times!

Ok Guys I need some help here, I went out to try and figure out whats going on with my layout and for some reason I have continuity between the center rail and the outer rails. If my brain is correct that should not be happening! Can someone explain it to me?

Mike,

Double check your wiring to the new sidings. I'm guessing you reversed a pair along the way and you have a hot/ common swapped.

Bob

mike g. posted:

Ok Guys I need some help here, I went out to try and figure out whats going on with my layout and for some reason I have continuity between the center rail and the outer rails. If my brain is correct that should not be happening! Can someone explain it to me?

Mike, I can't help you there as 3-rail is not my thing, but I'm wondering if you're going to the big Monroe show this weekend?

I'm probably going, depending on my wife's mood tonight and in the morning...

Mike g :  If your using the old tubular track with metal ties, you need to check the insulator that is between the center rail and the tie.  This is nothing more than a small piece of cardboard on the original Lionel track and as the track gets older can either fall out or sometimes gets saturated with track cleaner fluid and becomes conductive.

Don McErlean

Johan, wonderful job on the Box car! But I have to say Amazing work on the scenery!

John  & Bob, good news. The CEO gave me the weekend off so tomorrow I will be pulling everything from the track and vacuuming and running a magnet over everything. At which time I will recheck and if I still have the same problem, under the layout I go! LOL

Lee, Sorry no train show for me, Have to figure out what my wiring problem is!

Paul 2Wonderful job on the loading dock roof! Do you plan on putting LED's under it for night time use? Also the Silos are looking good! What color are you going to paint them?

So no train updates as I have been busy, but as I stated above I will let you all know tomorrow if I get it figured out or not!

Lionel Canadian Pacific Vista Dome

I switched to the Canadian Pacific Vista Dome after working on the Dome Observation.  I had to lower the Dome Seats to accommodate the Preiser 65693 Seated People I painted.  The interior has three coats of paint plus some touch-up.  I will add people to the Vista Dome next.  After finishing the Domes, I will move on to other CP cars.

Have a good evening.

Sincerely, John Rowlen

IMG_1620

Attachments

Images (9)
  • IMG_1620
  • IMG_1621
  • IMG_1622
  • IMG_1602
  • IMG_1603
  • IMG_1604
  • IMG_1612
  • IMG_1620
  • IMG_1620
TACOROG posted:
Mark Boyce posted:
TACOROG posted:

Well today I started drilling out the new control board that arrived yesterday.  Still not 100% sold on having the grids, but it will be nice to have something to play with as I continue the build.  Also started working on a tunnel.  Had to remove the ceiling will likely use some thinset as the husky stacks are cutting it too close for comfort.

The panel looks good.  What material did you line the tunnel with?  It looks like stones molded or cut into the surface.

Hi Mark, 

   I used a latex mold from bragdonnet.  Then did a coat of white resin followed by a coat of 610 foam all from alumilite.  Took a while to get the combinations correct.  If anyone goes this route I highly recommend using alumilite UMR for a mold separator.  Here are some photos of the beginning of the other mountain.Innter with Rockshell 

That's really great!  Thank you for the information, Alex!

Add Reply

Post

OGR Publishing, Inc., 1310 Eastside Centre Ct, Suite 6, Mountain Home, AR 72653
800-980-OGRR (6477)
www.ogaugerr.com

×
×
×
×
Link copied to your clipboard.
×
×