
I'm in the throws of deciding if I should build a new layout in 2-rail. I like the realism of 2-rail vs. 3-rail. I just can't seem to get past that third rail for some reason. Anyway, which brand of 2-rail track do you recommend? Atlas? Other? I want to maximize a realistic look as much as possible. Not sure how many manufacturers out there on 2-rail.

Many thanks in advance for your help.

Ralph

Original Post

Replies sorted oldest to newest

I used Micro Engineering flex, Atlas curved sections, and Signature Switch turnouts, all code 148.  I used the Atlas curved sections in the main ends of my layout and anywhere else I could to readily give me a constant curve instead of worrying about any kinks if I was to use ME flex.  I tried making turnouts, dismal failure and Signature Switch makes some mighty fine ones.

Here's more or less what my layout looks like:

PLAN H 2019

Attachments

Images (1)
  • PLAN H 2019

I used "Old" atlas roco track from the 80s-90s and handlaid my yard.     I am not familiar with modern Atlas.    However, there is a big diference between the Atlas flex I used and ME flex track.    The ME appears to be non-tempered.    It bends very easily, and it holds the bend, including any kinks your bending put in.   I found it harder to get a smooth curve with it.    On the other hand the Atlas appears to be a tempered material and is "springy".     If you bend a piece, it wants to spring back to straight.     When you bend it to a curve, it self smooths itself to the curve as you tack it down.     So it is easier to make smooth curves with the atlas - - but (there always is a but), the tempered rail is very hard to keep curved at the joints.     It is easy to get a kink at the joint.    On the other hand, the softer ME is very easy to get a smooth joint.     One way to work atlas is to solder the rail joiners at the joints on curvers before tacking it down but after you cut it to length, the inner rail has to be shortened.

So both types/brands have their advantages and disadvantages.      i think handlaid is least expensive, and most flexible.     Flextrack is next in flexibility and obviously more expensive.      But you can do any radius curve you like.    I think sectional track provides the least flexibility and costs the most.    However, sectional probably goes down the fastest provided you don't have to cut and fit anything.

@prrjim posted:

I used "Old" atlas roco track from the 80s-90s and handlaid my yard.     I am not familiar with modern Atlas.    However, there is a big diference between the Atlas flex I used and ME flex track.    The ME appears to be non-tempered.    It bends very easily, and it holds the bend, including any kinks your bending put in.   I found it harder to get a smooth curve with it.    On the other hand the Atlas appears to be a tempered material and is "springy".     If you bend a piece, it wants to spring back to straight.     When you bend it to a curve, it self smooths itself to the curve as you tack it down.     So it is easier to make smooth curves with the atlas - - but (there always is a but), the tempered rail is very hard to keep curved at the joints.     It is easy to get a kink at the joint.    On the other hand, the softer ME is very easy to get a smooth joint.     One way to work atlas is to solder the rail joiners at the joints on curvers before tacking it down but after you cut it to length, the inner rail has to be shortened.

So both types/brands have their advantages and disadvantages.      i think handlaid is least expensive, and most flexible.     Flextrack is next in flexibility and obviously more expensive.      But you can do any radius curve you like.    I think sectional track provides the least flexibility and costs the most.    However, sectional probably goes down the fastest provided you don't have to cut and fit anything.

Great explanation of the pros and cons. Thanks.

Modern Atlas Track is very easy to bend, so you have no worries about kinks.  You can easily slip the rails through the tie "plates."  This enables you to stagger the rail joints e.g. the joint on the outside rail is halfway between the joints on the inside rail.  This makes for very smooth, kink free curves.  It is also stiff enough that you can get natural easements going into a curve.  Do not solder the rail joints before bending, as this prevents the rails from sliding through the tie plates

Atlas track is soft (it is made from nickel plated brass) so can be cut with flush cut pliers, a Dremel cutoff wheel, and even a razor saw.  It is very easy to dress the cut ends with a few strokes of a file. I solder feeders to the web that can not be seen, or if both sides can be seen, to the underside of the rail.

It looks realistic enough for my purposes:

2181

Attachments

Images (1)
  • 2181

Here is a step-by-step YouTube video that is the first of about a dozen follow-on videos on handlaying O scale track.   Handlaid track is not hard but it is quite tedious and time consuming.  Proto 48 is even more tedious due to the tighter tolerances in the gauge.   It can be really rewarding and makes some great looking track and turnouts (as this video series shows).  However, as far as cost, I don't see that much of a cost benefit between handlaid track vs. flex track or premade turnouts depending on the amount of detail you add, e.g. separate tie plates, rail braces, etc.  Handlaying does give you greater flexibility in being able to build a custom turnout to fit a specific space requirement or track arrangement.

https://youtu.be/MYJl-a0TWqA

Scott

Last edited by Scott Kay
@Scott Kay posted:

Handlaid track is not hard but it is quite tedious and time consuming.


With the right music and company, and a few margaritas, it's quite pleasant and time becomes rewardingly spent.

Handlaying does give you greater flexibility in being able to build a custom turnout to fit a specific space requirement or track arrangement.

And there's a real advantage.  You get to have turnouts (and then track...) that go where you want them to go and not where a pre-fab one limits your design.

Hand Layed track, it takes little longer, but is rewarding. If you have five minutes you can throw in some spikes, and leave, you can pick it up and put it down ( when your wife or kids call )

Id like to try Peco Nickel Silver code 143 ( flat bottom ) ,flex track, this probably isn't so available in the US, and depicts more modern rail, my one beef with it is, I wish Peco had spaced the sleepers closer together, but they make good track.       cTr....( Choose the Right )

Last edited by Stephen Bloy

:...Signature Switch Company or O Scale Turnouts.   The latter has solid (not hinged points) which would look better.

John,

Brad's standard points are solid, not hinged.  My preference is hinged.  So the hinged Signature Switches I have resold at Strasburg should not reflect Brad's standard product.  Brad's hinged points are an extra cost option.  He keeps encouraging me to go with the solid rail.

-----------------------------------------------------------------------------------------------------------------------------------------------------

Concerning the ME track, an earlier conversation with someone at ME said that they insert the gauged rails into a plastic injection machine to apply the ties a segment at a time.  Insert, apply plastic, insert further, apply plastic, repeat until that length is complete.

That explains the tight ties.

They also said that the weathering is a chemical etching of the ME rail which causes a rough surface.  So when the weathered rail is inserted for the injection process that explains why the weathered "flex" is so stiff.  The plastic mechanically locks onto the course  surface of the rail.

In any event I have used a lot of ME track and find that it just needs a little more time.  Gloves for the weathered track.  Great appearance.

When I was building my last RR I started by using the newly introduced Atlas brown tie and I just had ordered a large quantity of Lou's rail detail items but got discouraged with the over size mew Atlas web which would not take the rail joiners or guard rails.

However, all bets are off on my latest RR.  Needing a lot of track to fill up my 2k s.f. basement I opted to go with NOS Atlas 3' black tie for a fraction of the $23.95 present retail price per length.  Building for myself with no thought of rivet counters and having a  stash of brand new factory sealed boxes of the 3' track it was an easy choice.  My interest is in running trains, scheduling stops, turning locos and having fun.

I do have a mix of ME for some of the highly visible portions, some newer Atlas thrown in here and there and a over a hundred different brand domestic and imported switches with some minor rail height differences but I have never had any tracking issues despite the armchair naysayers.

I even had Brad make about 50% of my switches with NOS Atlas rail that I supplied with absolutely no noticeable running concerns.  It's all good.

Last edited by Tom Tee
@Tom Tee posted:

John,

Brad's standard points are solid, not hinged.  My preference is hinged.  So the hinged Signature Switches I have resold at Strasburg should not reflect Brad's standard product.  Brad's hinged points are an extra cost option.

Tom

Tom

Thanks for the correction.   I based my original comment on your table at Strasburg and photos on his website.

Nevertheless,  I still prefer solid points for their looks!

John,  Your welcome. I agree with you, the solid rail has a much cleaner appearance.   Most of my points are free floating so solid rail would not work.  Your level of realism is incredible!  So perfect it is intimidating to someone like me.

Sorry that my hinged points gave you the wrong message.

Tom

Modern Atlas Track is very easy to bend, so you have no worries about kinks.  You can easily slip the rails through the tie "plates."  This enables you to stagger the rail joints e.g. the joint on the outside rail is halfway between the joints on the inside rail.  This makes for very smooth, kink free curves.  It is also stiff enough that you can get natural easements going into a curve.  Do not solder the rail joints before bending, as this prevents the rails from sliding through the tie plates

Atlas track is soft (it is made from nickel plated brass) so can be cut with flush cut pliers, a Dremel cutoff wheel, and even a razor saw.  It is very easy to dress the cut ends with a few strokes of a file. I solder feeders to the web that can not be seen, or if both sides can be seen, to the underside of the rail.

It looks realistic enough for my purposes:

2181

Remember the commercial: "Is it real? Or, is it Memorex?"   That applies here. Nice job.

This is long but may help you decide on hand laid or not.

Hand laid track using the Fast Track Components tutorial.

I have been building my layout’s track using Fast Tracks (from now on referred to as FT) components. I lost my last layout to a fire and had to start from scratch. I wanted to build it in O standard and as I was in On30 before the fire and was able to salvage some locomotives and rolling stock, some On30. A back woodsy theme dictated code 100 and 70 for the narrow gauge. I looked at ME track and turnouts in both scales. It seemed very pricey especially when I would need custom made turnouts in O and On30 (except for #5). After a lot of thought I decided to try the Fast Tracks system and went “all in”. (remember, the jigs bring good $$ on eBay when you are done)!!

I realize hand laying track is not for everyone but if you are at all considering it I urge you to read on and see how FT products and some of the tricks I’ve learned over the past 7 years can make it a less daunting task.

The FT method consists of jigs, 3 foot rail sections, PCB (printed circuit board) and wood ties. The rail is soldered to the PCB ties which holds everything together. The ties provide the additional support for the rail and receive the spikes further holding the rail.

I purchased jigs in O standard (code 100 branchline) of 36”, 40”, 42” and 48” curves as well as straight and # 4.5 and # 6 turnouts. In On30, I purchased (code 70 branchline) #4, #5, #5 wye, # 6, and # 6-3 way. Also a straight and curves of 22”, 24”, 26”, 28”and 30”. I mention all these because had I to do it again, I would not have purchased so many different radii jigs. The turnout jigs (for me anyway) are a must as they allow a fine working turnout to be made over and over in about 45 minutes. Get the frog and point tools as well as they save a lot of time. I’m using light code 100 and code 70 as I am modeling an old, back woodsy outfit. Also, I think the smaller rail makes the tighter curves I have look broader.

As to the curved track I would still get a jig for 36” (O) and 22” (On30) as this is tightest used radius and it is critical to have it consistent to avoid derailments. You can also save the cost of a Wye jig as I made this one using the left and right sides of a 4.5 O scale turnout. It was not a fast as using a jig, but I only needed one so I got to see what pre-jig turnout construction was all about. Jigs are much easier!!


Here’s how you can do more with less:

As I started laying the O standard track, I used to make an easement for a 40” curve, for example, by using the 48” jig to attach about 4 ties, then the 42” for the next 4 and then down to 40” and then back at the other end. I then found using FT sweepsticks and a couple of track gauges after soldering only the inside rail of the curve to the PCB ties in the jig gives you much more flexibility for easements and variable radii curves. You can also make any curve you need to fit your situation this way using track gauges with the one rail soldered. I find this results in much more natural looking track curves and is a lot faster. Except for the accuracy needed for minimum radii you could actually get away with just using a straight jig.


Track and roadbed alignment: what I’ve learned.

My sub roadbed is what used to be called ½ inch plywood (seems to be all different measurements today!)with homasote on top. I use cork roadbed but do not like the commercial stuff as it’s too thick. I buy rolls of 1/16th inch cork at Michaels, Ace or wherever I can get it on sale and cut it into strips 1 ¼” wide, half the total width needed (10 scale feet) with my power miter saw.
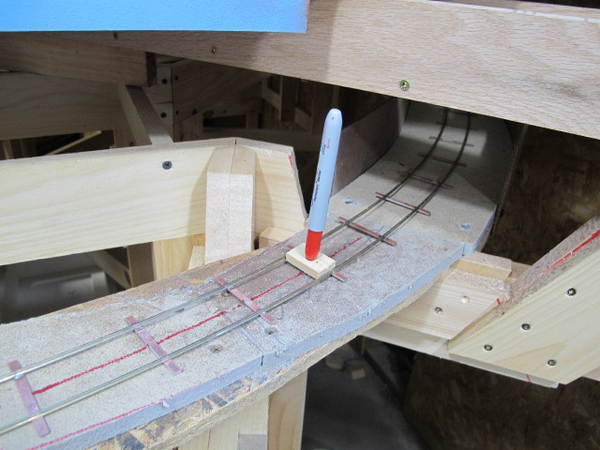
The basic premise of the FT system is soldering NS rail to PC board “ties” for alignment and strength. The PCB ties are spaced at the same spacing on all their jigs and tie racks of the same type, i.e. Mainline, Branchline and Siding (in O). I use Branchline which works out to 5 wooden ties between every PCB tie. In theory one loads up the “tie rack” with wooden ties, leaving out every 5th tie for the PC tie, then presses some masking tape to the tops of the ties. You then pull the whole strip out and place it on the cork you’ve laid down on the homasote and then set the rail and PC ties down onto the wooden ties and glue or spike. Easy, right? Well for straight track it is because a straight line drawn with ruler is always straight and everything will line up fine. The only straight track I have is in my small 4 track yard at one end of the run with the turntable, fuel and water facilities and enginehouse. The rest of the layout has curves. The problem comes because of this basic premise. No matter how carefully you measure and mark it is nearly impossible to get the wooden ties lined up with the PC ties and the edge of the cork roadbed and everything centered under the rail, all at the same time. The masking tape is not that flexible and it also blocks your view of any centerline you have. I’ve tried thin masking tape, plastic electrical tape and nothing seems to help. As you bend the strip of ties to follow the curve, the ties lose their spacing to the PC ties. Using slow setting glue for the wooden ties allows some time to monkey around getting everything lined up, but it’s very time consuming. Note the spacing of PC ties and wood ties and how in the last photo it's gone awry! See below:


I have completely scrapped this method-too time consuming.

I now do it this way.

When you first read this it will seem as if I’m doing everything backwards to how it should be done. Keep an open mind and follow along to the end and you’ll see there is a "method to my madness". Do not lay your cork or Homasote roadbed yet. With this method it comes second to last.

You will notice in O scale the PC ties are thinner than the wooden ties. Per FT instructions once the track is ballasted that disappears which is true but I’ve found a better way to do the whole process. I believe in HO and N scales, like On30, the PCB ties are the same thickness so you can skip this next shimming bit.

I cut 3/32 x 1/4” bass or balsa wood strips into tie lengths. I place the PCB ties in the straight jig and solder both rails to the first tie at the end of the rail where it joins the last piece and then solder only one side of the tie for the rest of the 3 feet of rail. Once removed from the jig I then score up the underside of the the PCB ties with rough sandpaper and use CAA (use only good quality super glue) to attach the shim ties to the PCB tie. For HO N and On30 solder the single rail as above.

You are now ready to start laying the track. You will need a lot of push pins to hold everything in place as well as your soldering equipment and track gauges. Lay your rail down where to you want it. You will notice you can bend it as you see fit. I you want, you can align it with sweep sticks but I prefer to eyeball it using the sweep sticks only to prevent it getting too tight. Once you have it down the way you want and it’s secured tightly with push pins on the ends of the ties (wont interfere with the track gauge and center line jig) use your track gauges to align the loose rail and solder the rail in place. Continue along until you have maybe 8 to 10 feet done or come to an area that needs a turnout or crossing. Leave your ends long. Now take a sharpie and mark the centerline of the track. I use a jig with a centered hole.
Once you have the centerline drawn, pick up the track as its time to add your under ballast roadbed. I use rolled cork 3/16th thick cut to size while still rolled up on my miter saw.


Now the fun part, laying the sub ballast road bed. I have found Weldwood water based contact cement works very well and doesn’t stink up the whole house and make you high.


My cut cork strips are 4 feet long. I pin the very ends of a few to a long board tightly and spread the cement evenly with a throwaway foam brush. Now go to the layout and spread the glue over your centerline just a bit wider than the cork. In 20 minutes you can lay down the cork. Remember this is contact cement so you need to get it down in the exact location it needs to be before applying and using a lot of pressure. If you make a bobble you can pull it off and re-align it now. On curved track I find putting down the convex piece down first. I tip it and lay the very edge along the line working my way around slowly then patting it down away from center until it’s all down. Now seal it does tight with a wall paper seam roller. Do the second piece the same way tilting the edge down to meet the piece already down at the center. Again once aligned right seal it with the roller. If you have a major goof (remember all the cork gets hidden by the ballast) you’ll have to cut that piece out and put in a patch. This is sooooo much easier than using craft glue and pins and I have completely scrapped that method. Using the contact cement it stays perfectly flat and is ready to sand smooth as soon as you’ve used the roller on it. I would suggest you try this method with flex track and assembled switches.

OK, go back and get the rail you’ve soldered together and place it back on the cork. As you used the track as a template it will fit perfectly. Once you’re sure of the alignment, its time to fix the track to the cork. With O scale and wood shims under the PCB ties I just run thin CAA at the junction of the cork and the wood on both sides of the ties and in 20 seconds it’s glued fast. With non shimmed PCB ties you have already scored up (this is important as the CAA needs some “tooth” to grip well), I like to use a medium CAA and pick the tie up and run a bead of glue in the cork and then set the tie down into the glue. As medium CAA is not instant set I like to weigh it down for a couple of minutes. The next and last step for now it to place a wooden tie in the center in between the PCB ties. I use Aileens Tacky glue. (the best there is-available online or at Michaels craft store). With 0 scale branch line there are five wooden ties in between the PCB ties. If your rail requires 6 ties, I would space out 2 in the center. Once the glue has dried, spike these ties in place. Using this method, these are the only spikes you will need to drive in your track. With my O gauge track the rail is anchored every 1 1/2 inches which is plenty to hold it in place….I cannot move it side to side at all. Spiking the rail to the ties is the most time-consuming and, to me, boring part of hand laying track and one of the biggest reasons people give up on it. Cutting this down to a minimum has made all the difference to me. The proto48 and proto87 guys out there, I salute you!

Your track is ready to use now so you can test everything for alignment and smoothness.

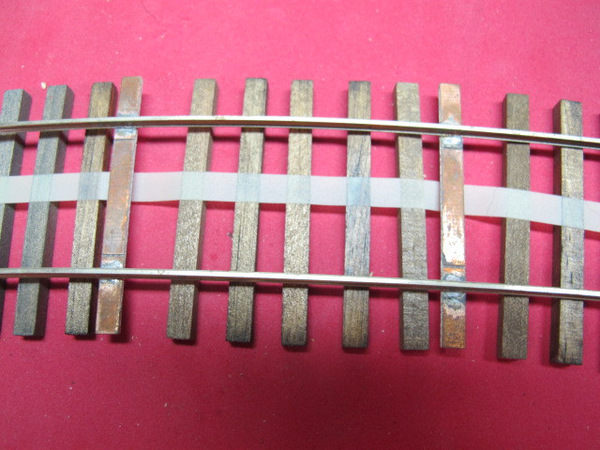
In the below picture you can see the rail and ties prior to adding the center wooden tie in the middle and with the center ties on the right.


Here’s what it ends up looking like ballasted and painted.


Turnout control:

I use Caboose Industries HO scale high switchstands which I find exactly correct in O scale. To control frog polarity I attach a micro switch under the switchstand with an extension up through a hole that is activated by the sliding bar of the stand. See video attached:

http://youtu.be/5zF3cW_MHFg


Staining Ties:

I hate the smell of Minwax Stain and it takes forever to dry so I use a homemade stain using black and dark brown India Ink in 92% alcohol. Do yourself a favor and wear latex gloves! I mix up about 4 different shades in those old rectangular plastic salad containers you get your “Spring Mix” in. Dump the ties in and swish around until they are evenly coated and colored to your satisfaction. You need to play around with the ink/alcohol ratio so I start with just alcohol and add ink until I get the right opacity tested by dipping a bare tie in. Do the same with the colors-mix the brown and black to get some variation. I use an old sieve to pull the ties out and shake off as much of the excess stain as I can. They dry faster and you stain more ties per box. Dump them on newspaper with couple of layers of paper towels (no, NOT your i-pad, Stanley!) and spread them out so they are just one layer. I then run a wad of paper towels over them rolling with a back and forth motion to get the excess dye off. They should be ready to use pretty quickly. Since writing this in 2014, I have discovered Minwax water based stain.

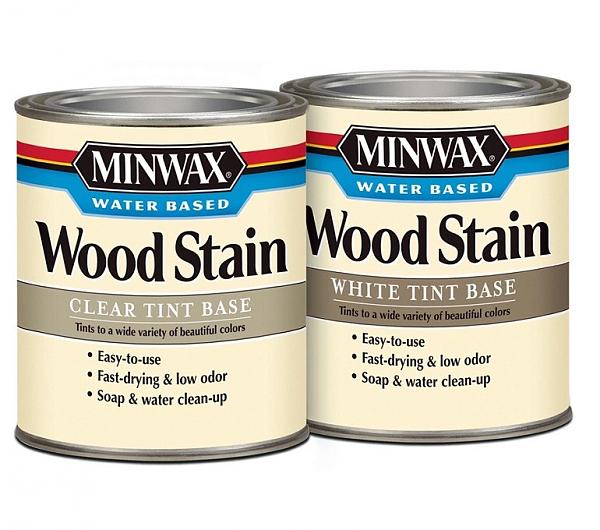
Like the water based contact cement it is very low odor and 1 small can goes a long way as you need to thin it a lot with water. I use it the same way as the idea ink dye. Wear rubber gloves, please.


Painting the PC ties and rail.

I pour some Polyscale roof brown or Tamiya medium brown into 3 small cups and add a little black to one and white to the other and mix, then brush these shades on the PC ties of assembled rail. On the rail I use Micro Lux rail brown in acrylic.

Ballast.

I make my own using a a product they have up here used on the roads called hard pan. It is a little big for HO and especially N. Before this I used to used sand strained different sized sieves and color it with my trusty sanded grout and think one could use this for HO. For N i wonder if sanded grout by itself would work. Here’s a closeup of the ballast:


That’s about it. I have found the Fast Tracks system to be of the highest quality, easy to use and they are delightful people to deal with. Like with everything, you learn tricks as you go along.

A few musts:

You should use Micro Engineering rail as others will not fit the slot in the assembly jig properly. You must use a non acid flux for soldering the rails or wash off the rail and PC ties with soapy water after or you will get a lovely green Patina on the rail and ties and the paint won’t stick to the ties or rail.

You must wash out your jig occasionally with a stiff NYLON brush so everything lines up correctly.

You must use a good quality solder and preferably non acid flux. I prefer my resistance soldering station as the tweezers heat both sides of the rail base quickly.

Have fun and now go build some track!!!


Peter

Attachments

Images (11)
  • mceclip0
  • mceclip1
  • mceclip2
  • mceclip3
  • mceclip4
  • mceclip5
  • mceclip6
  • mceclip7
  • mceclip8
  • mceclip9
  • mceclip10
@Scott Kay posted:

Handlaid track is not hard but it is quite tedious and time consuming.  Proto 48 is even more tedious due to the tighter tolerances in the gauge.   It can be really rewarding and makes some great looking track and turnouts (as this video series shows).

https://youtu.be/MYJl-a0TWqA

Scott

I agree.  Handlaid track will look superior to anything pre-made.   A contingent of S Scalers like to continually point that out to me.

However there ARE folks like me that find handlaying track a tedious and not very enjoyable operation (tried it once,) time and effort I'd rather be spending on locomotive or car projects.

Rusty

I also tried handlaying/making turnouts.  What the guys who are proficient in doing this don't tell you:

Ties crack, due to being too hard or putting too much pressure on the spikes when spiking

When they do crack, or if the hole the spike makes is not tight, the spikes become loose causing the rail to become loose and misalign

Turnouts MUST be aligned or derailments WILL occur

Anything causing the rails to be out of gauge must be redone

I'm sure that will result in some comments.

I found trying to build turnouts to be so frustrating I gave up, bit the bullet and spent the cash.

It is WAY cheaper if you become proficient at it plus you can make the track fit your needs.  I'd guess making 1 turnout might cost you $20 compared to $100 for a ready-built one.

If you want to keep the cost at a minimum, and have time on your hands, handlaying track is definitely the thing to do.  If you are disciplined and want to master this art, have at it.  My mind tends to wander and I often stare off into space, I quickly found out handlaying track was not for me.

@prrjim posted:

I used "Old" atlas roco track from the 80s-90s and handlaid my yard.     I am not familiar with modern Atlas.    However, there is a big diference between the Atlas flex I used and ME flex track.    The ME appears to be non-tempered.    It bends very easily, and it holds the bend, including any kinks your bending put in.   I found it harder to get a smooth curve with it.    On the other hand the Atlas appears to be a tempered material and is "springy".     If you bend a piece, it wants to spring back to straight.     When you bend it to a curve, it self smooths itself to the curve as you tack it down.     So it is easier to make smooth curves with the atlas - - but (there always is a but), the tempered rail is very hard to keep curved at the joints.     It is easy to get a kink at the joint.    On the other hand, the softer ME is very easy to get a smooth joint.     One way to work atlas is to solder the rail joiners at the joints on curvers before tacking it down but after you cut it to length, the inner rail has to be shortened.

So both types/brands have their advantages and disadvantages.      i think handlaid is least expensive, and most flexible.     Flextrack is next in flexibility and obviously more expensive.      But you can do any radius curve you like.    I think sectional track provides the least flexibility and costs the most.    However, sectional probably goes down the fastest provided you don't have to cut and fit anything.

I pull the rail from Atlas flex (both new and old), curve it using a Fastracks rail bender and slip it back into the ties.  Works the dream  Don't forget to cut off that last 1-1/2 inches that won't bend.

I was curious about the claim that hand laid track is less expensive than ready made, so I ran some numbers using the current pricing on the R-O-W website to see what a 3 foot section would cost.  On the basis of code 148 rail, 75 ties, and 4 spikes per tie the figures were:

  Rail:  $ 5.15          Ties:  $ 2.90         Spikes:  $ 2.34          Giving a subtotal of $ 10.34

But this figure leaves out the cost of tie plates, which adds $ 7.12.   Is cost the reason, unless I missed one, only Scott Kay's referenced video shows hand laid track with tie plates ?  It also always surprises me that Signature's standard turnouts do not have tie plates.  Apparently this absence doesn't bother a lot of modellers;  it would me, and I'm certainly not one of those "Track is also a model" types.

I would have thought that at any of the 2 rail shows -- March Meet, OSW, Cleveland, Strasburg -- it would be possible to find quantities of flex track competitive to the $ 10.34 price, and probably better looking.  Is that no longer the case ?  Maybe I just didn't pay enough attention to the track pricing, not shopping for any, at Cleveland last Saturday.

Best regards, SZ

I went with the more recent Atlas  2 rail, year 2000+. John Sethian pretty much summed up the reasons. I think ME is a great product also which made it a difficult decision. Staggering rail joints would be a bit more challenging with ME, though, and staggering the joints won out for me. ME is a bit more stiff but really beautiful track, probably a bit nicer in appearance than Atlas.

27 Y6a 2156 IMG_7867 AA OK copy

Attachments

Images (1)
  • 27 Y6a 2156 IMG_7867 AA OK copy
Last edited by christopher N&W
@AGHRMatt posted:

I've been dabbling with 2-rail track and between the Atlas and Micro-Engineering, the Atlas track is easier to work with. Further, it has UV-treated ties for outdoor use. It's pricey, though. I have most of a box of Atlas and a bunch of MTH ScaleTrax n my garage right now -- the jury is out as to what's going on my layout. Place your bets now.

Matt

Before I "place my bet", 😁 I looked up MTH Scaletrax; I don't see it in a 2 rail option...so I'm gonna go with Atlas, if we're indeed talking 2 rail. 🙂

Mark in Oregon

Overhead rails off course, didn't think of it that way before. Ive cut my own sleepers, using scrap wood. I scored some sugar pine that fell of someones trailer on the way to the tip, that made a  nice lot of sleepers, and another wood that a friend suggested was soft Meranti ( not the hard stuff ) this works as well as sugar pine, no splitting. Im guessing sugar pine is more common in the US. If you area a tight old Scotsman like me, you can use staples for spikes as well. I only know this because I thought , what would I do If I couldn't get Right of Way spikes, so I experamented. ( being all the way down under )   cTr....( Choose the Right )

Last edited by Stephen Bloy
@Strummer posted:

Matt

Before I "place my bet", 😁 I looked up MTH Scaletrax; I don't see it in a 2 rail option...so I'm gonna go with Atlas, if we're indeed talking 2 rail. 🙂

Mark in Oregon

MTH Did offer 2-rail ScaleTrax (actually Lenz) for a while. My interest in ScaleTrax is that the sections have insulated running rails even on the turnouts (for the hybrid wiring I've been working on). With the flex, you can yank the center rail if you want to, but if I'm in that situation it would probably be Atlas 2-rail track to start with.

I also looked at using Atlas 2-rail track and adding a Code 55 roller rail for my 3-rail equipment, but I'd have to perform major surgery on turnouts. With the loss of MicroEngineering, though, this pretty much moots the discussion about 2-rail track absent Lenz (if they're still producing it),

Christopher  I assure you I found It mangled on the side of the road, ( a fortuitous happen stance for me ) on the way to our tip, It seemed to have been used in some sort of construction, and was painted, not the usual construction pine. It took some work to slice it up in my small bench saw, but certainly worth the effort. Ive tried regular pine but its to hard, it gets really expensive to import sleepers rail etc, you can double the price by the time it gets to Aussi Land, same goes for Locos etc.          cTr....( Choose the Right )

I used ME uncoated Code 148.  Excellent product.  It flexed and bent without issues.  Mine is nickel silver for better electrical conductivity at the far end of the layout.  I used a Dremel to stagger the rail joints when I installed it.  The rail web required painting after installation but that was easy to accomplish.  The black tie Atlas seems to be modeled after European track.  Where the tie plates are, there are what appear to be Pandrol rail clips.  (My Atlas was older so I do not know what the present Atlas looks like.)   I also used Atlas turnouts as they were the only ones I found that did not have to be assembled, and that was a mistake.  I powered each frog with Atlas snap relays, and that was another mistake.  These relays simply do not have the horsepower to handle momentary currents in the range of 2-3 amps, such as would occur when an incandescent lighted passenger train passes over the frog.  They also are not good at handling 18VDC that is required to operate the MTH 2 rail locomotives in my collection using the DCS system, even though all of my MTH engines operate at less than one amp.  (I do not use smoke.)

SZ, Too bad you didn't stop by my table at the Parma two rail show last week. I had a  bunch of Atlas and Old Pullman flex track for sale at $10 a strip. I sold some black tie Atlas flex for $5 each. I also had some hand laid track on Homabed too. I was next to the guys with all the PRR diesels for sale.  Doug

Doug,

I didn't stop because I wasn't shopping for any track -- as a typical [ I think ! ] 0 scaler who's been in 2R for over forty years, I have a good supply of track and turnouts under a table, even though the layout has been essentially built for some time.  I was just regretting that I had not paid closer attention to the track prices to support my contention that buying track at 0 scale shows is as economical as hand laid, and your pricing you posted -- thank you -- does just that.

That fellow did have a nice looking selection of '628's, didn't he  -- almost enough to recreate the outside tracks of the PRR / PC era Conway turntable....

With best regards,

SZ

Sooo....you want to hand lay some track.

Well here is a challenge,  consider forming 7 tracks into 2 tracks using two 3 way switches, 1 not too obvious  double crossover, 1 single slip switch and 2 double slip switches all on a gentle curve.

This is a reposting of a OGR forum shot of Roo's from his friend's layout:

Roo England

The nicest example of 0 scale track work I have ever seen.

Attachments

Images (1)
  • Roo England
Last edited by Tom Tee
@Tom Tee posted:

Sooo....you want to hand lay some track.

Well here is a challenge,  consider forming 7 tracks into 2 tracks using two 3 way switches, 1 not too obvious  double crossover, 1 single slip switch and 2 double slip switches all on a gentle curve.

This is a reposting of a OGR forum shot of Roo's from his friend's layout:

Roo England

The nicest example of 0 scale track work I have ever seen.

Or at the other end of the scale, you can hand lay some really rough track....20210508_222631

But contrary to how it looks, it does require as much - if not more - care in laying as smooth, level track, if it's going to be reliable & not derail stuff. And my rough track IS reliable, as this video shows.

Edit - the high speed run is a demonstration only. Normally trains crawl along at walking pace, swaying along as close to the prototype as I can get it.

Attachments

Images (1)
  • 20210508_222631
Last edited by SundayShunter
@Tom Tee posted:

Sooo....you want to hand lay some track.

Well here is a challenge,  consider forming 7 tracks into 2 tracks using two 3 way switches, 1 not too obvious  double crossover, 1 single slip switch and 2 double slip switches all on a gentle curve.

This is a reposting of a OGR forum shot of Roo's from his friend's layout:

The nicest example of 0 scale track work I have ever seen.

Lets come back and look at that scene after the catenary has been strung.

I used Atlas Flex track and Atlas Switches.   Both Code 148.   The first was an excellent idea, the second not so much.  I would now go with Signature Switch Company or O Scale Turnouts.   The latter has solid (not hinged points) which would look better.

I checked out the Signature Switch Company website. I like the looks of their switches. My question is, what switch machine goes with these? Also how are wires attached? Lastly where would I find the switch machines and wires?

Curtis1983,

A below-the-track switch machine would look best and operate well.  I use the Hankscraft display motors, 3v, 4 rpm.  The are DC so are reversible to throw the switch both ways.  I use common wire and dpdt switches so the electrical switch can activate the switch machine and change the polarity of the frog at the same time.  Brad will wire the switch for a small additional fee.  Pay it.  It is worth having them pre-wired.  Google will get you some info regarding switch machines and others here will chime in also.  I use a 14 gauge bus and 18 gauge feeder wires to the switch motors.

Good luck,

Ed

I'm in the throws of deciding if I should build a new layout in 2-rail. I like the realism of 2-rail vs. 3-rail. I just can't seem to get past that third rail for some reason. Anyway, which brand of 2-rail track do you recommend? Atlas? Other? I want to maximize a realistic look as much as possible. Not sure how many manufacturers out there on 2-rail.

Many thanks in advance for your help.

Ralph

Micro Engineering O scale/Right 'O' Way Proto48 flex track and hand laid turnouts.

Last edited by jgtrh62
@Ed Kelly posted:

Curtis1983,

A below-the-track switch machine would look best and operate well.  I use the Hankscraft display motors, 3v, 4 rpm.  The are DC so are reversible to throw the switch both ways.  I use common wire and dpdt switches so the electrical switch can activate the switch machine and change the polarity of the frog at the same time.  Brad will wire the switch for a small additional fee.  Pay it.  It is worth having them pre-wired.  Google will get you some info regarding switch machines and others here will chime in also.  I use a 14 gauge bus and 18 gauge feeder wires to the switch motors.

Good luck,

Ed

Thank you for this information.

I'm in the throws of deciding if I should build a new layout in 2-rail. I like the realism of 2-rail vs. 3-rail. I just can't seem to get past that third rail for some reason. Anyway, which brand of 2-rail track do you recommend? Atlas? Other? I want to maximize a realistic look as much as possible. Not sure how many manufacturers out there on 2-rail.

Many thanks in advance for your help.

Ralph

I started in O-Scale using ATLAS 2 rail track and switches for trackwork for my NY City based Trolley and "EL" Rapid Transit layout.

Of course, on the "EL" structure trackage, I have to add much more prototype required details to the track and decking "R-o-W" on the EL trestle.  The ATLAS (flex and some sectional curved and straight sections) does the best job for me.  Its quick, strong, and detailed nicely enough for my needs.  This layout was started back in 1985 and finished between 1986 & 1987.  Weathering makes the track look even better.

I also hand cut track ties and hand laid spiked rail, on many of my yard (all ballasted) tracks.  Saved using paid-for ATLAS TRACK but obviously took longer to install and finish to completion.  But it was worth it and saved the cost of using additional Atlas Track. The yard track looks great and is generally covered with laid up stored Subway and EL trains most times anyway.  Some yard sections I actually did use some spare ATLAS track sections with ballast.  See 2nd and 6th photos below for those;  See other photos below using all Atlas Tracks on the open EL Structure decking..

PS:  I hand made  and laid various degrees of angled insulated-crossing tracks - as ATLAS did not make any back in the 1980's. (See 2nd photo)

Regards - Joe F


3-track-el-mainline-details_5449782856_ocrossover-between-local-tracks_5438012527_ocurved-local-track-and-guard-rail-details_5452264839_oimg_4665_6321473447_ooverhead-view-of-standard-3-track-el-line-and-signals_5449646838_oyard-layup-tracks-and-bumpers_5453094748_o

Attachments

Images (6)
  • 3-track-el-mainline-details_5449782856_o
  • crossover-between-local-tracks_5438012527_o
  • curved-local-track-and-guard-rail-details_5452264839_o
  • img_4665_6321473447_o
  • overhead-view-of-standard-3-track-el-line-and-signals_5449646838_o
  • yard-layup-tracks-and-bumpers_5453094748_o
Last edited by Joseph Frank

At the risk of diverting this EXCELLENT thread, (not to mention being too cute)... I guess I am handlaying my track as well. It's just a scale 21 feet above the rails:

5276

Hello John and others. Noticed the nice guard rails above, which are not a stock option for out of the box track (like Atlas). Prototypical question: when are guard rails usually implemented? Bridges, tunnels and crossings mainly? I don't see any of these in the gorgeous photo above, but maybe they are just slightly out of shot. Anyways, I think it really adds to the realistic look of the track.

@lionel1946 posted:

Noticed the nice guard rails above, which are not a stock option for out of the box track (like Atlas). Prototypical question: when are guard rails usually implemented? Bridges, tunnels and crossings mainly?

Yes. Anywhere clearance is restricted

I don't see any of these in the gorgeous photo above, but maybe they are just slightly out of shot.

Yes, the bridge is just out of sight in that photo.  See photo below

Anyways, I think it really adds to the realistic look of the track.

Yes it does

4282

Attachments

Images (1)
  • 4282

4282

Hello again John

Again, John - Excellent scene - trackwork and overhead catenary and modeling in general along with rolling stock with the PRR GG1 and the (Congressional ?) PRR Streamline coaches consist.  Below are a few of some of my many Mainline Railroad models seen on my O Scale EL.

IMG_6336IMG_6337IMG_6329Joe F

Attachments

Images (3)
  • IMG_6336
  • IMG_6337
  • IMG_6329
Last edited by Joseph Frank

Add Reply

Post

OGR Publishing, Inc., 1310 Eastside Centre Ct, Suite 6, Mountain Home, AR 72653
800-980-OGRR (6477)
www.ogaugerr.com

×
×
×
×
Link copied to your clipboard.
×
×