I posted before about getting power to my layout, and I finally solved that problem by getting more lockons.  I also tweaked the configuration slightly.  

I originally conceived the general theme of this layout sitting on the floor and playing with track.  I moved it to a ping pong table to make a semi-permanent for my kids and I to enjoy.  The goals are running two trains at once, having some train parking, and being able to make some deliveries to industry.  The equipment is almost all Railking rolling stock and the locomotives are all Railking, about half of which are scale.  Time period is postwar to present.  I'll run whatever, whenever if it will entertain the kids and me.  I'll pull Superliners with a cab forward, I don't care.

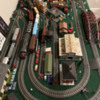
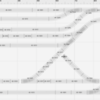
The track plan is with Railmodeler Pro on Mac.  It's not very accurate at modeling Realtrax.  For example, at the bottom right corner, I have O31 switch, O31 switch 3.5" straight, and then two more O31 switches.  The end switches are then connected with O42 curves.  In reality, O42 curves come nowhere near close to connecting.  They're off by inches.  Importantly, my various spurs are not as cramped as they look in the track plan.  I attached a pic so you can see what it really looks like.

Does anyone have any thoughts on how to improve on this configuration?  I guess the main question is whether it would be better to move the outer loop to the farthest outside track to eliminate the S curve on the main, but that doesn't seem to cause any real issues.

Attachments

Images (2)
  • Screen Shot 2022-01-11 at 6.19.25 PM
  • IMG_1306
Last edited by Mark Holmgren 110217
Original Post

Replies sorted oldest to newest

Yes; remove on left hand switch from the top two on the siding at the top of the picture and remove the second right hand switch from the two sidings in the table middle.  Now, using your left hand switch at the bottom of the inner loop, connect to the remaining right hand switch at the top of the inner loop  VIOLA, you have a reversing loop allowing trains to change direction.  Finally, use the remaining right hand switch near the bottom of the reversing loop connection to build another small siding that dead ends in the middle of your newly created reversing loop.  If you lay it out correctly, you should be able to place operating accessories on both sides of that new siding as well as along one side of the remaining siding at the top of the layout and in the middle of the layout.

Scenery "spacing" is an important element of any track planning exercise.

Chuck

@leapinlarry posted:

Great Question, I’m sure others will have ideas, however this looks like a workable plan to me. This also reminds me of the 1950’s when many of my grade school friends had American Flyer layouts on ping pong tables, I was envious. I would wire it up, run some trains and then see how you like the plan. Happy Railroading Everyone

Thanks! It's built and I've been running trains on it.  It's shown in the pic, just rotated 90 degrees so you can see the spacing of the spurs better.  Nothing it permanently attached, it's all just thrown on carpet on the ping pong table.  I'm just looking to make it better.

I really like your layout!! You fit in a good amount of structures for such a great track plan! The picture does make it look.

If the S curve isn't causing any trouble, and you like things as they are, then just let it be.

You've got yourself an inner and outer loop that the trains can go between with ease- which is great. The sidings are more than sufficient in length in allowing you to store locos and RS. I really love your layout and don't see a need to change it. That said...

Personally, and I might just be transposing what I want on my layout for yours lol, I think you could really add to the operating experience if you could have trains change direction. See the picture below:

Eliminate S curve, change of direction

1.) Eliminate the s curve(remove track between two dash marks)

2.) Connect curves in the "purple circle" to one of the three upper sidings, add the appropriate amount of straights to connect to black dash on the left

3.) Take LH switch in the green box that had been on your main line and move it to green box in the inner loop

4.) The switch will line up and connect to the straight end of the switch as represented by the red segmented line. You'll lose the siding but it could make up for the space lost to the track cutting across the inner loop

5a.) Orange on bottom right- the train enters going the direction indicated by the Orange arrow. Train is moving counterclockwise on inner loop, following the orange marks on the track

5b.) Train goes across red line to bottom of inner loop, now is moving clockwise

Obviously there's flaws- once it changes direction it cannot switch back0 kind of a one trick gimmick. Also- cuts into your scenery and you effectively lose two sidings. But the elimination of the s curve and the lower inner loop siding should create space.

Again, I'm kind of transposing things I want for my layout here. I like to have my inner and outer loop trains running in opposite directions. You mentioned you had kids so I thought they might enjoy changing the direction. Some people connect their loops but don't actually switch between them, some do. Some wouldn't like that you can only change the direction one time, some might. Just thought I'd at least provide some food for thought. Like I said previously, however, your layout is really neat as it is!

-Steve

Attachments

Images (1)
  • Eliminate S curve, change of direction

Mark, you got my idea, except I would try to cut the right hand switch, that now cuts into the middle at an angle from the bottom, into the reverse loop connection and then, using a combination of straights and curves, run it up into the right hand side "donut hole."  Makes for a longer siding and allows room for more accessories along side the extra length.

Chuck

I fooled around with the track and tried out all of the suggestions. Eliminating the S curve on the outer loop is nice, but the ping pong table is against a wall and I realized if it derailed back there, it was going to be a royal pain to fix. The alternate spurs added options, but they cost me almost all the buildings.

I eventually put it back to the original configuration and gave it the ultimate test by unleashing the Kraken…I mean Railking Southern Pacific Cab Forward. On the inner loop, it crashes into everything. On the outer loop, I just had to move one switch machine and leave a couple empty inches on the end of spur #3 and it’s just fine. I guess it will have to use an interchange track to drop freight for the locals to pick up.

Thanks for the thoughts and ideas everyone!

Add Reply

Post
The Track Planning and Layout Design Forum is sponsored by

AN OGR FORUM CHARTER SPONSOR

OGR Publishing, Inc., 1310 Eastside Centre Ct, Suite 6, Mountain Home, AR 72653
800-980-OGRR (6477)
www.ogaugerr.com

×
×
×
×
Link copied to your clipboard.
×
×