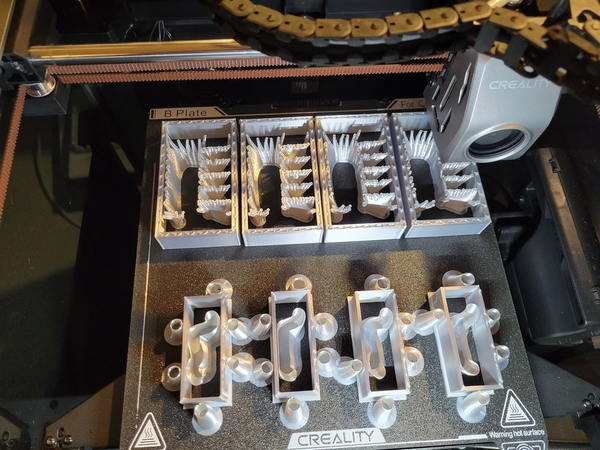
I thought this was an interesting look inside all the supports required to print these two piece trackside cabinets for the ultrasonic sensor boards. About 25% of the material I used for the printing is used for supports!


|
|
I thought this was an interesting look inside all the supports required to print these two piece trackside cabinets for the ultrasonic sensor boards. About 25% of the material I used for the printing is used for supports!


Replies sorted oldest to newest
John, it looks like you are well ahead of the learning curve. Seems I was just reading about your purchase of the printer. Those come out nice.
I purchased a scale sink for a building interior which isn”t that big. Seems there was as much throw away as product.
Well, this is Rod Stewart's design, I just did a few tweaks on it. I have the ultrasonic boards so I though I'd make some cabinets. I'm printing them with silver silk, it really looks like metal.
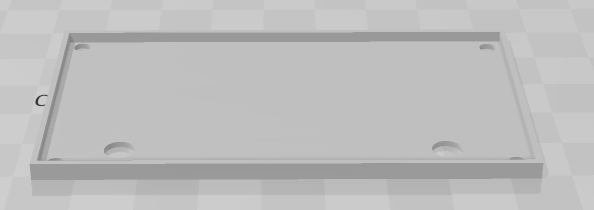
I'm creating a base to locate them now. You screw this down, set the PCB on it, and feed the wires through the two holes. That way the cabinet isn't going to wander around and you can lift it off to get to the innards.

Nice work John; they are looking good! ![]()
@Rod Stewart posted:Nice work John; they are looking good!
Thanks,
I decided that it would be handy to have a base under these so they have a place to be positioned. I attached the 3D file to this post. It has 3mm holes for mounting to the platform and larger holes for the wires at each end of the board.


That base looks good John. Just curious about the inside dimensions? If you are using your final R1.4 pcb design they should fit fine of course, being only 38 x 51 mm (1.5 x 2"). The boards I have used exclusively so far are my own layout; 76 x 43 mm. Just wondering if they will fit inside the raised perimeter of that base?
Rod
Very nice John.
@Rod Stewart posted:That base looks good John. Just curious about the inside dimensions? If you are using your final R1.4 pcb design they should fit fine of course, being only 38 x 51 mm (1.5 x 2"). The boards I have used exclusively so far are my own layout; 76 x 43 mm. Just wondering if they will fit inside the raised perimeter of that base?
The older boards may not fit, but I only have the later R1.4 boards here, so they'll work fine. I ordered a big batch of the R1.4 boards from JLCPCB, so I built for that form-factor.
The internal size inside the rim is 42mm x 77mm, so your boards wouldn't quite fit inside the rim.
It looks like if you flipped the bottom part over when you print the supports would not be needed.
@gunrunnerjohn will you share your tweaked base where the top set down in the little indention.
@Darrell posted:It looks like if you flipped the bottom part over when you print the supports would not be needed.
Nope, the depression in the top gets screwed up when I print it upside down.
@Shawn_Chronister posted:@gunrunnerjohn will you share your tweaked base where the top set down in the little indention.
Sure, here it is.
It was suggested that the base cabinet should really be concrete, so I printed a couple in gray, I think they may be a better match. Here's a contrast...
Not totally happy with the lines, but it was cheap filament that I don't think likes the speed I'm printing at, even though I slowed it down to half speed.


@gunrunnerjohn posted:It was suggested that the base cabinet should really be concrete, so I printed a couple in gray, I think they may be a better match. Here's a contrast...
Not totally happy with the lines, but it was cheap filament that I don't think likes the speed I'm printing at, even though I slowed it down to half speed.
I like the concrete look; mind you I may be kind of partial! And the lines look fine when you realize that concrete in the real world is rarely perfectly smooth, just saying.......
I think I figured out where the lines are coming from. The cheap gray filament I bought doesn't stick as well as the Creality Hyper-PLA, and it appears it was wandering around.
My first clue was this print... ![]()
![]()


OHMIGOD; something doesn't look right! ![]()
I couldn't quite figure how it happened until I saw it again as it was printing and it had come loose from the build plate. Then the penny dropped and I could see how it got looking like that. It was funny that it picked up printing almost normally after creating the bird's next, I'm amazed it did that!
You can try adjusting the plate temperature, or print with a brim to help adhesion.
For the Base... Rays Block Veneer - Project: 1019, could dress it up a little... throw a 4" concrete slab on the top.


@Darrell posted:You can try adjusting the plate temperature, or print with a brim to help adhesion.
I can't imagine a brim would help, the supports cover a broad base. If that ain't gonna' stick, I doubt a few more lines of filament would havechanged it. I never had this problem printing with the Creality Hyper-PLA, it's this cheap filament that is different. Live and learn, don't buy cheap filament. ![]()


That print definitely had enough surface area touching the build plate and should not have moved.
Until very recently FDM printers were printing anywhere from 50-150mm/s. John's printer can do 600mm/s (it can probably do 800mm/s). At half speed... 300mm/s it's 2-6 times faster than most FDM printers. Not all filament producers have formulated their filaments to handle these new printing speeds. If you get one of these new 'speedy' printers be aware that not all of the filaments on the market can meet these new printing standards.
Yep, it's back to the premium filaments for me! ![]()
I had a failed print just like that and my printer is old slow tech 100 max. Speed had nothing to do with it. At the recommended build plate temperature the print would stick too well and get damaged removing it. Dropping the temperature 5 degrees solved that issue but then the corners would warp up leading to lost of adhesion like John had. My part had even more surface area so that was not the issue. Using Cura I added brims to just the corners and that solved the problem completely. Every filament is different and not every solution works, but you can't say it won't until you try it. Beats tossing it in the trash and only spending big bucks when the cheaper stuff can be made to work.
I didn't toss it in the trash. I changed plates, applied the glue, and printed three of them with no problems.
Ah yes, different plates make a difference. I've never used glue yet, have a ceramic coated glass plate, my issue is that the prints stick too well! Getting the prints to stick is not hard to do, but getting them off can be a challenge sometimes! Glad you got it to work!
@Darrell posted:Ah yes, different plates make a difference. I've never used glue yet, have a ceramic coated glass plate, my issue is that the prints stick too well! Getting the prints to stick is not hard to do, but getting them off can be a challenge sometimes! Glad you got it to work!
I think the one print was a fluke of some kind, I use hairspray on the Creality smooth "A" plate, but normally no glue on the texture finish "B" plate.
The times I have issues getting them off the plates is if I use a brim, which is why I rarely use it unless it's truly necessary.
I'm printing a bunch of Jeep chassis now, I do them six at a shot. All the little pieces are separate, and I have no problem with them sticking, and once I remove them and cool the plate, I can pop them right off. The spring steel plate can be flexed, that helps the models free themselves from the plate, especially larger pieces. If I couldn't flex the plate to remove the models, I can see how they might be difficult to remove at times.


John
I think they make a flex plate.
It makes it a lot easier to remove the prints
@AlanRail posted:John
I think they make a flex plate.
It makes it a lot easier to remove the prints
I know they make flex plates, I have them. I was referring to the glass plate, flexing that like I can flex the spring steel ones doesn't seem likely. ![]()
on my Formlabs 3 resin printer the "glass" does flex ![]() so prints can't stick.
so prints can't stick.
on my Jupiter it doesn't so they can stick.
@AlanRail posted:on my Formlabs 3 resin printer the "glass" does flex
so prints can't stick.
on my Jupiter it doesn't so they can stick.
I'm guessing it doesn't flex quite as much as my spring steel build plates. OTOH, since the resin printer is a whole different process, I suspect having glass for the build plate is probably a good idea. It's submerged in the resin, right?
@Darrell posted:Ah yes, different plates make a difference. I've never used glue yet, have a ceramic coated glass plate, my issue is that the prints stick too well! Getting the prints to stick is not hard to do, but getting them off can be a challenge sometimes! Glad you got it to work!
You can use hair spray (Suave Max... super cheap) to assist in Adhesion and/or as a Release agent.
@Dennis-LaRock posted:You can use hair spray (Suave Max... super cheap) to assist in Adhesion and/or as a Release agent.
I can attest, thanks to your recommendation, the hair spray works just fine. The plate of small parts posted a few messages above with no brim stick just fine with the hairspray, and they also come off easily after the plate cools. I printed a single one of the chassis with a brim and it was a giant PITA to get it off! ![]()
This is all good to know! Might have to try the hairspray trick, and I found a PEI plate for my printer that I will probably end up ordering.
Those jeeps are going to make a nice load for a train for sure!
@Darrell posted:This is all good to know! Might have to try the hairspray trick, and I found a PEI plate for my printer that I will probably end up ordering.
Those jeeps are going to make a nice load for a train for sure!
#13 thru #18 are printing the final chassis parts now, and overnight I'll print the last six. Then I just have to assemble them all and they'll be ready for the road.
I'm looking for other stuff like WWII trucks, tanks, etc. to add to the Military train. I have 20 of the 14 3/4" flatcars to fill, and each flatcar will hold four of the Jeeps. Yes, I know that the real Jeep loads were much more dense, they had 20 or more on a flatcar stacked two high. They also had them shipped in crates, but I run a fantasy RR. ![]()
Access to this requires an OGR Forum Supporting Membership
