
I have a 1/2-ton Harbor Freight arbor press.  I've started rebuilding an old Lionel #736.  In some 2012 threads, there was discussion of modifying this item to press train wheels and bearings, but no discussion of how to modify the press, and the threads are now closed.  Can anyone give me some advice on this?

Original Post

Replies sorted oldest to newest

hah3, Is what you're saying that the base plate that came with the HF press is useless?  Seems to me also that something is wrong that the HF press  if to use it there must be a hole in the ram.  I've done many jobs on model trains and full-size boats & cars, but never did use an arbor press, so that's an area where I am a neophyte. 


Met you at York:  we were discussing wheel pullers.  The press on your web site looks to be excellent and top quality, but as I noted above, I don't expect to do another job requiring one.

Thanks for the offer, Harry, and I may eventually take you up on it.  But rebuilding this loco is one of a diminishing list of tasks that I physically can do, plus it offers the challenge of learning how to do something I've not tackled before.  In the 70+ years I've had trains, I have never completely torn down a loco, until now.

I want to again thank all those who offered me suggestions and advice, above.  I reassembled the loco with new bushings and axles, hooked up the side rods adequately quartered.  Rolls easily.  Have not put the motor in yet.


I had bought some bushings at York.  In the light of home, they didn't look just right, so I ordered some from The Train Tender.  They looked right and I installed them with the press.  The Train Tender also gave me some advice:  when pressing the bushings in, the inside diameter will shrink and they may have to be reamed out.  He was right.  I have a set of numbered drill bits and used them (and compressed air) to ream out the holes.  Axles are snug but turn easily.  TT's advice saved me from sweating.


The real test will come when I reinstall the PS2 system, which lets the loco run dead slow.  It was that capability that caused me to find there was binding.  When conventionally operating with a Pulmor, one doesn't/can't run dead slow.


I have the Harbor freight press.
I have not modified mine yet. But I have already pressed on several wheels, gears and bushings with nothing more than a few washers, some gauge blocks and a couple of sockets.  And removed wheels and gears with a modified eight dollar gear puller from AutoZone. Just cut the end off, drill a 16th inch hole and slip in a cut off shank from a 16th inch drill bit.
This is not rocket science. More like model T Ford. All you need is a mallet, a beater bar and a little common sense and good old Yankee ingenuity.
Check out YouTube. Guys modify these all the time for pressing rivets for various applications like making gun holsters and leatherwork. They don't require precise machining. Sometimes little play aids in self centering.
But any local machine shop can drill your press ram and the harbor freight base in about 20 minutes for probably under hundred bucks. Do you have a baseplate to be made for about 10 bucks. Piece of quarter inch steel plate or half inch aluminum plate.  Just drill one hole. If you want to get fancy by the adjustable anvil holder from the company that sells its own version with the cam. I have all the tools. When I modify mine, it won't be any better, just easier and faster to set up.
But if you're going to do this kind of work you're going to need a small drill press. You might as well learn to do it yourself. If you mess up on the first try you can always use the other end of the ram. If you had to even cut a little bit of the ram off. The baseplate is no-brainer just move it around until you get it to lineup. But the important thing is to have fun. Myself I try to or least attempt to learn a little bit of every aspect of this hobby
And I will admit that I've broken a few pieces and toasted a couple TMCC boards in the process. But I've learned a lot about electronics, airbrushing, modeling, scenery, and I've met a few nice people in the process.

RJR, a milling machine has an adjustable table that allows parts to be located very precisely under a drill or milling cutter, thus a hole can be drilled very accurately. A milling machine also has a much more stable table, allowing holes to be drilled straight in a part. Most home drill presses have tables that are not 100% perpendicular to the quill, thus holes are not drilled accurately when needed. For most purposes that is ok, but not for precision work. Of course, workarounds can be made, but for absolute precision, a mill is the way to drill.

Not knowing if the ram on the HF arbor press is hardened steel, carbide drills would be needed to drill it out.


Larry

Thanks for the description, Larry.  My drill press is a heavy industrial model, but as of right now, I have no need to modofy the press.


I have the loco back together, and it turned smoothly.  But with the motor on in rverse, I found it would jam.  Apparently, it is true that sintered wheels cannot be re-used; one moves on the axle.  So new wheels have been ordered.


quote:
 Apparently, it is true that sintered wheels cannot be re-used; one moves on the axle.  So new wheels have been ordered.


Generally sintered wheels can be reused without issue.

Once in a while a wheel will be loose so it slides in and out. If that is the case, and the wheel does not wiggle, a drop of gap filling CA or Loctite will fix the problem (after carefully cleaning away any grease, oil or dirt). Some folks will use a chisel to upset the splines a bit  on the axle as an alternative method.


I don't recall seeing a case where a sintered wheel would rotate on the axle. If I did, then I think I would have just tossed it, and put a new wheel on.

 
Hi John,
one of the reasons to buy the harbor freight one is because with my inside track membership and discount coupons I think I paid about $29 for the large press.
I also enjoy making things and I don't see drilling a couple holes in a piece of mild steel to be any different than modifying an engine or scratch building something.

But I do think that if someone does not know how to true up a drillpress table then a milling machine is not really going to be of any help. You still need the true up the part in your fixture whether it's a vise are you using hold down clamps. Just place the side of the ram next to the drillbit and tighten the vice and it doesn't matter if the table is off or not. I am a firm believer in allowing the avil plate to float in line it up with your eyeball.
All of these presses have slop in the holes. That's why they have a setscrew the holds the tool in the ram. Otherwise you'd never get it out. And the ram is also adjusted with a wear shim and a couple of screws. Like I said earlier, this is pretty primitive technology that has been used for a couple of centuries. In this case close enough is good enough. And probably better than the way some of the stuff was originally assembled.
Originally Posted by RJR:

  My drill press is a heavy industrial model, but as of right now, I have no need to modofy the press.

"I have no need to modofy the press."... Or even use the press! A drill press alone has work well enough for me in the past. If its only an occasional light press on an industrial model, the drill press wont be phased by the abuse. The "spin" of the chuck hasn't been an issue.  Still likely need to make plates, drive tips, etc., to do everything, but they wont suck up the room of a press you will only use once every ??? years. Id just return it  

My drill press is a heavy industrial model, but as of right now, I have no need to modofy the press.


This was unclear:  should have concluded "modify the arbor press."


I find it surprisingly difficult to install wheels square to the axles.  I suppose if I bought wheel cups, that would solve the problem, but they do seem pricey.


fffredd: I looked at the AutoZone web site and didn't see any $8 gear pullers.  All my pullers are too thick to slip under steam loco wheels.

Last edited by RJR

As I have commented before, the purchase of an arbor press and the associated tools is a big investment. I purchased my base outfit around thirty years ago and have been adding tools ever since.
Because I really enjoy repairing trains, it was probably the best investment into this hobby that I ever made.
With the proper tools and a little practice, one can effect repairs that look like they were done at the factory.
And the outfit does come in handy from time to time for household repairs.


quote:
All of these presses have slop in the holes. That's why they have a setscrew the holds the tool in the ram. Otherwise you'd never get it out. And the ram is also adjusted with a wear shim and a couple of screws.


Its true that the holes have to be large enough to allow the tools to slide in and out. But they don't have any perceptible wiggle on the Hobby Horse or Chicago Rivet (Lionel) presses.
The Hobby Horse and Chicago Rivet presses do not have any ram adjustments.

On these presses, I find it is important to place the rivet square on the anvil. Otherwise the rolled clinch will be deformed, and the rivet may bend.

Last edited by C W Burfle

You were clear enough on which press you might modify. Do you have other plans for this arbor press? If not paying someone might be the right choice for one engine. If you just want it "in case" and can afford it buy "the right one". Otherwise make due. For one wheel set I think your ind. drill press, used as an arbor press might work(depends on arms, & rack gearing). Wheel cups look like they might work with a Drill press too. Depends on the loco design, fit of the wheel to axel, etc.. Making custom base plates and jigs really isn't too hard if you have a good drill press. Buy good stock, drill, maybe tap a hole, maybe add a dowel. Heres how I did it, no cups, I would mount the axle bottomed out in the drill press chuck(add spacer?) (And mind how your chuck attaches, Are you bottoming on/damaging its screw head?) Mount till its stuck out about 1/2"max, hand tighten(no key), put one wheel flat on the trued table and drive the axle. The other wheel I kept flat using an old automobile engine valve mounted in the chuck while holding the motor & mounted wheel flat on the table. Ideally new wheels should be checked with a reamer before pressing, many are undersized. Proper wheel cups would make it all easier for sure. Quartering too. But the cost is much more than a HF arbor press, or one good used drivetrain.

Ive also pressed wheels in the jaws of a good vise I had. (I made "jaw" plates)  

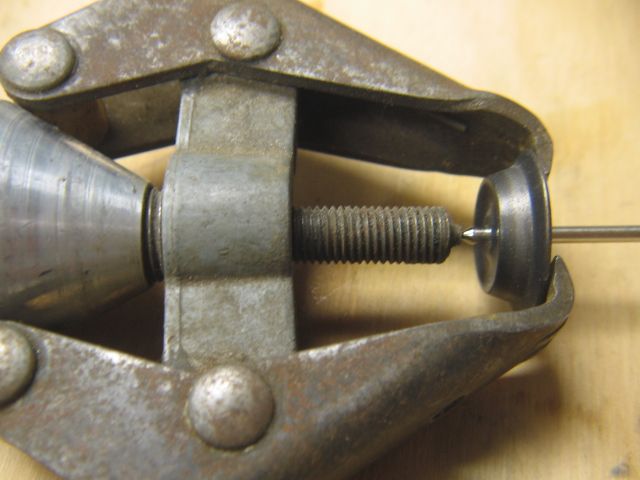
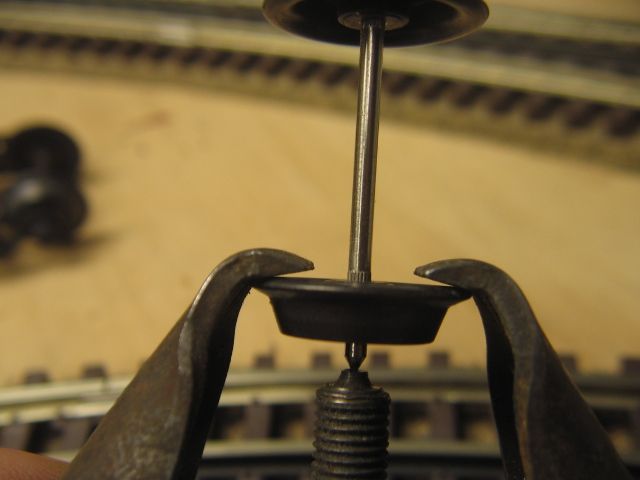
 Those HD/HF faucet pullers aren't wheel pullers. A proper wheel puller is a must on some motors. My old, but high quality(lionel?) wheel puller has even failed to grab a few edges prompting makeshift"custom" tapered wedge pullers. The best looking puller Ive seen looks like a small automotive 2-post steering wheel puller. The grabbing is done by adjustable posts, notched deeply at the tips forming half round "fingers", very flat, very thin, hardened. It was about $40, but forget who made it.  

 The best looking puller Ive seen looks like a small automotive 2-post steering wheel puller. The grabbing is done by adjustable posts, notched deeply at the tips forming half round "fingers", very flat, very thin, hardened. It was about $40, but forget who made it.  


Sounds like the one made by Frank Timko. He makes them in two sizes, one for 0 gauge and one for Standard Gauge. He doesn't maintain a stock, just makes them to order. Cost is around $40. I've got the Standard Gauge one on order, hoping to see it soon as I have to work on some locomotives for the toy train museum. 

For the most part, the tools are interchangeable. The only limitation would be the throat of the press. I use tools from TTRP (STX-360), Hobby Horse, Chicago Rivet, and Jeff Kane in my Hobby Horse press.


Which press is best? 


The Chicago Rivet and Hobby Horse presses work via a cam pressing down on the top of the ram.

The TTRP press uses a rack and pinion with the rack running along one edge of the ram. 


Is this inherently bad? - I don't know.

I do know that I've seen quite a few of the hand presses that came out of the Lionel factory when they liquidated. Most were the rack and pinion type.


Last edited by C W Burfle
Originally Posted by RJR:

My drill press is a heavy industrial model, but as of right now, I have no need to modofy the press.


This was unclear:  should have concluded "modify the arbor press."


I find it surprisingly difficult to install wheels square to the axles.  I suppose if I bought wheel cups, that would solve the problem, but they do seem pricey.


fffredd: I looked at the AutoZone web site and didn't see any $8 gear pullers.  All my pullers are too thick to slip under steam loco wheels.

I've used a Sears battery terminal puller.


By the way, Chicago Rivet still makes a press that is functionally the same as the Lionel ST-350 press. The only differences are the way the press mounts to a workbench, and the lack of a thumbscrew to keep a lower wheel cup from rotating.
As of 07/14 the Chicago Rivet model 915 press retailed for around $370 with a anvil holder and two adjusting nuts, tooling not included. They also have the complete set available, as well as the individual tools.

Hi Oldrob,
That is exactly what I have been recommending. Or do it yourself if you enjoy doing those things.

Not a gear puller but battery terminal puller.
Misspelled on Autozone site. They call it a pulley

OEM/Battery terminal pulley $6.99
Part Number: 25121

You need to remove the end cup, center punch the shaft and drill the end. Insert a piece of hardened drill rod. I also carefully ground the jaws so the end was flat and a little thinner. At the price they sell them for, you might want to make different ones for wheel specific applications. I have pulled Lionel, All-Nation, K-Line, and Weaver wheel sets from  powered trucks, plain and geared wheels.

Here are a few pictures of my modified arbor press.

Press was bought at Northern Supply.

Drilled out the center of the shaft the size of the tooling set and drilled and tapped the side of it and installed thumb screw to hold the tool.

Then made up a piece of stock and also drilled the hole into it.

I don't have the wheel cups so I can't say anything about pressing wheels but for any rivet jobs this set has served me will for over 8 years now!

DSC01363

DSC01364

DSC01365

DSC01366

Attachments

Images (4)
  • DSC01363
  • DSC01364
  • DSC01365
  • DSC01366
Last edited by Yardmaster
Nice set up. Using the KISS principle.
I can see using wheel cups if working on rare steam engines with fragile spoked wheels.
I have had good results using a drill press to align the axle and get it started.  Then I just use an aluminum standoff with an 1/8" hole under the wheel and finish the task using a flat spot on the ram.
If the axle is straight and the original hole in the wheel was bored correctly it will go in easily. If your axle is bent or the wheel is deformed or defective than not even an original Lionel setup is going to work.

Can anyone tell me the difference between the Hobby Horse HH-1004 Extension pin 2" and the HH-1062 wheel cup post? It looks like both provide more clearance to lift an engine up a bit, off the base to allow pressing wheels on, except the latter has a thumbscrew for quartering cups - is that the only difference?

Also where would the HH-1060 Small Diameter Splaying Clincher most likely be needed?

I guess I could call Hobby Horse in the morning, but I'm curious now

The HH-1004 extension pin attaches to the ram to bring it closer to the base so that wheels can be mounted.
The HH-1062 wheel cup post raises the lower cup for the same purpose.
They both have thumb screws.

The HH-1062 wheel cup post is a newer accessory.
I have both.
The results are much better with the wheel cup post.

The HH-1062 small diameter splaying clincher would be used to clinch the spring clip and bulb socket holder to a 675 boiler front.  It's used to get into tight spaces.

I have most of the customized tools that Hobby Horse made, as well as tools made by Train Tender and TTRP.
Often it's a matter of selecting a tool that fits into the space and does what you want. It doesn't really matter what the tool was originally designed to do.

C W Burfle posted:

The HH-1004 extension pin attaches to the ram to bring it closer to the base so that wheels can be mounted.
The HH-1062 wheel cup post raises the lower cup for the same purpose.
They both have thumb screws.

The HH-1062 wheel cup post is a newer accessory.
I have both.
The results are much better with the wheel cup post.

The HH-1062 small diameter splaying clincher would be used to clinch the spring clip and bulb socket holder to a 675 boiler front.  It's used to get into tight spaces.

I have most of the customized tools that Hobby Horse made, as well as tools made by Train Tender and TTRP.
Often it's a matter of selecting a tool that fits into the space and does what you want. It doesn't really matter what the tool was originally designed to do.

Thank you, CW, I can appreciate your last comment. To that end, I am asking my machinist friend to build a staking anvil that will sit under the 601-101, and 200 series ALCO motors to provide support to allow me to re-splay the top plate of the aluminum frame.

Staking Anvil Motor TruckThere will be a milled out area (bottom of tool in this view) to allow for a couple of small plastic protrusions on the underside of the motor. I have actually had good success using a very small Craftsman cold chisel to splay the remaining "tab" that protrudes thru the top plate. Since I don't grind off the tabs like others do when removing the top plate, I have metal left that I can re-splay, so to speak. And I do it lengthwise across the tab, instead of at right angles - that provides a more solid pinch on the remaining metal, and you don't have to punch down into the metal as far.

So it sounds like the point of having the HH-1004 and the HH-1062 is really to provide better clearance of body parts, .

I really wish the sellers would provide better photographs and/or descriptions of these tools - if you're going to spend some money, it's nice to know what you're getting.

So which of the tools have a 1/2" post?

Attachments

Images (1)
  • Staking Anvil Motor Truck

So it sounds like the point of having the HH-1004 and the HH-1062 is really to provide better clearance of body parts, .

Not really. They close down the throat. Without them, the cups would be too far apart.

I am asking my machinist friend to build a staking anvil that will sit under the 601-101, and 200 series ALCO motors to provide support to allow me to re-splay the top plate of the aluminum frame.

I use a rectangular block of steel that fits between the wheels. Works fine on postwar motors.


C W Burfle posted:

So it sounds like the point of having the HH-1004 and the HH-1062 is really to provide better clearance of body parts, .

Not really. They close down the throat. Without them, the cups would be too far apart.

My arbor press' ram goes all the way down flush with the base, so closing down the throat would never be an issue. But pressing a steamer wheel back on while the engine is still mounted in the body might require some extra clearance that the extensions would provide. Haven't done that yet, just surmising......

I am asking my machinist friend to build a staking anvil that will sit under the 601-101, and 200 series ALCO motors to provide support to allow me to re-splay the top plate of the aluminum frame.

I use a rectangular block of steel that fits between the wheels. Works fine on postwar motors.

Agreed on postwar - on my MPC truck, the little plastic protrusions I am dodging by milling out the block are pockets for the hinging of the collector arms.

Thanks! Good to hear from someone who has actually used his press - I'm getting there!!!


C W Burfle posted:

You may find it helpful to look over the sites of the guys that make presses that are set up for toy train repair.

Here is the Hobby Horse site

Here is the first TTRP page from the Henning's site.

And Here is Train tender's page on tools.


In order to find the old threads, I did a search on "arbor press" (without the quotes)

CW, I tried the link above for Hennings, doesn't work any more. I went to www.henningstrains.com and searched their site and can't find any reference to an arbor press or the tools. Do you know if they still carry any tools?

My arbor press' ram goes all the way down flush with the base, so closing down the throat would never be an issue. But pressing a steamer wheel back on while the engine is still mounted in the body might require some extra clearance that the extensions would provide. Haven't done that yet, just surmising......

The parts you asked about were specifically designed and made for the Hobby Horse press. How you might adapt them to another press is up to you.

It is true that you will have clearance problems with some items if you try to use a standard wheel cup sitting directly on a flat plate. Some items are Turbines, Berkshires, and Gang cars. There are probably others.

By the way, I don't think I followed your comments on disassembling the motor trucks.
I reduce the size of the tabs in order to get them out of the slots by cutting back the edges that protrude past due to the staking. That leaves plenty of material to re-stake them on re-assembly.
Even though I own a press and lots of press tools, I use a 1/4 inch chisel and a hammer to restake the tabs.

I cannot imagine being able to split the tabs lengthwise with the chisel.

C W Burfle posted:

My arbor press' ram goes all the way down flush with the base, so closing down the throat would never be an issue. But pressing a steamer wheel back on while the engine is still mounted in the body might require some extra clearance that the extensions would provide. Haven't done that yet, just surmising......

The parts you asked about were specifically designed and made for the Hobby Horse press. How you might adapt them to another press is up to you.

It is true that you will have clearance problems with some items if you try to use a standard wheel cup sitting directly on a flat plate. Some items are Turbines, Berkshires, and Gang cars. There are probably others.

By the way, I don't think I followed your comments on disassembling the motor trucks.
I reduce the size of the tabs in order to get them out of the slots by cutting back the edges that protrude past due to the staking. That leaves plenty of material to re-stake them on re-assembly.

That is EXACTLY the technique I use.

Even though I own a press and lots of press tools, I use a 1/4 inch chisel and a hammer to restake the tabs.

That is also EXACTLY the technique I have used, but I want to at least try the arbor press to see if it works better/smoother/easier...

I cannot imagine being able to split the tabs lengthwise with the chisel.

You have to be very careful, and hold your jaw at a 45 degree angle to the base plate .... Seriously, I don't actually split the tab per se, but it does squish both sides out just enough to form a very tight bond - I tried to pull it apart with my hands and couldn't do it.


That is also EXACTLY the technique I have used, but I want to at least try the arbor press to see if it works better/smoother/easier...

There are lots of times that I use a press tool outside of the press, striking the tool with a soft faced hammer. I have leather, rubber and brass hammers for exactly this purpose. It is important not to strike a tool with a regular hammer. Some say the tool can splinter. I don't know about that, but the tool can be distorted. Any distortion or burrs on the tool can cause it to get good and stuck in the ram.

I have a shelf full of different shaped blocks of metal that I use as anvils or as forming tools for shaping sheet metal. I also have a block that holds the press anvils, and allows me to use them outside the press.

C W Burfle posted:

By the way, if you are planning on using standard wheel cups, you should be aware that the shanks on lower wheel cups are 5/8 inch.
Old thread on press hole sizes

Yeah, I saw that - but THANKS! I actually bought the wheel cups before I had the arbor press, so I had those two tools as guides.

I'm trying to decide whether to use the rotary base that comes with the Harbor Freight press, or build a flat 4" x 5" x 3/4" block of metal with the appropriate holes. I'm thinking the block of metal would be more flexible for positioning. The rotary base that came with the press is typical HF quality, it's ALMOST perfectly flat, just one spot where there is the tiniest bit of rocking. I will have my machinist friend mill that flat. It appears to be perfectly perpendicular to the ram, so that's good news.

Who knew?  I always thought that Lionel hobbyists just ran the darn things, and only we 2-railers were in to pressing drive wheels, quartering, and keeping wheelsets from wobbling.  I actually machine my own drivers from cast iron, my axles from drill rod, and my frames on an end mill, and you guys are so far ahead of me that it is embarrassing.  I do need to get one of those HF arbor presses for $29.95.  I have four of their $50 cast iron drill presses.

For the hobbyist above who uses drill bits as reams - real reams are no longer prohibitively expensive.  I think you can get adjustable reams for around ten bucks each in small sizes.

I'm trying to decide whether to use the rotary base that comes with the Harbor Freight press, or build a flat 4" x 5" x 3/4" block of metal with the appropriate holes. I'm thinking the block of metal would be more flexible for positioning.

Every press that I have seen has the anvil holder in a fixed location. They cannot be moved around.
Alignment is very important.

I have seen presses that still had the table on the bottom, but they were locked in place.

Last edited by C W Burfle

For the hobbyist above who uses drill bits as reams - real reams are no longer prohibitively expensive.  I think you can get adjustable reams for around ten bucks each in small sizes.

Can you specify a source?

Who knew?  I always thought that Lionel hobbyists just ran the darn things, and only we 2-railers were in to pressing drive wheels, quartering, and keeping wheelsets from wobbling.  I actually machine my own drivers from cast iron, my axles from drill rod, and my frames on an end mill, and you guys are so far ahead of me that it is embarrassing.  I do need to get one of those HF arbor presses for $29.95.  I have four of their $50 cast iron drill presses.

I wish I had room for some machines. I don't.
Years ago I was given a really nice, commercial floor standing drill press. I couldn't fit it in, so it's on loan to one of my buddies. He's had it for years and years.

I have an inexpensive table top model drill press. It does what I need.
I also have a Minicraft high speed rotary tool mounted in a fairly precise drill press accessory.
Minicraft made some nice stuff. I picked up a bunch of it at a Black and Decker outlet store. I don't think it is made any longer.

Last edited by C W Burfle

Add Reply

Post

OGR Publishing, Inc., 1310 Eastside Centre Ct, Suite 6, Mountain Home, AR 72653
800-980-OGRR (6477)
www.ogaugerr.com

×
×
×
×
Link copied to your clipboard.
×
×