
Rather than hijack John's post and to allow for easier location of this thread in the future I moved it out of John's intro thread.

No parts were broken during this process if you're very careful at each step.

  1. Remove Truck screw and truck
  2. Remove the 4 panhead w/built-in washer small screws you see below.  thanks John for the photo!  This portion of the underframe is removable, but also held into place by some of the brake rigging, so don't just pull it off or things will break!!!


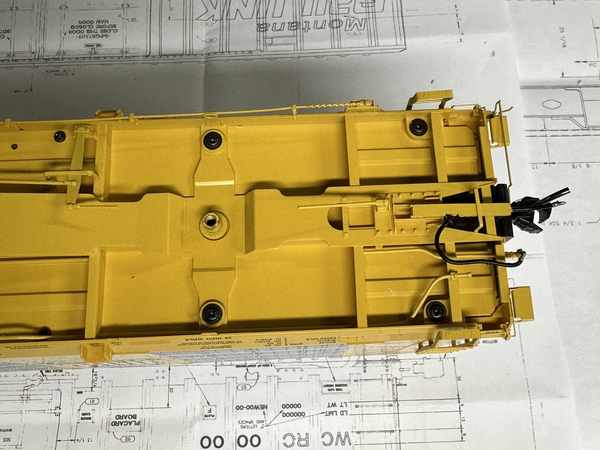
    Will look like this when finished


  3. Optional - The airline is attached as one piece and connects to the angle valve on the end of the car, it can be removed for easier access to the atlas and subsequent Kadee draft gear box, by slightly twisting the support bar which hold a larger pieces of plastic and the actual air line under the coupler.  This larger piece of plastic also is glued in place but can be removed and lifted out if careful.
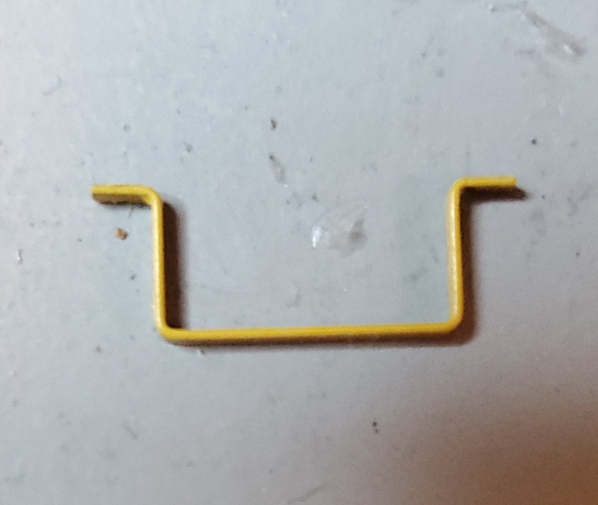
  4. The support bar is in the shape of a U with small lips on each side at the top which slide under gear box outer frames, removed in the photo above.  Removing this support bar provided more access to the coupler boxes.
  5. Now it's time to carefully pry up near the screwholes the portion of the underframe exposing the gearbox.  Be extremely careful NOT to pry to far or you will break something.  Should look similar to the photo below.  I've noted that you can gently rest the section on top of the stirrup steps without causing too much stress on the parts, but be careful and take it slow.


  6. You can now remove the atlas gearbox using the method of your choice, I use a small/thin flatblade screw at the rear of the atlas gearbox to pry back the slot on the gear box so that the tab in the lid is free .  You can also insert a flatblade screwdriver into one of the slots in the rear of the box and while lifting up and twisting slightly the lid and/or tab will come free exposing the coupler, spring and screws to remove the atlas gearbox.
  7. Remove the coupler, spring and 2 phillips screws and the rest of the atlas gear box will come out
  8. A standard Kadee box with the ears trimmed off fit in the opening.  Prep the hole close to the end of the car by using a 2-56 tap.  Be sure to have the tap perpendicular to the opening as much as possible.


  9. I choose to clip the trip pins from my Kadee couplers and make sense especially with this cars airhose right under the coupler.   I don't use magnets for uncoupling but if you do pay attention to the trip pin as it will likely be fouled by the airhose
  10. From here reassemble paying close attention to brake rigging and airline connections not to pinch anything to much as it will bend and ultimately break.  Should look like the photo below


  11. Decide if all this work is really worth it!!! or just clip the atlas trip pin and call it a day.  I may paint the kadee gearbox much like the atlas gearbox sticks out like a sore thumb.


Attachments

Images (8)
  • mceclip0
  • mceclip0
  • mceclip1
  • mceclip2
  • mceclip3
  • mceclip4
  • mceclip5
  • mceclip6
Last edited by Mike DeBerg
Original Post

Replies sorted oldest to newest

Are you talking the Atlas gearbox cover or something else?  If the atlas gearbox cover is what you're talking about, I've found over the years those two methods usually work if you're not in a hurry and just take it slow.   Also, something to think about is if you're not wanting to save the atlas gearbox you can take some smaller cutters and just clip the sides and you don't get the pop and zing that sometimes happens if you twist the screwdriver blade with too much force.

I often save those Atlas gearboxes in case others need them.

Last edited by Mike DeBerg

A 2nd BNSF car was completed using the same techniques as noted above.  I completed the car to this stage in less than 20 minutes taking my time so nothing was broken.  So while there is more to this conversion than just slapping on some kadees, it's not a huge time investment.

Seen here prior to giving the knuckles a little paint with one of Scale Models Division's EoT's,  If you haven't seen these EoT's yet, I would check them out as they slide right into the Kadee gearbox so for operations they are amazing and easy to add to the last car on your train and then remove.  Thanks Serge!   I may add an air line to this EoT to help complete the effect.

Check out the video here of the SMD O scale EoT - SMD-O-202

First pass at the added airline to the EoT.  Once the hose had fully set I will heat it up a bit and shape it a little better.

Attachments

Images (3)
  • mceclip0
  • mceclip0
  • mceclip1
Last edited by Mike DeBerg
@jgtrh62 posted:

Mike,

thanks for this conversion guide, this is really helpful! I'm also working on getting sets of Proto48 wheelsets made for these 28" wheels, and if I'm successful I'll share here as well for anyone who might be interested.

John

That's awesome John! 

Can't wait to see these with P48 wheelsets and working knuckle couplers (not the atlas ones)!   Are you using Kadee's, PC, Jimmy's or something else these days?

@Mike DeBerg posted:

That's awesome John! 

Can't wait to see these with P48 wheelsets and working knuckle couplers (not the atlas ones)!   Are you using Kadee's, PC, Jimmy's or something else these days?

Thanks Mike!

I haven’t decided yet, I currently use a hodgepodge of different couplers and they all work well together so I’ll likely just continue on doing so. I like the Kadee 74x series couplers a whole lot, and they operate great with the latest revision of Protocraft’s couplers, and most of my Atlas couplers. I have not seen a set of Jimmy’s couplers yet so I’ll try to find a set of those and check them out.

John

Last edited by jgtrh62
@rdunniii posted:

Have you contacted Jay Criswell @right-o-way?  

Not yet Richard but plan to ask Jay his thoughts on the matter. I experimented with a set of NWSL’s Proto48 28” shouldered wheelsets and can get them to work, barely, but the axle length is too short to pick up the spinning bearing caps, the shoulder diameter is also incorrect for this application. I am also fabricating a Proto48 bolster to use with the existing truck side frames. I am contacting NWSL to see if they can do a bulk order of axles based on specifications I provide, since they already make the 28” treads. I plan to ask Jay the same, so hopefully one of them will be able to accommodate the request.

John

@rdunniii posted:

Another person/source to try is Jerry Snow at Accurate O Scale.  He was at the National in Denver and had trucks to sell but...  he made some awesome trucks that are P48 but he never made any 70T trucks with 28" wheels either.  But now I can't find any contact information for him.

Great info, thanks! I have Jerry’s contact info here somewhere.

I have attempted to replace the 33" wheels on Protocraft 70T trucks but whoa boy are they a PITA to disassemble.  They actually have 9 springs in each side frame.  If I can get an axle out of one Jay can copy it with 28" wheels as Norm has said he will not make them.  I have another source that can also copy the Protocraft axle with 28" P48 wheels in Korea.  I think the minimum would be 500-1000 axles.

@jgtrh62 posted:

Thanks Mike!

I haven’t decided yet, I currently use a hodgepodge of different couplers and they all work well together so I’ll likely just continue on doing so. I like the Kadee 74x series couplers a whole lot, and they operate great with the latest revision of Protocraft’s couplers, and most of my Atlas couplers. I have not seen a set of Jimmy’s couplers yet so I’ll try to find a set of those and check them out.

John

John, there is also a new player in the coupler market and he would produce O Scale couplers if he gets enough interest.   You might have seen him on FB with all of his HO couplers and now he is doing S scale.  I gotta believe we would have as many orders if not more!

Eric Xing ! (16) Inventive Models | Facebook

Some examples of couplers he has produced in HO

Picture 1 of 14

Picture 3 of 14

Picture 5 of 14


Picture 7 of 14


Picture 9 of 14

Picture 12 of 14

Mike,   on your conversion, how come you chose to use one  2-56 screw , rather than 2   1-72 screws like the other Atlas cars?      Is it due to clearance issues (other parts in the way?).     Right now I am prepping the couplers, i.e.  painting couplers screws and boxes.    The install will be later as time is available.     Thank you in advance......

Last edited by R Nelson

@R Nelson It's simply a matter of my chosen standard size screw that I use.  So personal preference is the answer.

I feel it helps reduce the play in the gearbox by not using a smaller diameter screw, basically not allowing the head of the screw to sink below the gearbox cover, especially in the plastic gearbox (#817).   The other factor and maybe the real reason is I purchased a rather large supply of 2-56 screws from Micro Fasteners that I need to work through...

IIRC

1-72 - .073

2-56 - .086

Mike, okay, that sounds reasonable enough!    I was not sure if it was due to a clearance issue, i.e. not enough room for getting the rear screw in.   I have plenty of both sizes, so I might try the 1-72s, and can go to the 2-56s if they seem the better direction.   BTW, I painted my metal  Kadee boxes ( and screws )  using Rustoleum Tuscan Sun Yellow, which looks like a dead on match to the yellow used on the Atlas Multi Max cars.    One drawback was, the so called adjustable spray nozzle is a P.O.S.........  however,  spraying from a distance of a few feet, coverage was a series of light dustings that worked just fine.

Last edited by R Nelson

Well, I finished my conversions last week, using the longer 746 couplers with metal boxes on my cars.  Thanks to Mike D., the work went well, taking a while for the first car, but the rest were much quicker to get done!   Taking ones time is the key to not destroying things!   There were a few parts loose all ready right out the gate, so reattaching with a plastic weld type cement was easy.   It is too bad, Atlas did not use brass details, rather than the plastic that was used, as this may have been a better choice to prevent "pop offs"......    Either way, the cars came out great.    I was only able to use one 1-72 screw per end, as the second hole was in-accessible to get a screw into.   A micro drop of Walther's Goo helped solve this issue.   After the screw was cranked down, things will not move.   Now onto flat finish, and weathering the cars!

Last edited by R Nelson
@R Nelson posted:

Well, I finished my conversions last week, using the longer 746 couplers with metal boxes on my cars.  Thanks to Mike D., the work went well, taking a while for the first car, but the rest were much quicker to get done!   Taking ones time is the key to not destroying things!   There were a few parts loose all ready right out the gate, so reattaching with a plastic weld type cement was easy.   It is too bad, Atlas did not use brass details, rather than the plastic that was used, as this may have been a better choice to prevent "pop offs"......    Either way, the cars came out great.    I was only able to use one 1-782 screw per end, as the second hole was in-accessible to get a screw into.   A micro drop of Walther's Goo helped solve this issue.   After the screw was cranked down, things will not move.   Now onto flat finish, and weathering the cars!

Great to hear you were able to complete some conversations!  interested in seeing some photos !

Mike, I will once a get a chance.   Finished weathering them just a few days ago, and trying to get a whole lot of projects finished before the March Meet.   The Atlas cars are really nice models, and do look better with some light weathering.   The conversions went surprisingly  good, with the first one taking the longest to do, which would be expected.    Will try and get some pics before the March Meet.   Are you going to be there??    Looks like it'll be a good show this year.

Add Reply

Post

OGR Publishing, Inc., 1310 Eastside Centre Ct, Suite 6, Mountain Home, AR 72653
800-980-OGRR (6477)
www.ogaugerr.com

×
×
×
×
Link copied to your clipboard.
×
×