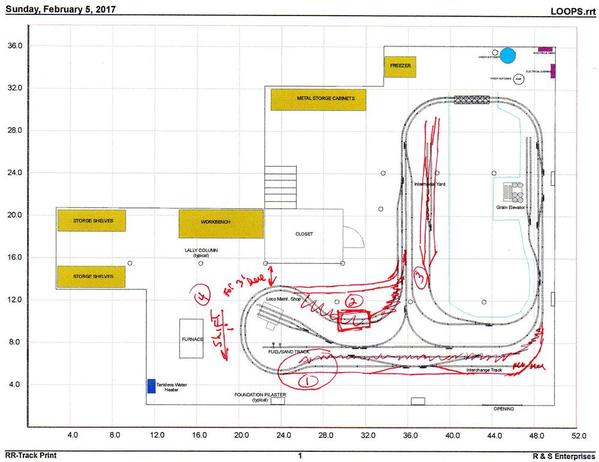
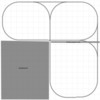
I have been working on a track plan that I want to build in my unfinished basement.  This will be my first layout after "collecting" a lot of locomotives and freight cars over the last 12 years.  The basement is dry and the wall are painted.  I decided not to finish the basement because I'm getting older and I can't do the things I use to be able to do.  Several past stays in the hospital and some surgeries made me realize I had better get going on a layout.

I am going to use Atlas sectional track with minimum curves of O-81 although I do have a couple of Atlas O-72 wyes in the plan.  I have most if not all of the track.  All turnouts are #5s.  My roster of locomotives are primarily MTH Proto 2 and Proto 3 with fixed pilots and scale wheels, although I plan to change the wheels to hi-rail.  There are a couple Atlas engines and one Lionel.  All the locomotives are modern diesels with the exception of one MTH Erie 0-8-8-0 Camelback Steamer.   I plan to install Kadee couplers on the rolling stock and the locomotives, with the exception of the Camelback.  I have two conceptual layouts, both are one level.  One layout has loops for running trains with some industries for operational considerations.  The other is more for operation and would limit the number of trains operating at one time.  Please take a look if you have time and I am open to your thoughts, critiques and suggestions.  My concern is access to and around the layout.  The operational one has greater access.  I plan to use Mianne benchwork for either layout.  The "LOOPS" layout would include a lift section for access to the center area.  I have attached PDF copies from RRT V5 and I'll try attaching the files from RRT V5 for the two proposed layouts.  Thanks you for any comments and assistance.

Attachments

Original Post

Replies sorted oldest to newest

I am liking operational. Less Mianne , less track, faster build. Running command,  multiple trains can be running simultaneously. just need a good dispatcher

the wye can double as a reverse direction.

really, really close to being a walkaround, which I think you would enjoy. Handling the deck, installing it and shaping the deck will be the toughest job.

You can pre-wire a lot of it before decking.

Carl has some great ideas and is a forum layout guru.

My preference would be for the Loops with the lift out bridge. 

In my humble opinion a 2-3 foot reach is a lot easier for working on a model railroad then reaching under or across to center of a giant peninsula.

In the Loops plan, I like how you can walk into the layout and possibly around the outside of the layout too.

Seacoast posted:

Carl has some great ideas and is a forum layout guru.

My preference would be for the Loops with the lift out bridge. 

In my humble opinion a 2-3 foot reach is a lot easier for working on a model railroad then reaching under or across to center of a giant peninsula.

In the Loops plan, I like how you can walk into the layout and possibly around the outside of the layout too.

A quick trip to the terrain tab reveals only one reach area -the loco shop - which could be remedied with a slight track modification - and an organic table deck.

Attachments

Carl, Laugh out Loud!

WJP either design will work and you did nice work on both designs.

I'm 52 and I'm no longer into long reaches or crawling or ducking under a layout to access wiring or above deck scenic issues.

Another option: How about a complete around the walls design ? Just thinking out loud.

  I did not finish my basement because I knew the walls would eventually have a backdrop  but did add a dropped ceiling just have  a cleaner look.  I also did not want a duck under or lift-out for the everyday entrance to the layout. Mostly for older guests. There are 2 main lines that run parallel and a yard line that is basically 3 loops. The yards, round house and most of the sidings are off these loops. Hope this gives you some ideas.

Steve C.

track layout revisionIMG_0778

Attachments

Images (2)
  • track layout revision
  • IMG_0778

WJP - not that you'll want to hear this, but I feel it needs to be said:

I'm a young guy, and had endless exuberant energy from the day I started on the 33 x 18' layout in my basement.  I worked in construction in college so know how to work quickly, and tirelessly for hours.  So, my double main line folded dogbone "L" layout, with the 14' yard and 40' incline up to the "mountain" main line design seemed like a cake walk.  I was quite certain I would have it done within a year or maybe a year and one-half.  Heck, I had built a temporary 8 x 16 double loop layout with Fastrack and scratch built very detailed tunnels, mountains and waterfalls in 4 weeks! 

Four years later, I can tell you that, even though this is a nighttime and weekend project for me, it is a daunting task to build something that big alone - and especially if it's your first time, as it was for me.  We have all the benchwork done, the track laid, the star-pattern wire run and soldered, and some very nice scenery.  But the time and effort was so many times more than I could have ever imagined.  And, to complete it would take an easy 2-3 more years at least. 

My advice - start with a digestible sized layout that you know you can complete in under a year.  Something simple and small - but something that you can expand upon.  Even the monstrously large Gorre and Daphetid fabled layout started as a simple and very small layout that grew and grew - and its owner had nothing but time and money from the word "go."  

I do feel you will be happier, and healthier, if you follow this path.  

Peter

Last edited by PJB

Thanks everyone for your suggestions.

George, There are issues with an around the wall design including access to utilities and a large opening to another section of the basement (bottom right of the basement) where I keep my treasures (train stuff).

Steve, your layout is awesome.

I'm going to take another look at my two layout designs and possibly make some tweaks.

WJP, Ok sounds good or you can do a combination of a peninsula design and around the walls if it's an access door my experience is to put in a lift out bridge or other. Stevens layout does a good job of combing both on a huge scale. Pete said it well .. start small or medium and expand from there.

PJB posted:

WJP - not that you'll want to hear this, but I feel it needs to be said:

I'm a young guy, and had endless exuberant energy from the day I started on the 33 x 18' layout in my basement.  I worked in construction in college so know how to work quickly, and tirelessly for hours.  So, my double main line folded dogbone "L" layout, with the 14' yard and 40' incline up to the "mountain" main line design seemed like a cake walk.  I was quite certain I would have it done within a year or maybe a year and one-half.  Heck, I had built a temporary 8 x 16 double loop layout with Fastrack and scratch built very detailed tunnels, mountains and waterfalls in 4 weeks! 

Four years later, I can tell you that, even though this is a nighttime and weekend project for me, it is a daunting task to build something that big alone - and especially if it's your first time, as it was for me.  We have all the benchwork done, the track laid, the star-pattern wire run and soldered, and some very nice scenery.  But the time and effort was so many times more than I could have ever imagined.  And, to complete it would take an easy 2-3 more years at least. 

My advice - start with a digestible sized layout that you know you can complete in under a year.  Something simple and small - but something that you can expand upon.  Even the monstrously large Gorre and Daphetid fabled layout started as a simple and very small layout that grew and grew - and its owner had nothing but time and money from the word "go."  

I do feel you will be happier, and healthier, if you follow this path.  

Peter

Peter I wouldn't make you type that over but you can say that AGAIN.I have a habit of creating things on an extreme grand scale must be the biggest and best ever all at once.Big MISTAKE keep it manageable like you said ….design it so you can expand latter.Besides if you are like me…once its done you will get bored and want to do more anyway.Good advice you have given.Nick

Dear Sir,

Having built a few layouts.. to the one I now have in my own barn.. I would consider these valuable lessons.

-No duck unders..  Having those suck. Especially for those with back, leg, hip issues.. if you feel you need a duck under.. then built the walkway area with a lift out bridge or something similar. because ducking under sucks! 

-reach.. only make the benchwork as far as you can reach.. if it's outta reach, that is where your issues will be. If you can get to the tables from both sides, then your reach to center from each side is your width.

-height.. I would have made mine Chest height.. It isn't.. and I contemplate raising the layout every day.

-electrical... do that before scenery.. at least the bus wires.. get them run under the layout. 

-height of scenery works better to the eye then depth of scenery.. 

-make all benchwork modular. So if you don't like something or want a change, taking out the old and inserting a new piece is easier...  Plus you can work on the new piece while the old one is still in place and you can still run trains. 

-For O-Scale, use 3/4" plywood sub road bed.. For the areas where sometimes where risers get a little wide, the plywood being a little thicker, won't sag. because 1/2" will. Don't use flake board.. that stuff sucks for model RR. If you get flake board and use water against it for scenery, the flake board seems to expand and never contract. 

-Wide isles.. A must, you can do it with the room you have.. 30x50.. Trust me, it is worth the effort to have these.. I have two spots where the isles gets close, but they ope right up to wide ares.. I also didn't make those areas points of interests.. make your points of interests where the isles are wide. so people can gather easier without hitting benchwork.. 

 -If your thinking of having a turn table.. One where the tracks are coming out all around it, that becomes an area of interest and people gather around it.. I did mine where the mainline went behind the house and people can see into the roundhouse.. and also get right up to the table to see the loco's turn.. This turntable idea came to me this past spring and I changed the whole yard and turn table area into another part of the layout in another area of the room to accommodate this. It works out great now.. 

-Also, with your yard, well, before i forget, have a staging yard.. one hidden under mountains or there of.. then your yard itself won't be cramped with cars as mine was till I did this.. (I am also ridding cars of later dates because my model RR is set around 1977. So this purge is setting up nicely as I now have room for the cars that fit the timeline.) Also, keep switches within easy arm length.. repair is easer etc..  I did redesign the yard as stated above, and am going to again because of the railcar purge etc.. Plus, the yard is smaller and more manageable. well, the whole layout is..

Also, keep this in mind when you design.. 1) model the places as scenes you love as a kid, adult.. just don't put track down for the sake of putting track down.. you will get bored with it. I learned this on the first layout here in the barn.. I thought I had all the room and when the layout was up.. it sucked.. so a friend came over and told me it sucked and gave me this advice.. number 1 again, model scene you love, figure out the top five scenes you love and design them into the layout, then the next five and so one. you find that the layout fills out nicely and you will want to work on it all the time.. Mine is (3) years old now and it is awesome to me! I;m not biased or anything! HA! But I can't wait to work on it when i have the time.. Or add to it or whatever.. I am always designing for the better.. I love running it, showing it, etc.. with these changes too, I have to write into this mag to show my updates as the model RR was published in O-Gauge at about two year ago.. 

Anyhow, designing and building is fun! Good luck!   I hope this points help?

Dan

A layout is a very personal thing, and while its good to have expert opinion, in the end, you need to do what is right for you.

I will admit, that my ideas do not fall into the norm (as I blow up the 3' access rule) , but if this was my layout going into my basement, I would:

1) take out the curve under the fuel/sand track, and run the interchange inside the mainline rather than outside the mainline.

2) Take out the sweeping curves below the closet.  In my mind, long scale cars look better when then they don't traverse as many "s" curves, especially passenger cars.

3) Rather than have one short, two track, 6' intermodal yard, consider a 4-way (or multiple 2-way) switches as far to the lower side of the layout as possible. This would allow having 4, 12'+ tracks for the yard.

4) Consider shifting the whole layout 1' towards the bottom of the layout.  I would personally rather have to squeeze into the back of the layout instead of trying to squeeze past the closet to get to the workbench/storage shelves.

img005

Just my opinion.

Jim

Attachments

Images (1)
  • img005
Last edited by jd-train

A modest start to a layout is good (and affordable) advice; then expand it later with add-on sections semi-planned in advance. For future expansion, consider adding "level two" in the vertical dimension with an elevated line above "level one"; no add'l floor space required.

A "sub-platform level" subway line could be added later, but keep the buss and feeder wiring for "level one" affixed to the underside of that level to avoid snags beneath it.  This practical step also encourages dressed up wiring.

For another expansion -- add a wall-mounted highline near the ceiling with supporting wall brackets. This would be a great way to accommodate wide radius track (O72 or larger) for trains that require large curvatures. A layout near the ceiling need not be limited by plywood platform sizes, so an around-the-wall design could be spectacular and prompt a "Gee Whiz" reaction from visiting guests and grandkids.  Tip: add an edge barrier to "catch" a speeding loco before it plunges to the floor below.

Example:  Here's a PDF drawing of my high line planned for an L-shaped room - attached. The high Line is basically a wall-mounted shelf installed about 7 inches down from the ceiling to accommodate a RI Rocket passenger train with a backdrop along the perimeter walls painted by my daughter, an artist.

Mike Mottler
(ritrainguy)

Attachments

Images (1)
  • Wall-mount High Line at Mottler Station: High Line with Lionel FasTrack, O72 minimum radius & switches

Add Reply

Post
The Track Planning and Layout Design Forum is sponsored by

AN OGR FORUM CHARTER SPONSOR

OGR Publishing, Inc., 1310 Eastside Centre Ct, Suite 6, Mountain Home, AR 72653
800-980-OGRR (6477)
www.ogaugerr.com

×
×
×
×
Link copied to your clipboard.
×
×