A Question!!!!!!

After a month or so of making arrangements with my painter, AND moving EVERYTHING out of the basement, I am having the ceiling painted flat black Monday morning! Can't wait for it to be done so I can get back to work on the new layout!

My question is this:  For those who have painted the ceiling, did you paint the exposed fiberglass insulation around the sill plate?  Is the insulation paper-backed? Is that the side that got painted or was it the exposed side?  I have to install some insulation above an interior wall that opens to the other side of the basement.  Any help would be appreciated!

My painter has not gotten back to me and I have to put up insulation today or tomorrow.

Thanks!

I did not have any exposed fiberglass insulation when I painted my ceiling. However, I think exposed fiberglass, especially the pink side, would not be good. I'd expect it to act like a sponge. If you have the paper side facing into the room, you are probably okay. Another option would be to install blocks of rigid foam (think pink or blue) and seal it in place with expanding spray foam from a can. Depending on how deep the cavity is, you may need more that 1 layer. Or, put the fiber glass in, and cap it with the rigid foam. But don't compress the fiberglass too much. You need the air space for it to work properly.

Chris

LVHR

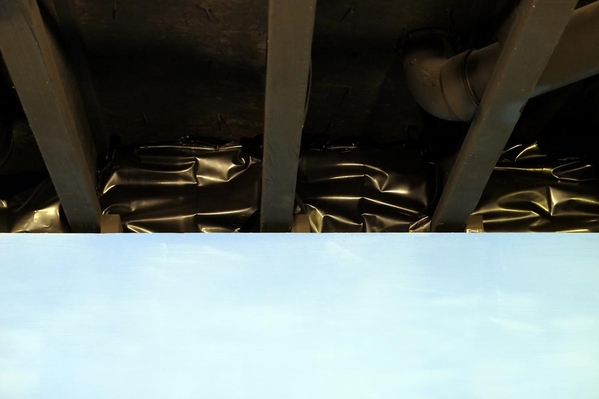
Dennis, I have exactly the same situation as you.  There are fiberglass insulation blankets above the sill plates around the basement walls.  I got some black plastic sheeting from Home Depot and installed it in front of the fiberglass.  In some places I was able to stuff it in around the insulation without any fastening and in some other places I needed a few staples from a staple gun to hold it.

Here's a photo showing my black ceiling with black exposed beams and the plastic sheeting over the fiberglass above the blue-painted wallboard.

plastic1

Here's a closer view of the black plastic.

plastic2

Attachments

Images (2)
  • plastic1
  • plastic2

A blank canvas!!!  It would appear as though I am ready for paint!  Pretty close - just a little electric to finish up.  Oh,... and the rim joist insulation !  The last couple of picture shows what I am up against.  I am thinking the rigid foam for the opening above the interior wall.  Not sure on the exterior wall.

Pictures came out a little dark.  It is much brighter than it appears.  I will have track lighting down the center so the LED's can be turned off, if needed.

IMG_3021IMG_3023IMG_3024IMG_3026IMG_3027


There is stuff piled EVERYWHERE! I guess I should count my blessings

IMG_3032IMG_3033IMG_3035IMG_3037

Attachments

Images (9)
  • IMG_3021
  • IMG_3023
  • IMG_3024
  • IMG_3026
  • IMG_3027
  • IMG_3032
  • IMG_3033
  • IMG_3035
  • IMG_3037

I have not even looked to see if I have insulation like that in my basement but I will check. I bought the stuff to convert my copper drain pipes to plastic. One leaks and the rest are probably rough on the inside since they're original from 1962.

I will look at the primer option. I just figured nobody would touch the ceiling so I might get away with paint alone.

This is the least fun I've had so far on the layout! But I know that the time to do this is now; not when the layout is up and models and whatnot installed. It'll be worth it!

Yes, this is an important decision, is there a way you could post a few pictures of your train room, floor, walls, ceiling, door ways, light fixtures, wall switches, and most important, the actual size of the train layout area. This will help.  Something else, is your train room in the garage in CDC01D9F-5148-4062-B9A3-7D867429663298D8F73D-0FA0-4D8A-8387-CB097B14938EDF3F1060-1F98-4E51-96CB-2BB6567B24C388038EB8-957E-4B1D-AAE9-13139BDEA6435A788461-0B22-4AB9-8E5B-A7A9A6A42E236B701D71-7C3E-41D4-99AB-58BC89BE587257D591F3-E8C1-4E7C-973A-7D0C28573DF4basement, or bonus room, Where?
Now, if you decide to paint the ceiling Black, I suggest satin sheen, and black color track lighting. Finished basement room.
My ceiling is 8’1 inch high, with white grid/white 2 by 4 panels, white track lighting all around and over the layout. Also, there’s a 60 amp breaker electric box designated only to the layout.
Bob Bartezek’s layout, a fabulously designed layout, has a black ceiling, black track lighting, the lighting is focused on the layout bringing your eyes directly to the area your seeing. When you go down the stairway into his World of Trains, you see a large trestle that’s meticulously made and to the right a 34 inch Millhouse Tutntable with many beautiful steamers ready for duty... A must see layout.... Awesome...

Good luck and get to work. Happy Railroading Everyone

Attachments

Images (7)
  • CDC01D9F-5148-4062-B9A3-7D8674296632
  • 98D8F73D-0FA0-4D8A-8387-CB097B14938E
  • DF3F1060-1F98-4E51-96CB-2BB6567B24C3
  • 88038EB8-957E-4B1D-AAE9-13139BDEA643
  • 5A788461-0B22-4AB9-8E5B-A7A9A6A42E23
  • 6B701D71-7C3E-41D4-99AB-58BC89BE5872
  • 57D591F3-E8C1-4E7C-973A-7D0C28573DF4

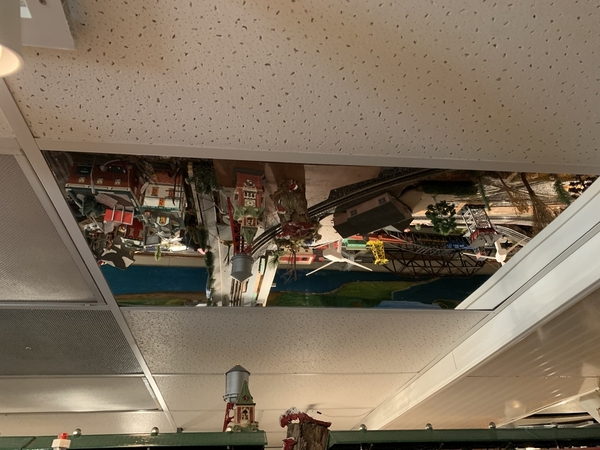
This my attic layout....1993-2003. I took a different approach......

My layout went against the knee wall and the pitch of the roof melded with the layout.....so, I used a pale blue that I just continued on the ceiling. It seemed to work for me.

I definitely would do the black in a basement.....

B2CDA84A-DF8E-48C7-9F28-C38FFFCACC19FCAC92F3-A230-4BED-BC6C-4D172BBF6F9ECEB95E5A-3450-468C-82DF-C606B215F99EThis

E3FA2134-68F0-4094-99F6-D8AFE28EE9EA20D6A1FF-B828-4B67-92A4-A77D4E97EB01A99D0554-650A-47D0-B7DB-270C3BDE277F2B2BA375-1854-404F-9C27-DE9E1B7335D7C66029DC-D35E-4FC9-BD7A-D87138BF2ADFF32FE620-C331-46E2-87E5-98098E8D89693F608381-55CB-4F06-B6AE-FBE1A120D98E

These pics were taken about 1999-2001....

Peter

Attachments

Images (10)
  • E3FA2134-68F0-4094-99F6-D8AFE28EE9EA
  • 20D6A1FF-B828-4B67-92A4-A77D4E97EB01
  • A99D0554-650A-47D0-B7DB-270C3BDE277F
  • 2B2BA375-1854-404F-9C27-DE9E1B7335D7
  • C66029DC-D35E-4FC9-BD7A-D87138BF2ADF
  • F32FE620-C331-46E2-87E5-98098E8D8969
  • 3F608381-55CB-4F06-B6AE-FBE1A120D98E
  • B2CDA84A-DF8E-48C7-9F28-C38FFFCACC19
  • FCAC92F3-A230-4BED-BC6C-4D172BBF6F9E
  • CEB95E5A-3450-468C-82DF-C606B215F99E
Last edited by Putnam Division

Here's my solution to the fiberglass insulation - IT"S ALL GONE!  I spent the day Sunday (after church, of course!) pulling down the fiberglass bats and replacing with 1.5" rigid foam.  It worked well to plug the openings above the interior wall and it cleaned up the look of the rim joists.  A little caulk around the edges and I think we are good to go.  Waiting for the painter!

Stay tuned ...

Rim Joist Insulation 1Rim Joist Insulation 3Rim Joist Insulation 5Rim Joist Insulation 8

Attachments

Images (4)
  • Rim Joist Insulation 1
  • Rim Joist Insulation 3
  • Rim Joist Insulation 5
  • Rim Joist Insulation 8

Yes, it will need a second coat, but I believe my painter and his crew will brush it this time.  He used his airless sprayer straight out of the 5 gallon bucket.

He's back tomorrow to finish the ceiling and paint the walls.  I have much experience with painting in our apartments, but I simply DO NOT LIKE TO PAINT !

Ceiling 2Ceiling 4

Attachments

Images (2)
  • Ceiling 2
  • Ceiling 4
Last edited by dennish

Funny I happened on this thread. I am a retired commercial electrician and have worked on many restaurants,gymnasiums, meeting rooms, large classrooms, whatever. I have seen alot of these ceilings being painted flat black. It was kind of dissapointing after taking the time to run racks of conduit perfectly aligned with the building lines and being proud of what I had done to see a painter to follow up with flat black paint. The paint really does make things sort of dissapear. Neat electrical conduits are now hard to see. I will admit in the end that these flat black open ceilings really do look nice. Never really considered it in my basement.

However, last week my brother told me his daughter wanted her open joist basement ceiling painted flat black. So we went on a mission. He bought a new Graco airless sprayer and 5 gal of Sherwin Williams pro mar 200. Never used an airless sprayer before but it was very easy and it turned out fabulous. Not much mess at all. I am now convinced that I will be doing my open joist basement as well before I start my layout.

Add Reply

Post

OGR Publishing, Inc., 1310 Eastside Centre Ct, Suite 6, Mountain Home, AR 72653
800-980-OGRR (6477)
www.ogaugerr.com

×
×
×
×
Link copied to your clipboard.
×
×