I will be handlaying track and wonder if anyone has used code 148 (or, better yet, Protocraft's code 138) to use with regular Lionel (&etc) wheels, looking for your first-hand experience.
Thx-
Mike


|
|
I will be handlaying track and wonder if anyone has used code 148 (or, better yet, Protocraft's code 138) to use with regular Lionel (&etc) wheels, looking for your first-hand experience.
Thx-
Mike
Replies sorted oldest to newest
Tinplate wheels will work on code 148 rail without the flanges hitting the spikes.

For more info take a look at the Nortwest Trunk Lines.
Thanks guys. I just bought some code 148, so I guess I've commited to this project. I have 2R gear (my primary focus) but some postwar and MPC-era Lionel; I cannot afford the time, effort, or space to do two setups. I've decided Nickel Silver rail is necessary, as much of this is in a basement space with too much moisture, and I hope to experiment with outdoor trackage as well. This will be set up for continuous running so I will not have to worry about turnouts &etc. I will use conventional DC (later Radio Control/battery) for the 2R, but I need to decide what newer 3R locomotives can be run on straight DC and therefore be be suitable for straight Radio Control. I am thinking Williams GP-9 or FAs?
For now I'm using the holes in the Atlas track for the nails because I'm working with mostly straight track. Curved center rails may have greater lateral force applied to it and require more nails. This is kind of a learn-as-you-go thing. You can always spike the center rail to the Atlas ties too, but be prepared to pre-drill the holes on each side of the rail.
My original intent was to go 2 rail but I got discouraged with the limited availability of 2 rail engines (particularly steam engines) and didn't want to become a machinist or send my stuff out to a machinist for alteration. I can live with the center rail but the height of the Atlas 3 rail track was a no-go for me. I spent alot of years as a serious prototype modeler in HO scale and I no longer care to listen to all the arguments between what's right and what's not, but I just cannot stand the height of that rail! ![]()
Hopefully I'll put the "juice" to my experiment this weekend. I'm sure that the flex track bits will work and I'm hoping my clearances in the switch are wide enough to avoid any "welding." I'll let you know how it goes.
Joe
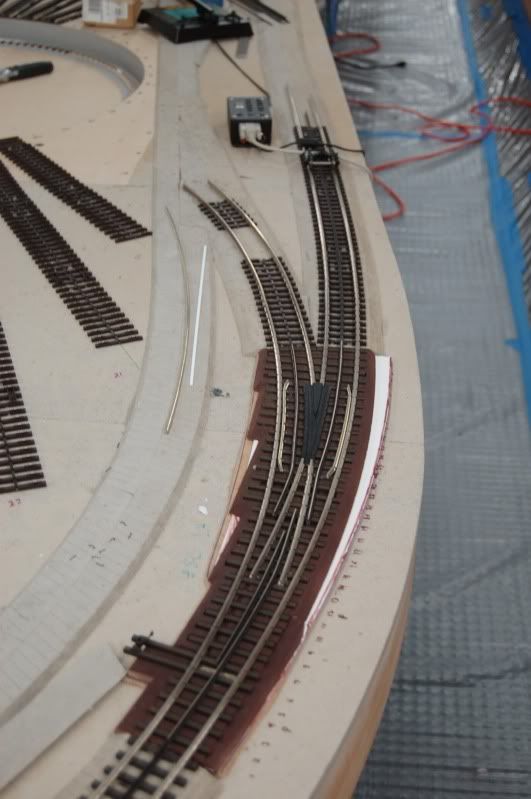
I have now worked with the idea a bit and think it is a great idea and improvement for those wanting a better rail profile. My experimental section in the front goes well with the 2 rail further back. The Code 100 third rail works well with the Code 148 rail. This is an experimental section and the third rail is solid. I may leave it intact. I placed a piece of Atlas 3 rail track in the picture for comparison. I think I have figured out how to achieve a more consistent product, but want to try one other method. I won't go into my technique until I feel it is suitable for prime time.
I guess the other question is what to do with the switches. I have an idea as to what I might do, short of hand laying my own switches.
Also, for now I only care about using this where my 2 and 3 rail track runs next to each other.
I also completed my experiments with a code 100 center rail attached to Atlas code 148 flex track and a scratch-built switch using code 148 rail for the center rail. I too found the process to be completely workable for those who are willing to do a little more work for a more scale-appearing track without the need to modify all your locomotives and rolling stock.
My scratch-built switch worked great with tin-plate wheels but I did have problems with scale wheels picking the point of the frog when taking the diverging leg of the switch. It didn't happen all the time but it happened enough that I certainly couldn't call the track-work "bulletproof." My flangeways around the frog may be a little too wide and when the wheel dips into the gap before the frog it wants to climb the point (if that makes any sense). As far as electrical issues, I only had to change the location of one set of gaps in the closure rails (nearest the points). I could creep a 4-axle diesel through the switch at well-below switching speed with no problems.
I like your idea of incorporating 3 rail in with your 2 rail layout. Most of my engines are 2 rail capable and the majority of my layout will be two rail. But, I do have some 3 rail steam engines that I like to run around once in awhile without the need of a completely separate layout. Wiring may be a small hassle but once it's done it will only involve flipping a toggle switch. The easiest thing to do would be to keep the 3 rail loop completely isolated from the 2 rail portion.
I'm really interested in how your technique for a consistent product turns out. My stuff isn't ready for prime time either and any time someone has a better idea I'm ready to listen!
Joe
My scratch-built switch worked great with tin-plate wheels but I did have problems with scale wheels picking the point of the frog when taking the diverging leg of the switch. It didn't happen all the time but it happened enough that I certainly couldn't call the track-work "bulletproof." My flangeways around the frog may be a little too wide and when the wheel dips into the gap before the frog it wants to climb the point (if that makes any sense).
Joe
Your problem could be caused by the frog. But I would also look at the guard rail opposite the frog. If the guard rail is too far away from the stock rail it could fail to guide the wheel set away from the frog.
Ted,
I think you're correct about the guard rail away from the frog. I'm using the Fast Tracks jig from Handlaidtrack.com to assemble the switches and because of the greater clearance requirements for tin plate wheels there are parts of the switch that have to be assembled out of the jig. I read somewhere that the clearance needed to be 1/8 of an inch for tin plate wheels. My guard rail opposite the frog may be slightly wider, but not by much. How close can I pull the guard rails to the stock rail for better operation with 2 rail equipment and still get reliable clearances for tin plate wheels? And would this hold true for the wing rails around the frog?
Thanks,
Joe
Joe:
Can you post and/or send me some photos? Thanks.
Also, the guard rail can be a bit closer than 1/8 depending on the width of the frog which will allow the 3-rail wheel to pass and will pull the scale wheel close enough to clear the frog. We were tinkering around with Atlas #7.5 2-rail and 3-rail turnouts several years ago for possible dual-gauge modifications and were testing variations on the guard rails.
Matt,
I'll try and post a few pictures but it probably won't be for a few days.
Joe
I read somewhere that the clearance needed to be 1/8 of an inch for tin plate wheels. My guard rail opposite the frog may be slightly wider, but not by much. How close can I pull the guard rails to the stock rail for better operation with 2 rail equipment and still get reliable clearances for tin plate wheels?
Joe
NMRA Standard 3.3 calls for flangeways 0.154 inches wide. The NMRA standards for hi-rail track work are junk, do not use them!
I do not have a switch and a micrometer available so I can't give you a dimension at the moment. But I can guarantee that the NMRA figure is too wide.
And would this hold true for the wing rails around the frog?
If you have a Ross switch handy measure his flangeway and frog dimensions. Steve knows more about tinplate switch dimensions and the behavior of tinplate wheels rolling through switches than anyone else. If the NMRA was smart they would just ask Steve to rewrite the standard.
Also, the guard rail can be a bit closer than 1/8 depending on the width of the frog which will allow the 3-rail wheel to pass and will pull the scale wheel close enough to clear the frog.
Joe
Matt is dead on right as usual with that advice. This hand laid switch has a Ross frog with 0.165 flangeways, even more generous than the NMRA standard. But the guard rails are 0.10 to 0.11 wide. The narrow flangeway on the guard rail pulls the wheel set to the outside and away from the point of the frog. The wide flangeway on the frog allows fast angle wheel sets room to pass through the frog.
Wow, that looks good!
jeff C
Access to this requires an OGR Forum Supporting Membership
