I guess I see a substantial difference in posting pictures versus doing a really meaty, focused article, but people do what they are comfortable with, so move on. I will send you an e-mail, Trainman, about where I hope it would go.
Trainman, I hope you know that I only posted their policy for general informational purposes and not as an admonishment towards you. Most do not have any idea how these things work and why would they? If nothing else, perhaps, it will serve to enlighten others who are considering submitting articles.
As Dennis said, it's good to know how "exclusivity" works. I am often approached by people asking for advice on preparing an article for publication. They sometimes end by saying, "I'm going to send it to all the magazines. Maybe one will print it." That's not how it works. It must be sent to only one.
In general, few magazines are going to publish material that has appeared elsewhere. Their readers will feel deceived in that they are paying to see something that they have already viewed somewhere else. Readers deserve fresh material.
It does happen on occasion, as when the other magazine published an article only to find that the same photos had appeared in an ad campaign just prior to publication. It can be very embarrassing all the way around.
Perhaps, at some time, the policies will change as the use of forums expand, but probably not in the foreseeable future. Magazines are already feeling the pressure of all the other sources of information on the web.
IMO it would be their death knell if their pages contained material that could be seen elsewhere for free. Their only hope is to provide something new and of the highest quality with each issue.
Jim
Marty with the laser here. I don't want you taking it the wrong way. I gladly will help you cut the windows and buildings, but as the low price i told you before was that you would supply files with minimal amount of cleanup to cut. Everything is not 25% scaled up if it was i could easily scale down. The mouldings were smaller than the door and the starburst is way out of scale from the sizes you gave me after my email questioning the sizes. With the talent you have and all the buildings you want to do, i dont understand why the nomial 20 a month to adobe is a big deal, when your done cancel it, your going to move faster and have a nicer finished product. Every one of us waste $20 a month on something, you couldnt get a kit for 20 a month let alone a custom building built how you want. As roy from shipping wars says "its a nickle holding up a dollar" I can also do the drawings for you but of course the price will be higher. I have a 63" x 36" laser, in o scale thats almost limitless what we can do.
Thanks again to all!
Next up is probably the firehouse that grandson and I started. It's a Westport Models kit that I bought a couple of years ago at York. Les Lewis made very few of these kits and it has remarkable brickwork. Les laid on one brick at a time on the master. It was his technique that I adopted when making the chimney for the Victorian Station. I really can't imagine doing a whole building like that, but then I couldn't imagine making a museum-level substations either. Never say never.
I'm going to use another Miller Engineering florescent light for this one. I have some really nice Corgi 1:50 fire engines that are just waiting for a home to be built.
Marty Milner and I are trying to hook up so he can laser cut the windows for the next four scratch-builds. I'm having trouble since the demise of my Windows computer and loss of my CorelDraw vector drawing program. I've downloaded a free Mac program called Inkscape which has most of the capability. It saves files as SVG which is a standard vector file type. But when I sent him a test file, it enlarged the drawings 25% when he put them into the laser driving software he uses. He really wants Adobe Illustrator files, but I don't want to pay a monthly rental for the privilege of using it. I also had the entire adobe suite on my old computer and also lost that.
While I'm going to build the fire house, I will be doing the detailed drawings for the distillery. Even if I can't laser cut the parts, I can still buy Grandt Line, Tichy, or Rusty Stump windows and doors and do the job the old fashioned way. The distillery could be another article. If so, I will be very circumspect about what to post and what to keep out of the Internet. Even so, it's just a building... it's not nearly as unique as the substation.

Attachments
Marty, let me look into that. I agree. I don't want to be wasting time working on graphics that don't work. The distillery is going to be a very involved design project and I should use the best software for the job. Hey... I just blew $2,400 on this MacBook Pro and without software it's just a pretty box with an illuminated Apple logo on its cover.
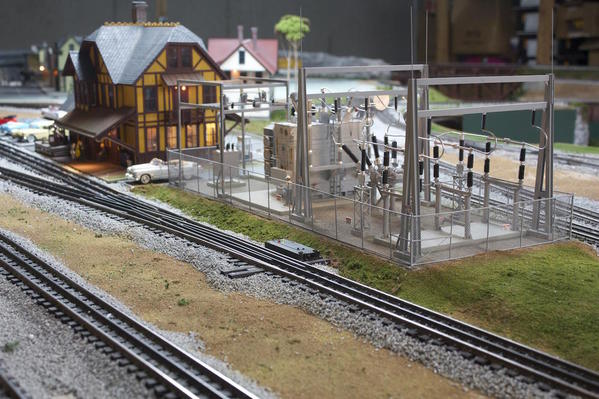
Another milestone today... the civil works crew got their work done on time and under budget so they were ready when the cranes came to erect the substation. It dropped into the plaster socket perfectly. So without boring you with more trivialities, here's the newly installed substation.
I still have to install the telephone poles and transmission towers. I may hold off doing this for a while since they're easy to bump into while doing other work. The whole thing popped into the plaster cavity like a hand in a correct-fitting glove. It looks like it's always been there. At least that's how I imagined it.
Attachments
It looks great there! Congratulations!
So impressive Trainman. I've been quietly following all the various threads of your conversations and have thoroughly enjoyed this topic. Thank you!!!!!
Again, thanks one and all.
I also thought about making a video. I was so engrossed in shooting the UP Veranda as it rolled past the substation that I didn't notice that it was only 3/4 of a train that went by. The remaining 1/4 had parted and was lying stalled on the tracks at the right rear corner.
All of a sudden, CRASH!. The veranda collided with the caboose and pushed the remaining three cars into a jack knife. Two left the platform and hit the floor. One car suffered minor damage to a corner just above the foot step. Some solvent cement fixed it up good as new.
That's not the first time that the Veranda has been involved in running into the rear of its own train. The other time happened in Germany when the first iteration of this pike was just put in operation. In that instance I mounted the control station in the center of the layout. You had to access it by a duck under. Everything was running great so I ducked under to the outside and was looking for something on a shelf with my back to the layout. Again, CRASH! Train had parted, but this time it really smacked it. One old Weaver box car completely disassembled when it hit the floor. That too was fixed.
Trains are like two year-olds. Never, ever take you eyes off of them.
Dennis, no umbrage taken. I realize that you were just illuminating the topic. Jim Policastro also added good insight. It is interesting that many of the readers of this thread would ALSO appreciate having a print version. That's the disconnect with the new technology vs. conventional publishing.
Oh man, your done. Forget the rust. A new install!![]()
Oh man, your done. Forget the rust. A new install!![]()
Leave it looking new. This utility is proud of its equipment and takes care of it!
Trainman, I don't know if you plan to put the usual small white with black letters and red warnings on the fence, but usually a utility does, it says something like "Big State Electric Service Company - Main Street Substation." Or if you have a name for your utility name.
Utility Names - getting the Era Right. Electric company names, real and made up, were sometimes a function of the times. I once got a large consulting contract with a major utility because at dinner I told their senior executive that I could tell the age of a electric utility (when it was founded) based on its name, and he put to to a little test and I passed. IIhad reserached it for one of my books) . Today, with all the mergers in the 1990s and since, you can't - utilities are run by MBA types who change their names after mergers and want them to sound like anything but utilities (Centerpoint, XCel Energy, Exelon, etc), but up through the 1980s:
Electric Utilities with the word "Illuminating" in their name are the oldest. They were founded in the 19th century or first ten to fifteen years of the 20th. Many was Charles Brushe companies (he was an early and ultimately unsuccessful competitors/utility franchiser to Edison and Westinghouse). The only major utility still doing business under its original name is The Cleveland Electric Illuminating Company. So if you are modeling a layout in the early 19th century, such a name is appropriate.
Electric utilities founded just before WWI most often were Lighting or Light companys, as for example, City Light Company or Central Lighting Company. If the alyut is WWI or thereabouts, this is realistic as the local electric company name.
Smal rural utilities foounded under the rural electrification acts in the early 20th century often have the word "electric cooperative" in their name (Madison Country Electric Cooperative, etc.). layouts that are 1930s forward . . .
If a large electric company has both words "power" and "light" in its name, then it was likely founded during or after WWI but before WWII. Generally, companies with the world light preceding power (Houston Lighting and Power) were founded earlier (post WWI) wtereas those with power in the lead were founded in the '30s. Layouts from 1930 on could use Light and Power, from 1935 to 1970 could use Power and Light realistically.
If the company does not have the word light in it, it was founded in the 1930s or 1940s or went through bankruptcy during the depression and was renamed (many were). A possibility only on postwar or wartime layouts.
Companies founded or created through mergers in the post WWII era often had "electric service" as in Texas Electric Service Company. 1950s layouts or later, only.
Companies formed via mergers and so forth after 1970s often have the word energy.
Most Electric and Gas companies date from the early-mid 20th century
Here is another take on it. When I first started working for Virginia Power in 1976, they went by VEPCO, which stood for Virginia Electric and Power Company. Sounds kind of redundant until one understands the origin. They started as a company providing power for the first electric street cars in Richmond, Virginia. Therefore, as I recall, the Electric was for the the street car line and Power was for the electricity generated to power them. Now they go by Dominion, which is their holding company for their electric, gas, and other ventures.
I defiantly agree with Lee, you need at least one sign on the substation gate or fence nearest the road. In addition, I like the Reddy Kilowatt signs that are out now, and would like to get one of those sometime.
Oh man, your done. Forget the rust. A new install!![]()
Leave it looking new. This utility is proud of its equipment and takes care of it!
I will agree with Lee's and Adriatic's take on that too! I remember painting transformers, and even old structure way back in my younger days. Yes, I started about as low as one can go. ;-) Those two college degrees I finally earned helped rectify that situation. Rectify, no pun intended.
I like the "Redi-kilowatt" theme. I'll search out that logo and make some signs. I'm not putting anything else on that very fragile fence. The high voltage signs were installed when the fence pieces were flat on the work bench. I do not want to stick anything on them now that they're erected. I'll make a free standing sign that will go into the landscape.
Thanks, but I've got this one covered. I went on the Google and looked for images of Redi-kilowatt, Philadelphia Electric, Pennsylvania Power and Light, and Louisville Gas and Electric. Since I'm going to build a Bourbon distillery at some point, I chose LG&E. I also doctored up an image with Redi-kilowatt to make another sign.
I'll cobble together some backing and supports and make some signs for the substation. I'm finding for some simple graphics I'm able to get by using Apple's "Keynote" app that's a clone of PowerPoint.
I've already received the money from PayPal for the Santa Fe F3 A-B-B-A that I sold through eBay. The sale closed on the 20th and the money's transferred to my bank tonight. Pretty fast turnaround. Now I have to decide what to do with the money... more buildings? A new loco to replace the Santa Fes? MTH DCS? Some combination of these? I have a budget for the trains per year that's been arranged with my better half, but anything I can do to contribute to it is highly appreciated. I don't change the budget even if I get additional funds. It just reduces the $$$ needed from the family funds.
In looking at the layout tonight, my grandson and daughter think I should start filling in the back right corner where the mountain's going to go. Some of proceeds could go to buying more materials and four tunnel portals.
Attachments
Time to switch gears.
After painting the lampposts a nice dark green with "Concrete" bases, I mounted two in the train station parking lot. I'm glad I listened to my grandson and made new ones for the substation that were more industrial and saved these for municipal lighting. I'll have to make more of them to use in the town. I have two left.
They're pretty simple to make and quick too so making more will not be too great of a hardship. These, like the substation lights, were wired in series with a 330 ohm current-limiting resistor soldered on the negative lead going to the power source. I just wrote up a comment on another thread about using old electronic hardware power converters to power all my DC needs. The best are old laptop chargers since they're often 12VDC and have high current capacities. But even the smaller 1 amp units can light a lot of LEDs if you use series/parallel arrays.
With these running I decided to make one of my old craftsman railroad car kits. Many years ago a colleague at one of the Henkel plants gave me five old Quality Craft and Ambroid car kits. These are the way O'scalers used to get all of their equipment; they made it out of wood kits. I had already built two of them before we moved to Louisville. The remaining kits are all various types of hoppers.
This one is a Great Northern Airslide grain hopper on which I'm going to install a pair of Atlas O, Bettendorf freight car trucks. Having another grain hopper will be useful on the pike to feed the Bourbon plant.
All of the fine structural detail in the kit is milled basswood, including all that angle "iron" in the end bays. When I mentioned in the substation build that I had some brass structural shapes hanging around in the shop for many years, it was for these car kits that it was bought. My intention then—as it still is—was to make this detail out of soldered brass. That was even before I bought the Resistance solderer. And it was one of the thoughts in the back of my mind justifying that purchase. After looking at that very fragile, OLD, basswood, I realized more than ever that I must make it out of brass. You'd probably break something if you accidentally picked up the car by the ends. Therefore; the model will be a hybrid with basswood body, floor, bolsters and center sill, with soldered brass end detail epoxied to the wood structure. After building the substation, I have no concerns about doing this job in brass.
Here's a poorly taken shot of said brass.

The first steps was to build a floor extension.
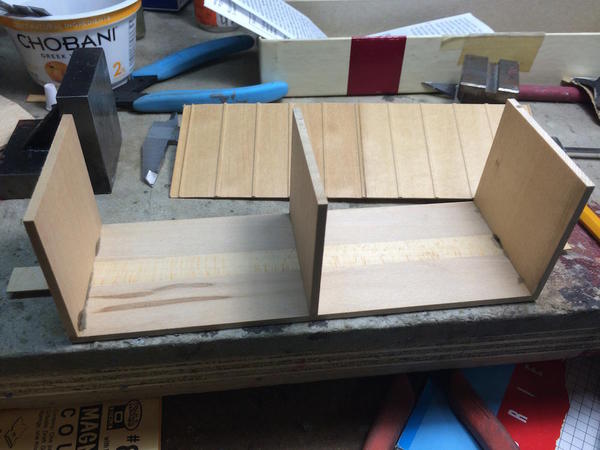
The milled sides are in two sections which must be edged glued. I used a technique learned in building the B-17. You true the mating edges and tape them tightly together with masking tape on one side. You turn the piece over and bend the joint open. In this space you put a bead of SuperPhatic aliphatic glue. It's water thin, penetrates quickly and when dry is very strong, sandable and invisible. You tape the other side to hold it tightly while the glue cures. The RC scale plane builders use it to glue balsa skins together before attaching to the wing ribs.
The bulkheads were positioned using angle blocks and then weighted until they dried. The inner roof goes on next and again weights clamp it until glue cures. BTW: this was a rare Sunday shop day. Grandson #1 had another quickie project which we did last night and this morning. Little by little he's getting a complete industrial arts education program. He's now getting proficient with the drill press, 1" belt sander, jig saw and Dremel tools.

The decals are Walther's and are really old, so just to be sure I coated them with Microsol liquid decal film which restores old decals and keeps them from cracking. I don't anticipate this being a long project. Famous last words...
I weighed the parts along with the trucks and the white metal fittings and it comes out just about 15 ozs. This is right on target for NMRA's car weight for a 40' freight car in O'scale, so no additional weight should be needed. I intend to weather this car. I haven't yet gotten the courage to weather my store-bought cars and engines, but I don't have that reservation with kits and scratch-build projects. I have Kadee couplers for it too. One the first two kits, I only put Kadees on one end and big, fat, O'gauge monsters on the other so they would mate to the rest of the train. On this car, I may put Kadees on both ends. Sometime in the future I plan on converting more of my O'gauge couplers to Kadee. With my wide curves, I can get away with much closer (more scale) coupling.
Attachments
Thanks, but I've got this one covered. I went on the Google and looked for images of Redi-kilowatt, Philadelphia Electric, Pennsylvania Power and Light, and Louisville Gas and Electric. Since I'm going to build a Bourbon distillery at some point, I chose LG&E. I also doctored up an image with Redi-kilowatt to make another sign.
I'll cobble together some backing and supports and make some signs for the substation. I'm finding for some simple graphics I'm able to get by using Apple's "Keynote" app that's a clone of PowerPoint.
I've already received the money from PayPal for the Santa Fe F3 A-B-B-A that I sold through eBay. The sale closed on the 20th and the money's transferred to my bank tonight. Pretty fast turnaround. Now I have to decide what to do with the money... more buildings? A new loco to replace the Santa Fes? MTH DCS? Some combination of these? I have a budget for the trains per year that's been arranged with my better half, but anything I can do to contribute to it is highly appreciated. I don't change the budget even if I get additional funds. It just reduces the $$$ needed from the family funds.
In looking at the layout tonight, my grandson and daughter think I should start filling in the back right corner where the mountain's going to go. Some of proceeds could go to buying more materials and four tunnel portals.
I like the sign very much! It conveys the message and is the right era!
I like the "Redi-kilowatt" theme. I'll search out that logo and make some signs. I'm not putting anything else on that very fragile fence. The high voltage signs were installed when the fence pieces were flat on the work bench. I do not want to stick anything on them now that they're erected. I'll make a free standing sign that will go into the landscape.
Reddi Kilowatt was a real fixture everywhere back in the '50s and all. It is easy to find images and download them to make your own signs. One of my favorite '50s logo items.
----------------
Here is another take on it. When I first started working for Virginia Power in 1976, they went by VEPCO, which stood for Virginia Electric and Power Company. Sounds kind of redundant until one understands the origin. They started as a company providing power for the first electric street cars in Richmond, Virginia. Therefore, as I recall, the Electric was for the the street car line and Power was for the electricity generated to power them. Now they go by Dominion, which is their holding company for their electric, gas, and other ventures.
I defiantly agree with Lee, you need at least one sign on the substation gate or fence nearest the road. In addition, I like the Reddy Kilowatt signs that are out now, and would like to get one of those sometime.
Wow. You were with Dominion Va Pwer, Mark? Now, in semi-retirement, I work for only a limited # of clients and they are one of them. Good company. Best engineering department in the electric utility industry, IMO.
ou are right about the electric company name. I have a really cool book for 1926 - the McGraw Hill Guide to Electric Railway Companies, 1926. Gives summaries, name and contact infor for executives, for all the electric railway companies in the US. There were more than two thousand across the US, including more than 114 in PA and about 60 in NC, many tiny (Raleigh's had only about 100 miles of trolley track and some others in NC only a dozen miles or so). In big cities in particular, electricity was really the only option - use coal and you'd choke your potential market to death.
I didn't make the signs because we'e having printer/WiFi problems with some new Time Warner Equipment. I did finally print out the graphic. Instead I worked on the Airslide Hopper. This was supposed to be a simple job to fill the time between major projects.
All was going well until...
I glued on the side panels, end panels and some bottom trim. The I scored and glued on the very thin wood top roof sheet. This conforms to the slight (8°![]() slope. It also extends out about 3/4" on each end. Did I say it was thin...? I also started to manufacture the brace framing on the end starting with the upper end roof stiffeners.
slope. It also extends out about 3/4" on each end. Did I say it was thin...? I also started to manufacture the brace framing on the end starting with the upper end roof stiffeners.
 This picture clearly shows the roof overhang and the thinness of the material.
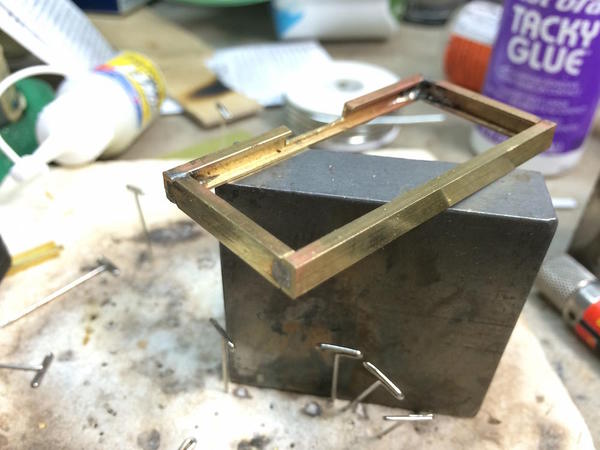
I cut the reinforcements from 1/8" sq" brass tube. It's a little over-sized and robust, but I didn't want to got to the hobby shop today so I used what I had. I measured the angle of the roof peak and made a sanding fixture to put that angle onto the brass' ends. I then made another fixture to hold it in that position for soldering.
I pinned it to the soldering pad and first tried using the mini-torch. It was over kill. I then switched to the resistance unit and it worked well.
I then solder the flank pieces to the ends of this assembly.
This was just sitting there. I probably won't glue the brass into the car until it's mostly all assembled since soldering and wood don't go well together. Then while holding the car up to check the fit of this piece I proceed to loose my grip on it and drop it on the concrete floor, severely damaging the roof over hang on one end and the lower body extension.
What a freak'n mess! I don't usually do this. Or... when I do do it, I tend to get lucky and not do catastrophic damage. I simply can't glue it all together since it would look awful. I don't know where to find bass wood that thin. I could use some very thin aircraft ply and either laminate to the existing roof, or somehow remove the roof with wrecking anything else and replace it with ply. I'll get the ply tomorrow and see what works best. Like I said... it's a piece of cake compared to the substation. Yeah! Right!
Attachments
i would substitute styrene for the wood. when i built several of these in the past i replaced all the wood with styrene, it makes a lot stronger car as well as takes the issue of getting rid of the wood grain.
I decided to use 1/32" aircraft ply that I had in the shop to replace the roof. I did use styrene for another part that was damaged. Since I'm going to have to sanding seal all the rest of the wood, adding the roof didn't make much of a difference.
It took almost two hours today to affect all the repairs. My spouse says, "that's part of the hobby too." At first I was going to put the new roof over old, but like real roofers, that's not a good idea. So using a single-edged razor blade, I peeled up the old roof in chunks, sanded the heck out of it on a sand paper adhered to a piece of plate glass, and got the roof back to the sub-roof.

All the manhandling also broke of one of the side's extensions. It's on the far corner away from the camera.
I then measured the new roof piece off the plans. I found that I had a nice big piece of 1/32" aircraft ply that I was able to cut. I scored and almost cut through the center line to enable the sheet to bend cleanly at the roof's peak.
I again used Aileen's Tacky Glue (actually this is a new product of their's that has super tack). It's very sticky and works nicely in this application.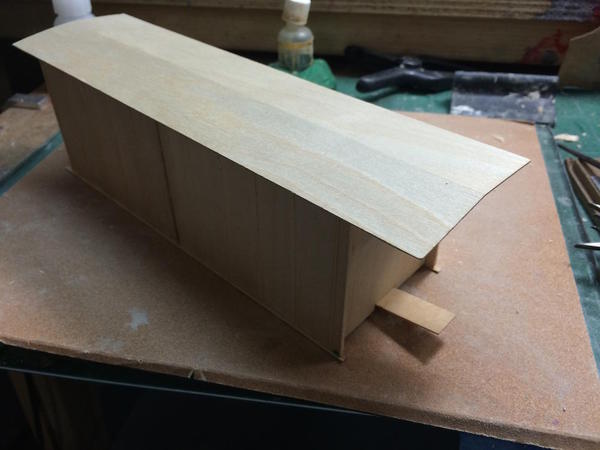
I also needed to reinforce the floor extensions sticking out of the bottom. I'm not sure why they're so thin and unsubstantial considering that couple box has to go there. I added a piece of 1/8" aircraft ply and a piece of the roof wood that I salvaged to make it more robust. One side was almost completely broken off.
As I'm writing this, I've just gotten concerned that I may have caused a future problem with couple alignment. We'll cross that bridge... This pic also shows the styrene repair on the side extension. The wood part was splintered pretty badly so I shave it back flush with the end wall. I measured the amount of overhang, minus the thickness of the flange and cut a piece of .020" styrene for the web. The web and flange were solvent glued before CA'ing them to the car body.
Finally I was able to get back to the brass fabrication. I soldered the other roof piece and then laid out and cut the first horizontal member for the bottom framing. This piece needed to be notched to fit over the floor extension. I sawed the extremities in the miter box with the razor saw, and then removed the middle with a cut-off wheel mounted in the Dremel Flexi-shaft held in my Panavise. I use goggles when doing this.
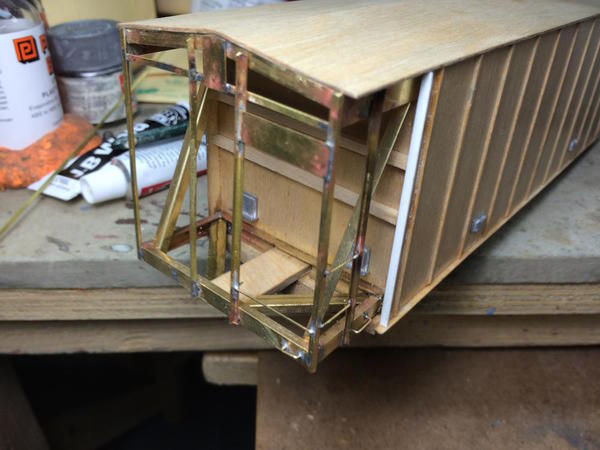
Here's all the brass bits prepared so far. The bottom frame will consist of four pieces of brass channel, notched in the corners so they nest together correctly and soldered. As I noted yesterday, I'm going to try and build the entire end frame off the car and put it in as a finished assembly. If I can't do this, I'll at least do any soldering that would be next to wood off the model.

Before I'm done, there will quite a pile of brass parts that will need soldering.
Attachments
For some strange reason, yesterday's post was missing so I re-entered it. Today I worked with Time Warner Cable to resolve a WiFi problem. They upgraded us up to 30 MB/S and had to change our modem to handle it. The new modem had a built in router that wasn't up to the job, so last week they installed a little Netgear router which also couldn't give up full-coverage throughout our not-so-large house. The tech came today and kept saying that it was the router's location in the upstairs office that was the problem. So instead of having to continue to mess around with relocating phone jacks for our alarm and putting the modem and router downstairs, I went to Costco and bought a Netgear Nighthawk router and the problem is now solved. TWC has only one router to offer customers and it's a marginally capable one worthy of being used in an efficiency apartment, but not in a two-floor house.
So... I didn't get into the shop until after 3:00 and did very little. What I do was street repair. As I've noted many times before in this saga, the lamination of Bristol Board onto green insulating foam using 3M77 spray adhesive was a total failure. The card stock edges started lifting almost as soon as the streets were installed and continue to this day. I've spent at least four work session systematically injecting Aleen's Tacky Glue into the separated areas, weighing them down with everything heavy that I had handy, and moving onto the next section. It's working! I give each section a half hour to set and then move on. Meanwhile, I do work on other projects.
It's especially notable at the Bristol Board seams as noted in this image. The Aleen's solution is working and repaired areas are not de-laminating. Gladly, I don't have much detail work done in town yet such as lampposts, telephone poles, traffic lights, etc., and my buildings aren't fastened down and can be moved out of the way to get to the edges. While the Bristol Board gave a terrific smooth surface for painting, lines and sticking fake manhole covers, the lamination concept destroyed whatever advantage it gave. Next time it's use foam directly and paint it the best I can.
For the hopper, I soldered one piece of brass. I'll do more tomorrow. I downloaded some prototype pictures to get an idea about weathering. These hoppers generally were used to haul powdered materials, such as flour, cement, even carbon black. I need cars to haul grain which I now have a few. I may have to install a baking plant or concrete plant to make use of such as car.
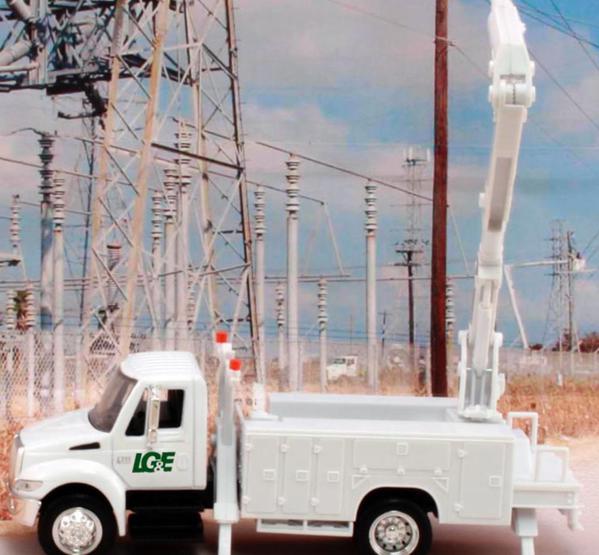
I also ordered some 1:43 utility vehicles to populate the substation and beyond. Die cast Direct had some and I found two that had Louisville Gas and Electric logos on them. They're contemporary, not 1950s, but neither is the substation technically. My railroad is sort of a mis-match of eras. While I'm purporting to be at the steam/diesel transition time—late 40s through mid-50s—I have some 2nd generation diesels, 2 turbines, and the N-S reconditioned F units that were put on rails just a short time ago. I never claimed to be a pure scale enthusiast, just a guy who likes stuff with a lot of detail.
This one could be digging a hole to put in one of those telephone poles
I think I'll park this one in the spot in the substation...if it fits.
I wish they made vehicles for us that were 1:48 instead of 1:50 or 1:43. Both trucks will need some weathering, and detail painting.
Attachments
Originally posted by Trainman2001:
"I never claimed to be a pure scale enthusiast, just a guy who likes stuff with a lot of detail".
Which is why I find your work so interesting. Lifelike isn't just scale.
Spray isn't my favorite contact adhesive but 3m is a good one. I like DAP's red brush on in a quart can. For laminating counter tops, and showcases, I've found none I like better. (ventilate!)
You did wait for it to dry per label right? It doesn't work as well as a wet glue.
I have used Elmers white glue to secure FoamCore to pink foam to make streets. To this date, there have been no problems. I'm not a big fan of spray adhesive.
3M makes a higher strength spray that one of the RC aero modelers uses to adhere skins, but I don't know it's name. I too am becoming less enamored with sprays. They're okay for adhering paper. I do believe I did let it dry before adhering, but I'm not sure. I also find that contact cements in general don't always work so well. This goes for Walther's Goo, and other contact cements.
I find that they dry out and let go. I glued individual copper plates to the hull of an 18th Century American Naval ship. The model was completed in the 1970s. Almost all of those plates have fallen off! The contact cement is hard as a rock and is no longer effective. Our models do have to hold up for many years. Many are in places where they can't easily be reached for repair so whatever materials we use in construction really needs to be high quality.
Adriatic,
I'm glad you "get" my approach. The thing is... I really like models of stuff. It doesn't matter if it's an 18th Century ship of the line, or a really interesting die cast model crane. If it's intricate, well-executed, and interesting I like it. So my railroad is quickly turning into an anachronism. Most of the buildings in town fit the 1950s era including the Berkshire Valley gas station. But the distillery's going to be based on a building built in the 1870s... why? Because it's cool...that's why. I'm also thinking again about buying the Plastruct chemical plant kit. That could be from the 50s to present. Clearly, I'm not an O'scale purist.
I like the trucks.
After trying to be more prototypical in years past, I find it more fun to do what I like. Either approach is valid, one should do what he or she likes best.
Life is too short! Our railroads are our place to use our creativity and create our own little worlds. It's like doll houses on steroids.
The road reconstruction is effectively over and the resurfacing crew will have to come in and do some patchwork. I always thought that the roads were too pristine when I installed them. Now they're not!
While each phase of the repair was drying I was working on the Airslide Hopper. Made some decent progress. I had noted that I was worried that the added bulk I glued to the floor extension would lower the Kadee coupler to far. Quite the opposite. It put the coupler at the exact height I wanted with no additional shims. I made a test.
I glued the center sill and bolsters in place and then placed the trucks underneath and temporarily clamped the couple box in place and checked it against one of the other kit-built cars I previously made.
The picture doesn't lie. I am no longer worried about the couplers, AND the bolster is now firmly glued to the floor AND the floor extension so the coupler mount is very strong (as it should be).
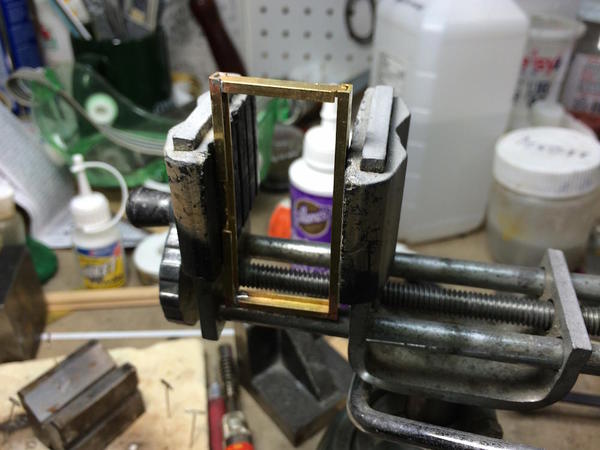
I finished building up the bottom rectangular frame using only the RSU. The torch, which I again tried, simply overheated the joint to quickly and destroyed the fluxes activity. I also used less fixtures instead of more because it gave me more access with the RSU tweezers.
By clamping the parts in the vise enabled me to hold the solder in one hand and the tweezers in the other.
After soldering I cleaned up the ends with the cutoff wheel and some hand filing.
Here's the top and bottom frames lying in their respective locations.
I will pull the roof corners down into contact with the top frame during the epoxying step.
There are some diagonal channels that also reinforce the bottom frame. I'm not solder these since the middle joint is between the center sill and brass. It will be epoxied.
I'm driving to Die-Cast Direct tomorrow to pickup my utility trucks. They're outside of Frankfort so they're only 45 minutes away. Why pay shipping when you don't have to. Meanwhile, I'd really like to see their showroom.
The vertical angle iron will be soldered and I'll try and use the TIX which melts below 300° F so if I watch very carefully and release the foot switch as soon as it melts, I probably won't melt off anything else. At least that's the plan.
I could have this soldering work done in one more work session. I should probably use the sanding sealer now, before any metal is added. It will take multiple coats of sealer. As noted before, it's the one drawback of building with wood.
Next to building the entire car out of brass, I think this hybrid approach should let each material perform to its best advantage. With the brass the weight will probably be 17 ozs.
Attachments
I don't blame you, i'll bet their showroom is neat!
But maybe not nearly as much fun!
Monday is shop day...
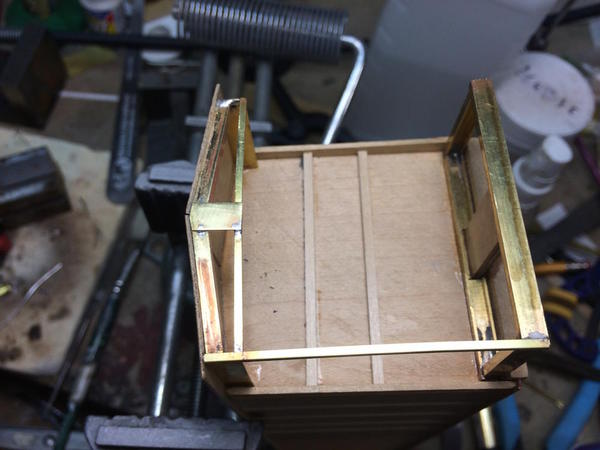
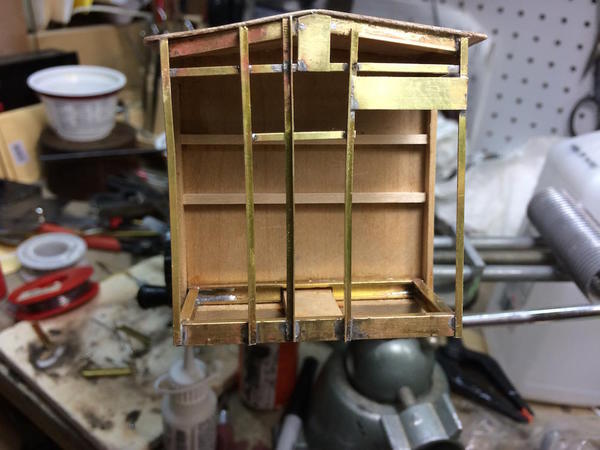
Really got into building the brass ends on the Airslide Hopper. The details are working out as planned, but it's not square. Instead of ripping it all apart, I'm going to leave it be. I think I know where it comes from. I'll explain in the pictures.
The two main components were CA'd to the car body. Horizontal angle piece on the top, the rectangular plate and the one vertical angle are soldered.
I filled in the remaining angles on the hand brake end is all soldered. I was trying to use the TIX solder due to it's low melting point, but was having trouble with it working. For some reason, it flows, looks like a good joint, and then separates. It's not that one side is not tinned. Both sides are evenly tinned, but the solder film breaks right down the middle.
From head on it looks pretty good. But when viewed from the side, the bottom frame extends out further than the top and the angle pieces are not square.
It's not that obvious in the above pic, but it's there. I think I made one of the fundamental blunders—other than getting stuck in a land war in Asia and challenging a Sicilian when death is on the line (couldn't help that Princess Bride quote)—I didn't subtract the thickness of the channel when cutting the length of the bottom side pieces. They fit inside the end piece, therefore the end piece thickness is added and that's the amount that it's out of square.
The last thing I did was use J-B Weld to attach the diagonal braces on the bottom. In addition to adding the same braces on the other end after this side cures, there are two additional braces that extend from the inside top of the box down to the bottom of the outside rail of the bottom frame. That was much harder to describe in writing than to show in a picture... which I don't have.
J-B Weld takes a good 12 hours to cure. I'll add the rest of the parts next session. I think I'm going to heavily weather this car so some of the non-square aspects could be interpreted as a tired old car.
Attachments
Yesterday, we took a nice trip to Indy to visit their very nice Museum of Art to see the Georgia O'Keefe exhibit. Since moving to the Midwest we're making an effort to get to all of these mid-sized heartland cities and take advantage of what they offer. Coming from the East Coast there's a built in bias that unless a city is 1.5 million or bigger, it doesn't count. Wrong! Both Cincy and Indy have wonderful mid-sized art museums with some great treasures. It's less than two hours from our house and we're used to getting in the car and going places.
But, today I was back in the shop. I realized when I awoke this morning that I'd better get the brake machinery into place before adding any more details on the ends. The mounting for the cylinder was ambiguous so I added a brass plate. I made a brake piston rod out of some aluminum tubing, sliced the end to make it a clevis, drilled and pinned it to the swing arm, and drilled out the cylinder to receive the piston rod.
The swing arms were pinned and then soldered. This in turn was soldered to the mounting bracket that's CA'd to the car body. The kit came with pre-painted floral wire. It's easy to form... too easy and deforms just as easily. I probably should have used brass wire which, being half-hard, holds it shape better.
The triple valve has three pipes going into it, one to the cylinder and two to the reservoir. I'm going to use brass for the grab irons. I added some of the cast doo dads that add some realism to the car, and I also started adding the hopper dumper details underneath.
I had trouble getting the reservoir in; both in getting the CA to hold and getting the piping installed. The wire wasn't holding well in the holes I drilled, and the tank kept coming loose. I was probably rushing. I should have epoxied the tank in place and let it set overnight. CA can be disappointing at times.
I've seen better piping...
I plopped the car on its Atlas trucks just to see what it looks like. Even though the ends are out of square, it will have to do.
I'm leaving all the roof ribs and hatches off until the rest is in place since I didn't want to put any extra load on those delicate ribs.
Only had a couple of hours to build today, and continued working on the brake end details. I added a bit of brass underneath the manual brake mechanism to give a more substantial base for the case gear box. This was soldered in place. I really love the RSU. It's always ready to go. You just clamp the tweezers on the parts, hit the foot pedal and the solder joint is complete in a couple of seconds. There's an off-on switch, but it can be left on since no current flows through the unit until the foot is activated.
I then used J-B Weld to glue the bottom dump bottoms onto the car body and the previously CA'd sides. I clamped this and will leave it overnight.
In looking at the brake mechanism as the model instructions would have me build it, it would be totally non-functional. It makes no mechanical sense, but it looks reasonable.
I'm still completely annoyed that the ends are not square. Since the model didn't cost me anything, I'm using it basically as a training device to continue to hone my scratch-building-in-brass skills and using the RSU. I have two other kits to build: one is a standard hopper with extended sides as a wood chip hopper, and the other is a standard covered hopper. Both will require the same level of end treatments as this one, so since "practice makes perfect", I should have the creation of a hopper with the correct end geometry. Both of these other kits are hoppers with sloped end pieces and a square end which will require a little less brass-crafting than this one.
I realize that this project is a little more mundane and certainly less engaging than the substation. It also isn't taking almost 7 months to complete.
Attachments
I went to the Protocraft site and found brake gear that actually looks real. The cylinder and manual brake work through a bell crank that transfers the various direction of motion to one that runs back and forth along the cars axis. I'm not going to buy anything like that for this car, but may be tempted on one of the other kits. Maybe...
Again, I had little time in the shop today having been to the Hobby shop to buy more CA and brass. All I got done was measure, shape, and install the diagonal braces that extend from the top of the car body to the lower end beam. On the other end, I just used CA to hold these in place...which I'm nor so sure about. On this end, the upper end is CA'd, but the lower end is soldered to the main beam. Again, the RSU let me solder this piece in without de-soldering the joint that's less than a 1/4" away. The second the solder melts and the joint forms, you must let go of the foot switch. Otherwise, it will overheat and start melting the surrounding joints just like a soldering iron would.
The discharge chutes glued up really strong with the J-B Weld. I cleaned that up a bit too. Next up will be installing ladders and grab irons. Then I'll finish up the roof and prepare for painting. The trucks will be aged and toned down quite a bit, and we'll lose the giant O'gauge couplers.
Attachments
It's looking mighty good!
Thanks Mark!
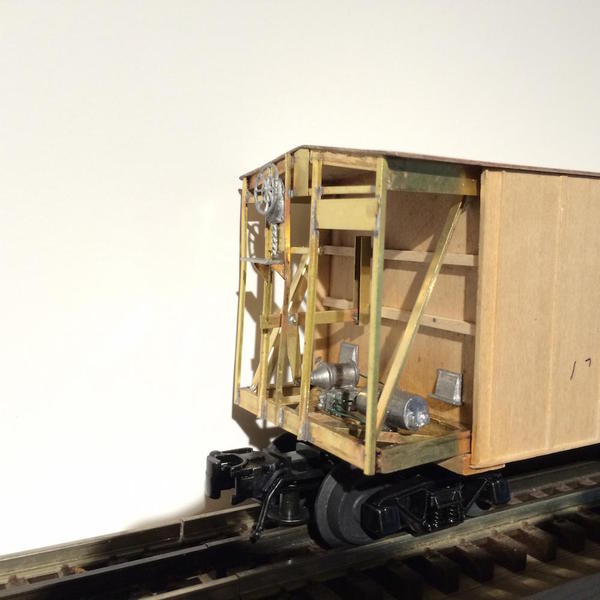
Moving right along. Today was an exercise day so I didn't get to "work" until after 3. But I did get something done. All the ladders and grab irons are in place on the ends. I still have to install the mechanism for the unloading chutes. The plans aren't very descriptive about what this really looks like. All the grads are soldered in place. I didn't make any drop grabs (although I probably should have since they're much safer for crew members since it prevents your foot from sliding off. While manipulating the car body to do all the measuring and soldering, the brake wheel fell off along with the foot platform that sits below it. I couldn't find the wheel. Swept the floor. Nada! When I was putting the train up on the shelf for the I kept feeling something under my shoe. Yup! I had stepped on it and it was stuck to the bottom of my Mephisto dock siders rubber sole. The wheel wasn't damaged... miracle! And I re-glued it in place.
Notice the missing brake wheel.
Almost ready to do the roof details.


