Wow, that is nice. I gotta get a nice fire station on my layout. Yours is beautiful.
The firehouse looks fantastic.
Absolutely incredible work. One quick question...so you plan on adding firefighters? Just feels like there should be a few of them around cleaning equipment...maybe a Dalmatian sitting guard...just a thought.
Anyway, absolutely stunning...wish I had the patience and skill to do something like that.
Bill
Since my return to the forum this is the first I have seen this thread............. wow! Got a lot of catching up to see your fine work.... impressive.
Really like the fire station.
Mark
Thanks everyone! Yes! It does need some firefighters. I'm collecting little people, but haven't placed them yet. There's more detail work needed in town before I do.
As to patience... I'm more "persistent" than patient. I tend to rush things sometimes, but I hang in there long enough to get it right. Are you retired? Part of the "patience" thing comes from being retired with my only real job is building a model railroad in the basement. Life doesn't get much better than that.
I certainly don't want to wish my life away, but I do look forward to retirement and being able to spend more time with my layout and trains in general. From reading tidbits about your background, you deserve this time of retirement. It is nice once someone has paid his or her dues with 40 to 45 years of working. I have 39 in, not counting summer and part time jobs while in high school and college.
I appreciate that Mark. And I am enjoying retirement immensely.
I've been getting too caught up in looking at this fine old specimen, to think about what could be added for a modern look. I got to work in over a hundred firehouses doing ventilation systems.
Everyone thought lung issues firemen were prone to develop, were related to smoke from fires. Turns out it was exhaust fumes from running the diesels "indoors" so often.
So one thing, new firehouses have a ventilation system to exhaust the motors fumes.
There are normally big hoses hanging from above, that get connected to the fire trucks exhaust pipe by clip, magnet, air pillow ect. Most just fall away as the truck leaves.(if they work right![]() otherwise its time wasted to untangle the mess, and often some decent damage to building, and truck too
otherwise its time wasted to untangle the mess, and often some decent damage to building, and truck too![]() )
)
Look in the doors of your local fire house today, and you will likely see big yellow and black hoses hanging down near the side of each vehicle.
Almost every station seemed to have an extra body board or two, around the garage somewhere.
A couple of painted lines on the floor for each engine, helps tremendously to properly park the big trucks straight and centered. Bad weather compounds the issue, and makes it hard to just use the "cracks" in the floor, or other things.
Rural- A red drop box for permits, reminders, and just letting the firemen know your having a cookout or bonfire, so they don't crash the party unannounced.
The roof- A large Radio antennae. Hatch or door over about 40ft. Birds nests and something that doesn't belong up there, and you cant figure out how it got there. (big birds steal really stupid things![]() )
)
The "workbench". Things to be rebuilt, need a place to be rebuilt.
An air compressor is at almost every station (used some of the ventilation systems too). A few used vintage gas station arrival "air bell lines" to know where the truck tire were. Ding ding![]() ! Still hard to hear over a loud truck.
! Still hard to hear over a loud truck.
Every firehouse seemed to have something interesting they work or play at, to fight off the many monotonous "slow days".
It might be an old truck, cloths drives, gourmet meals, an Argo, a boat, parade float, horse shoes, a card table, "pitch-back", or the infamous charity dunk-tank out back![]() .
.
Maybe a train room?![]() (I was always hoping to find "that one"
(I was always hoping to find "that one"![]() )
)
I would love to have a nice fire station. Does anyone know where I can get one, not a kit.
Thank You
Ken M
I would love to have a nice fire station. Does anyone know where I can get one, not a kit.
Thank You
Ken M
Ken,
drop me an email and we can talk about.
Andre.
This has really inspired me.
I really want to build a fire station with a 'Streets firetruck or two (I already have two) parked inside that I can run out and switch onto my Streets when I want to. I've seen a video on these forums in the past of someone who managed to do that (even before the WBB turnouts were available). It's difficult to arrange because of the room needed by the turnsout and all, but I want to do it, and then build the fire station to fit.
Trainman,
My American Beauty unit is on the way. I can't wait!
Love the firehouse/details. Look forward to what you build next.
This has really inspired me.
I really want to build a fire station with a 'Streets firetruck or two (I already have two) parked inside that I can run out and switch onto my Streets when I want to. I've seen a video on these forums in the past of someone who managed to do that (even before the WBB turnouts were available). It's difficult to arrange because of the room needed by the turnsout and all, but I want to do it, and then build the fire station to fit.
Good luck with the RSU. If you have any questions about it, feel free to ask. I may not know the answer, but we can discuss it and arrive at something. I'm still in a learning mode using it.
I'm happy that the fire house has been an inspiration. As far as all the wonderful detail ideas, I would have loved that input about 5 days ago, before I had glued it down to the base. As it is, with the station sited where it is, means you couldn't see any of it. It would only have worked if the model was to be a stand-alone display piece for a contest, which is ain't. As it is, I'm off to the next projects.
I've finished the drawings for the Night Hawks Cafe. I'm doing the detailed drawings for the engine house. And I'm waiting for a pile of parts for the distillery. Depending on how those go together, I'm going to draw up the plans for the boiler house and the warehouse.
As for the engine house, if I want to laser cut it, it would be very expensive. It's quite large at 40" long and 16" wide, plus the machine shop. I have a friend who has a CNC mill and has offered to cut parts for me. My thinking is to have the main structural parts either hand-cut out of foam core and hand-build all the trusses, OR have the main parts and trusses cut with the CNC and have all the windows laser-cut.
This would serve two purposes. The first is cost, but the second is important. Andre has a size limit of 6 X 16" for the stock. This forces all large parts to be multi-part affairs with complex joinery for alignment and strength. I was okay with this for the distillery, but the engine house would be much more difficult. For example, I'd like to have the roof trusses to be integral with the clerestory trusses. This creates a piece that's so large that only one per piece of stock is possible. There are 13 trusses like this. That's 13 pieces of 1/4" stock just for the trusses. I'm thinking about making the trusses out of more pieces so more could be crammed on a single sheet of stock.
But I believe that the CNC could cut bigger parts and therefore reduce all this joinery and simplify the job. I've been doing some research on making the overhead crane system for the engine house. That will be a fun part of the job out of styrene and plastruct.
Sorry to go on here, I'm just thinking out loud.
Laser bed is 40.00" x 28.00" ![]()
Andre.
Andre, if that's the case, why was I working so hard to get everything to fit in a 6 x 16 envelop. It would have been much easier if I didn't have to put all those vertical and horizontal joints between wall and floor pieces.
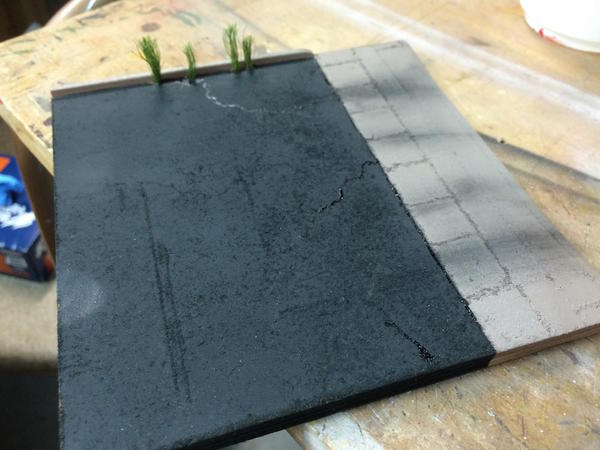
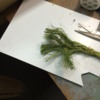
I finished the little filler piece. It was a nice two hour project instead of 6 weeks... a pleasure for a change. I decided to add some weeds growing out of the edge of the curbing. I saw a video about making weeds out of sisal twine. I bought the twine months ago in anticipation of using it for weeds. I think you're supposed to use fabric dye, but since I didn't have any, I used Tamiya green paint thinned a lot with alcohol. After a couple of dippings, here was the result.
I used black iron wire to wrap around a bunch to stabilize it and then inserted into a drilled hole with some Gorilla Glue or used this CA from the back to lock them into place.
Here's the painted filler piece with some weeds, stains and tire dirt and strategically placed tar repairs.
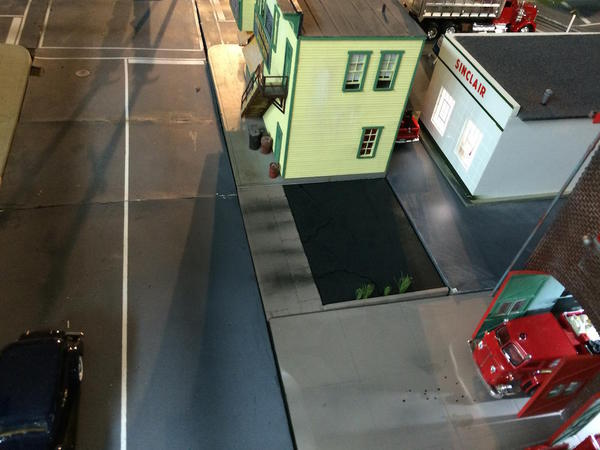
And here it is glued down to the space behind Saulena's. Any ideas about what should be placed on it? Dumpster? Limousine, what?
Andre shipped all the parts so before long work will begin on the distillery.
Attachments
I can't wait to see the engine house project/overhead crane. I'm sure it'll be awesome.
You have true talent.
The RSU should be here early next week. Excited to get it and start soldering projects I've only dreamed of doing until now...
A wind up, here's the pitch.....
You already have some garbage cans, but it is a tavern, they have lots of trash. And its not a big lot, so maybe a small one. Or maybe they share one with the gas station, just put it behind the station.
It wouldn't be too unusual for the city to own that. Fenced firehouse storage?![]()
An empty "bottle" or a little broken glass belongs outside a tavern near the garbage.
A limo driver would stay on the street near the door if he could. But if Saulena's is rough & tumble in this town, still leaving room for a "bouncer toss" if he is smart ![]() .
.
Parking blocks. Maybe a sign. Parking lines. Handicap spot?
Saulena's parking only, violators will be towed away.
Then park a tow truck right behind the garage![]() .
.
Or maybe that parking is for upstairs tenants only, not for the tavern.
In which case a basketball net somewhere might work out
Really want to appeal to the younger set?
Wood pushers! Bi-peddlers! ![]() (skateboarders & bikes)
(skateboarders & bikes)
A stunt ramp, or half pipe![]()
Or maybe someone is "sleeping it off" in the backseat of a car.
How about an animated, rocking van? (Done it yet Lee?![]() )( Hmmm
)( Hmmm ![]() I meant the modeling idea
I meant the modeling idea ![]()
![]() )
)
A car out of gas?![]() Or the one that left the repair station without antifreeze in the new radiator (that should be a 1974 Caddie...those idiots!
Or the one that left the repair station without antifreeze in the new radiator (that should be a 1974 Caddie...those idiots!![]() ).
).
Ok that's it, have to reload![]()
Adriatic,
This is a clean, respectable town Trainman has, with law abiding citizens. I think the auxiliary area for the fire department or gas stations' extra equipment would be the ticket, not drunken bums. ;-)
I have an idea an every town has a burnt down or tore down building lot where part of the foundation is still in place but not complete. looked for a pic but couldn't find one basically a foundation that's not complete cause it has fallen apart. and the building is no longer there. and maybe a fence around it to keep the kids out.
All good ideas! You guys have better imaginations than I do. I'm down in the weeds too much to see the big themes.
Mark's right. It's a respectable town. I was thinking that the other side of the gulches would be more run down. Or it could be on the other side near the railroad yards and "future" engine house.
Now that I have real estate, it's just up to the developers to decide what should go there.
I am still here. I parked an EMS truck on the vacant lot for a place holder... that being said, I'm definitely between projects. The first shipment from Andre came with the parts for the distillery main building. I quickly slapped them together held with masking tape only to find that on at least five parts my drawings (and therefore the parts) were incorrect. My errors were mainly centered on the size and positioning of the intersecting tabs and slots. I also found a couple of sheets that were missed by Andre. The result... a new shipment is coming this week. Additionally, I found out that I am not really limited to 6 X 16" since Andre's machine is much larger. By increasing the art board size I was able to redesign all of the two-part walls and floors thereby doing several things. First, it gets rid of the joints that would show up on the finished model. Second, it will reduce cutting time and therefore the cost of producing the parts. Lastly, it has a secondary effect of making the brick work better.
I also found out how to "draw inside" on Illustrator that enables me to put the brick inside the building lines and do so in seconds instead of the hours (days) that it was taking me. I'm using this technique on all future brick building projects. I've got the engine house drawings almost finished and Nighthawks drawings are done.
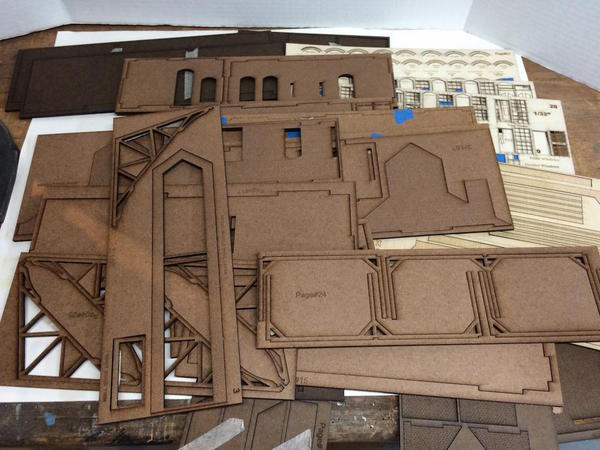
I am going to proceed and building the prototype with the two-part walls to perfect the building process, design the instructions, and make additional improvements. For future builds if I proceed in kitting the building, they will have one-piece walls and produce a nicer model. Here's a pile of parts. BTW: The parts and brickwork were cut beautifully. The windows fit perfectly.
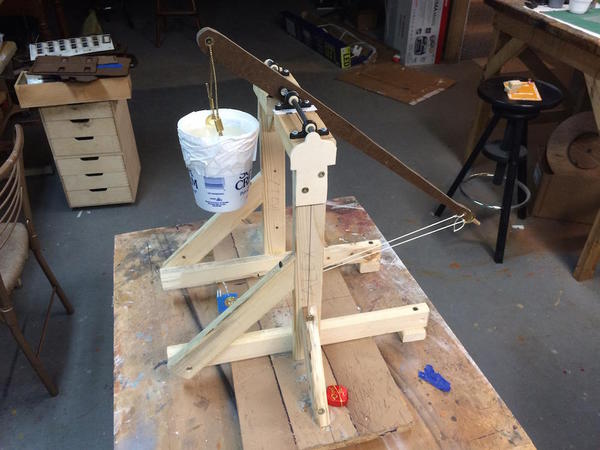
So what did I fill up my working time with? Grandson number 1 had started building a trebuchet in the Maker's Space at his school. With school being over for the Summer, he brought the unfinished object home. We finished it up in the shop. We had to build the swing arm, the bearings, the counterweight, the cross pieces and additional bracing.
For the uninitiated, a trebuchet is a Medieval catapult device that relies on gravity's pull to power a swinging arm and a sling with holds the projectile. They are used today for silly things like "Pumpkin Chunk'n".
Our first attempts weren't so good. In real life this happened also. Cortez in his siege of a Central American town ran out of gun powder so they built a trebuchet. The projectile went straight up, and came straight down smashing and destroying the machine. It's a factor of the shape of the release pin that sticks out of the arm. One string of the sling is held with a loose ring on the pin. The pin's angle determines the release point which in turn determines the projectiles trajectory. We need to modify ours.
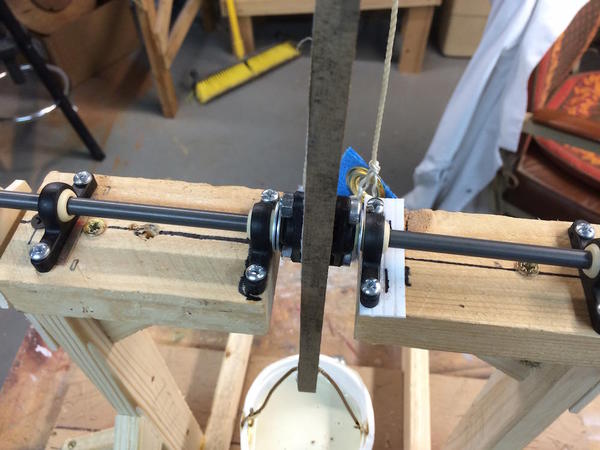
The bearings are from a Maker's Fair kit and are really nice ball pillow blocks and bearings. The shaft is hard anodized aluminum. The swinging arm is three laminated pieces of 3/16" Masonite.
For the counterweight, which is really the "engine" that powers this contraption, we used 4 pounds of BBs in a sour cream container filled with Alumilite Urethane Casting Resin. It cured in 5 minutes and forever locked the BBs in place. Our first attempt to wire the weight to the arm relied on a some light gauge picture hanging wire. We found eyelets at Lowe's which were used on the sling cup and the on the counterweight's walls.
The first time we let the cup drop, the sudden stop at the end had so much kinetic energy that it snapped the cables at one of the crimp fittings that were holding it and shattered the cup walls in one spot. We fixed the cracked cup with good old duct tape. I substituted much heavier cable and made cable crimps using brass tubing. It has held so far. We still have to fine tune the pin so the sling releases at the proper point. Four pound dropping 10 inches produces some prodigious energy.
So that's what I've been doing. As for the distillery, I may not blog the details because I'd like to develop an article on designing, cutting and building a scratch built major project.
Attachments
Lots of fun everywhere for you, wow!
Trebuchets are fantastic, fun things. Good physics lessons, too. I've been around and helped with several that were built. I always thought the lessons learned when you compare their performance with and without wheels mounted on them when they shoot was one of the best as a lot of people don't see the result coming.
I'm glad to see the articles are working out! I think it will be good for more people to see what you have been doing, and get ideas for what they can do.
The grandsons are blessed to have a grandfather like you to help them with projects like you do. My dad was slick in teaching me things, but he always said my grandfather was better. Alas, my grandfather passed away 6 months before I was born.
I'm glad to see the articles are working out! I think it will be good for more people to see what you have been doing, and get ideas for what they can do.
Great news on the articles, you're truly a craftsman able to work with about any type of material. I know, like Mark said, you've motivated at least one guy to get off the couch and start building stuff!
I would have never heard of an RSU until I saw your thread. I love mine and it makes delicate projects so much easier.
The grandsons are blessed to have a grandfather like you to help them with projects like you do. My dad was slick in teaching me things, but he always said my grandfather was better. Alas, my grandfather passed away 6 months before I was born.
Again, as Mark said, your creating memories your grandsons will always remember. My Grandpa was much as you, able to make anything. The mechanical stuff he taught me will never be forgotten and is still used each day of my life.
Plus, it's great to spend time with the little guys!
Attachments
That's very funny! LOL.
I'm starting work on the Distillery and I have a separate thread running about it so I may re-direct folks to that one... or I might just make the notes here.
First of all, I got word from RCM that the article will be in November's issue. So I just pitched him another one. I want to write about the entire distillery project: concept, research, design, drawing, laser cutting trials and tribulations, and construction; all with the eye to producing something that could be commercially viable. They have accepted this idea so I will be publishing again.
Let me tell you, designing for laser cutting is much harder than it looks especially when you're trying to create something more than a rectangular box with window and door openings. I'm building the prototype and finding one error after another. Let me be perfectly clear here. These are my design errors, not laser cutting errors. The laser cuts exactly what I drew. Exactly! I realize that part of the problem is designing in Illustrator using just front and side views. It's the top view alignment that I'm messing up. Even with that, here's what's happening so far.
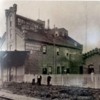
As a reminder, here's what the building looked like in 1870 and this is the only picture I found.
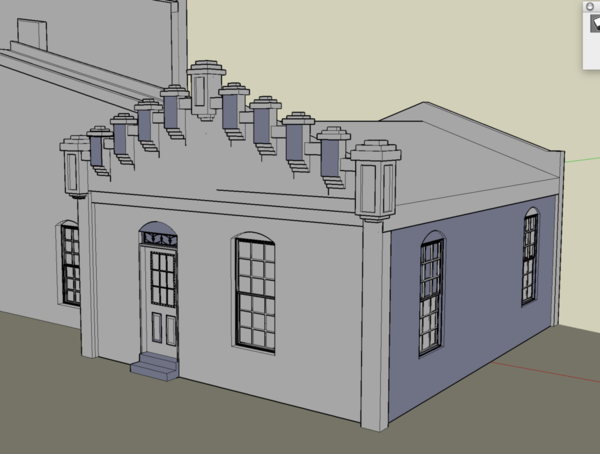
Here's the kitchen as I drew it in SketchUp.
And here's what I've built so far. Notice that for some reason, the door position go reversed. This will be adjusted in the production drawings.
Even though there were some minor problems with the fancy brick work on the front, it still came out pretty good. In fact, from this distance you can't actually see what I have to fix.
The roof is held up by laser cut supports and trusses. I made slots for purlins, but they're not necessary. The roof is 1/8" Masonite and is very stiff sitting on the trusses.
The supports were about 1/32" too short so I shimmed them up and glued them in. The roofs fit very snuggly and a slight bit of sanding was necessary to shoe horn them in. The peak edges were tapered to fit tightly.
One of the biggest "AH HAH'S" was finding out that the 3/16" stock is actually 0.155 not 0.187. This 1/32" disparity created havoc with the fit of the tabs. They were too long! I was able to remove the extra stock and then I changed the drawings to reflect this.
Andre and I had a long talk yesterday about finer details of designing for laser cutting. For example. the beam is .003" and the cut ends up being .005", therefore you have to design things like windows a little over-sized so they fit snuggly into the opening. I was designing for absolute fits. That's not so good.
We also discussed how to position parts on the stock to both reduce stock usage and reduce shipping costs. It's a steep learning curve that I'm climbing.
The fancy brickwork is made of a lamination of four layers of 1/16" ply, plus some other cut pieces. It was challenging to design, but fun to build.
I may or may not publish all the gory details of this project. RCM is not as sensitive about posting as was the other magazine. In fact, I was going to contact that mag to see if they'd be interested, but I immediately changed my mind. RCM was good enough to accept the article knowing that I was posting all this stuff for "Free", and I wanted to give them right of first refusal. That's only fair.
Attachments
Everything looks fantastic! It is a great building to model, and I can see very challenging to make the drawings for,laser cutting! The fancy brickwork is fantastic. It is interesting to learn about the sizing as you mentioned you and Andre have to work out. Andre turns out some fantastic work!
I am going to look for photos online for the distillery I mentioned in the personal message to you. It was of the same vintage, but not so ornate.
Congratulations on your articles. I will have to purchase the magazines when they are available.
Ray,
That is just fantastic work.
Have fun.
Alan Graziano
Nice to see all those parts together creating a shape.
The corbeling is beautiful.!
amazing job, you did from a picture to the drawings, my hat off!
Andre.
Took a long weekend to visit Asheville, NC and the Biltmore Estate. If you're into life of the rich, great collectors of art, architecture, conservation, horticulture or design, seeing the Biltmore Mansion is a "bucket list" item. It's less than a 6-hour drive from Louisville, and the drive took us on I-40 straight through the Smokies and Pisgah National Forrest.
Back to work building the distillery's "kitchen" and finding more design adjustments that I need to make. Yesterday and today I spent most of the time scratch-building trim for the building's sides. I was clearly unsure of just how the pieces were going to intersect at the corners so the parts I created were ambiguous. I thought I was using 2 layers of 1/16" ply to make the upper wall trim. So I super-glued the two pieces together only to find out that I really needed one thickness and destroyed one piece trying to get the CA apart. I find that CA holds the most whenever you want to take them apart after finding out something was wrong. I find that CA holds least in applications where it must hold or bad things can happen.
The scratch-built parts were from various thicknesses of styrene strip upon which I had to hand-engrave the brick pattern to try and match the laser-cut bricks on the rest of the model. This was an entirely UN-satisfying chore which produced dubious results. But it did clarify what design changes are needed on the production drawings which I'm modifying after each work session.
In this view you can see the trim on the end. It overlaps the side by about 1/16" to which the corner trim should abut. In the re-design, I'm going to make both pieces over lap the corner by one thickness and then ask the builder to file/sand a bevel in the corner so they'll meet exactly in the corner. This will be the best solution since it will show no end grain of the the overlapping piece. Ideally, the 3/16" main wall thickness should be beveled too instead of tab and slot, but I'm not able to generate the accurate long bevel needed for the entire joint. The prototype building had enlarge buttresses at each corner which lent themselves to using cover strips like I'm using.
Notice too how the trim needed to be relieved for the nice "eyebrow" lintels that are going over many windows in the project. There will also be roof capping on the parapets that's not done in this picture. I realized that I had left out the loading door parts in the first set of drawings I sent Andre. I'm correcting that also in the next set of drawings.
Attachments
Nice job on the scratch built parts. I received Andre's Drug Store kit today. I ordered it for my wife to give me for a Fathers Day gift, so after inspecting the parts, I wrapped it up for Fathers Day. I must say, the laser etched brick parts are exquisite! The detail of all the rough places on the individual bricks is amazing! To see it on a large building must be fantastic. Also, I never expected the walls to be so thick and sturdy.
I can also see what you mean about exact measurements on your drawings is necessary.
this post and Andre's work on your buildings made me decide to have a building made by Andre. it will be my first Model of this sort so I have a feeling it is going to take me a long time to build it ![]()
Yes, but it will be a wonderful project to work on, and one to admire when finished.
That's an ambitious project. There're lots of intersecting roofs and gables, a long front wall which may or may not have to have seams in it depending on what stock you're using and André's capacity. The long canopy roof also falls into this category. What material was the prototype made of. i.e., clapboard, stucco, brick, etc.? The height of the building is also a question. Clapboard siding comes in 6" widths. For walls higher than 6" you will have a seam to design. If you're doing it out of brick or stucco then André can cut the part out of wider Masonite material and you'll have no seam to worry about.
Will you use production windows: Grandt Line, Rusty Stump? Or are you going to design and have André cut them? If you're going to do the latter, perhaps you should have a discussion with André about it before you do your drawing since there are some nuances you need to be aware of. You'll also have to provide roof shingles. I've just ordered the first set of slate-like shingles from Rusty Stumps. The distillery will take four sets. That's $40.00 just for shingles. These projects, even if you design them yourselves are not inexpensive, but they're highly rewarding.
If you use clapboard, the corners are much easier to design and build. You just butt each side to a 3/32" square corner post and glue. This is how Bar Mills does it. Bricks are much harder in every way. They're way harder to draw since there are no O'scale brick-engraved wood sheets from which to cut. You can buy and cut scale millwork clapboard in our scale so you can draw plain walls and specify the clapboard material. Take it from me, designing the bricks will add hours to the drawing time.
Then there's what to do with the brick corners. André butts up his corners and then puts a cover strip on the exposed end grain. I'm using slot and tab construction for strength and alignment, but this now exposes end grain on both edges which must be dealt with. I'm in the process of rethinking how I want to do this going forward. I'm thinking that I'm going to have the cover strips meet in a mitered edge thereby removing any traces of end grain exposure even from the cover strips themselves. Mitering thin 1/16" stock shouldn't be too difficult to do with a piece of sand paper fastened to a flat surface.
The parts that will be really cool are the roof supports. These will come out great when laser cut.
Good luck with the design. If I can be of help let me know and we can work it through private eMail. I'm expecting a finder's fee from André with all this new business I'm getting him ![]()
well it should be interesting to build to say the least. it is clapboard so if I understood correctly should be easier ![]() he is cutting the windows and doors also for me. which sounds like that makes it easier also
he is cutting the windows and doors also for me. which sounds like that makes it easier also
the plan came from someone else that I bought it was for foam core or cardstock I'm just having it cut up so that it is in wood. ![]() this should be a fun project
this should be a fun project
"These projects, even if you design them yourselves are not inexpensive, but they're highly rewarding."
You sure said that right! My brass steam locomotive project total is nearly what a new Legacy steamer sells for new!
I really like your 'current' project! Being in KY, you have to have a distellery on the layout.
Having visited the Biltmore Estates, it truly is a magnificient place everyone should see once in a life time. I was blown away by it. And, that stuff doesn't really interest me much!
Vanderbilt inherited $10 million from his grandfather which is over $280,000,000 in today's dollars and that may not be enough to re-create Biltmore even if you could find extant Italian stone masons to carve all that limestone. As it was, it nearly bankrupted him. His widow sold 117,000 acres to the Federal Government which became the Pisgah National Forrest to help pay his debts.
My Victorian station cost over $200 in raw materials and that was completely in styrene. I'm planning on retailing a kit of the distillery and I'm working to bring the overall costs down a bit so it's affordable. I can see why B.T.S' entire sawmill complex will cost you over $3,000 to buy the kits.
Back to the Distillery pilot. I finished all the trim work today making (and re-making) styrene trim (that will ultimately be more laser-cut parts). My scribing in no way duplicates the beauty and regularity of the laser etching. It reinforces the decision to have the model laser cut in the first place. I changed the way I was cutting the "eyebrows". Instead of making them curves to follow the lintels, I selectively took out "bricks" to square it off. Bricks wouldn't be trimmed in such a curve. They're more like pixels in that regard.
I'm now at a point where I can make all the drawing corrections on the kitchen and the main building for the production version. I'm still going to have to build the main building pilot to give myself the level of assurance that I now have for the kitchen. I waiting on a shipment of corrected parts for the main building. But meanwhile I'll finish up the kitchen. I have a left over Grandt Line chimney that I'm going to put on this building.
Here's the four sides before priming.
This view clearly shows the notches above the lintels.
After dinner I took the kitchen and connecting corridor outside to put on the Rustoleum brown primer. This is the same color I used for the fire house. It's very hot here tonight and there was a breeze that kept changing directions. Every time I thought I was spraying with the wind I wasn't. This will dry over the weekend and then I'll give it another sealing coat of Dullcoat. I found that the joint compound dissolved some of this paint on the fire house and to avoid that I'm sealing it again with a non-water-based product. I'll still use the alcohol wash as before.
It looks overly red in the sunshine. It's more brown than that in person. The parapet tops of all the walls will need some capping tiles. I'm going to use styrene for this to simulate the stone that would be used in this instance. The reverse side of the Masonite is not smooth. Some of this parapet wall will show after the shingles are in. I'm going to simulate tar paper going up to the capping to cover it. That's not so far fetched. Lots of roofs are made like that.
I was going to glue the corridor onto the kitchen. I had it fitted and even had my clamping procedure down. Then I realized that it would make getting its two windows installed much more difficult. But I needed to check one thing first. Could I get that roof on with the corridor in place. I tested the theory and, yes, I can easily slip the roof down the groove into position. So, installing the corridor will have to wait until all the windows are in place. Again, that's why I'm making a pilot. I'm going to have to create instructions for this as a kit and it needs to go together without undue complications.
Attachments
And one more thing.
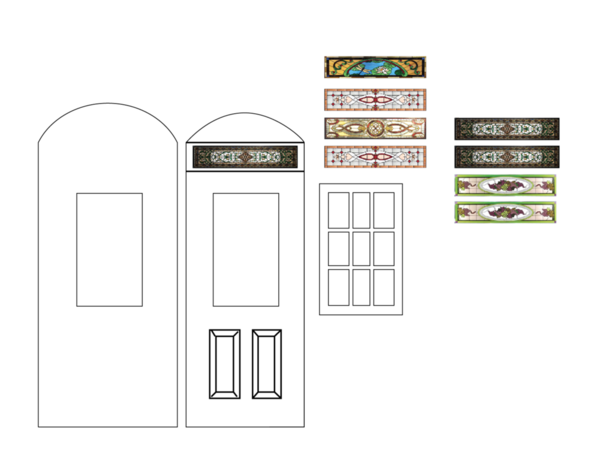
There is a stained-glass window in the transom of the kitchen door. I googled "Stained Glass Transom Windows" and found many to choose from and several in the same proportions of the model. I copied the images, imported them into Adobe Illustrator and then shrunk them to fit the door opening. I first used an enlarged image of the opening to shape the image to fit and then reduced the images to fit the opening.
I printed this image out on transparency film and will cut them out to go into the opening. I'm going to use 0.010" clear styrene as glazing. This will be put on top of that 'glass' to give it some body. Transparency film is rather flimsy. This image is not to scale. The real window is very small. I printed out several styles to see which one will show up best with the backlit LED lighting.


