
I'm wanting to change most of the layout from Scaletrax to Atlas 2 rail converted to 3 rail. The middle rail is N scale rail.

The first agenda is to see if I can produce an ultra smooth electrically correct 3 rail switch using Atlas 2 rail 7.5 turnouts.

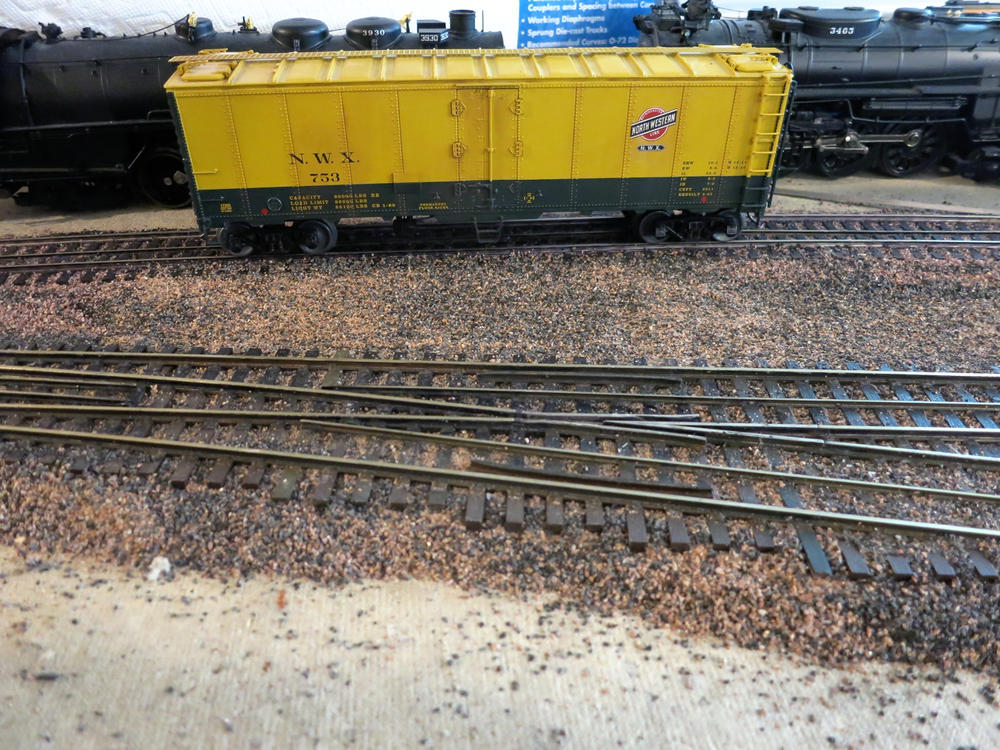
This is the beginning of the series.

switch1First thing is I had to move the guard rails a little less than 1/8th inch so modern 3 rail wheels will fit through. Then I had to file down the top of the frog so there would be no jiggle regardless if the car had 3 rail wheels or two rail wheels. In this first photo one can see the original mounting holes

This photo shows the movement of the guard rails. The guard rail at the bottom has the new spacing. The movie shows how smooth the new set up works with 3 rail cars.


Attachments

Images (2)
  • switch1
  • switch 2
Videos (1)
turnout mov. 1
Last edited by Ron H
Original Post

Replies sorted oldest to newest

The movie doesn't show where the cars are crossing the frog, only the points.

In the photo, the only guard rail that appears correctly positioned looks to be in the default 2-rail location. The one that looks like it has moved (on the diverging route) looks reversed, like it's poised to catch an errant flange rather than ease it toward the stock rail.

I did similar work to the old 1970's version Atlas switches, they're still on my test track loop serving as the yard. My motivation for making those was purely economic--at the time (late 1980's) they were something like $8-$10 each for manual versions. In my case, the guard rails were molded as part of the base so I just cut them off and never got around to making new ones.

---PCJ 

Ron - One suggestion.  In the book Detailing Track, Masterclass Modeling Series™ No. 2, by Mike Cougill, Joe Giannovario wrote about what was wrong with Atlas turnouts from a modeling standpoint.  The problem is that the frog and guard rails are way too long to look prototypical.  I modified them using some guidance in the article.   They do not need to be as long as they are and are easily shortened.  I didn't go as far as Joe because I was converting the turnouts to 3 rail, but they look much better than a stock Atlas turnout.  You can count the ties to see the difference between mine and the ones on which you are working.  

Good luck, once you do one, the next ones will go much quicker.

BTW because of family needs I haven't even looked at OGR in a year.  I was surprised to see your post.  Very nice. 

Howard, Great to hear from you. If you have the time check out the super detailing of the Williams cab forward. Lotta work , but turned out well.

Railride, you were right. Here are 2 more videos at the frogs.

I've got to do just s tiny bit more filing on the frog. But, it is very smooth. 

Attachments

Videos (2)
switch 2
switch 3

I am now fab-ing the N rail third rail. Because the N rail sits so low between the 2 rails one must ramp the third rail up to the height of the outside rails so the  third rail rollers won't bump the rail as the roller crosses the code 148 rail, making the loco or passenger cars jump. Also, to thoroughly secure the third tail I use a combination of pinning through the ties and brass cross plates soldered to the 3rd rail. The rails will be epoxied to the ties after painting the turnout ties and rails.

N rail 1n rail 2

Attachments

Images (2)
  • N rail 1
  • n rail 2

Ron

 Thanks for doing this thread.  You have already converted me to building my layout in 2-rail code 148/n scale center rail.  My first thought about 2 rail turnouts was "No way."  But now I'm intrigued. 

Could you clarify your modification of the frog?  Are you filing down the top of the frog rail or the channel?  I would expect it's the channel to allow for the hi-rail flanges.

Bob

Bob,

There are some 3 rail wheels that simply not work. It is those that bump along the tie plates on the code 148 atlas. Those that do clear is what I have modified the frog for. I have both ground the channel and filed the top of the frog. Not very much though.

It is the electrical part I want to prove out. We'll see soon.

Also on the hidden parts of my layout, which is an around the room layout , I've left the scaletrax in place. I'll demonstrate how to ramp up the code 148 to mate with the scaletrax later.

Ron


Eureka it works !

Finished the first prototype turnout and wired up a test. Used my 3rd rail super Hudson and it ran through the turnout both sides forward and backwards under TMCC control. Went totally smooth with no glitches. I did not get a video as my phone had no more storage. Deleted a bunch of stuff and snapped 3 quick pictures.

switch trial 1switch trial 2switch trial 3


Attachments

Images (3)
  • switch trial 1
  • switch trial 2
  • switch trial 3

Nice work. But I think to make others more informed when they try this for them selves could you list the code of the "n" rail ? I assume by the profile it is code 80 stripped from Atlas flex right? I know from my past experiences handlaying track if you are doing much of this to buy micro engineering code 83 rail (or whatever size rail you choose)  by the 99 foot bundles. It saves a lot of money ij the long run. But great looking conversion ! I enjoy these threads very much.

Hey TJ,

and others. Actually this is code 55 N scale. It's really small. Some things I've learned about mounting the rail and joining the rail. I joined the rail with N scale joiners and they were really a bite in the bo-hunk. Also the way I epoxied the soldered on brass plates to the ties is not viable long term. So I am going to drill holes in the brass plate and epoxy and pin the rail into the ties.

I'm also going to show how to distress the tie ends so they don't look so much like plastic Then weather and paint the switch.

Best to all,

Ron

Ron,

How did you ramp up the code 55 rail for the pick up roller to cross the closure rails? I'm building switches with a Fasttracks jig and am at the stage to add the center rail. I started on a project similar to this a couple years ago but a change of address put that on hold. Now that I am moved I'm finally at the track laying stage and am using all code 148 track with code 55 center rail. 

Joe

I appreciate people thinking outside the box and trying new things and you've done a nice job. What I would really like to see is a new 2 rail HiRail track system. If Atlas were to make the adjustments that you've made to frog, wing rails, and guard rails then you could run MTH HiRail Proto 3/2 equipment on it with no mods. Currently only Gargraves and Ross make 2 rail HiRail track. Neither of those look as nice as Atlas.

You've encouraged me to do some experimenting with my Atlas turnouts. Thanks.

Jonny,

 I agree. With so many of us using 3 rail equipment that does not have pie pan wheels, there is probably a market for code 48 three rail. Atlas would be my choice or Micro engineering.

Joe,

If you look at the post I made on 8/6 you can see how I ramped up the rail. I bent the end of the code 55 rail, about 3/8s from the end. I reinforced the bend with a tiny bit of solder and drilled a mounting hole to adjust the N rail to match the height of the code 48 rail. I provided a soldered brass screw about 4 ties back from the end to anchor and start the ramp. These pins were epoxied through their respective mounting holes.  Works well.

Ron

I painted the N scale rail with black Neo Lube because it is electrically conductive and this switch will be part of a cindered yard.

Next I begin to rough up the ends of the tiles with a mill and a razor saw. I like close ups so want the ties to look old. Here one can see the effect

before paint.

Have to run to lows to get some paint for the ties and rails.turn out weather 1

Attachments

Images (1)
  • turn out weather 1
Ron H posted:

I painted the N scale rail with black Neo Lube because it is electrically conductive and this switch will be part of a cindered yard.

Next I begin to rough up the ends of the tiles with a mill and a razor saw. I like close ups so want the ties to look old. Here one can see the effect

before paint.

Have to run to lows to get some paint for the ties and rails.turn out weather 1

Great work.   Now that I seen how you did the turnouts. I am sold with this option.  Question is the Neo Lube offered in any other colors?  

The Neo Lube only comes in black. On other non cinder ballasted track I leave the rail its natural color and it blends in with the ballast.

Also, there is one electrical change I made I need to share with ya'll. I'll do that tomorrow. The points are electrically connected to the closure rails to the frog. I ground through those brass connections from the back isolating the closure rails.

Well, back to Olympic volleyball. My grand daughter hopes to play for Texas A&M and Nanna and I are her sponsors.

Ron


Last edited by Ron H

This is the finish. I've got a dozen more of these to do. So I can put back together the half of the layout torn apart.

Three pictures of how the weathered turnout looks. I sped through this and put the switch into some ballast. One picture of the backside of the turnout to show where I ground out the brass electrical connection between the points and the closure rails to the frog. I did this to insure there would be no shorting as rollers rolled over these rails.

weather 1weather 2weather 3isolate the points

Attachments

Images (4)
  • weather 1
  • weather 2
  • weather 3
  • isolate the points

Ron, that looks fantastic! Thanks for taking the time to describe and photograph the process, it has saved me hours of experimenting. My switches are scratch built in a fasttracks assembly jig with several pc board ties. I have ALOT of gaps to cut! Your photos show that it is definitely worth the effort.

Joe

In the early 80's I used the Atlas 2-rail,  and I forget if I added an HO or N center rail.  This was the early Atlas track, when a straight or curve was $.99 each, and the remote control turnouts were $7.50 each.   I too was able to modify the turnout as well.   All of my post war and modern trains ran fine with the large flange wheels.

Dave


Attachments

Images (2)
  • mceclip0
  • mceclip1

After many many tries to make this concept sturdy enough to accommodate high speed passenger train pounding.

And to accommodate all the variations between my various locomotives pick-up wheels. I finally just this morning hit the sweet spot that I can replicate reliably.

I did this as I hated the wheel bounce customary to Atlas or Scale trax turnouts and I wanted 148 rail.

Straight through.

Turnout left

I don't recommend this to anyone, but for me, no jounce, no bounce is a big deal and kinda worth it.


Attachments

Videos (2)
TO 2
TO 1

Add Reply

Post

OGR Publishing, Inc., 1310 Eastside Centre Ct, Suite 6, Mountain Home, AR 72653
800-980-OGRR (6477)
www.ogaugerr.com

×
×
×
×
Link copied to your clipboard.
×
×