


Im working on 3..still got to finish my S1 duplex and S2 turbine...Got a rail king SD45 that I'd cut the chassie in half and exstended it 3" ..Putting a williams SD45 scale PRR shell..going to add leds and hope smoke unit to it too.So it will have mth chassie and guts with a williams shell.ill post pic of it tomarrow.
I pretty much tinker with every engine in one way or another. My most involved has been on a Weaver CP Royal Hudson. All the detail parts were there, but it really lacked the paint detail. Even the beaver on the cab was done in a single color gold, which required 2 beaver decals from sunset to correct each one, along with a white bar decal and some custom mixed paint. The rest was paint detail on the window frames, hand rails, side rods, cylinder covers and various other areas to bring it to life. I added some window glazing, a new headlight and replaced the ugly gray cast wheels with some plated ones. Soon I will replace the rest of the wheels, paint the centers and upgrade it with ERR cruise and Railsounds to be worthy of sitting next to my 3rd Rail CP Selkirk.


Attachments
Images (5)
Sometimes...
Here's a Marx 666 that I reworked the pilot and removed the ladders under the cab. sand pipes were also added on the right side of the boiler. The left side already them molded in. Paint also helps improve the looks.

A set of Weaver E-8's A lot was done.
Here is a link to the upgrade pictures. Click on the underlined phrase for a slideshow.
I've been doing some (and plan more) modifications to a Lionel T-1:

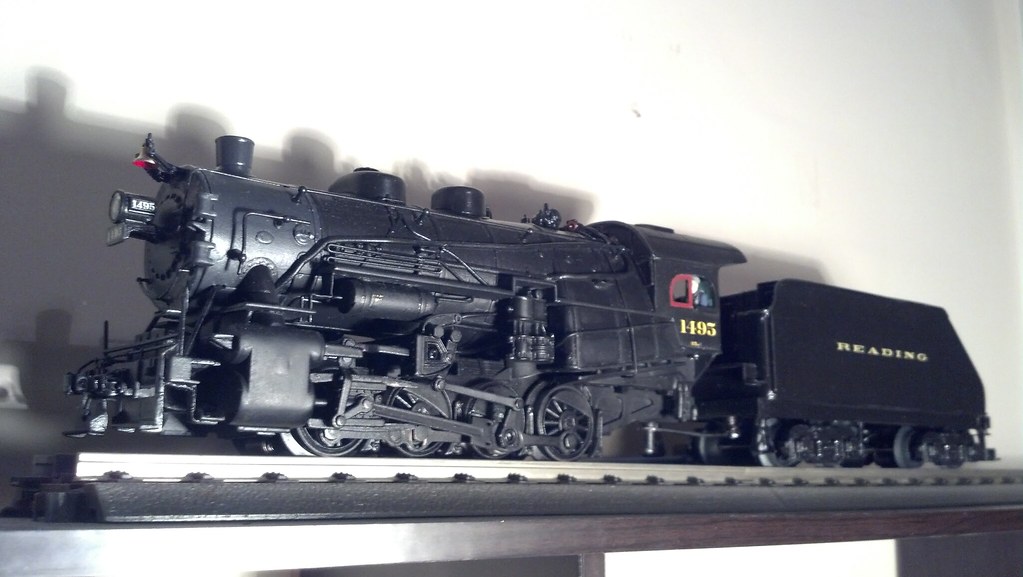
I've heavily modified a Lionel USRA 0-8-0 to represent a Reading Company E-5sa switcher:
Currently I'm modifying a Lionel Dockside to represent Reading's Locomotive Shop switcher #1251 (preserved at the Railroad Museum of Pennsylvania):

My future plans include modifying another USRA 0-8-0 into a Reading I-9sa 2-8-0, and using the mechanism from a Lionel Berkshire Jr to build a larger Reading I-10sa 2-8-0.
I do. I add Arttista engineer and fireman figures to all my locomotives. I like them because they are actually scale sized, and they are usually doing something (waving, fiddling with a leaver, or leaning on the windowsill). I hate the Lionel and older MTH figures, they are just seated there with the hands to their side, and looking straight ahead.
On my Southern steam locos, i usually paint the rim a wheels white... if the prototype had whitewashed wheels.
And also I always paint the inside of my bells red.
Here is an example of one of my modifications on a Weaver Sou. 2-8-0
Before.

After

I added white to the wheels.
Added extra white striping (on the tender and under the cab).
Painted the windows red.
Moved the bell.
Added Arttista figures.
Painted the leavers and dials in the cab.
Added whistle cord.
Added Kaydee 805 coupler on the rear.
Still need to:
Add bell cord.
Move the marker lights lower.
And a few more odds and ends.
Attachments
Images (2)


I have cut the bell off my Weaver A&Y 481 2-8-0 and replaced it with a Cal Scale bell mounted on the top front of the smoke box, one of two ways Southern typically located theirs.[A&Y leased their freight engines from the parent Southern Ry].
The smokebox, firebox and cylinder covers need repainting in imitation aluminum or light graphite.The tender deck should be oxide red.
A&Y 542, pictured down below,was cosmetically restored at Spencer shops by the N.C. Museum crew and is really dolled up,it was in the movie "Leathernecks", and moved about with a small Yard Goat coupled behind.
Good job on your 2-8-0 Ben!


Attachments
Images (2)

Beautiful work, everyone! I really enjoy the dedication and creativity. Here are 2 more Marx steamers. A tin 0-4-0 (I'm not sure of the number, as the factory didn't apply one to the body) that has had the simulated pilot and trailing wheels removed and functioning pilot truck added. Compared to a factory stock example, above.
Also, a #490 with custom paint details and the horn removed.
Attachments
Images (2)


Only mods have been LEDs for headlights, mars light, sound systems, and then diodes and thermistors for speed control and startup.


Slowly over the last two years I've been replacing what I had in HO with custom builds in O scale. Finished engines now include a BN E9 commuter, IHB sw1500 (second one in the works, posted on another forum). Current projects are a Metra F40c and IHB SD20. Planned builds include Paducah geeps, Crandall unit and a Amtrak Cascades Talgo. Ill be happy to help anyone that is looking for tips/ideas in detailing or kit bashing. I'd post pics but for some reason it will only let me do it if I start a thread and not as a comment.

My new projects are a K-Line Plymouth and MTH SW1 repaint.
I love the K-Line Plymouth switchers(I have two), but the C&O version has a horrible yellow that almost looks fluorescent in person. The yellow was sprayed over the blue coat which gave it a bright and slightly greenish yellow look. Anyway, I took mine apart and am starting to strip the paint. This one with be painted black and lettered for Pere Marquette. This will be a fantasy paint job.
The gray shell seen in the photo to the right was an NYC SW1. It has been stripped of paint and after adding a few details it will be ready for repaint. Will also be painted and lettered for Pere Marquette...PM #11 as it sits in Baltimore.

Attachments
Images (1)

Originally Posted by TrainsRMe:
The basic locos can benefit greatly from detailing. This Lionel 8625 2-4-0 has been made into a 2-4-2 with trailing wheels added, window frames painted, and numbers added to the headlight.

Nice work! I should do that to some of mine ...
Attachments
Images (1)
Great work, guys!
A question, is there a thread somewhere that discusses how you manage to get all of these detail items off of the engines so that they can be painted, without breaking these small, delicate parts? I can see myself breaking every little piece I try to get off the body.
What's the best product for stripping paint?
Thanks,
Ron
Originally Posted by FrankfordJunction:
how you manage to get all of these detail items off of the engines so that they can be painted, without breaking these small, delicate parts?
Which small detail parts are you talking about? most parts I paint in place on the locomotive, and either mask off things I don't want painted, or paint out details by hand after the fact. And when I can't avoid removing parts... sometimes they break, and you replace them (with better aftermarket parts of course.)
Depends on the parts for me. Windows I try to take out with hot water and a small screwdriver. Wires I pull out and replace by cutting/bending my own. The key is taking your time and assessing each part if you wish to dismantle it. As for paint remover, several products out there. 91% isopropyl works great on weaver engines but would destroy a mth. Chameleon or scale coat is your best but most expensive options. I had mixed success with DOT 3 break fluid in HO but have yet to try it in O myself but my friend did on a weaver engine and the shell disintegrated. Hope this helps.
Ron,
To remove detail parts that are glued in place, I put a drop of Z-7 debonder(made by Zap). This softens the glue and the part can then be pulled out with small toothless pliers. **Z-7 will remove paint in the area applied. As long as you are doing a repaint, it's not a problem.**
For things like grab irons, that aren't glued, I place a index card under them and lightly pry them with a flat screwdriver. However, if I know that I am going to make new grab irons anyway, I will just pull them out with pliers. The index card prevents nicking a plastic shell. Some small parts that aren't glued may have a very tight fit, like my Plymouth's stanchions, in this case I find its hole inside the shell, insert a blunt object and tap the part out with a small hobby hammer. My hobby hammer was made by X-acto and has several heads that screw on.
I strip paint with 91% iso. alcohol. **All items that I have stripped have been modern Lionel and MTH...I haven't had a problem with it affecting the plastic yet.
All this work deserves an article in OGR magazine. I have wanted to do this for years but have not due to fear of ruining a good model. My one attempt failed when the 91% alcohol dissolved a lionel F-3 shell. I really would like to learn more about cutting and modifying shells to fit specific needs.

Keith, Tunnelmotor3000, Wowak,
Thanks for the info. It gives me a place to start with a repaint, if I can finally bring myself to try to modify an engine or rolling stock. I'll work with an inexpensive piece first.
Can't start anything right now 'cause the wife and I need to help our daughter and son-in-law out with arrival of a new grandchild. That will tie us up for a few weeks. Thanks, again.
Ron
Originally Posted by FrankfordJunction:
Keith, Tunnelmotor3000, Wowak,
Thanks for the info. It gives me a place to start with a repaint, if I can finally bring myself to try to modify an engine or rolling stock. I'll work with an inexpensive piece first.
Can't start anything right now 'cause the wife and I need to help our daughter and son-in-law out with arrival of a new grandchild. That will tie us up for a few weeks. Thanks, again.
Ron
Ron, you are welcome and congratulations on the grandchild.
Ok, here are a few pics of the BN E9 I've been working on. This started life as a Weaver conventional engine. Only thing I did to the frame was remove the old fuel tank and add a U25B tank (not shown in these pics). Still Needs some work but nothing special,I.E. decals, beacon, grab irons on nose. I plan on putting proto sound in it eventually but she will do fine as a conventional engine for now. enjoy!


Attachments
Images (3)


Originally Posted by Bob Delbridge:
Yep!!!
I don't have a single engine (yet) that has not been modified in some way. From fixed pilots, Kadee couplers, crew added, LEDs, electronic packages (ERR Cruise Commander, PS2 installed), repaint, all the way to taking my Dremel and cutting away a Bellpaire boiler to make a RailKing 2-8-0 into something that looks more like a Seaboard Air Line engine.
When my 3rd Rail E7 gets in that may be the first engine not to get modified.
Williams E7 with the works:

Okay.. I've seen this photo several times. I have to say I think it's gorgeous. That's all.
Thank you, Ace. Like you, I have bought many decrepit items to see what I can do with them. This 8625 came from a yard sale and needed several parts. I should have mentioned, too, that I gave it a coat of black paint to decrease the plastic look.
How to repair a crack on an MTH Superliner shell questions?
The side of the shell split near the middle of the car from the bottom to about half way up. It might have happened when I removed the car from the Styrofoam set box.
(1) What kind of glue to use and how to apply it?
(2) Should I remove the shell before attempting to glue it?
(3) Should it be clamped after gluing it?
(4) How noticeable will the repair look and is it worth trying to touch it up with paint and who makes silver Amtrak Superliner paint?
Hmmm. If it was my car I would remove the shell. Using plastic cement I would glue a thin piece of styrene over the crack being careful not to use too much so it doesn't get near windows and fog them up. Because of the size of the car I would use string to hold it tight together. Let it sit cracked side down for a day or two so the cement can fill into the crack. Wet sand the outside of the area to remove any cement and smooth the crack line. You might need to use a small bit of bondo or your choice of filler over the crack if its that noticeable. Polly scale makes both stainless steel and aluminum paints. One of those should be a close match. Hope this helps!!!
![]()
Here is a few that I have done. Most of them have started out as either dead hulks or a pile of pieces from various locomotives.
The Rock Island NW-2 is a combination of a MPC and post war parts.

On the PNC GP7 I added lift rings and grab irons, added new smoke stacks, filled all the holes on the top of the shell and the holes for mounting the shell to the frame. To attach the shell to the frame I drilled new holes on the frame and built new mounting post on the inside of the shell. Now it mounts from underneath.


The Rock Island GP7 is a dummy. All I did to this is painted out the Rio Grande on each side, painted the pilots and frame, and added the rock island decals and numbers.


This is my current project when it is complete it will be a C&O GP7. I'm planning on adding the same details as the PNC GP7 and mount the shell to the frame the same. I will also added details such as a nose mounted bell and 5 chime horn according to prototype photos.

I also am working on repainting and detailing a Williams NW-2 for the New York Central.
Attachments
Images (6)
There is some great work going on out there. It takes a lot of talent to do what some of you have done.
I put a 736 boiler front on my 2046. Does that count?
(almost) finished E9, still waiting on decals.

Starting a Metra F40C. MTH FP45 shell cut to scale, windows and exhaust off a Atlas F40ph.

Attachments
Images (2)


Some very interesting and helpful comments and photos, here. My own mods have been fairly minimal but, for example, on a K-Line Pacific painted in the Milw Rd Hiawatha colors, I removed the outside frame trailing truck and replaced it with an older Lionel spoked wheel, inside frame truck. Not a big deal but the prototype had that style of trailing truck and, (I think) it looks better this way.
MTH's Rail Kink rotary snow blowers were always funny looking and I thought that something was missing. Finally I realized what it was: rotaries were steam powered and therefore needed a tender. I added an old K-Line tender to mine, cut the rear cab end open and fitted in an old cab from a plastic Lionel steam engine and added a smoke stack to the center of the car. Again, I think it looks better and I will still add some more things like a track flanger and maybe some small wings.
Other than to have a number of my steam engines weathered, and now, even an old diesel with mild weathering, I've always been a bit hesitant to "mess up" one of my expensive investments. I'm getting a bit of inspiration from some of you guys' photos, however. Probably tackle a few more things.
Paul Fischer
