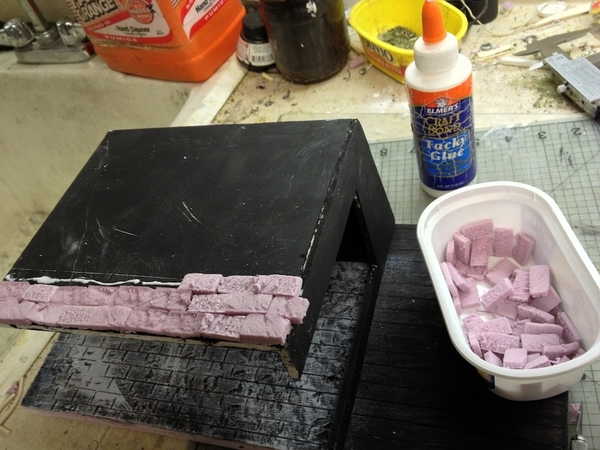
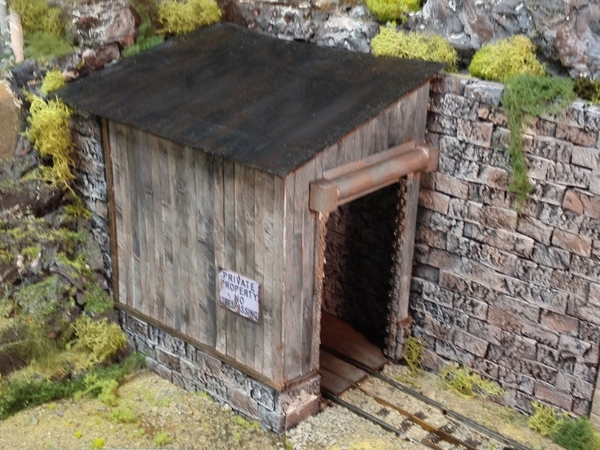
Another option is to make individual stones out of very thin slices of pink foam. They can be individually glued to foam core. I have never done this with random stone, but I have done it with cut stone:

|


|
chris a posted:Quarter Gauger 48: I mistakenly ordered the WRONG ones with the "self adhesive" back, they are smooth. I went to his current listings and found what I believe to be the TEXTURED one. I don't think I am allowed to put a live ebay auction link in an OGR post:
So here is the item TITLE and description from the seller (Starboc1 from Greece) This should be what you are looking for as it is the same wallpaper stock that my brick is printed - -- 1 mm thick Italian Wallpaper and should have physical relief and texture in it.
Item Title: ! 6 SHEETS EMBOSSED BUMPY BRICK stone wall 21x29cm SCALE O scale CODE vg667y
Item Description:
YOU have the feeling of real stone..6 SHEETS BRICK wall 21x29cm O SCALE EMBOSSED BUMPY
each sheet 21cm x29cm
Professionally printed on a high end digital press. The color and quality of these sheets is exceptional.
YOU WILL GET 6 SHEETS
MADE OF NEW SPECIAL DESIGN , 1 MM ITALIAN WALLPAPER CARDBOARD TEXTURE BUMPY
Thanks Chris'. your efforts are appreciated'... I have placed the order'...
Avanti posted:
Thanks very much Pete'. Great idea. How did you cut the foam thin and then the stone to size, That wall looks pretty good........ I would like to give it a try'...
Quarter Gauger 48 posted:Thanks very much Pete'. Great idea. How did you cut the foam thin and then the stone to size, That wall looks pretty good........ I would like to give it a try'...
I first cut a "stick" of foam the correct width and height of the stones. I then sliced thin individual stones using a single-edge razor blade. It would be a bit harder with random stones, but should be doable.
If you have the room for a full 1/2" piece of foam, it is also possible to carve and paint very convincing stones. Here's an example:
The base of the sign is a single piece of foam, carved with a manicure tool. (the wall in the back is real stone glued together).
Interesting topic...I tried to see how just printing (free and readily available) images off the Internet would look. So, here are a couple of test pictures:
I hope to retire in a few years and incorporate these ideas into a new layout.
Tom
Avanti posted:Quarter Gauger 48 posted:Thanks very much Pete'. Great idea. How did you cut the foam thin and then the stone to size, That wall looks pretty good........ I would like to give it a try'...
I first cut a "stick" of foam the correct width and height of the stones. I then sliced thin individual stones using a single-edge razor blade. It would be a bit harder with random stones, but should be doable.
If you have the room for a full 1/2" piece of foam, it is also possible to carve and paint very convincing stones. Here's an example:
The base of the sign is a single piece of foam, carved with a manicure tool. (the wall in the back is real stone glued together).
Pete - really nice foam work. What kind of manicure tool did you use?
Sean007 posted:Pete - really nice foam work. What kind of manicure tool did you use?
You can get a little manicure set at the Dollar Store (at the eponymous price). It contains four or five tools. They are nice for embossing because they come in different shapes and none of them are too sharp.
Nice work Pete'... Cutting a stick of foam makes sense and then go from there making blocks.... Thanks for these wonderful tips'. It's nice to learn new tricks in making accessories for the layout'.......
MNCW posted:
Tom, don't wait for retirement'... Start now.... get a head start'...Those prints look pretty good for background use'........![]()
Pete, (Avanti), I decided to try your method, not for the spot I need to rework but as an experiment. I took a regular Styrofoam sheet and cut a strip, and then blocks for quarry stone wall. Glue on to a thin piece of chip board, painted and weathered with acrylics. Let me know what you think'..
Thanks again for the great idea'.. ![]() Showing the process for those that may want to try Styrofoam for stone blocks.
Showing the process for those that may want to try Styrofoam for stone blocks.
I've used the Vollmer cut stone sheet around a Styrofoam base for a homemade passenger platform. I like it. Over time the glue I used let me down but that's an easy fix on an accessible platform.
Cutting individual blocks out of foam takes more patience than I have. QG 48's Styrofoam workmanship is excellent and works well at a distance but the material doesn't hold up to close ups like the 5th picture. B who's ever getting that close to it anyway?
Quarter Gauger 48 posted:Pete, (Avanti), I decided to try your method, not for the spot I need to rework but as an experiment. I took a regular Styrofoam sheet and cut a strip, and then blocks for quarry stone wall. Glue on to a thin piece of chip board, painted and weathered with acrylics. Let me know what you think'..
Thanks again for the great idea'..
Showing the process for those that may want to try Styrofoam for stone blocks.
I think it looks great, given that you were working with styrofoam.
That said, when I said "foam", I was talking about the pink or blue insulation foam you can buy by the sheet at Home Depot. It is much less friable than styrofoam (less messy, too), and it will take an embossing much better as well. I think if you repeat your experiment with that material, you will be very pleased.
Okay Pete, thanks very much'. Actually, I have used Styrofoam quite a bit for stone and cement foundations and piers. I like the look of the imperfections and indentations in the foam. I think it does look like cement, stone. I will try the green foam as I have plenty of it. I find it a little difficult to cut. I haven't tried embossing it. But I will....
Access to this requires an OGR Forum Supporting Membership
