Hi,

Some of you may recall that about 3 months ago, I was trying to find a simple motion detector switch to turn on my Atlas Well Pump (derrick) and a small flashing light.   Both the pump and light operate on DC current.

My power supply is a very small DC transformer with throttle control, designed for N Gauge trains, that I bought used for $5.00.  I have it set on low, about 5 volts.

I decided to buy an Evans Design DC Motion sensor switch, which turns on when it senses motion, then runs for 15 seconds, and then turns off.   It is very inexpensive, about $10 with shipping.  Although the main title says that it is for operating LED lights, the description plainly states that it can be used for other trackside accessories.

The sensor has a fish-eye lens, which looks like a Bee's eye, that covers a complete hemisphere, 360 degrees.   I found that it can detect motion anywhere around or over it, out to a distance of 4 feet or so.

I mounted the sensor by drilling a hole in the top of a mouthwash cap, and having the lens stick through the top.  Here is a picture of the sensor label and the mounting.


P1020426


P1020423


In the foregoing picture, you only see two wires coming from the sensor, but in reality, there are four.  Two go to the power, and two go to the accessory.   

I very "loosely" wired up the sensor to the 18 gauge power lines running from the transformer, and to the lines running to the oil pump and a small 3-5 volt LED light, and it worked great.  Any motion turns both of these on for 15 seconds, and then it goes off.  BEST OF ALL, is that you can cover up the sensor with a dark object, leaving only a portion of the fish-eye exposed, and the sensor will only come on when there is motion in the field of the uncovered eye.   I was able to place a Lionel lantern cover over it (from an O22 Switch), with three of the lenses covered with black tape, and one of the lenses removed to create a round hole, and the sensor would only come on if a train went past the round hole.

So, everything was great and I proceeded to try to permanently wire the circuit.

BUT, then my project failed.

1.  The wires on the switch are super thin, and they are far thinner than 22 gauge.  When the switch arrives, only about 3/8ths of an inch of the wires are striped on the ends, and I needed about 1/2 to 3/4ths of an inch striped.  My standard wire stripper slots were no good, and I had to somewhat "scrap" the covering off of the wires.

2.  However, these are solid wires, and trying to scrape them created dents and stresses in the exposed wire, which caused the wire ends to break off as soon as any curves or movement was applied to them.

3.  So, my first question is:  What type of tool should I buy to strip these super fine wires?    Is it even possible to strip them?

4.  My next problem was, that even on the ends that I was able to strip, I could find absolutely no way to attach them to the 18 gauge power feed wires.    I tried using crimp connectors (18 gauge, with the 18 gauge wire shoved in one side and the thin wire shoved in the other), but the very act of crimping the connector tight served to "snap-off" the thin wire.  Even when I got one connection to work, the thin wire is so thin that if you slightly bend it twice, it will break.

5.   So, how in the world can I connect these super thin wires to anything else?     Is my 18 gauge wire super overkill for running the DC voltage out a distance of 4 feet?    Should I be using 22 gauge power wires instead?  Even if I can use 22 gauge power wires, I still can't figure out how to connect the super thin wires to the 22 gauge wires.   Perhaps some type of power block connection would work, but again these sensor wires are so fragile that even trying to twist them around the post of a block connector screw may cause them to break.

6.  Maybe there is some type of "slide in and snap closed" connector that might work?

P1020424


Thanks for any advice on these questions.  The sensor works great, if I can just get it properly connected.

Mannyrock

Original Post

Replies sorted oldest to newest

Can't see your pictures, but looking at the motion sensor online,  it looks like they were designed to work with the LED connectors.

Get a bus bar, mount it permanently with the sensor.   You may have to connect the wire ends to the bus bar and then solder the  small switch wires to the wire ends.   Then connect the other devices to the other side of the bus bar.  If you want to run multiple devices hook up a low power relay.    Switch enables the relay which can handle higer currents for the devices.   With the relay you will need a tap into the power supply for the devices also.  The relay would be used a switch for the devices.   

Links are examples, I don't gurantee they will work in your setup.

No photos but sounds like magnet wire. Use sandpaper to remove the coating. 22ga wire can be soldered to the magnet wire pretty easily.

Dave at Evans also has smaller wire. Give him a call as he is extremely helpful.


5:49

I checked Dave’s website and he has 28 ga kynar wire which should work fine. I would twist the wires together, fold them back on each other so they cannot pull loose and secure with heat shrink.

Good luck.

Last edited by Bill Webb

Hi Guys,

I looked at the model railroad bus bars.

Problem is, I would need four separate bus bars, not connected to each other.  Black and red power wires into the sensor (to power and operate the sensor),  and black and red wires out on the other side of the sensor to send the power to the accessories once the sensor turns its internal switch on.

I guess I can try to solder the tiny wires to 22 gauge wire ends.  I am pretty bad at soldering.

Because the tiny wires from the sensor are pretty short, the soldering of them to the 22 ga power feed wires and 22 ga output wires would have to be done above the table, and then the ends of the longer power feed wires and output wires would have to be pulled down into a hole drilled in the table underneath the sensor unit, so that one set could run underneath the table to the transformer and the other set out to the accessories.   As mentioned though, the tiny wires are really prone to breaking under very little pressure or bending, so I am not sure they would survive the "pull through" and stapling operations.

When I was able to connect one of the tiny wires to an 18 gauge wire, the mere flex resistance of the 18 gauge wire was enough to break the tiny wire in half while I was handling and positioning the wires.

It seems as if I would almost need to solder these tiny wires and connections to a small computer board that is screwed on top of the table, which does not seem very practical.

I wonder why the manufacturer uses such tiny wires?   

Thanks

Mannyrock

@Mannyrock posted:


I wonder why the manufacturer uses such tiny wires?   


This is the heart of the problem.  There appears to be no good reason for the size and type of wire that was chosen.

It's a problem that's tough to fix after the product is manufactured and shipped to you.  So tough from what you've described that many of us might well avoid buying it in the future.

Mike

For stripping insulation off tiny wires (down to 30 gauge), you need a tool like this one:

https://www.amazon.com/DOWELL-...anship/dp/B07D25N45F

You can connect the two red wires shown in your photo above by tinning the stranded wire first, then apply flux to both wires, hold them so they overlap (put a heavy object on the stranded wire to hold it in place) and touch them with a hot soldering iron.  You don't need to twist the wires together, the solder will hold them.  There is virtually no current that will pass through the joint, so this method will be fine.  The smaller wire does not need to be stripped any more than it is.

It takes the right tool, some practice and a light touch to strip very fine solid wire.  I use "V" groove wire strippers for this.  When working with delicate wire like yours, I use the stripper to pinch the insulation without squeezing the strippers enough to nick the wire and then keeping the strippers perpendicular to the wire, pull firmly away to remove the insulation .

Here's a link to some v-Groove wire strippers:

https://www.google.com/search?...&sclient=gws-wiz

For connections: Wago 221 Lever Nuts may work Link: https://www.google.com/search?...=221+wago+lever+nuts

The 221 Wagos are rated for 12-24 gauge wire, but I've tested them with 29 gauge and they still hold it securely.

V-notch stripper_fine-wire_wago

EDIT, Note that with these Wago 221 Lever Nuts, 3/8" of stripped wire is enough for them to clamp onto.  Just look through the clear back and see that the bare wire end is only inserted past the end of the metal strip but the insulation isn't, then clamp the lever.  When you look at them, they're pretty intuitive.

Attachments

Images (1)
  • V-notch stripper_fine-wire_wago
Last edited by SteveH

cheapskate wire stripper

For entertainment value:

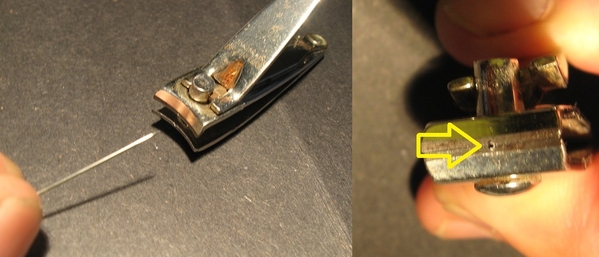
I can't remember where I saw this hack, but had to try it.  I think there was a youtube video too.

Firmly squeeze a needle with some old nail clippers you're going to toss.   For whatever reason a needle is harder than a nail clipper and you end up with a hole as shown on the right.  You have a bit of control on the hole size based on where on the tapered needle point you squeeze.  Then you put the unstripped wire into the nail clipper, squeeze and pull.  It actually worked - I remember testing it on 30 gauge Kynar wire.  Your mileage may vary...

Attachments

Images (1)
  • cheapskate wire stripper

Thanks for all of the great info.

I think I'm going to buy another Evans sensor and try this all again. 

I'll start by changing my feed wires on both sides of the switch to 22 gauge, and buy the stripper tool that Gunrunner has suggested, and then try using the Wago lever nuts.

I hope that somehow the reference to this post and thread can be brought to the attention of Evans Design.  This is a lot of time, trouble and expense just to hook up a switch to operate a train accessory, and perhaps this really great sensor can be redesigned in the future to use 22 gauge or heavier wire.   Train accessories themselves are typically very robust and get moved around a lot, so a sensor to turn them on and off needs to be easy to wire and robust as well.

Mannyrock

I purchased the strippers that Jon mentioned above after he recommended them the first time a while ago.  Can't tell you the amount of frustration I don't have since using them.  I used the green set in the past which only go down to #20  by turning the stripper on an angle to decrease the opening size.  Broke lots of wires doing it that way. Thanks again Jon !

Thanks for the additional info.

One thing is, that the wires that run from the sensor are fairly short, and if you want to mount it up inside a two-inch base, then the amount of wire that is left to run out of the bottom of the base is even less.  So, if you accidently break a wire off twice, which is easy to do, then you don't have much left over to try to solder to a feed wire or attach with a crimp connector.

I forgot to mention, as to the operation of the sensor, I found that you can't mount it flat on the train table next to the track, and you can't mount it only one inch high next to the track.  For some reason, my sensor would not operate in those positions when a train passed, even though it was aiming directly at the wheels of a steam loco.    It would only work if I mounted it high enough to face the body side of the loco.

These small wires also make it really hard if you want to try to run them straight down into a hole in the table, and hook them to the heavy transformer wires underneath the table, by means of a power block or Wago or similar things.  There is just not enough wire to work with.  And, I sure can't solder wires together when they are underneath the table and I am lying on my back.  :-)

So, if Evans  made the feed wires just 6 inches longer, that would be a good improvement too.

By the way, another ignorant electrical question:  If the transformer is putting out 5 volts DC, and the feed wires from the transformer to these tiny #30 sensor wires are a hefty 18 gauge, then is this like trying to attach a big round hose to a tiny round hose?  Will the heavier wire carry so much current (or whatever) that they will burn out the tiny wires?

What about the fact that the wires on the other side of the sensor will be connected to the 22 gauge wire of the oil pump.

I have often heard that a motor only "draws" the current that it needs, but I'm not sure if this only applies to AC power, or DC power, or both.

It seems as if Evans had in mind that this sensor was really intended for operating the little LED lights, and not traditional Lionel or Atlas trackside accessories, and so they went the route of using the same short tiny wires as LED lights.    This sensor has far better application possibilities than just lights, and I would gladly pay double or even triple the $8.00 price to have one with heavier, longer and more flexible wires.  22 gauge stranded would do.  :-)

Thanks for all comments.

Mannyrock

Yep, it's for #28 or #30 wire.  I use it with a couple of large reels of #30 solid Kynar insulated wire-wrap wire for wiring lights.  The wire is easy to hide and carries more than enough current for any lighting task. I've had my No-Nic stripper for at least 40 years, it has a lot of mileage on it.

I use the HANLONG TOOLS HT-5023-R Tool Wire Stripper for the other wire stripping tasks.

@Mannyrock posted:
If the transformer is putting out 5 volts DC, and the feed wires from the transformer to these tiny #30 sensor wires are a hefty 18 gauge, then is this like trying to attach a big round hose to a tiny round hose?  Will the heavier wire carry so much current (or whatever) that they will burn out the tiny wires?

What about the fact that the wires on the other side of the sensor will be connected to the 22 gauge wire of the oil pump.

You're right about the load (and applied Voltage) determining how much current is drawn from the source.  Knowing how much current the lamp and oil pump draw at 5V are the keys to answering this question.  I don't have the pump for testing or know which bulb you're using.

Whatever this total current draw is, should not exceed the rating of the Motion sensor.  The specs on it only say that it can power up to 30 LEDs.  Since LED current draw varies depending on the series resistance, a generous estimate for the sensor's capability would be around 500mA.  30 Gauge wire is rated for 860 mA, so it should be fine.  The sensor maybe, maybe not depending on the total load current.

If the load is too much, the sensor could be used to trigger an inexpensive  5V relay, which can handle a heavier load through it's output contacts, while only drawing a small current from the motion sensor at its trigger inputs.

Do you have a meter that can measure the current drawn by the lamp and pump without the sensor connected?

Last edited by SteveH

I've had good luck using an Exacto knife and new, sharp blade to strip the insulation off very thin wire. Just put the knife on the wire with slight pressure - just enough to cut through the insulation and not the wire and roll the wire until the blade has cut a 360 degree notch all around the wire and then pull off the insulation. The key is to use a sharp blade.

To connect the wires, strip both ends about 1/2" to 1" long and put a piece of shrink wrap about 1.5" long over one end and slide it down the wire. Take the two wire ends and weave the two wires together lengthwise so you end up with one straight piece of connected wire. Apply some solder to the bare wire connection (doesn't take much - you're only trying to prevent the wire from unwinding) and slide the shrink wrap up to cover the now soldered bare wire connection when it cools and then heat the shrink wrap to cover the bare wire with your soldering gun or heat gun.     

You could also use a pre-soldered butt splice to place the two cut ends into and then heat to make a solid connection.

Last edited by Richie C.

I simply strip about 1/4" on each wire, tin each end, and lay the two wires together and then heat them and solder them together.  I use about 1/2" of heatshrink to cover the joint.  I find no reason for internal wiring to have to twist two wires together, strength is not an issue with a decent solder joint.  This makes a very compact and thin connection.

Lots of great comments on this. The only thing I'd add is that Evans Design will do any length wire for any project you have. I often want the resister in a different location or wire at longer lengths than they offer. I send an email and they respond with whether or not they can do it and the minor increase in cost. I have done this a lot in the past.

Also, in regard to wire size. I use their LEDs and other items in switch stands, building lighting, engine headlights, 1/50, 1/48 and 1/43 cars and construction equipment etc. It's the size of the LEDs and small wire that make them easy to use, easy to hide, and sized right for very small spaces.

Thanks to all for the additional ways to strip the wire!

Terry

I simply strip about 1/4" on each wire, tin each end, and lay the two wires together and then heat them and solder them together.  I use about 1/2" of heatshrink to cover the joint.  I find no reason for internal wiring to have to twist two wires together, strength is not an issue with a decent solder joint.  This makes a very compact and thin connection.

True - I just find that weaving the wires together makes them easier to solder, at least for me, especially if I'm not at my workbench and don't have access to a helping hands stand or I'm trying to solder two wires together under the layout and can't get the wires to stay together.

Ritchie,

I tried weaving the thin wire and the numerous wires from my 18 gauge wire together three or four times last week, with no success.  The 18 gauge wire, taken together, is just too stiff, and forces a separation or break from the tiny thin wire, which won't "hold" a weave.   Perhaps I would have better luck trying to weave it with the 22 gauge wire strands.

Easton,

Thanks for that specific info, but since you work with the thin wire all of the time, how are you joining them together with other wires, even other thin wires?   Soldering?  Connectors?  Tiny power blocks?

Steve,

Thanks for that detailed explanation of the electronics.  I do have an electrometer that I can use to measure the draw in volts by the pump and light when they are operating.  I guess that first I need to contact Evans and ask what the mA rating is for the motion sensor itself.   I am also hoping that if the load exceeds the sensor's rating, it just burns out the sensor and nothing else.

Gunrunner, as always, thanks for the additional info.

I am going to go forth and order three more of the sensors, because I am sure that I will mess up one or two of them trying to work these issues out.

Mannyrock

Interesting thread, especially the stuff on stripping wires.  I use a lot of Kynar wire now, based on @gunrunnerjohn 's recommendation a while back.  When I first needed to strip it, my cheapo strippers wouldn't work.  I don't recall how I came up with the idea (on my own) of using the soldering iron to take off the insulation, but that worked pretty well.  I was surprised that @stan2004, another whiz kid, uses that method.  I do think that method does weaken the wire a bit though.

One thing, I have a spool of red and a spool of black kynar, from different vendors.  When I strip the black with the soldering iron it gives off a very, very bad smell which is quite similar to body odor.  Yuck.

@Mannyrock posted:


..

I forgot to mention, as to the operation of the sensor, I found that you can't mount it flat on the train table next to the track, and you can't mount it only one inch high next to the track.  For some reason, my sensor would not operate in those positions when a train passed, even though it was aiming directly at the wheels of a steam loco.    It would only work if I mounted it high enough to face the body side of the loco..

Does it operate facing the "body" of a caboose or other non-powered rolling stock that does not warm up in operation?  That is, that sensor uses a so-called PIR sensor which operates by detecting, in-effect, thermal variations in its field-of-view.  I'm curious if it works at the beginning of an operating session when the engine has not had time for its body to warm up to above ambient room temperature?

Stan,

Once I had mounted the sensor two inches high, and one and a half inches from the side of the track, facing the track, it would work reliably as soon as I turned on my layout and a train went by, with the time being as little as 10 seconds after I turned on the power.  So, I'm not sure that it needed for a locomotive to warm up. 

I did not ever test it with just a cold rail car or caboose going past it.  Perhaps it wouldn't have tripped the sensor.

I do know that if I walked around the end of my table, four feet from the sensor, without stopping, the sensor would turn on.

This is a really curious little sensor, which worked remarkably well for an $8.00 item.  Because the fish-eye looks like a geodesic dome, like the one at Epcot center, maybe some of the little geometric sections were not as sensitive as the others.

I think that if people such as yourself, with high electrical skills and knowledge, bought a few and experimented with them, you would be pretty impressed.

As advertised, the sensor turned on the accessories for almost exactly 15 seconds and then shut off.  15 seconds seemed a little long for the accessories to run, because my track ovals are not that big and the train was often coming back around just as the things turned off.     10 seconds would be about right.   

I wonder what the odds would be of convincing Evans to upgrade these so that they are larger and more durable.  They would be a very versatile switch for use with many things, and one could forget about trying to put one of the hit-or- miss mechanical switches under the track which is triggered by the weight of a passing train.  I haven't checked but I think these may come in an AC version as well.

Mannyrock

Mannyrock,

Here’s the answers to the questions you asked me:

  1. I use the same method as gunrunnerjohn. In some cases, I also twist the wires a bit to make it easier to solder
  2. If I feel that I knicked the wire when stripping it, or it’s going to be placed in a position with limited access or even where it might get stressed a bit, I use (pics attached) a connector that is a combination solder and heat shrink. I use a small heat gun and I’m done. It protects the wire not only at the solder point but at both ends of the connection for about 3/8th of an inch.

After reading this post, I’m buying the stripper gunrunnerjohn has!  Terry

12

Attachments

Images (2)
  • 1
  • 2

Add Reply

Post

OGR Publishing, Inc., 1310 Eastside Centre Ct, Suite 6, Mountain Home, AR 72653
800-980-OGRR (6477)
www.ogaugerr.com

×
×
×
×
Link copied to your clipboard.
×
×