Just wondering what :

 1) grade would roughly be 

 2) or if your steam locomotives your steam locos handle the grades OK?(Weaver Hudson w/5 car mth streamline(plastic)70' cars for example)

 3) clearance at the cross over point? 5.5"?

 4) is this a good idea in the long run? or should I run separate levels no grades.

  Layout I'm thinking of is a pretzel shape dual track main. I will try to scan a copy of the plan

Al

Original Post

Replies sorted oldest to newest

I built my layout with a six inch riser leading up to the crossover point.  I have O84 outside and O72 inside loop Fastrack.  I used MTH Girder bridges for the crossovers.  The double track bridge would not work for the required side clearance.  My outside O84 loop is about 24' from the point below the bridge to the crossing point above.  One thing I learned the hard way when I purchased a MTH Premier double stack is that six inches isn't enough clearance.  If you take into account the height of the track to the top of the rail and the girder that hangs down from the bottom of the bridge and I only have about 5" clearance.  My premier Big Boy climbs it without any issues so far.  I only hooked about six different pieces of long rolling stock to check clearances.

Attachments

Images (1)
  • DSC01920

I'll have to go down and look to make sure.  I think I used the 4" riser kit to get up to a four inch piece of foam and a 2" riser to get the rest of the way up.  I needed four sets to support the Fastrack, two for each loop.  My track climbs up to six inches and I used six inck thick pieces of foam on top of the benchwork for the upper level.  I found a semi local company that cuts big blocks of styrofoam and had them cut me several pieces 6" X 12" X 48".  I used some of the pink, blue or green foam depending on what I had to fill in some of the spaces.  On the other side I decend using styrofoam sheets I had taper cut 6" to 4" X 24" X 48", 4" to 2" X 24" X 48", 2" to 1/8" X 24" X 48".  I called the company and asked if they could make the taper cuts and they said they could, so I just guessed at the width.  The 6 to 4 sits at a 90 degree angle and the 24" width gives me plenty of room for the O84 curve.  From there it drops to 4" height for 8' and I placed the 4 x 2 at a 90 abd drop to a 2" level for about 6'.  From there I used the 2 x 1/8 to get back to the lower level.  There are a few pictures showing my room and benchwork construction in another post.  Do a search for "I've been working on the Railroad room" under my name.  I have more current photos on another computer.  I'm still tweeking the track position and need to start covering the foam with plaster so I can get the track wired and start the scenery.


Al,

The length of your train area will determine the lowest grade that you can achieve. You will get some relief by starting the grade at the curve. The maximum relief will be having the 0' height at the underpass.


I build pylons from wooden shafts (3/4-1" dia.) with a flat to fit under the track screwed to the top and a mounting flat screwed to the bottom.

Arches can be cut from 1/4" to 1/2" plywood, particleboard and such. Square stock works also.


You can print stone or brick patterns on paper and glue to the supports or they can be painted to look like concrete. Then you can leave them exposed.


So, if I understand correctly, you would like to see a double-track over\under figure 8 modified or stretched. If you give me the length I can put it together. Tell me which track. You should really try SCARM. It's free, and you can get the hang of it easily.

Two levels will allow you to run more trains, but I like grades and the pretzel layout idea sounds great.  Hopefully you can post your plan.


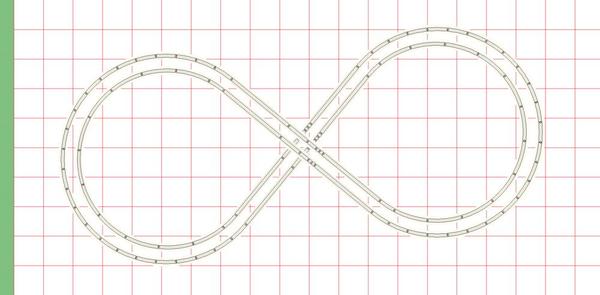
Below is a simple figure 8 from RR-Track using FastTrack O84/O72 curves, with a 6" clearance (seems to be the recommended minimum height).  You will need a 9' X 18' area to do it.  The inner track has a 2.6% grade and the outer has a 2.3% grade.  These grades will actually be a bit steeper if you use a gradual transition from flat to grade.  Any additional track between the crossover will lessen the grade.  Anything less than 3% is probably acceptable, although you will get lots of opinions on this.


Ron


FastTrack 8

Attachments

Images (1)
  • FastTrack 8
Last edited by CAPPilot

Moonman, I'm still working on it.  I have the track temporarly laid down and have been testing with my Big Boy and some long cars to test clearances.  I'm at the point where I have to get the plaster cloth or something to cover the joints in the foam base and start the wiring.  I try to do something on it at least once a week.  I had a minor water leak that I discovered in my new ceiling that i had to stop and fix before I proceded.  I fixed the leak and patched the hole in the new ceiling.  I found a roll of mesh thats just like the fiberglass drywall tape.  It's like the roll of tape, but it's about 36" wide.  I used it to cover the foam and it will help the plaster stick to the foam.  It's a slow process for me.  I take a section of track apart and roll out the mesh and smooth it out.  Then I put the track back and move to another section. 

Al,

The basic double 8 needs 8' x 17'. Add your clearances for walk around or two sides.

I increased the elevation at the overpass to 6 1/2" to allow for the height of the rails underneath (~1/2" with FasTrack) and provide 6" of clearance. This does not allow for bridges, like some truss bridges that extend below the upper roadbed.


The point is that the grade went up slightly to 2.8%.


A couple of the small fitter tracks were needed as there are no partial curves for the 084.


Attachments

Images (2)
  • 084_072 Double 8
  • 084_072 Double 8 3D
Last edited by Moonman

You’re going to need a couple access hatches. Anything over 24" is going to be hard to deal with. I have O84 and O72 loops and I left a large opening in the center. My layout looks like an upside down backwards letter G. I tweaked my track plan on the platform and now I'm in the process of starting the hard shell over the foam base. I started taking the track off the platform and documenting the placement and size of each piece, so when I get ready to put it back I'll have a plan to follow. The average width of my bench work is 36" and it's hard to reach into the corners. You might consider rounding off the square corners to allow you a little closer access. The bridge over your yard area on the lower side looks to be pretty long. If you use MTH Steel Arch Bridges you have to allow for the support columns. One on each end of the bridge will support the weight of a Primer Big Boy. I used one of the Steel Arch Bridges with a Girder bridge attached on each end. I removed the center support from the Arch Bridge and made bridge abutments for the ends. The double track bridges were too narrow, so I had to use two sets of single track bridges. The support columns had to be modified to allow their placement side by side. You may be able to adjust your spacing; I couldn’t and still have clearance for the big boy.  I have another crossing on the layout that I used a steel stud for the bridge.  I went to a building site where they were building a commercial building and found a piece of scrap about 36” long by 8” wide with one inch lips.  The steel is heave enough to span the distance with no support.  I painted it to look like a plate girder bridge and ran both tracks across it.


Al,

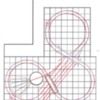
Here is your plan in SCARM. I only needed 2 custom 7" fitters.

  1. You can make the 8 x 8 a 7 x 8
  2. All standard FasTrack pieces except 2 10" cut to 7"
  3. Two spots on elevated loop won't fit exactly, but are within a 1/8", so will wiggle fit
  4. The straights across can be all 30" and fit perfectly. When you introduce all of the switches it becomes a fitting task for sure. I have close with stock pieces.
  5. The roundhouse is a 24" Millhouse with 15 stops. You'll need to work on that area yourself. I put in for viewing.
  6. The inside grade is 3.6% and the outside grade is 3.1% to 7". In Scarm, the grade heights can be shown by selecting the H button. Build your risers and place at the track joints.
  7. You'll have to adjust the overpass track lengths to fit your bridge.
  8. 6" spacing center to center rail was used as an 072 crossover sets that spacing and FasTrack works with it. Note: once you crossover you have no way to cross back.

Have fun! It's pretty cool.

Attachments

Images (4)
  • Al s Pretzel 2D Track Plan
  • Al s Pretzel 3D 1
  • Al s Pretzel 3D 2
  • Al s Pretzel 3D 3
Files (1)

 Here is a little more fine tuning of what Im thinking.

- Re-locating the TT(having the first stall lined up with the lead track)

- Im thinking of using 4 MPC 15" truss bridges to span the lower tracks

- I need to figure out if I could have a double track tunnel some where

- TT probably scratch build to length to handle N&W Y / A class?

   for sure a Niagara(I hope)

- Picturing mountains/valley terrain.... oh and a river/stream!

- I was thinking of adding 10" straights to extend closer to the end of the table

   Everything a person wants in their 4 x 8 layout.. Al

- Re-locating the TT(having the first stall lined up with the lead track)

Relocated the TT to first stall


- I need to figure out if I could have a double track tunnel some where

Added tunnel

- TT probably scratch build to length to handle N&W Y / A class?

   for sure a Niagara(I hope)

- Picturing mountains/valley terrain.... oh and a river/stream!

Added a lake and stream where it wouldn't cross under tracks

- I was thinking of adding 10" straights to extend closer to the end of the table

Don't add the 10"s, it will ruin the symmetry for very little gain. Use the space for scenery. My opinion, your layout.


Added a right hand crossover package to get back to other main line.


I had to play some games to get some better 3D images to help you visualize. The photos and new file attached.

Attachments

Images (2)
  • Al s Pretzel 3D  no terrain
  • Al s Pretzel 3D 4
Files (1)
Last edited by Moonman

 John, just a concern with some of the medium sized brass steamers on the grades. I had problems with a 2-10-4 pulling a set of GGD heavyweights on level track.

  I successfully downloaded SCARM(now have to figure out how to use it lol).

 Moonman,  Appreciate the feedback on opinions always helpful. Probably will stay with the 7' table as suggested(always try to max out track space)

 Al

Al,

Just use it for viewing 2D, (scroll to zoom, arrows to move or reposition) and 3D (green button in toolbar)(mouse moves it all around) and the Parts List.(Tools>Parts List)

If you do make changes and practice on it, just rename it for a save or close it without saves. You can always come back to here to get the files again if you mess something up. There's a lot going on and some of the small areas that don't quite fit will cause you problems as well as the elevations. Perhaps a physical check of your maximum height needed for your equipment would allow an elevation drop. I have it at 7"-1/2" lower rail height=6 1/2" clearance. A 1/2" drop would get you to the 2.5-3.2% grade range. Auto carriers and hi-cubes need the most clearance.

It's a cool pretzel. Not a PHILLY pretzel, but a cool pretzel.


Last edited by Moonman

  Neccessity is the mother of invention, I guess! I just wanted as long a mainline as possible(doesn't everyone?). That was the one reason I added those 10" straights on the 8x8 table originally. That is going to determine my grade.

   I may try the cookie cutter method for the grades.

Nick, 28' would be nice to have. You could have the pretzel area for your mountain territory and the straight stretch for your flatlands.

   Im going toplay around with the plan some more and remove the double "S" curves etc.

  Al

Gentlemen,

   I know a lot of you like the elevated trestle and for years I had my 1st and 2nd levels connected, I learned I could do a lot more with my layout if I got rid of the trestle rise and simply built with 4 or 5 different levels, especially with my FasTrack, the elevated trestle took up one heck of a lot of platform space.  Although it is cool to  have the trains run from one level to another, I redesigned my FasTrack layout with a multi level design to be able to run more than one train on every different level, excepting the street car level, at the very top.  In this manner I could control 5 - 8 trains with my DCS all at the same time.  I did not miss the trestle rise at all.

Albert, please post the layout pictures as you build, I will be very interested in seeing them.

PCRR/Dave 

Last edited by Pine Creek Railroad

Ok, I have finally found some time to post the layout from SCARM to my computer(had to print it then scan to load to pics).

   Anyways, I have added quite abit more to the original idea. Some may say to much track, but for me I like to have some variety from simple loop running, switching the mine and engine servicing facilities to hostle locomotives if I want.

     Is this design carved in stone? No way.  It looks fun for me, with lots of Mountains all around(blue ridge?). I will post the track plan and add some more pics of the Roundhouse(which is sitting under my layout)

Attachments

Images (4)
  • Als Pretzel Layout Buildings: Added some buildings MTH Station, Lionel Coaling Tower, Water tower and mine with sidings
  • IMG_0820: Roundhouse beams. Ripped all lumber strips made a template to make identical copies
  • IMG_0818: Stacks have holes cut in roof for smoke units. Cool to watch
  • IMG_0815: Installed lights as well. Now I have to build a 29" turntable

Add Reply

Post
The Track Planning and Layout Design Forum is sponsored by

AN OGR FORUM CHARTER SPONSOR

OGR Publishing, Inc., 1310 Eastside Centre Ct, Suite 6, Mountain Home, AR 72653
800-980-OGRR (6477)
www.ogaugerr.com

×
×
×
×
Link copied to your clipboard.
×
×