
I'm looking to create an isolated siding so I can park a train or cars while running the rest of the layout.  I understand Rich Melvin's recommendation to just use a Dremel with a cut-off wheel to cut the center rail.  My question is what is the best way to then control the power to that section?  I'm hesitant to try soldering a wire to the center rail because of the plastic bed.  I have a Lionel 364C controller to use as an on-off switch for the block.

Original Post

Replies sorted oldest to newest

There are power tabs underneath every section of track. The common rails can remain connected.

If your not comfortable soldering. Use an 18 guage spade connector like those that come with Lionel  starter sets.

See here: https://ogrforum.ogaugerr.com/...ctors-under-fastrack

I soldered all of my feeders to the tabs underneath fastrack. No damage to the road bed. It doesn't take alot of heat, a 25w Weller iron worked great.

Last edited by RickO

To be more specific, I have a left hand switch.  I will enter the switch on the point side and will maintain power on the curved side.  I want to create a block on the straight side.  I've reviewed what I can find of the wiring diagram and removed the bottom plate from the switch.  I still can't see how power is jumpered to that straight section so that I can remove that jumper and wire in an on/off switch to control it.  I'm not that familiar with Fastrack. This would have been very easy with an O22 or Ross switch.

@lionelflyer posted:

To be more specific, I have a left hand switch.  I will enter the switch on the point side and will maintain power on the curved side.  I want to create a block on the straight side.  I've reviewed what I can find of the wiring diagram and removed the bottom plate from the switch.  I still can't see how power is jumpered to that straight section so that I can remove that jumper and wire in an on/off switch to control it.  I'm not that familiar with Fastrack. This would have been very easy with an O22 or Ross switch.

That's because you are looking INSIDE the switch. You need to be looking at the EXTERNAL add on pieces on both the straight and curved sections.

You buy these if not included with your specific size switch http://www.lionel.com/products...ack-section-6-12073/

From this topic is where the picture comes from https://ogrforum.ogaugerr.com/...fastrack-kill-switch

Last edited by Vernon Barry
@lionelflyer posted:

I want to create a block on the straight side. - Again easy, remove the jumper wire on the included short piece, or if your switch does not have that piece, then buy one.

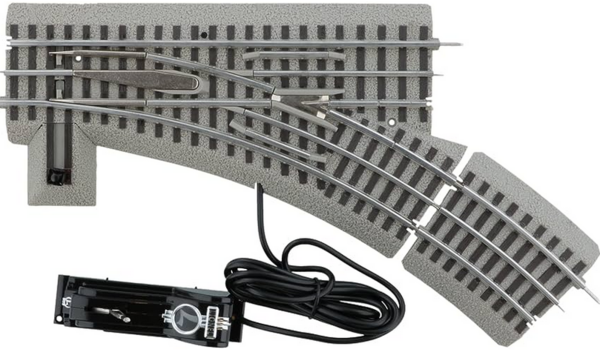
I've reviewed what I can find of the wiring diagram and removed the bottom plate from the switch.I cannot recommend what you think you are going to do- create an intentional dead isolated leg inside the switch- bad, bad, bad idea IMO.

I still can't see how power is jumpered to that straight section so that I can remove that jumper and wire in an on/off switch to control it.  There is no jumper inside, this is the stamped and folded tab connections inside the switch when manufactured.

Going even further, it's recommended for more permanent installs and honestly just reliable operation in general, to internally solder those folded tab connections. You seem bent on doing the opposite and trying to break the circuit.

Fastrack_20Switch_20Solder_20Update

Again, inside fastrack switches, there is a Y or short of T bar stamped metal plate and the rails have folded tabs that fold over and make this connection between the 3 rails. From the factory, there is no solder joint, just the pressure of the folded tab poking through the plate and hopefully making a connection. With trains running and expansion and contraction, over time this folded tab electrical connection can become intermittent and cause heating, then further loosening and heating in a self destructive manner leading to dead track sections.

072

Again, it's actually recommended to solder all the folded tab connections for best long term power reliability through the switch since folded tabs tend to weaken and degrade over time and usage.

022B3516-042A-460E-820C-8AB3FD65125A

Attachments

Images (3)
  • Fastrack_20Switch_20Solder_20Update
  • 072
  • 022B3516-042A-460E-820C-8AB3FD65125A

Also, Fastrack O-31, O-36, O-48 switches seem to come only with the curved section- and that specific curved one is not meant to be an isolation block and doesn't have the jumper to remove.

Larger switches starting at O-60, O-72 do come with the short 1 3/8 in isolation block for both curved and straight as part of the switch as a "kit".

Attachments

Images (2)
  • mceclip0
  • mceclip1

Add Reply

Post
This forum is sponsored by Lionel, LLC

OGR Publishing, Inc., 1310 Eastside Centre Ct, Suite 6, Mountain Home, AR 72653
800-980-OGRR (6477)
www.ogaugerr.com

×
×
×
×
Link copied to your clipboard.
×
×