


Outstanding work all around. Thanks for showing us ways to create such good looking structures.
A second floor and interior details...WOW, that is way more intricate than I would want to attempt. Looks great BTW!.
Last week I mentioned making my windows with a peeling paint effect. This is how they turned out...


I think it turned out OK. The standard practice is to paint your base color (Grey in this case), then paint rubber cement on the areas where the top coat (red)has peeled away. When the red dries, rub off the "rubber" to reveal the grey underneath. I was too lazy to find my ancient bottle of rubber cement. So I borrowed and improvised a technique used by airplane modelers. Those guys use silly putty or even Playdough as a paint mask. Instead, I used modeling clay. I smeared it on in a few places a la the rubber cement. When the red was dry, I simply wiped away the clay to expose the grey. I wan't sure how it was going to turn out, but like I said, it turned out OK.
Here are the completed walls ready for assembly...

This the first wall raised...Barn raised..get it...


Then some more...and then hold my breath and hope every thing stays lined up...


Well, here are they are, all assembled. Not too shabby...or is it?


Now all that is left is the roof and final details. Here is my corrugated roof material with basic rust applied. In this picture I just applied a grimy black wash that is still wet...

I have to cut these into sheets and apply to my sub-roof material. Have a good week and next week we should be wrapping it up with the a great reveal.
Attachments
Images (13)
Mark: build looks great! Especially liking the varying degrees of weathering and stain you used on the boards. Really makes a difference. Also noticed the signage you added on the side ... wonderful idea and well executed. The doors are particularly well done. What are you using for handles and knobs?
As I stated a few days ago during our check in, its been a busy week and I had hoped to have the roof raised by last Thursday. A few days and dollars short, the roof has been fitted. Here are a few shots detailing the short cuts I used along the way.


Attachments
Images (3)
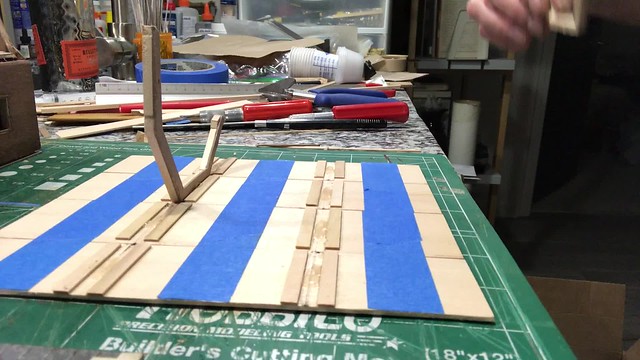
Here's a short video I shot showing how I made the roof. I believe you have to click on the embedded pic to access the clip.
bfishma1 posted:Mark: build looks great! Especially liking the varying degrees of weathering and stain you used on the boards. Really makes a difference. Also noticed the signage you added on the side ... wonderful idea and well executed. The doors are particularly well done. What are you using for handles and knobs?
As I stated a few days ago during our check in, its been a busy week and I had hoped to have the roof raised by last Thursday. A few days and dollars short, the roof has been fitted. Here are a few shots detailing the short cuts I used along the way.
Thanks for kind words. The door handles on the large doors and side doors are simply very small pins just cut and bent to shape. I was hoping to hide the "sign" until the final reveal for dramatic effect. ![]()
bfishma1 posted:Here's a short video I shot showing how I made the roof. I believe you have to click on the embedded pic to access the clip.
I liked the way you handled that roof. It gives new meaning to the phrase "roll your own". ![]() Did you leave the blue tape on after installing the roof?
Did you leave the blue tape on after installing the roof?
BTW, your work bench is a lot neater than mine. ![]()
Mark: sorry I blew up the spotlight on the signage but got to admit ... it was great advertising ![]()
Thanks for the shout out on the the rolling roof technique. The design calls for all levels to be accessible for future interior detailing and lighting. This always presents unique challenges with every build and this one in particular was a tough gig. Its fun to figure out how to solve these riddles and I hope it can help others who dare tackle removable dutch roofs. ![]()
Painters tape was easily removed after the glue hardened and I stained all sections. Got some warping so in hindsight I should have braced the outer edges of the roof as well. I'm gonna try to fix it before I add the cardboard inserts to simulate the same walls I affixed on the ground floor.


Attachments
Images (4)
I'm enjoying watching everyone's progress. I am taking a little different approach in that I am finishing the walls flat, then assembling them. As stiff as the foam board is, it warped when I glued on the siding. So, bracing was needed.

I airbrushed the windows with Floquil Reefer white, added glazing and glued them in with Canopy Glue (left). Then, I scratched in wood grain, and covered them with a wash of the same gray weathering mix I used on the wood (right).

Now the sliding doors:


Wall sections were assembled with Canopy Glue, squared up, then corners were reinforced with 3/16 square pieces of wood.

After the glue dried, I added wood strips to cover the edges.

I should be able to finish the roof with the time remaining. As this is a bank barn, I intend to carve stone walls for the basement level, but it will have to wait until next month.
Bob
Attachments
Images (7)
Great update Doc! Beautiful work and some real progress to witness as well.
I have had repeated problems with my base material warping no matter what I use. Both foam board and basswood bend and twist with gluing, washes, or paint so I always brace just in case. Saves a lot of cussing and face palming down the road.
Like you I will also have a tough time of it making the four week deadline. Looks like perhaps a mid March finishing date for me. Still have a million individual planks to weather and glue on ... not to mention doors and windows to build and insert.
The removable roof has been quite an interesting endeavor but I finally think I've rounded the corner on it. Just added some eaves (?) to help with securely fitting and holding the roof in place as well as hiding some gaps. Quite a pain in the tuchus but I'm pleased with the look and results. My next problem will be figuring out how to install the roofing material without there being a significant seam line between the removable section and the permanent part.


Attachments
Images (2)
Well, you are tackling twice as much project with doing a full interior and removable roof!
Using the Fascia to cover the joint with the roof is a great solution. I may add a fascia board if I'm not happy with my roof fit. I think if you allow your lower row of shingles on the removable roof to overhang, you should get a neat joint with the fixed roof.
Here is one more detail I'm going to add:
A roof vent

I think I have a toy funnel laying around somewhere if I can find it!
Bob
I've only been out of the house twice since Jan, and chose to go and buy food, so no more wood to progress with. So mine remains more shed than barn.
If I'm stuck much longer I might just go 100% popsicle sticks as I can get those at the corner $1 store again; fresh restock.
I like the hoist beam Mark Diff. Work smarter; not harder.
I planned on one too but decided that could wait to near last or be ommited if it remains a shed.
I've used the "roll top" technique most effectively to make my water tower wall(s). No easier way imo.
adriatic: i find the dollar store to always be a great place to find scratch building shwag on the cheap. Its fun figuring out how to re-purpose the many things available there. I hope you are able to grab some sticks on your next visit or snag some coffee stirrers from a doctor's waiting room or coffee hole. I always walk away with a handful.
doc: i'm no interior guru by any stretch of the imagination. Way too intimidating for me right now. As my skills improve I hope to eventually add lighting and interiors to my builds. This is why I have been building my scratches with removable roofing and floors so that when I do attempt some lighting and interior scenery it will be easily accessible.
Well here we are on our fourth week of our build. Looks like a few of you might be close to wrapping up. As I alluded to last week due to unforeseen circumstances with family commitments I have fallen behind and will have to add a few more posts to my build. I was however able to figure out what i believe to be the most difficult part of the process which was navigating the removable roof section of my build. I was debating between what material to model: tar paper, corrugated aluminum, or shingles. In the end I opted to go with tap paper. The tough part was figuring out how to model the overhang section of the lift out section and what material to use to best simulate the tar paper.
Went with First Aid Paper Tape as it has a realistic knap to it and the added advantage of a sticky side. Once I had the tape applied, cut the edges flush, and test fitted the removable section I went ahead and applied several washes of diluted white glue and ink mix. Not only did the multiple coats give a good initial base color, but this might even eventually provide some structural support once hardened.


Hope to finish up painting and weathering coffee stirrers at some point this weekend and begin applying them en mass and aiming for wrapping up doors and windows as well. Would love to have the doors situated and in place too.
Anxious to s see what you fellow Community Builders have to show for your efforts this Thursday! ![]()
Attachments
Images (4)
I like your approach to the tar paper roof, very authentic.
Well, this is a February build, so I was up late last night and finished it. So, picking up where I left off last week...the roof:
My sub-roof is simple mat board, cut to fit. To help keep warping to a minimum, I braced it pretty thoroughly...


also to help brighten the interior and as a further sealer against moisture intrusion, I spray painted the interior facing surface with white primer...

The sub roof panels are now ready to be glued into place. But before I did that, I realized I needed to paint the inside floor of the barn. Doing so AFTER the roof was glued in place would have made that extremely difficult. I wanted the floor to be essentially a dirt floor, and since I intended to make a mini diorama anyway I painted and "soiled" the entire base inside and out. I used a mix of these two colors for my "dirt" base...

I painted the base and while it was still wet, sprinkled real sifted dirt on top as seen here...


While this was drying, I glued the sub-roof in place...


With the sub roof firmly attached, the corrugated sheeting could now be applied. Here is one section completed...
Any thing over hanging the ends were trimmed back leaving a uniform with a minimal over hang.
After all this was dried I completed the base in the usual practice of wet water spray followed by diluted white glue. and finally a few details to complete the scene. So here now is my entry for February's Community build...


Attachments
Images (26)
I like the look of that paper tape as tarpaper. I have a bunch laying around my office. ![]()
I cut the roof pieces from 1/8" hardboard. All the edges except the gutter edges were cut at 22 degrees which was just about spot on for the angles.

I used the tape/roll top method to line them up, and applied white glue in the gaps and layer the whole thing over the barn to dry.

I found a diamond tile texture image on the web and copied and pasted multiple times in Paint. After printing it on a color laser, it came out brown, so I adjusted the hue in Photoshop Elements to get the green shade. I sprayed half the roof with adhesive and applied a sheet of the "shingle paper."

Attachments
Images (3)
I repeated this on the other half, cut some small pieces for the pointy overhangs, and added a 1/4" strip over the peak. When the glue dried a little, I flipped the roof over and trimmed the roof paper so it had 1/16" overhang.


Well, the basic barn just made the deadline!
I still need to cast and carve the basement walls, add wood posts for the basement overhang, make a roof vent, and the beams and pulleys over the loft windows. I may weather the roof a bit also.
Bob
Attachments
Images (3)
Mark
Nice work! Great weathering and the IH Tractor sign is a nice touch.
Bob
RRDOC posted:I repeated this on the other half, cut some small pieces for the pointy overhangs, and added a 1/4" strip over the peak. When the glue dried a little, I flipped the roof over and trimmed the roof paper so it had 1/16" overhang.
Well, the basic barn just made the deadline!
I still need to cast and carve the basement walls, add wood posts for the basement overhang, make a roof vent, and the beams and pulleys over the loft windows. I may weather the roof a bit also.
Bob
Using a photo for tar paper is great idea Bob. You've done an outstanding job with your rendition.
Doing this build really reminded me how much fun structure building is. I have few buildings to rehab (and one I am almost done with) that I will be posting over the next few months.
Great work everyone! Its always incredible to look back over this thread and see the progress made on these builds.
Mark: congrats crossing the finish line first. I really like the diorama approach you took and finding all the added details in the scene you created. Especially admire the signage and the opening in the roof. Wouldn't mind seeing a separate post and write up detailing how you so effectively pulled that barn side advert off.
Doc: roof looks amazing and your cuts precise. The diamond texture you chose really makes it pop. Look forward to continue watching your progress on the basement walls and roof vent and appreciate you keeping me company here in March.
Hectic times have passed for the moment and I was able to bury myself on Sunday painting and weathering a batch of coffee stirrers. I decided to duplicate the process I used on my last build since I was so pleased with the results. Unfortunately as with all good things it takes attention and time ... both of which have been in short supply the last month.
The method I have been using is based on one that has been around for some time known commonly as the "Chuck Doan" method and requires a precoat of paint thinner, followed by a relatively thick coat of acrylic paint, timely chipping with an x-acto blade, and finally a peeling away of scotch tape. I was able to take a few pics in an effort to document the process:


I have tried other techniques before most notably the salting method of weathering on my structures. While effective for simulating rust and flaking paint on metal surfaces, in my opinion it is not as effective at giving the same impression of peeling paint on aged wood as this method does. Of course there are trade offs ... only about a 60% success rate and a tremendous amount of time. After twenty plus batches of these I still don't quite know what the heck I'm doing. Getting the right mixture of paint and water, finding the right amount of drying time and tackiness of paint between steps, deciding how many passes of peeling tape have all been things that continue to allude me. But as with all things in life its a process and a learning curve and one I enjoy!

Attachments
Images (4)
bfishma1 posted:
The method I have been using is based on one that has been around for some time known commonly as the "Chuck Doan" method and requires a precoat of paint thinner, followed by a relatively thick coat of acrylic paint, timely chipping with an x-acto blade, and finally a peeling away of scotch tape. I was able to take a few pics in an effort to document the process:
Wow! I'm sure that is time consuming, but that's a great peeling paint effect. It definitely looks more realistic than my drybrush-simulated peeling paint:
Fortunately, mine will pass the 3 foot rule, which is what I need. My hat is off to you for trying anything that Chuck Doan does!
Bob
Add Reply
Sign In To Reply
