
Here we are on the cusp of February and the Token Build.  If you are planning on taking part, now is the time to solidify your commitment by posting pics of the barn (or barns) you are choosing to model or combine into one build.  The next week should be spent building the super structure of your barn with expectations of sharing your progress on next week's February Build Check-In.

I'm gonna be going with this version of a barn but will possibly be combining other aspects I like from different barns I've come across in my search.

IMG_5009IMG_5013IMG_5014

I like the classic look of the roof and the doors.  This will be a first for me building a second story structure so I'm a bit nervous but looking forward to the challenge and learning from the other builds and any advice offered along the way.

Lets see what you've chosen for the Community Build

Attachments

Images (3)
  • IMG_5009
  • IMG_5013
  • IMG_5014
Last edited by bfishma1
Original Post

Replies sorted oldest to newest

IMG_4490

Mark: Love the old school approach.  Beautiful work on the drawings and I can appreciate the time and effort spent doing so.  Using the grid paper is a smart move in that it assists in making all lines straight and square ... and makes a great template to build directly on top of.  I transfer the corners of all walls as well as windows and doors through the paper onto foam board or basswood using a pin ... line the holes up with a straight edge after that and BOOM

IMG_4494

Attachments

Images (2)
  • IMG_4490
  • IMG_4494
Last edited by bfishma1

I dug out my very dusty drafting board and T-square and put together this 28'x48' gambrel roof bank barn.  I'm not doing an interior, so construction will be coffee stirrer sticks over black foam core. Stone walls will be cast plaster, hand carved.  Total cost is $10 for Tichy windows.  Everything else I had laying around.IMG_2936

IMG_2937

Bob Glorioso

Attachments

Images (2)
  • IMG_2936
  • IMG_2937

One week deep and time to share your progress.  Looks like those on-board are off to a great start.  I transferred the design I chose to a drawing on grid paper.  This is one of my favorite parts of a build because of the opportunity to sharpen a few pencils and scratch some lead.  The grid paper is very helpful in that it makes the lines straight, corners square, and allows you to accurately gauge distances.  Once I had the blueprints up to par, using a pin I poked out all the corners of the building, doors, and windows.  When I pulled away the paper, all I had to do was connect the dots for a picture perfect transfer of the design.  All that was left was some careful x-acto cutting with a metal straight edge to guide me.

IMG_5533 [2)IMG_5537 [2)IMG_5539 [2)IMG_5543 [3)

I've found that keeping the cutouts of the doors and windows proves helpful as templates for scratch building the windows and doors that will eventually be on the farm.  Since they are the original cuts from the template, using them ensures a snug fit.

Lets see the progress you've made this week on your version of the February Build 

Attachments

Images (4)
  • IMG_5533 (2)
  • IMG_5537 (2)
  • IMG_5539 (2)
  • IMG_5543 (3)
Last edited by bfishma1

Progress this week...

The end wall sub-framing is about complete...

IMG_1278IMG_1279

The most tedious part of any build is waiting for the glue and paint to dry.

While the windows for the side wall are layout out. These need to be completed as it will determine the final exact length of the structure...IMG_1280

I am waiting for my order of strip wood from Mt. St Alberts to arrive. No matter, I can always work on the roof and doors. See you next week!

Attachments

Images (3)
  • IMG_1278
  • IMG_1279
  • IMG_1280

Mark: great work and I applaud you for opting for the sub-framing.  My anxious soul was too scared to take this route even though I initially attempted to.  I figured sub-framing would allow me to give the impression of some broken boards and gaps to shine through ... not possible with basswood or foam as the template.  Unfortunately I found it too difficult to match up the angles on the roof.  Any tips you can provide?  I noticed you used some pins to hold things in line and in place.

Joe: thanks for the encouragement.  Never too late my friend.  Would love to have you add your skills to the mix.  As with all these builds I find the more the merrier! 

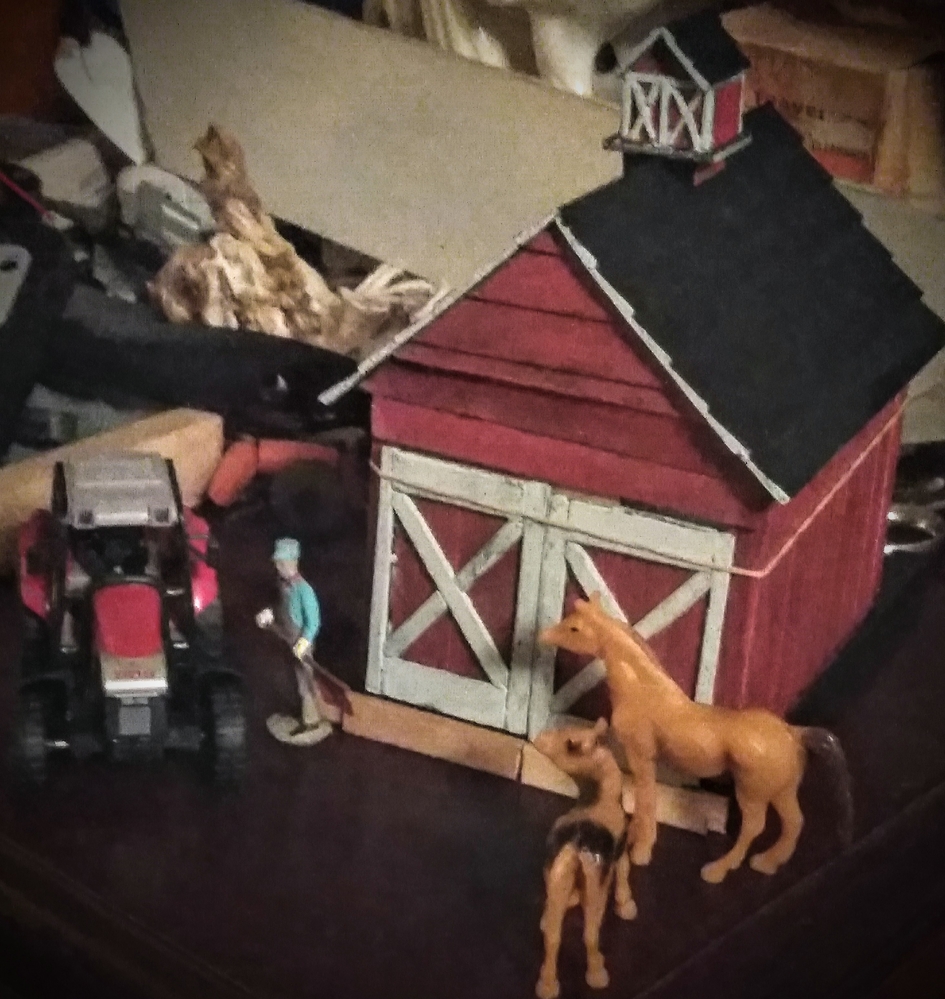
  I'm shooting for a folk art meets toy look. Uneven, skewed, etc. Signs of weathing and age, but happily colorful fixer-upper to fit with my style.

  I'm moving fast due to using a failed covered bridge's cover for the 2cnd floor/loft with plans to drop part of the framing details in later.

Once this lift is done, my plan is to step up to a more structured build for the lower section, where it will serve as a base where the "loft section" might be removed for actual use alone as a small barn on my tiny layouts.

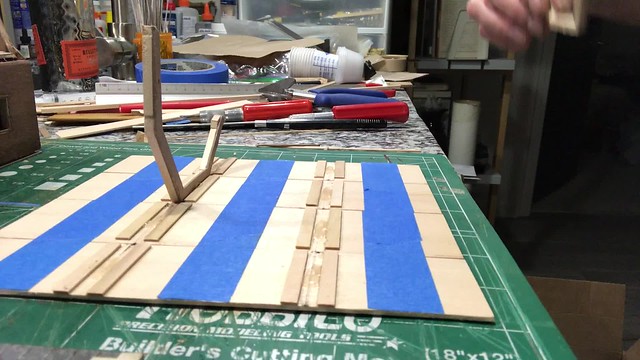
I.e. I'm so far I'm taking the kludge approach, as usual, without much measuring, using scraps, popsicle sticks mostly, plus anything I find to move me forward asap.   So Im going to include this loft as sub-structure even though the frame is going in after the fact and there should be more frame comming with the ground floor.

Popsicle sticks are also prone to being hard, brittle, and will split along the grain pretty easy while trying to saw. Scissors and snips usually just split a stick. So does crossgrain razor pressure.  I might try soaking a few to see if they soften, warp, etc.   Some batches are soft though.  The short of it is, I may or may not narrow some boards. I'll eyeball each choice and see how those rips go on a case by case basis.

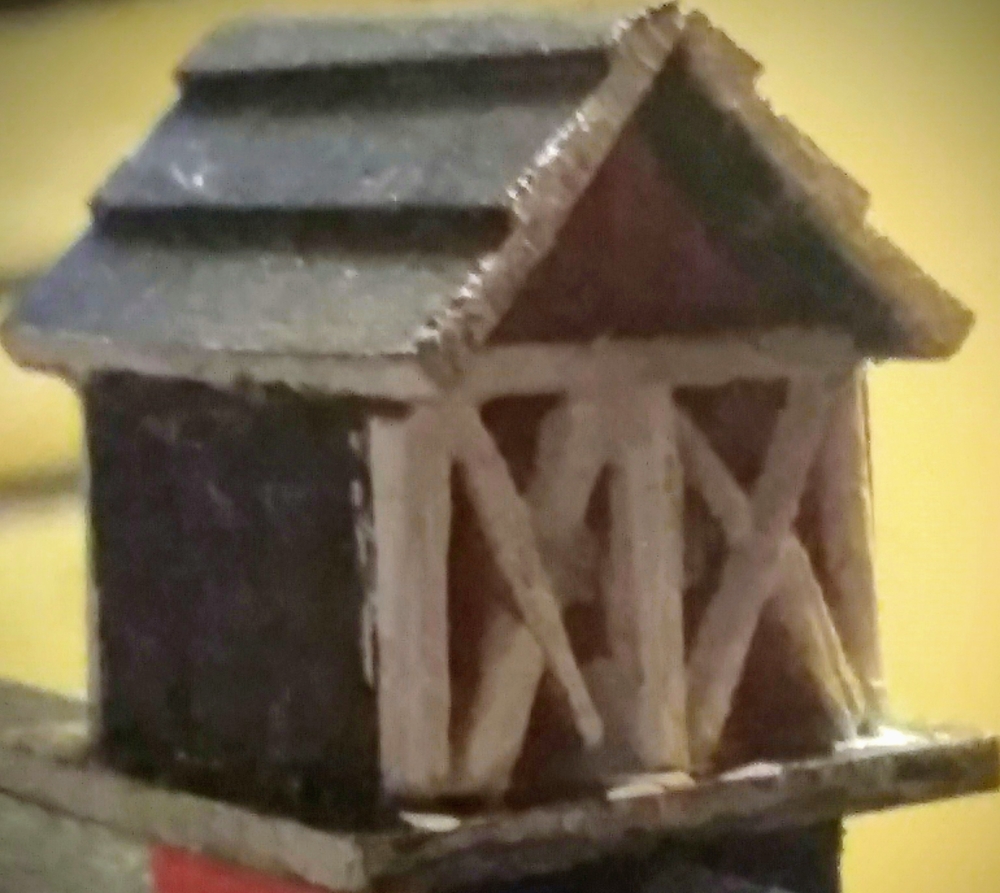
About 1/3 to 1/2  the length of this visually.  Red and pale grey, black roof. Swinging loft doors serve the dual purpose barn/loft best and narrowness kinda demands them. The lower floor should have enough width for hung roller doors  

images


Here is the bridge. Dollhouse materials on roof and paneling were scraps from Grandpa and his sisters dollhouse building buisness/hobby of the 70s..  No internal structure yet as that narrowed it too much. The girder bridge was ok, the cover was too narrow by about 1/16". 

 I had to add a rear wall , make doors, and fill in the rear wall/doorframe corner paneling and uprights. Some stud framing was added too, more coming.  At this point there are about 10 pieces, 2-roof, 2 -peaks, 2-horizotal roof on wall pads, 2 walls, two bases (unpainted and long on the girders) The roof is sitting on the walls, which are sitting on the girders, 3pc without glue.

IMG_20181010_185357~2IMG_20181010_184059~3

The upright corners were finished with both Popsicle sitcks (P-stix for short) and some scrap home spun dollhouse laminate (table saw cut by Grandpa) .  The corners and some laminate panels are pre-assembled and glued onto a stiff brown construction paper backing or thin cloth. It's far easier than doing it on the piece, but backside grooving for detail is out of the picture because I used a square patch (strips of cloth in a less seen area up high, or down low, hidden behind beams, etc is how to retain detail and still use the method)

I had removed part of the face for pantagraph clearance as a bridge and ad to both fill it (too high) and angle it to reach out fwd. as I liked a little offset of the roof towards the front, a contribution to the crooked look I like. (thats' Night Court on tv and I built the table alone in fall of 7th grade. I like the flat glass center for building and sanding on)

IMG_20190128_144756~2

Base paint and door sizing. The doors are hobby paneling, the X frame work P-stix

.IMG_20190130_042348~2

Some color and contemplating a covered hoist, belfry, or steeple venting.IMG_20190202_192209

 More comming near immediatly, hold of on posting more just a bit please. I want to split the post up in case the post doesnt take.... 

Attachments

Images (7)
  • images
  • IMG_20181010_185357~2
  • IMG_20181010_184059~3
  • IMG_20190128_144756~2
  • IMG_20190130_042348~2
  • IMG_20190202_192209
  • IMG_20190202_192209

if you waited, thank you...

The breather box won... I'm holding out on why for my last post. Pretty self explanatory.  The center brace is to prevent collapse of the weak paneling if the loft is gripped and lifted there, which will be the intuitive/habitual choice for most the black wood is stronger P-stix. 

IMG_20190203_212007

This kinda shows the roof's offset to the front (right), just like the loft roof it sits on. (base is not glued here)

IMG_20190203_211929~3

The breather box getting color. Touch ups needed everywhere, loft too.i have too split the post again...The screen isifreaking out, IIcant even see if this text is taking 

Attachments

Images (5)
  • IMG_20190203_212257~3
  • IMG_20190203_212007
  • IMG_20190203_211929~3
  • IMG_20190204_010804~3
  • IMG_20190204_032036~2

Largest screen resize ever, lol.  A  period alone filled my whole screen and the composer wouldn't zoom down.

Color......

More color.... and an issue.  I want the doorway to be taller than I made it. I have a tractor that wouldn't quite fit when its on the ground. I'm going to see how two boards looks at the bottom. I'll just tie them in with vertical slats in hopes of skirting around the building of two new doors.

For hinges, I'm thinking staples in like an L with loops hung on them. I don't think I have strong wood with fine enough grain to work out all wood hinges.

There will be a functioning, pivot and wood bar to hold them shut for sure. With an handle inside and out for use up high as a loft (gotta open from inside) or at ground level (opens from either side)

My livestock sure is eyeballing that tractor about to steal thier new bedding. "Animal Farm: The Final Chapter" 


bfishma1 posted: "I figured sub-framing would allow me to give the impression of some broken boards and gaps to shine through ... ". That is what I was thinking. There will be a few boards broken/missing. This isn't going to just be be a barn build, but a mini diorama too, with some "repair" work going on.

I use the pins to keep everything aligned while the glue sets. The work surface is a piece of particle board salvaged from a old compter work station. It's nice and flat. I then laminated a piece of foam core board on top of that. It's the foam core that holds the pins in place.

Last edited by Mark Diff

Adriatic: impressed with both your progress and 80s nightly sitcom reference.  Great choice of colors too as I will be using a similar scheme.  When I first heard the term "breather box" I originally thought of something like a penalty box in hockey. Obviously I was barking up the wrong box.  Looks great and is an interesting addition in detail but ... what exactly is it?  Thinking about possibly working it into my build.

Thanks to all who have posted their progress as well as to those who have offered kind words.  Hope to see some more work up as the week goes on.

Progress the last couple of days:

I usually brush on the stain but I tried this old ziplock bag trick, and it's much faster. After sloshing them around for a minute or two, I laid them out on newspaper.

IMG_2938

I used bfishma1's idea of transferring the plan to the foam core by poking a pin through the paper template. I cut out the sides and ends and oversized window openings with a #11 blade and straight edge by connecting the dots.

IMG_2939

I actually glued the sides and ends together, but before the glue dried, I pulled it apart. I decided that construction would be easier by finishing flat walls. I laid down beads of white glue and placed the Tichy windows as I progressed. The window width was just a little wider than 4 boards, but I could fit the windows without notching them by spacing the boards slightly. This is where my choice of a black foam base really helped. It just looks like the loosely fitting boards of an old barn. When the glue dries I'll trim the excess with a Zona saw.


IMG_2940

Bob

Attachments

Images (3)
  • IMG_2938
  • IMG_2939
  • IMG_2940

Doc Bob:  Great start!  Great looking staining and smooth cutting on the foam core.  Looks like those windows fit perfectly.  I will borrow your idea of having the template be a dark color to give more of an impression of loosely fitting boards.  Where do you pick up the stirrers?  Thats the exact style I use but have had trouble finding them at various coffee pots around the hospital and offices. They are much more accurate scale wise than the standard ones I seem to find everywhere.

Happy Community Build Day!  Two weeks since we began, one week since our last update, two weeks to go.

Been a busy week focusing on everything BUT my build but I was able to get a few important things done since my last post.  After cutting out the templates from basswood, I first shored up the wood with bracing to help control the inevitable warping that occurs from glue and stain.  I also added "sills" (?) to all windows and doors which were the same dimensions as the bracing.  This would allow not only the interior walls to lay flat and snug against the template when gluing into place but I have also found that they make scratch building windows a little less of a messy affair.  The spacing between the interior wall and outer also provides a nice empty space to hide wires if I decide to add lights later.  I then temporary glued all the sides together with rubber cement to make sure that everything lined up and was square.

IMG_5646IMG_5638

With a few more experiments on cardboard simulating "real wood" under my belt I finally felt confident in the results I was getting and decided to include them in this build as my interior walls.  This process is much cheaper and less time consuming than individually gluing boards and also allows quick and easy manipulation as far a trimming to ensure a snug fit.

IMG_5654IMG_5656

With some nervousness and slight hesitation I glued the inner wall cardboard inserts into place and I am pleased with the look and the results.  

IMG_5681

Excited to see and hear the results of your builds this past week and look forward to getting honest and helpful feedback.  Show 'em if you got 'em 

Attachments

Images (5)
  • IMG_5646
  • IMG_5638
  • IMG_5654
  • IMG_5656
  • IMG_5681

Hey, I like the approach you took building your walls, looks good! 

This week I've completed the sub walls and mocked them up as shown here...

IMG_1281IMG_1282

After being satisfied that there wouldn't be any problems assembling them, I spray painted all the areas not exposed (i.e. "seen") flat black...

IMG_1289

Here are the windows I am using for the one side of the barn...

IMG_1286  

The group of six are modified Tichy 4x4 windows, the bottom two were modified from windows I had in my parts stash. The one on the lower right is what I combined to make the 3x4. It is the last one I have, so I'm glad I didn't screw it up.

Here are the windows primed. After they dry, I will give them a black wash to dirty them up and  attempt the peeling paint trick.

IMG_1287

With the windows painted in standard barn red, I am waiting for them to dry. After which I will attempt to remove the sub-strait material to show the weathered grey beneath. If this works, I will go into greater detail how this worked...

IMG_1292

Moving onto the roof. I want to have a corrugated metal roof. I found this material on ebay in what seems like an eternity ago, well at least not this century. I have been saving it for the coal mine I am going to build someday. Any how, I spray painted some strips a silver color. After it dries I will spray them with a flat clear spray (i.e. dullcoat) that kills the shine giving them more of a galvanized look. Then I will paint streaks of many different shades of rust before cutting them into individual "sheets"...

IMG_1285IMG_1288  

Finally, the UPS man delivered my strip wood order today. Here are the stains I am thinking of using...

IMG_1283

Bfish, I am going the individual board route, so over this next week its is going to be cut, stain, glue repeat. Here are some of the pieces I managed to cut so far...IMG_1291

Just a few hundred more to go! Have a good week, I am off to cut some more sticks.


Attachments

Images (10)
  • IMG_1281
  • IMG_1282
  • IMG_1289
  • IMG_1286
  • IMG_1287
  • IMG_1292
  • IMG_1285
  • IMG_1288
  • IMG_1283
  • IMG_1291

Mark and Bfish, looks great!

I noticed that some barns have the wall planks of the upper stories overlapping the lower stories to prevent water from running down the wall into the end grain of the planks below.  I wanted 3 levels of wood planks.  I had to cut the planks to scale 10' lengths which is a little short for the prototype, but then again, my 28'x 48' barn is compressed. I used the same coffee stirrers as spacers to accomplish this.  I also staggered the planks so the vertical spaces did not line up.

All of this did complicate the window and loft door construction.  In hindsight, I should have lowered the windows another 1/4".

IMG_2942

I drybrushed red craft pain on each level as I completed it.  I applied it heavier under the eaves and under the overlaps where there would be more protection from  sun and rain. In the photo, my lighting blew out the grey stain, but it actually looks grey.

IMG_2944

The loft door was done with some stripwood I had around.  There are 2 knot holes  at bottom center and bottom right.  These were "natural" in the coffee stirrers, but his old barn needs a lot more of them.  With 2 weeks left, that is going to have to wait!

IMG_2945

Well, one side is done (except painting the windows), three to go.  Then the roof and the stone walls.  I'm away for the weekend, so it'll be a lot of evenings work starting on Monday.

Bob


Attachments

Images (3)
  • IMG_2942
  • IMG_2944
  • IMG_2945
Last edited by RRDOC

Another week in the books for this February Community Build.  Been a busy and eventful seven days for me and thus I was unable to attend to my barn as much as I would have liked.  Hoping to get the roof squared away later tonight but have already measured and cut the supports and roof inserts.  This being my first two story build I also was able to finish up both the first floor and the second floor in the hayloft.  I always design my builds to be taken apart in sections for future indoor interior details so this extra layer has been an interesting design challenge.

IMG_5759IMG_5760

IMG_5776

Hope your week has been slightly less hectic than mine and you were able to make some meaningful progress on your builds!  Throw them up here and give those following an update on the status of your barns 

Attachments

Images (4)
  • IMG_5759
  • IMG_5760
  • IMG_5776
  • IMG_5776

A second floor and interior details...WOW, that is way more intricate than I would want to attempt. Looks great BTW!.

Last week I mentioned making my windows with a peeling paint effect. This is how they turned out...

IMG_1295IMG_1296

I think it turned out OK. The standard practice is to paint your base color (Grey in this case), then paint rubber cement on the areas where the top coat (red)has peeled away. When the red dries, rub off the "rubber" to reveal the grey underneath. I was too lazy to find my ancient bottle of rubber cement. So I borrowed and improvised a technique used by airplane modelers. Those guys use silly putty or even Playdough as a paint mask. Instead, I used modeling clay. I smeared it on in a few places a la the rubber cement. When the red was dry, I simply wiped away the clay to expose the grey. I wan't sure how it was going to turn out, but like I said, it turned out OK.

Here are the completed walls ready for assembly...

IMG_1294

This the first wall raised...Barn raised..get it...

IMG_1298IMG_1299

Then some more...and then hold my breath and hope every thing stays lined up...

IMG_1301IMG_1302

Well, here are they are, all assembled. Not too shabby...or is it?

IMG_1303IMG_1304IMG_1305IMG_1306IMG_1307

Now all that is left is the roof and final details. Here is my corrugated roof material with basic rust applied. In this picture I just applied a grimy black wash that is still wet...

IMG_1297

I have to cut these into sheets and apply to my sub-roof material. Have a good week and next week we should be wrapping it up with the a great reveal.

Attachments

Images (13)
  • IMG_1295
  • IMG_1296
  • IMG_1294
  • IMG_1298
  • IMG_1299
  • IMG_1301
  • IMG_1302
  • IMG_1303
  • IMG_1304
  • IMG_1305
  • IMG_1306
  • IMG_1307
  • IMG_1297
Last edited by Mark Diff

Mark:  build looks great!  Especially liking the varying degrees of weathering and stain you used on the boards.  Really makes a difference.  Also noticed the signage you added on the side ... wonderful idea and well executed.  The doors are particularly well done.  What are you using for handles and knobs?  

As I stated a few days ago during our check in, its been a busy week and I had hoped to have the roof raised by last Thursday.  A few days and dollars short, the roof has been fitted.  Here are a few shots detailing the short cuts I used along the way.

IMG_5813IMG_5855IMG_5857

Attachments

Images (3)
  • IMG_5813
  • IMG_5855
  • IMG_5857
Last edited by bfishma1
bfishma1 posted:

Mark:  build looks great!  Especially liking the varying degrees of weathering and stain you used on the boards.  Really makes a difference.  Also noticed the signage you added on the side ... wonderful idea and well executed.  The doors are particularly well done.  What are you using for handles and knobs?  

As I stated a few days ago during our check in, its been a busy week and I had hoped to have the roof raised by last Thursday.  A few days and dollars short, the roof has been fitted.  Here are a few shots detailing the short cuts I used along the way.

IMG_5813IMG_5855IMG_5857

Thanks for kind words. The door handles on the large doors and side doors are simply very small pins just cut and bent to shape. I was hoping to hide the "sign" until the final reveal for dramatic effect. 

bfishma1 posted:

Here's a short video I shot showing how I made the roof.  I believe you have to click on the embedded pic to access the clip.

IMG_5862

I liked the way you handled that roof. It gives new meaning to the phrase "roll your own".   Did you leave the blue tape on after installing the roof?

BTW, your work bench is a lot neater than mine. 

Mark: sorry I blew up the spotlight on the signage but got to admit ... it was great advertising 

Thanks for the shout out on the the rolling roof technique.  The design calls for all levels to be accessible for future interior detailing and lighting.  This always presents unique challenges with every build and this one in particular was a tough gig.  Its fun to figure out how to solve these riddles and I hope it can help others who dare tackle removable dutch roofs. 

Painters tape was easily removed after the glue hardened and I stained all sections.  Got some warping so in hindsight I should have braced the outer edges of the roof as well.  I'm gonna try to fix it before I add the cardboard inserts to simulate the same walls I affixed on the ground floor.

IMG_5868a

IMG_5870aIMG_5873aIMG_5876a

Attachments

Images (4)
  • IMG_5868a
  • IMG_5870a
  • IMG_5873a
  • IMG_5876a

I'm enjoying watching everyone's progress.  I am taking a little different approach in that I am finishing the walls flat, then assembling them.  As stiff as the foam board is, it warped when I glued on the siding.  So, bracing was needed.

IMG_2975

I airbrushed the windows with Floquil Reefer white, added glazing and glued them in with Canopy Glue (left). Then, I scratched in wood grain, and covered them with a wash of the same gray weathering mix I used on the wood (right).

IMG_2977

Now the sliding doors:

IMG_2978IMG_2979IMG_2984

Wall sections were assembled with Canopy Glue, squared up, then corners were reinforced with 3/16 square pieces of wood.

IMG_2981

After the glue dried, I added wood strips to cover the edges. 

IMG_2983

I should be able to finish the roof with the time remaining.  As this is a bank barn, I intend to carve stone walls for the basement level, but it will have to wait until next month.

Bob

Attachments

Images (7)
  • IMG_2975
  • IMG_2977
  • IMG_2978
  • IMG_2979
  • IMG_2984
  • IMG_2981
  • IMG_2983
Last edited by RRDOC

Great update Doc! Beautiful work and some real progress to witness as well.

I have had repeated problems with my base material warping no matter what I use.  Both foam board and basswood bend and twist with gluing, washes, or paint so I always brace just in case.  Saves a lot of cussing and face palming down the road.

Like you I will also have a tough time of it making the four week deadline.  Looks like perhaps a mid March finishing date for me.  Still have a million individual planks to weather and glue on ... not to mention doors and windows to build and insert.  

The removable roof has been quite an interesting endeavor but I finally think I've rounded the corner on it.  Just added some eaves (?) to help with securely fitting and holding the roof in place as well as hiding some gaps.  Quite a pain in the tuchus but I'm pleased with the look and results.  My next problem will be figuring out how to install the roofing material without there being a significant seam line between the removable section and the permanent part.

IMG_5894IMG_5897

Attachments

Images (2)
  • IMG_5894
  • IMG_5897

Well, you are tackling twice as much project with doing a full interior and removable roof!

Using the Fascia to cover the joint with the roof is a great solution.  I may add a fascia board if I'm not happy with my roof fit.  I think if you allow your lower row of shingles on the removable roof to overhang, you should get a neat joint with the fixed roof.

Here is one more detail I'm going to add:

A roof vent 

I think I have a toy funnel laying around somewhere if I can find it!

Bob

  I've only been out of the house twice since Jan, and chose to go and buy food, so no more wood to progress with. So mine remains more shed than barn.

  If I'm stuck much longer I might just go 100% popsicle sticks as I can get those at the corner $1 store again; fresh restock. 

  I like the hoist beam Mark Diff. Work smarter; not harder.

I planned on one too but decided that could wait to near last or be ommited if it remains a shed.

I've used the "roll top" technique most effectively to make my water tower wall(s). No easier way imo. 

adriatic:  i find the dollar store to always be a great place to find scratch building shwag on the cheap.  Its fun figuring out how to re-purpose the many things available there.  I hope you are able to grab some sticks on your next visit or snag some coffee stirrers from a doctor's waiting room or coffee hole.  I always walk away with a handful.

doc: i'm no interior guru by any stretch of the imagination.  Way too intimidating for me right now.  As my skills improve I hope to eventually add lighting and interiors to my builds.  This is why I have been building my scratches with removable roofing and floors so that when I do attempt some lighting and interior scenery it will be easily accessible.

Last edited by bfishma1

Well here we are on our fourth week of our build.  Looks like a few of you might be close to wrapping up.  As I alluded to last week due to unforeseen circumstances with family commitments I have fallen behind and will have to add a few more posts to my build.  I was however able to figure out what i believe to be the most difficult part of the process which was navigating the removable roof section of my build.  I was debating between what material to model: tar paper, corrugated aluminum, or shingles.  In the end I opted to go with tap paper.  The tough part was figuring out how to model the overhang section of the lift out section and what material to use to best simulate the tar paper.

Went with First Aid Paper Tape as it has a realistic knap to it and the added advantage of a sticky side. Once I had the tape applied, cut the edges flush, and test fitted the removable section I went ahead and applied several washes of diluted white glue and ink mix.  Not only did the multiple coats give a good initial base color, but this might even eventually provide some structural support once hardened.

IMG_5916IMG_5913IMG_5922IMG_5926

Hope to finish up painting and weathering coffee stirrers at some point this weekend and begin applying them en mass and aiming for wrapping up doors and windows as well.  Would love to have the doors situated and in place too. 

Anxious to s see what you fellow Community Builders have to show for your efforts this Thursday! 

Attachments

Images (4)
  • IMG_5916
  • IMG_5913
  • IMG_5922
  • IMG_5926

I like your approach to the tar paper roof, very authentic.

Well, this is a February build, so I was up late last night and finished it. So, picking up where I left off last week...the roof:

My sub-roof is simple mat board, cut to fit. To help keep warping to a minimum, I braced it pretty thoroughly...

IMG_1309IMG_1310IMG_1308

also to help brighten the interior and as a further sealer against moisture intrusion, I spray painted the interior facing surface with white primer...

IMG_1314

The sub roof panels are now ready to be glued into place. But before I did that, I realized I needed to paint the inside floor of the barn. Doing so AFTER the roof was glued in place would have made that extremely difficult. I wanted the floor to be essentially a dirt floor, and since I intended to make a mini diorama anyway I painted and "soiled" the entire base inside and out. I used a mix of these two colors for my "dirt" base...

IMG_1311   

I painted the base and while it was still wet, sprinkled real sifted dirt on top as seen here...

IMG_1312IMG_1313

While this was drying, I glued the sub-roof in place...

IMG_1315IMG_1316

With the sub roof firmly attached, the corrugated sheeting could now be applied. Here is one section completed...IMG_1317

Any thing over hanging the ends were trimmed back leaving a uniform with a minimal over hang.

After all this was dried I completed the base in the usual practice of wet water spray followed by diluted white glue. and finally a few details to complete the scene. So here now is my entry for February's Community build...

IMG_1318IMG_1319IMG_1321IMG_1323IMG_1324IMG_1326IMG_1327IMG_1328IMG_1329IMG_1330IMG_1334IMG_1336IMG_1337IMG_1338IMG_1339IMG_1340

Attachments

Images (26)
  • IMG_1309
  • IMG_1310
  • IMG_1308
  • IMG_1314
  • IMG_1311
  • IMG_1312
  • IMG_1313
  • IMG_1315
  • IMG_1316
  • IMG_1317
  • IMG_1318
  • IMG_1319
  • IMG_1321
  • IMG_1323
  • IMG_1324
  • IMG_1326
  • IMG_1327
  • IMG_1328
  • IMG_1329
  • IMG_1330
  • IMG_1334
  • IMG_1336
  • IMG_1337
  • IMG_1338
  • IMG_1339
  • IMG_1340

I like the look of that paper tape as tarpaper.  I have a bunch laying around my office. 

I cut the roof pieces from 1/8" hardboard.  All the edges except the gutter edges were cut at 22 degrees which was just about spot on for the angles.

IMG_2986

I used the tape/roll top method to line them up, and applied white glue in the gaps and layer the whole thing over the barn to dry.

IMG_2987

I found a diamond tile texture image on the web and copied and pasted multiple times in Paint.  After printing it on a color laser, it came out brown, so I adjusted the hue in Photoshop Elements to get the green shade.  I sprayed half the roof with adhesive and applied a sheet of the "shingle paper."

IMG_2989


Attachments

Images (3)
  • IMG_2986
  • IMG_2987
  • IMG_2989

I repeated this on the other half, cut some small pieces for the pointy overhangs, and added a 1/4" strip over the peak.  When the glue dried a little, I flipped the roof over and trimmed the roof paper so it had 1/16" overhang.

IMG_2990IMG_2992IMG_2994

Well, the basic barn just made the deadline!

I still need to cast and carve the basement walls, add wood posts for the basement overhang, make a roof vent, and the beams and pulleys over the loft windows. I may weather the roof a bit also.

Bob

Attachments

Images (3)
  • IMG_2990
  • IMG_2992
  • IMG_2994
RRDOC posted:

I repeated this on the other half, cut some small pieces for the pointy overhangs, and added a 1/4" strip over the peak.  When the glue dried a little, I flipped the roof over and trimmed the roof paper so it had 1/16" overhang.

IMG_2990IMG_2992IMG_2994

Well, the basic barn just made the deadline!

I still need to cast and carve the basement walls, add wood posts for the basement overhang, make a roof vent, and the beams and pulleys over the loft windows. I may weather the roof a bit also.

Bob

Using a photo for tar paper is great idea Bob. You've done an outstanding job with your rendition.

Doing this build really reminded me how much fun structure building is. I have few buildings to rehab (and one I am almost done with) that I will be posting over the next few months.

Great work everyone! Its always incredible to look back over this thread and see the progress made on these builds.

Mark: congrats crossing the finish line first.  I really like the diorama approach you took and finding all the added details in the scene you created.  Especially admire the signage and the opening in the roof.  Wouldn't mind seeing a separate post and write up detailing how you so effectively pulled that barn side advert off.

Doc: roof looks amazing and your cuts precise. The diamond texture you chose really makes it pop.  Look forward to continue watching your progress on the basement walls and roof vent and appreciate you keeping me company here in March.

Hectic times have passed for the moment and I was able to bury myself on Sunday painting and weathering a batch of coffee stirrers.  I decided to duplicate the process I used on my last build since I was so pleased with the results.  Unfortunately as with all good things it takes attention and time ... both of which have been in short supply the last month.

The method I have been using is based on one that has been around for some time known commonly as the "Chuck Doan" method and requires a precoat of paint thinner, followed by a relatively thick coat of acrylic paint, timely chipping with an x-acto blade, and finally a peeling away of scotch tape.  I was able to take a few pics in an effort to document the process:

IMG_6029IMG_603876344301-BED3-46A6-B273-0F41A6E57058

I have tried other techniques before most notably the salting method of weathering on my structures.  While effective for simulating rust and flaking paint on metal surfaces, in my opinion it is not as effective at giving the same impression of peeling paint on aged wood as this method does.  Of course there are trade offs ... only about a 60% success rate and a tremendous amount of time.  After twenty plus batches of these I still don't quite know what the heck I'm doing.  Getting the right mixture of paint and water, finding the right amount of drying time and tackiness of paint between steps, deciding how many passes of peeling tape have all been things that continue to allude me.  But as with all things in life its a process and a learning curve and one I enjoy!

IMG_6045a

Attachments

Images (4)
  • IMG_6029
  • IMG_6038
  • 76344301-BED3-46A6-B273-0F41A6E57058
  • IMG_6045a
bfishma1 posted:


The method I have been using is based on one that has been around for some time known commonly as the "Chuck Doan" method and requires a precoat of paint thinner, followed by a relatively thick coat of acrylic paint, timely chipping with an x-acto blade, and finally a peeling away of scotch tape.  I was able to take a few pics in an effort to document the process:

IMG_6045a

Wow! I'm sure that is time consuming, but that's a great peeling paint effect.  It definitely looks more realistic than my drybrush-simulated peeling paint:

Fortunately, mine will pass the 3 foot rule, which is what I need.  My hat is off to you for trying anything that Chuck Doan does!

Bob

Add Reply

Post

OGR Publishing, Inc., 1310 Eastside Centre Ct, Suite 6, Mountain Home, AR 72653
800-980-OGRR (6477)
www.ogaugerr.com

×
×
×
×
Link copied to your clipboard.
×
×