
Dear Friends!

As you might already know I have finally made the decision to move on to Proto:48 standards. And now I am so excited about it that I get on everybody's nerves with that news. It's a small step for mankind, I know. 


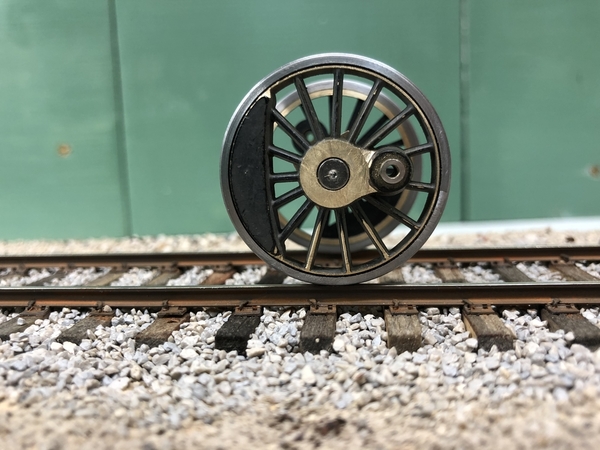
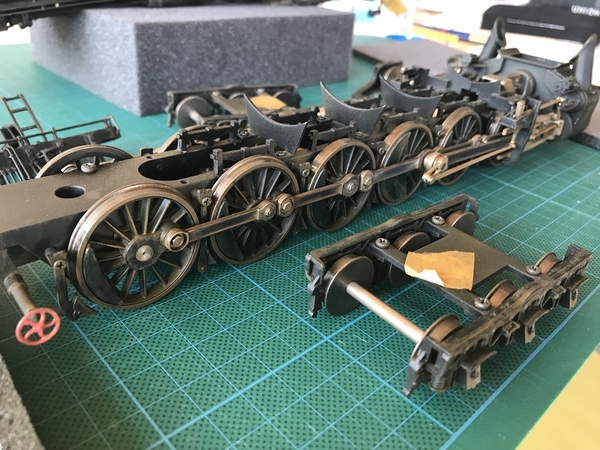
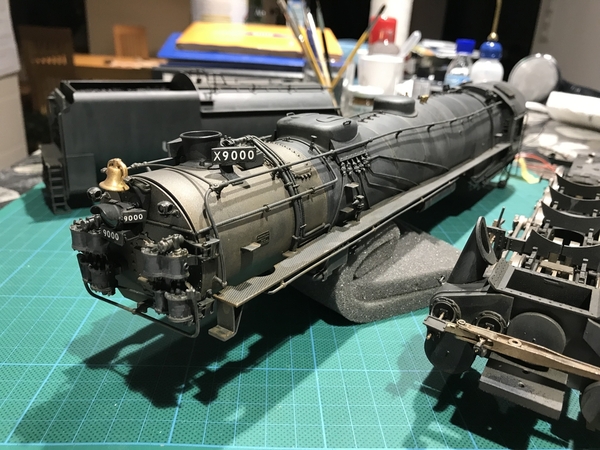
These are my first humble conversions of my Sunset UP 9000's drivers. I use the already filigrane architecture of the OW5 wheels to my advantage and remove material of the attached tire, so that is a simple conversion. Future projects might be more demanding. I have by now most of the tools together and first turning and milling experiences, I slowly learn how the different metals react and what they like and what not. Great adventure. 


Just look how they 67" drivers sit on that code 125 rail. I'm so much into this now!


IMG_2939IMG_2940IMG_2941


I would also like to say thank you to all of you that I had the pleasure to meet in Chicago. This is the worlds greatest hobby! Literally!

Sarah

Attachments

Images (3)
  • IMG_2939
  • IMG_2940
  • IMG_2941
Original Post

Replies sorted oldest to newest

Oh no. Is it too late? Did we lose her? Way off to the dark side for another one. 

 I look forward to you sharing your journey. If I cared more (at the start) and didn't dive in so deep to the RTR stuff, I would have done this too. I admire good trackwork of others so much that I feel that I missed out. I have handicaps so I can't spend too much time bent over the RR. My body won't do what my mind wants it to. Maybe I should have built it on it's side for my ease, and rotated it into position?

 I just slapped my O scale 2 rail RR together on my old G scale benchwork. I had hoped to move to a bigger house (lot size mainly) and do it right someday. My girl isn't interested in moving like I am. So that was a big mistake. 

 I also would have liked better trackwork on my G scale layouts. I admire many European layouts for what looks like perfect trackwork. I enjoy good realistic trackwork in many videos as much as the trains themselves.

In the early days of Proto-48 folks were cautious about how thin they would go on a steam driving wheel.  Jim Harper and I had a discussion about that maybe two decades ago.  I assume trackwork is now good enough for the .115 tread.  That 4-12-2 wheelbase is pretty long.  Mine has .172 tires, and requires 74" radius.

Very nice work.  Good machining can be satisfying.

Hi Sarah--I think the bolt heads make nice hub caps, but wonder if the U.P. had those ?   Ok , I also thought 2 P or not 2 P ....I love the look, and when scratch building locomotives, nothing bothered me more than having to increase the width of the cylinder block . I decided to jump in too.

Then I met this guy in San Jose, Gary Schrader (I think thats his name) and he was using fine scale wheels set to OW5.    At that same time , I was starting to assemble a set of ultrascale passenger cars, and realized I will never have a place big enough to run P48 on 80 foot cars, so I decided to go OW5 with finer treads like Gary.   After that,  it started to make sense for me in that direction.

That said, if I ever do make another locomotive,  I will make it P48 or just order an extra set of drivers and make it convertible like the Glacier park models.  That biggest gripe about widening the cylinder block was only a big deal when i was using the wide treads,-----with the narrow ones , and using accurate drawings to keep the rods and valve gear slim, it's not the grievous offence  it was before.

Oh good, now I am doubting myself again ...How about if I make the axles threaded , and they can be turned in a couple threads each time I want to go from OW5 to P48 ? , or better yet , a hydraulic cylinder axle that can be actuated half way down a train set when the track changes gauge...

Amyhoo, happy trails --going to the p48 treads is almost like the added detail going from HO to O......I love P48 & 1/4AAR too. 

Kind regards, Jeff JJ Davies  San Ramon CA

Okay Jeff - time for some steam photos.  Start a new thread so this one can stay Proto 48.  Scratch builders are really quite rare.

I have been known to drill crosshead guide and piston rod holes slightly off-center to clear.  Most of the time I am in 17/64 scale, where clearances are slightly better.

bob2 posted:

Okay Jeff - time for some steam photos.  Start a new thread so this one can stay Proto 48.  Scratch builders are really quite rare.

I have been known to drill crosshead guide and piston rod holes slightly off-center to clear.  Most of the time I am in 17/64 scale, where clearances are slightly better.

Hey Bob--Iv'e only built 2  ,,,,and a half engines  But my best one needs a little work, and I guess I could photo doc the disassembly and mods- it would show how I put it together.

Rods off center to cylinder block?  THAT is a GREAT idea ! - every little bit helps there...OH! I just saw last month , one of the 3 rail brass loco makers had made the cross head guide like about 1/2 inch (!!!!) too long in order to get swing for a  lead truck !..but that's a little tooo egregious for me ...

Last edited by J J Davies

Thank you all for your comments!

Oh, I struggled with that decision a long time – Matthew Forsyth then said to me "You can do what ever you want!" and that simple sentence convinced me at last. 

Meanwhile I got the first axle together. The problem was to upgrade the NWSL Quarterer III first to accept an 120 degree thirding arrangement required for that three cylinder locomotive. 


The axle is just a tiny little bit too short - you learn as you go. 

120 degree 


Milling a third channel

Very strait forward with the Sherline indexing vice support. Great tool!

Although the NWSL Quarterer was a good buy it did not work out right out of the box, even when quartering a 90 degree angle. The brass bushings for the crank pin fixation were way too thick and had to be machined down to fit the channels. I could possibly not have done that without a lathe. It's so useful that I ask myself what I did in the past without one!


Attachments

Images (5)
  • mceclip1
  • mceclip2
  • mceclip3
  • mceclip4
  • mceclip5

 "You can do what ever you want!"    No better words can be spoken.   As for me,  I suppose that not being officially married to either, I am allowed to "swing"from one to the other depending on mood--After all, the concepts of P48 and OW5 are only mutually exclusive in their conveyance , and further, I should be able to offer up additional irrefutable justification to this 'open' relationship if only my personal inquisitors were interested .   

Speaking of oddities, I had never considered the valve timing on the 'threesome' engines (shut up you Freudians) ,, oh , my ,, a bit trickier!  I have since boughten one of quarterers from Nevada shops , but I have not used it yet, and I found that I could do quite well on the lathe with surface gauges--if looking close , you can see tiny scribe lines on my driver tire sides.  Further testimony that a lathe is merely essential (along with dial calipers) .

Great job on the drivers..I presume you have read all about Tom Mix and his driver adventures?  If not . it's required reading .....   Jeff Davies 

Thanks Jeff,

no need to justify for being in OW5 - O-scale 2-rail is great! I saw that all the young guys with great ambitions and motivation like Ian Watts, Timothy Huebner and many others went straight into p:48 so I see the potential in O-scale there. At least the diesel manufacturers will one day offer new locomotives in p:48. Steam is generally on decline and it is very unlikely that we will see any models here.


Who is Tom Mix and where can I find his publications?


Thanks

Sarah


The Tom Mix that I know of was a silent movie star, born in Cameron County, PA around 1880.  He briefly lived in DuBois, PA, (my hometown), in the area that is now occupied by the DuBois Campus of Penn State.  He lived a very colorful life, of which most of what he claimed is not true.  He died in an automobile crash when his Cord went out of control at a high speed in 1940.

No, not cowboy Mix....Capt Mix (I think he is still alive, but has sold off his models) is a fine gent in the south west.  What I think he was doing is finding full scale locomotives and then with about 1,000 cans of gold spray paint , would take pictures and claim they were brass models he built.  Maybe not, but I built a loco, and thought it was pretty good...and it was...probably good enough for the cover of Model Railroader in 1970.   Then comes along Mix , and it makes my stupid train look like the local cub-scout troop put it together on a camping trip after a serious argument !  Ohh..boy...

Anyhoo, Gene Diemling writes a P48 blog called ,,uh,, P48 blog... But before that he wrote the  Proto 48 Modeler blog that Norm from Protocraft handles now.   If you google Proto48 Modeler (not just p48) you should get to a page and see "articles" on a top banner. Click that "articles" and to the left a list will appear. in that list find "Tom Mix scratch builds drivers" .  Wait til you see Mix's work...but tape your jaw up so it doesn't get hurt hitting the floor.  am hoping i'm not in trouble mentioning another site, but they are p48, not O gauge, and besides, I'm over here posting ...I've posted over there too--that Omaha box I just posted is p48 and was in the p48 blogs.  (the other cars are OW5)

I don't know where steam models are headed ...I know that when The UP ran around their 4-8-4 at 70 mph with that 1,000 lb main rod hopping up and down, it caught the eyes of old AND young!...and I model an era I was never a part of (1895-1915 ).....'course I don't recall many giving up the opinion that I was normal......Jef

That's awesome Sarah!  Having just started 2 rail, I am super impressed with your skills and ambition.  I love when someone has a vision then researches, learns, and carries that vision out.  I am sure it is super satisfying when you finish milling and hold the piece in your hand.  Can't wait to see how this progresses for you.  Enjoy and thanks for posting!

Last edited by roll_the_dice

Way beyond anything I do.  I have scratchbuilt drivers, but only the easier Scullin Disc type. I have machined dozens of spoked types from rough castings. 

On the cylinder blocks: I note that MTH not only uses wider guides, but also smaller cylinders.  Hard to tell until you measure.  

I only move them slightly outboard - maybe less than a sixteenth.  I am doing a Dockside at the moment, using a spare Lorenzen laminated cylinder block.  It will require plugging and re-drilling.  Even in 17/64, clearance is a problem.

My three cylinder steam (so far, only four locomotives) all have 90 degree quartering.  You cannot tell, since it is physically impossible to see both sides at the same time.  Much easier to get the side rods perfect.  Sure, one side will have the center rod slightly out of synch, but you really have to be OCD to notice that.  And three have Gresley gear, but all I require is that it wiggle.  I do not have a clue as to how it should look on a real three cylinder.

"90 degree quartering.  You cannot tell,"

I hear that ! Yeah, Bob,  when I decided on my last 4-6-0 that I needed working valve gear , I made a crankshaft on one axle with two 90 degree throws--it was difficult enough to turn the crank shaft on the lathe , that I did not even consider the actual valve timing .  The drivers are quartered exactly, but when pressing on the crank / axle , it was enough that the Stephenson gear just moves independently.  

Thanks!

Yes, I‘m using a leadloy steel. I work on a Sherline, that‘s a very small lathe so no profiling tool can be used, that would outpower the little machine. I simply off-set the chuck at 2 degree angle and cut the running surface back to the flange and that assures a light taper in the wheel profile. Flange shaping is then phase two, this time at -2 degree so that the flange face is also slightly tapered. 

All the tricky things are about making the right arbor and getting the wheel run true. Have to machine wheel first around the axle holes to make it happen.

Sarah posted:

Thank you all for your comments!

Oh, I struggled with that decision a long time – Matthew Forsyth then said to me "You can do what ever you want!" and that simple sentence convinced me at last. 

Meanwhile I got the first axle together. The problem was to upgrade the NWSL Quarterer III first to accept an 120 degree thirding arrangement required for that three cylinder locomotive. 


The axle is just a tiny little bit too short - you learn as you go. 

120 degree 


Milling a third channel

Very strait forward with the Sherline indexing vice support. Great tool!

Although the NWSL Quarterer was a good buy it did not work out right out of the box, even when quartering a 90 degree angle. The brass bushings for the crank pin fixation were way too thick and had to be machined down to fit the channels. I could possibly not have done that without a lathe. It's so useful that I ask myself what I did in the past without one!


You have some big time skills.To take on one of the biggest steam locomotives around.UP 4-12-2 is a huge locomotive but your off to a good start.Look forward to seeing more of your work.

I would never have guessed you did not have a form tool.  It just goes to show, a bit of care and patience using just basic tools can work just as well as big expensive tools.  I made my own form tool by grinding a groove into the end of a piece of 1/4" square high-speed steel using a 1mm-thick cutting disc in a hand-held motor tool.  My lathe is not powerful enough to do all the cutting with this form tool, but after I rough-cut the tyre a little bit over-size, it works okay.

I wish I had pictures of some of the crazy things I did to my long suffering little Sherline--It took a 'lickin and keeps on 'tickin ...But I also have an Atlas 10x24 now.

One of the more memorable was somehow clamping a GN belpaire firebox to the cross slide , and with a flycutter very rudely engaged into the four jaw, made a  1 &5/8ths hole in 1/4 brass plate  for the boiler to slip into..yikes !  

Some more progress has been made – the frame made it through a 72“ curve. I hope to stabilize the ride a bit more by increasing the spring loads of the first and last axle a bit. I replaced all the original journal springs with freight car truck springs that are much softer.

 D8AA814B-17E2-4319-9370-63A0ED645775

78D82CCA-6FDF-4F7F-B2CD-A136E08A5BAC


Attachments

Images (2)
  • D8AA814B-17E2-4319-9370-63A0ED645775
  • 78D82CCA-6FDF-4F7F-B2CD-A136E08A5BAC
Videos (1)
95931D3B-9794-4774-A5CE-ED47D89A30B4
Last edited by Sarah

Thanks, Ed! Kind words from a master! Yes, I go full p:48, it's quite a difference once you get more used to it. At first I thought what do I need that for. But now I'm quite happy with the new look of the rail sitting more narrow under the trains. Also do the trucks look great when they have the sleeker bolsters. My layout consists of a bench for test tracks until I get the layout room prepared. That particular locomotive will not be detailed much more since I have already weathered the boiler in a way I am very happy with. I hope to get sand lines on the brake shoes and equip the engine with smoke. Thanks again!


Mechanically she‘s finished! All wheels flanged on 72“ radius test track. There‘s still a radius reserve in the layout of the running gear.

The undersized wheels of the lead truck have been replaced with scale wheels. Lead truck received ball bearings to minimize irritation of the first driving axle in curves. It‘s super smooth now and the wheels look much better at their 30“ diameter. 

I‘m really happy with the outcome. All following engines will have shorter wheelbases.

9551C5FF-026C-4AE7-97AC-C4698C0B4D08750C3512-969B-4E95-85A3-A8473E9DA12B724C691D-5B10-4B45-A9C3-C5D690F0C762

Attachments

Images (3)
  • 9551C5FF-026C-4AE7-97AC-C4698C0B4D08
  • 750C3512-969B-4E95-85A3-A8473E9DA12B
  • 724C691D-5B10-4B45-A9C3-C5D690F0C762
Videos (1)
40B74FA6-3599-41B0-B98E-EECF0D41B7AF

Thanks!

Bob2 and Mark, the weathering was carried out with acrylic paints and very few chalks. 

1) a brown overspray with highly thinned acrylic paint, I use Revell but the brand does not matter. This is the only moment when an airbrush is used. All Components are disassembled so you can roll the mechanism in your booth and for better handling. It is important to apply more of the brown on the lower portion of the model, becoming lighter towards the roof. Oh look how crude the wheels are!  We will have to change that later 

2) The color is then modulated with a flat brush and isopropanol alcohol, at that time I used methylated alcohol. they both re-activate the color and you can brush most of it away, creating streaks. I try to leave more over the rivets and generally on the lower portion of the model. Attention here -  the alcohol might eat up the decals, they have to be sealed carefully. The sealant should resist the alcohol, of course - I will make tests before I weather an other. All the factory painted plastic models like Atlas and Intermountain cars have no problem with alcohol.

3) Seal your brown layer with a clear coat. Krylon Matte Finish or anything that protects against the next coat.

4) The most important step is to apply a THIN wash of a light grey with your brush. I use pure thinner to wet the model before applying to avoid drying edges, they can ruin the job. All of this can be modulated with alcohol but I find it easier to apply it nicely in the first place. This step is subject to really developing your own technique and to use your HO corpses for test runs. 

It's all about removing paint and shoving it around. Once you're happy the components go back together and some pigments are added. At that time I had no concept of soot and grime on a steam engine, today I would add more black pigments around the stack and on the roof. 

All the side rods received some burnishing on the outside. This locomotive ran through Nebraska at 60 mpH and is now going to be serviced at Cheyenne, Wy. The shine of the rods would have looked still too fresh with just the above weathering. 


I wished I had converted the engine to p:48 before all the weathering. That way around would have been much easier. 


Attachments

Images (5)
  • mceclip0
  • mceclip1
  • mceclip3
  • mceclip4
  • mceclip5
Videos (1)
IMG_0372

Very, very nice.   I guess what drives me crazy modifying complicated models is taking apart and reassembling over and over !  You have some patience! 

I took apart a Great Northern  4-6-0  E-8  I scratch-built years ago to finally illuminate the headlamp, and for the life of me could not remember the clever ways I hid some of the fasteners.  to remove the headlamp to carve out the inside , I had to take apart everything but the axles on the frame --the cylinder block had to come loose because the boiler is attached as one , and the drive is hidden by sliding the motor and half the gearbox into the boiler before attaching to the frame . The wires interfered, so I had to modify the motor mount and forward weight.---And your big engine has twice the number and size plus five times the electronics! Yikes!

So I reassembled it for the fourth time (during construction it may have been assembled 150 times), then put it on the track.  Great !!! it now has lights and .....smoke !!! So cool, but there is no smoke unit .....  OK, time to take it apart again --I think I accidentally stripped a wire when slipping the weight in and it shorted .

So, anyway, great work Sarah ! 

Regards, J J 


Very  very nice , Sarah!!!   I'm going to order one of the smoke units because of this-it looks fantastic!  Oh, and by the way, your layout is great too-  I could swear the shimmering silver lake and water fall by the bridge is real !, but the black rock formations may be a little too glossy-- a  grinder and rough disc should fix that in a few minutes.  #:&lt

Last edited by J J Davies
@Dave_C posted:

 Very Nice. The weathering came out great and it runs as good as it looks.

 Sarah, in watching the video of the uncoupling. Can you elaborate on how you did it. Looks like a thread running through the spring is pulling It open ?  I’m guessing a small solenoid or a servo motor. I know Kadee makes one but it’s in G Scale.

That's exactly right – I use the uncoupling kit (HO) by www.precimodels.com/en 

It works just fine with the old Kadee #805 and next time I'll try it on a #745 scale coupler. It will be a bit more challenging to connect the thread.

Last edited by OGR CEO-PUBLISHER

Beautiful! I have enjoyed this thread immensely. 

Since this is the "O gauge Railroading" forum a quick question. Why Proto 48 ( 1/4 inch scale) vs. 17/64 inch scale?

As I understand it, the purpose of Proto 48 is to bring the track gauge in scale to 4 feet 8 1/2 inches, which is the prototype gauge in North America and Europe. 

Of course 1/4 inch scale on O gauge track, which has a gauge of 1 1/4 inches,  is a scale 5 feet in 1/4 inch scale, which is too wide. The too wide track gauge can affect the appearance of the models. Thus, track gauge in Proto 48 must be around 1.1766 inches (or 1 22/125 inches) to bring the the gauge to 4 scale feet 8 1/2 scale inches.  But, this track gauge is no longer O gauge. 

However, O gauge track in 17/64 scale does scale to 4 scale feet 8 1/2 scale inches. Why not keep O gauge track and just proportion everything to 17/64?

Both approaches accomplish the same goal of having a track gauge of 4 scale feet 8 1/2 scale inches, but only one keeps O gauge. 

Hopefully not opening a can of worms. 

WBC,

The answer, I would guess, is that switching to Proto 48 involves primarily trucks (on rolling stock) and drivers/diesel trucks and related equipment on locomotives.  Switching to 17/64ths scale involves almost (if not) everything else being adjusted since 1/4 scale is what most manufacturers build.

Chuck

@PRR1950 posted:

WBC,

The answer, I would guess, is that switching to Proto 48 involves primarily trucks (on rolling stock) and drivers/diesel trucks and related equipment on locomotives.  Switching to 17/64ths scale involves almost (if not) everything else being adjusted since 1/4 scale is what most manufacturers build.

Chuck

That‘s right! I already have a ton of equipment and I just trade in track and trucks or convert them. Really the only thing are the steam locomotive drivers. 

It‘s all readily available nowadays for those diesel guys. Easy. But you need to keep your trackwork level and incorporate gentle easements for curves and changes in elevation - OW-5 is maybe a bit more forgiving here.

Wow Joe, that were many thoughts! Yes, I see modellers of the various fields more as a big family and ofcourse everybody has a favorite sibling.

As for the track I gave hand laying a try using  Jay Criswell‘s code 125 rail, ties and plastic tie plates. The ballast is made by Roco of Austria, it‘s HO and just the right size. The rest of the wooden board was covered with ordinary gravel from a road in the fields.

I brushed every individual tie with a wire brush to create individual grooves. Then they were individually stained with india ink of various intensities. Rail weathering with brown acrylic paint and an enamel wash with MIG rust washes. 

I‘m glad you like it! :-)

The first pic shows wet ballast in place after scenic glue was applied.

9096BA1F-0A71-412D-8EC8-BF65EEB437D12ABD013A-6521-4FF2-8EAD-A0680E21FEBBFBF18642-18B0-4A26-A6B4-C2A029DDB754

Attachments

Images (3)
  • 9096BA1F-0A71-412D-8EC8-BF65EEB437D1
  • 2ABD013A-6521-4FF2-8EAD-A0680E21FEBB
  • FBF18642-18B0-4A26-A6B4-C2A029DDB754

. . . But you need to keep your trackwork level and incorporate gentle basements for curves and changes in elevation - OW-5 is maybe a bit more forgiving here.

That is true.  But one can enjoy slightly narrow gauge without going all the way to scale treads and flanges.  About 60% of my motive power is 17/64 scale, so it runs on O 4'8 1-2".  Then I have my original solution to the dilemma of track gauge - On4.5.  I use standard flanges and treads, so my sideframes are properly inset from the carbodies.

I tried Proto-48 wheelsets for a while.  They were sensitive to temperature changes.  My trackwork is not up to the job.

But Sarah's is - way to go!  Track is a model, too.

@bob2 posted:

That is true.  But one can enjoy slightly narrow gauge without going all the way to scale treads and flanges.  About 60% of my motive power is 17/64 scale, so it runs on O 4'8 1-2".  

1. Then I have my original solution to the dilemma of track gauge - On4.5.  I use standard flanges and treads, so my sideframes are properly inset from the carbodies.

I tried Proto-48 wheelsets for a while.  They were sensitive to temperature changes.  My trackwork is not up to the job.

But Sarah's is - way to go!  

2. Track is a model, too.

1: Can you post some photos of that?

2: Very true. I think back in the '70s(?) Model Railroader did an article with that as a subtitle...probably written by one of the early proponents of "FineScale": Bob Hegge or Bill Clouser, maybe...

Mark in Oregon

Hello Sarah, 
This track work is simply amazing. Laser lined ballast on the inside and out of the rails and ties. If I didn't know any better, you might of worked for the DL&W track crew. I have been away for a long while with a medical condition, but I have to tell you that your track work is beautiful. Your 9000 looks real, I hope you have a photo page of your layout. I would like to see all of your work. 

9096BA1F-0A71-412D-8EC8-BF65EEB437D12ABD013A-6521-4FF2-8EAD-A0680E21FEBBFBF18642-18B0-4A26-A6B4-C2A029DDB754


@DL&W Pete posted:
Hello Sarah, 
This track work is simply amazing. Laser lined ballast on the inside and out of the rails and ties. If I didn't know any better, you might of worked for the DL&W track crew. I have been away for a long while with a medical condition, but I have to tell you that your track work is beautiful. Your 9000 looks real, I hope you have a photo page of your layout. I would like to see all of your work. 


Dear Pete, 

My friend and mentor, Matthew Forsyth, is a dyed-in-the-whool D&H man and I visited him in March near Scranton, PA. So I have a very good feeling about the mood of your prototype road since we went railfanning in the area. Very cool, the eastern roads. 

Unfortunately I can not show you a lot more since I only started with the hobby by actively modelling stuff. A real layout is still very much in the future so in the meanwhile I build up my rolling stock and try to organise all the material, track, color, solder (really - the lead containing solder is already impossible to get) and other commodities that I will need in the years ahead. 

Kind regards

Sarah

Sarah, is it a 'California thing' - no solder with lead?  We can still get it over here in England and it keeps (you knew that!).  It's a while since I read about it, but there are real reasons we haven't had it universally banned.  I'll see if I can find the reference.  Have you checked with Jay and Matt?  And Rod Miller who is an expert O-scale builder in Ca.

Jason

Sarah,

Your track work is super fine.

I've done the same thing on my Carbondale RR. Some is hand laid and some  hand scribed code 148 3 ft lengths. for the ready made track, I remove the rails, paint the rails and scribe the ties and reassemble. My RR is around the wall with a double main. I built it in my air conditioned third garage.

I sure hope you find the space to build your railroad.

Mine is 3 rail so I use a thin N scale rail for the 3rd rail in most foreground spaces. Everything runs super smooth.

IMG_2448IMG_2450

Attachments

Images (2)
  • IMG_2448
  • IMG_2450
Videos (1)
IMG_1753
Last edited by Ron H
@Ron H posted:


Your track work is super fine.

I've done the same thing on my Carbondale RR. Some is hand laid and some  hand scribed code 148 3 ft lengths. for the ready made track, I remove the rails, paint the rails and scribe the ties and reassemble. My RR is around the wall with a double main. I built it in my air conditioned third garage.

I sure hope you find the space to build your railroad.

Mine is 3 rail so I use a thin N scale rail for the 3rd rail in most foreground spaces. Everything runs super smooth.


Very nice! And very creative to use an N-scale third rail!!

Add Reply

Post

OGR Publishing, Inc., 1310 Eastside Centre Ct, Suite 6, Mountain Home, AR 72653
800-980-OGRR (6477)
www.ogaugerr.com

×
×
×
×
Link copied to your clipboard.
×
×