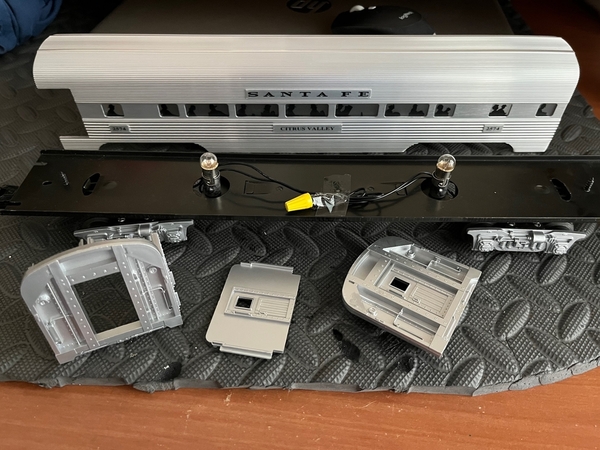
I've finally gotten the Santa Fe F3 Warbonnet ABA set I've been wanting since I was a kid.  I also got 4 Santa Fe passenger cars.  I'll work on the engine second, but right now I would like to upgrade the 4 passenger cars.  In case it matters, they are Lionel, numbers 19176 through 19179 inclusive.  A picture is at the end.

The three things I would like to do are;

  1. Add an LED strip to each car.  I've added individual LEDs as directional headlights to my #60 trolley, so I'm a little familiar with that technology.  I've searched this forum on that subject, but many topics are at least 3 years old.  Is there a simple LED strip, preferably warm white, that I can attach to the top of the car?  It is 15 inches long.
  2. Add a base to install seats and real people, instead of the silhouettes.  I'm not a very detailed guy (yet anyway), so simple O scale coach seats are okay.  I've had a hard time finding those, although in HO they have nice ones.  I already have been buying sitting people.
  3. Obviously take out the silhouettes and replace with a plastic strip.  I imagine it would need to be clear, not frosted, right?


Thanks in advance.


IMG_4162

Attachments

Images (1)
  • 19178 Citrus Valley Passenger Car 2574
Original Post

Replies sorted oldest to newest

Correct, the AC is track power, and there's no polarity observed, connect either way.  The DC is the LED strip, and obviously you do have to pay attention to the polarity.

For windows, you can just use clear plastic packaging, I get tons of it on various products, enough for plenty of windows.  You can of course buy clear plastic sheets or even tinted plastic sheets if that's what you like.

I used this Ultra-Thin Double Sided Adhesive Tape to hold the windows in.

As far as interiors, go to MTH Parts & Sales, click on the Shop, link and search on interior.  Just click on the camera icons if you find a description you like and see if it might fit.

Here's a couple of samples I found as an illustration of what is available.

Attachments

Images (2)
  • mceclip0
  • mceclip2

Texgeekboy:

Great thread !!!

Please keep us updated on your progress.  

I plan to eventually do similar upgrades to my Lionel 15” aluminum Zephyr cars.  

First I need to clean out my basement & get it sealed.  Then I will have space to start these upgrades.

I really love the look of the plated aluminum cars.  To me, they simulate Budd stainless steel cars better than any silver painted plastic cars.  

Looking forward to your updates !!!

@CBQ_Bill,

FYI, I've just completed the change out of the silhouette windows on my 4 passenger cars with clear plastic.  It looks like real, clean glass.  Definitely use the stuff that @Craftech noted.  Some suggestions;

  1. Carefully remove the silhouette strips (just in case you have to put them back).  On my passenger cars (see the OP for details), there were 2 places on that strip that used double sided tape to hold the strip close to the car.  You should be able to remove the silhouette strips from the tape before sliding it out, leaving the tape in place for the new clear strip.  If not, get some double sided tape detailed by @gunrunnerjohn above.
  2. Measure the width of the the silhouette strip, and measure a strip of a slightly smaller width on the clear panel.  For me, the cut strip is always bigger than what I measured, so that's why I cut the strip 1/16 of an inch smaller than measured.  Put a new blade in the exacto knife for this.
  3. For cutting, carefully measure the width along multiple points on the clear plastic (it has a protective cover that you can write on).  Connect the dots with a ruler, then use the ruler to guide your exacto knife along the line.
  4. Your cut won't go completely through (mine didn't), so turn the sheet over, and cut along the line on the other side.  Now you should be able to snap the piece off the plastic sheet.
  5. You should now be able to slide the clear plastic sheet into the groove that holds the windows.  If it doesn't slide in, you'll have to trim.
  6. Clear out the grooves, remove the protective film from both sides of the clear plastic, hold onto it with a cloth or paper towel, and slide it in.  If the double sided tape is still there, try to raise the clear plastic over that spot so as not to smudge the clear plastic.


While the above may seem obvious for some, I'm not an arts and crafts guy.  It took me some time to figure this out.  The first car took 50 minutes (a lot of trimming), the second 40, the third 30, and the last one 10.  The above procedure is what I did on the last car.

Now, I'm waiting for the circuitry @gunrunnerjohn suggested in order to put in the LEDs (I have the strips already).  I'm also waiting for the seating to put into the passenger cars (I have the little people already).

I'll take a pic for the next update.

@texgeekboy

Thanks for the update.

Can the silhouette window strip be used as a template ?  Simply trace its size onto the clear window material ?

Some where I have some green-blue tinted clear JAM plastic sleeves from Staples.  The blue tint is close to that used in the windows of the post WWII Budd Zephyr cars.  I will attempt to use that material for my window strips.

For the Vista dome glass, I have some translucent Krylon Stained Glass Soft Blue spray paint.   I plan to use light coats of that spray paint on the insides of the vista dome glass of my Zephyr cars.

Thanks again !!!

Last edited by CBQ_Bill

Add Reply

Post

OGR Publishing, Inc., 1310 Eastside Centre Ct, Suite 6, Mountain Home, AR 72653
800-980-OGRR (6477)
www.ogaugerr.com

×
×
×
×
Link copied to your clipboard.
×
×