
https://www.mouser.com/Product...PHl1FCPZucit6Q%3D%3D

The link above is to the chokes I used. They cost about $0.30 each if you buy 10. They are only a recommendation in case the cars would run on a DCS system. At the time I did not know if MTH would become an important supplier to the S scale community, so I built in as much flexibility as possible at the lowest cost possible. As for DCC, I don't believe the addition of a choke will have an adverse effect on that system. I chose 12-volt strips because I had some extra from a home improvement kit, and because I had a bunch of 12-volt DC wall warts I am using to light buildings with extra sections. I found that cutting the strips in strings of three LEDs is the smallest I can go using the built-in resistors on the strips themselves.

The LED strips are either mounted on or supported close to the ceiling of each car or caboose so that the light shines downward on passengers visible through windows. No circuitry is visible in the cars.

Terry

Last edited by TOKELLY
@Tom Stoltz posted:

Thanks again to everyone for your explanations and patience.  John, your board sounds perfect, but at $20 a car, I couldn’t afford that even if was the installed, ready-to-run, price.

You want cheap?  How about a couple bucks a car as long as you're doing some soldering anyway.

GRJ's Original DIY Constant Current PAX Car Lighting Module Files

This is the same functionality as my boards on Henning's Trains site, you just have to build them.  Total cost is a couple bucks and they have all the attributes I talked about for my commercial module, the circuit is the same.

  • Requires a small fraction of the power of conventional lighting
  • Provides adjustable lighting intensity
  • Storage capacitor on module provides flicker-free operation
  • MTH DCS compatible, will not degrade DCS track signal
  • Simple connections to power and LEDs
Last edited by gunrunnerjohn

DANGER WILL ROBINSON!

These are only BOOST converters, so if your track voltage goes over the max rating for your LED strips, you have a problem.

Below is a link to a buck/boost supply, note the two inductors.  This will keep the output voltage over the entire rated input voltage.

XL6009 DC-DC Step Up Step Down Boost Buck Power Supply

Note the one you specified says: Output Voltage Adjustable Step-up Converter Board Module

John, I found HiLetgo XL6009 for a better price.  Am I safe in assuming that any XL6009 will work?

https://www.amazon.com/dp/B07B...pY2s9dHJ1ZQ&th=1

The output voltage is a little different.

Tom Stoltz

in Maine

@Tom Stoltz posted:

John, I found HiLetgo XL6009 for a better price.  Am I safe in assuming that any XL6009 will work?

https://www.amazon.com/dp/B07B...pY2s9dHJ1ZQ&th=1

The output voltage is a little different.

No, it has the same problem, it's only a boost regulator.  If your track voltage goes past your set voltage, the output voltage will rise as well.  Since your rectifying your track voltage, and the typical voltage for the 12V strip will be more like 9-10 volts for proper illumination, any track voltage more than about seven-eight volts will result in the LED strips getting brighter as you increase track voltage.

The guy that wrote that description was smoking something strong and not sharing!  They're considerably larger than quoted!

Try .875" x 1.9" for an actual size.

Yes, I have some in my parts box.

Tom, I'm at a loss as to why you are looking for modules that big, they're a PITA to hide on most passenger cars.  I guess you didn't take notice of my previous post for the DIY module for a couple of bucks?  Using the 5V LED strips, it'll solve the lighting issue perfectly for your use.

Attachments

Images (1)
  • mceclip0

The guy that wrote that description was smoking something strong and not sharing!  They're considerably larger than quoted!

Tom, I'm at a loss as to why you are looking for modules that big, they're a PITA to hide on most passenger cars.  I guess you didn't take notice of my previous post for the DIY module for a couple of bucks?  Using the 5V LED strips, it'll solve the lighting issue perfectly for your use.

John, I don't know either.  At a couple of buck per car your module is by far the cheapest.  What is the actual size and where do I order?

If I upgrade to DCC, will it still work?

I've tried to compile Terry's circuit and parts into a Word document.  I find I am still lacking a value for the capacitor.  It's hard to do when you have no idea of how the finished circuit works and my searches on values have taken me to several wrong components... I'm about ready to give it up.

Tired,

Tom Stoltz

in Maine

Tom, GRJ's light control module is ideal for the AM Budd cars if LED's are used. The other possibility is to buy the new AM LED circuit boards at $7/car and adapt them to the Budd cars. The problem I see with that is the lumen output of the three LED's on the AM boards is not adjustable. Having installed a lot of these AM boards in AM heavyweight coaches, they are bright. They were designed for the frosted window inserts with the black passenger silhouettes and the LED's are whiter and brighter than the incandescent bulbs provided by AM.

I just checked one of my AM heavyweights with the LED's in it. With AC track power they trigger on at about 5V. I am testing it with an MRC AH101 which is seriously non-sinusoidal at low voltages, so I do not trust that my meter is providing an accurate voltage measurement.

With GRJ's controller you can pick the color temperature of the LED's used with it and the intensity is adjustable. If I ever get around to replacing the incandescent lights in my fleet of Budd cars I know I will not be using a buck-boost regulator. My layout is command control so its a lot easier. The longest set of Budd cars I run is 8 with incandescent and two domes with LED's. Those 10 cars plus a Legacy engine do not come close to challenging the 10A from one channel of a ZW-L.

@Tom Stoltz posted:

John, I don't know either.  At a couple of buck per car your module is by far the cheapest.  What is the actual size and where do I order?

If I upgrade to DCC, will it still work?

I've tried to compile Terry's circuit and parts into a Word document.  I find I am still lacking a value for the capacitor.  It's hard to do when you have no idea of how the finished circuit works and my searches on values have taken me to several wrong components... I'm about ready to give it up.

If you look at the link, you'll see you build them, but all the parts are readily available and they're simple to build. Since you are looking at other solutions that require component soldering, it seems like these would work out better and be more suitable.  Yes, they would run fine on DCC voltage on the tracks.

@Tom Stoltz posted:

Good, I will go that direction.  GRJ has given a link for the 5V LED strips and I think I'll add some JST mini connectors. 26AWG wire...

https://www.amazon.com/FainWan...b3RMb2dDbGljaz10cnVl

Wrong pitch for the connector sets, you need to look for the JST-XH connectors if you want them to fit the boards I'm talking about.

Just an endorsement...I'm a big fan of John's regulator sold by Henning's and cut-to-fit LED light strip reels. I keep a supply of both on hand so I can quickly address any bothersome flickering. Super simple....some positioning, some cutting, some soldering, some adhering into place. No knowledge needed of all the circuitry components/assembly discussed above.

You want cheap?  How about a couple bucks a car as long as you're doing some soldering anyway.

GRJ's Original DIY Constant Current PAX Car Lighting Module Files

This is the same functionality as my boards on Henning's Trains site, you just have to build them.  Total cost is a couple bucks and they have all the attributes I talked about for my commercial module, the circuit is the same.

  • Requires a small fraction of the power of conventional lighting
  • Provides adjustable lighting intensity
  • Storage capacitor on module provides flicker-free operation
  • MTH DCS compatible, will not degrade DCS track signal
  • Simple connections to power and LEDs

I think I found the boards on the Osh Park site, however they are more than a couple of bucks and do not include the components.  I also looked at HENNINGS TRAINS, but did not find any DIY kits...

Did I misunderstand something?  I thought the DIY kit had everything you needed to complete the module, but that does not appear to be true.  I'm about ready to give up...

Tom Stoltz

Tom, Osh Park pricing is for quantity 3 at $3.80 shipped.  That’s $1.27 per pcb.  The components to complete the board can be ordered from Digikey or Mouser or offshore for pennies per component.  Offshore is cheapest but a wait is involved due to shipping generally.  Below is a representative cost per board, parts included, that I paid a couple years ago.  A little research using the parts list from Digikey or Mouser will give you todays pricing list. Buying in quantity will lower the pricing somewhat.  In the end, certainly you have to decide how you want to proceed, or not.  We’re just here to help.  If we aren’t meeting your needs, it may be time for us to move on.

D30E05FF-52CF-4DF2-B522-9586F7871CD16FCF518B-0B7B-4E42-A8E3-43EC3172B342A84066F9-615F-4CBB-AAEC-81D8466AAABB

Attachments

Images (3)
  • D30E05FF-52CF-4DF2-B522-9586F7871CD1
  • 6FCF518B-0B7B-4E42-A8E3-43EC3172B342
  • A84066F9-615F-4CBB-AAEC-81D8466AAABB
Last edited by TedW

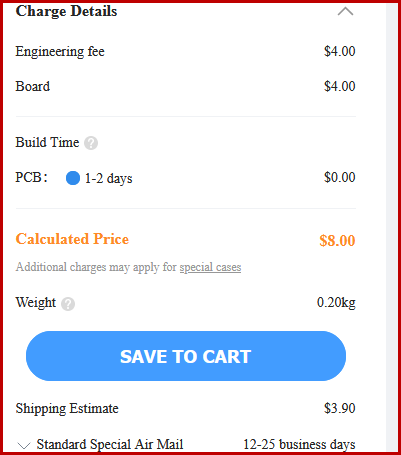
You can buy the boards from OSHPark, but if you use a place like JLCPCB, they can be MUCH cheaper.  I just ordered 25 1" x 2" boards from JLCPCB, and the total price was a bit over $10. 

As a test, I just entered an order for 100 of the lighting boards under discussion at JLCPCB, and the total cost including shipping was $11.90, so that's 12 cents a board!  It don't get much cheaper than that!

@Tom Stoltz posted:

Did I misunderstand something?  I thought the DIY kit had everything you needed to complete the module, but that does not appear to be true.  I'm about ready to give up...

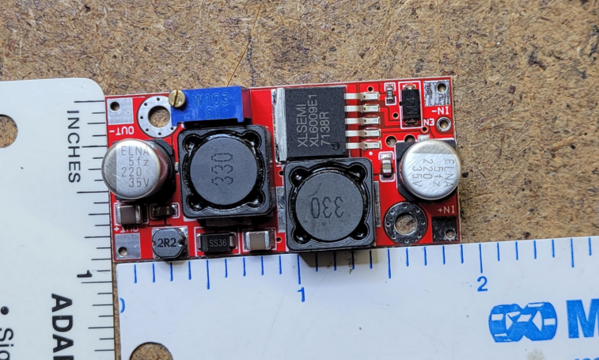
You keep saying you're about to give up, and truthfully it's getting a little tiring.  We all trying to accommodate you here, and the constant defeatism is wearing.   Truthfully, if you want an "all inclusive" solution to the board, I gave you one, you're just not willing to pay for it: LED Lighting Regulator.

I get that you don't want to spend the money for the pre-made and tested modules, but time is money.  If you want to spend less money, you will spend more time.  Quite frankly, I seriously doubt you'll spend less money than a little judicious shopping for boards and components for this lighting board and the matching 5V LED strips.  Yes, you're going to have to put a little more effort into it, and we've certainly been trying to help you achieve your goal.

Attachments

Images (1)
  • mceclip0

Tom, I have one more possibility. I couple my AM passenger cars together to make several trains. I almost never uncouple the cars after that. What you can do is buy a strip of lights and cut them up for each passenger car. Buy one of GRJ's pre-made regulator boards just for the head end passenger car in each train set. Then power all the cars in the set from that one regulator. Each car will only need 3 or 4 LEDs. The cars will be connected with two pin jacks if just the head end car is used for power pickup. A four pin is used if you want to use all the cars for power pickup. Two pins bring the track power back to the head end car and two send the regulator power to the trailing cars. It is easy to swap, add or subtract cars from a train set. Additionally, all the cars will be the same brightness with just one regulator to adjust that controls all the lights.

Hi Everybody,

It’s been some time since I have collected all the part necessary to build GRJ’s passenger car lighting circuit.  The weather changed and I am outside for the rest of the season and all the parts are in a box waiting for me to get back to train stuff.  I wanted to thank everyone for their patience in helping me get to this point and especially John and Ted, who really guided me through a bunch of hurtles – Thank you.

With John’s help, I was able to get the price down to about $4.40/car.  That was a decent price to pass by my accountant, I mean, wife.  Of course I didn’t tell her that I invested enough to do 50 cars worth – that’s beside the point.  LOL

So now I am looking forward to learning how to solder a PCB and have found lots of uTubes on the subject…  should be easy enough.  I will report on my progress when I get back to the train room.

Thanks again,

Tom Stoltz

in Maine

@Tom Stoltz posted:
So now I am looking forward to learning how to solder a PCB and have found lots of uTubes on the subject…  should be easy enough.  I will report on my progress when I get back to the train room.

Start with the proper tools.  A decent soldering iron with temperature control is very important for PCB work, and I recommend 63/37 Rosin Core Solder for the task.  Important tip, especially for soldering neophytes!  Do NOT try to use lead-free solder!  It's much harder to work with than leaded solder, and many people complain about how difficult soldering is, and much of the reason is they're using this stuff!

Soldering Station, Merece Digital Soldering Iron Kit w/ 176℉-896℉

63/37 Rosin Core Solder

Hi John,

I do have an old Weller WSD81 station and some conical tips for it.  IIRC, Ted suggested setting the temp at 555°.  I also have Kester 63/37 that’s labeled ‘No Clean’.  It does say it is resin core, but as I mentioned to Ted, I had to add flux when soldering Western Union splices using 18AWG.  The wire was striped just before I tried to solder, but the solder wouldn’t flow until I added flux.  Now I’m not sure if I need to add flux to the PCB or not.  When I add flux, I wash it off with denatured alcohol.

Tom Stoltz

in Maine

One issue with many soldering stations is any temperature display is way off in calibration.  That results in either insufficient heat or way too much heat.  One of the reasons I like my Hakko FX-888D soldering station is the fact that it has a calibration feature.  I can use the FG-100 calibrator to set the exact tip temperature and have it matched to the digital display.  That way when I dial in 500F, I know that's really what I'm getting.

For surface mount parts, I use 500F (260C), for thru-hole I usually kick it up a bit to around 550F (290C).

Last edited by gunrunnerjohn

Add Reply

Post

OGR Publishing, Inc., 1310 Eastside Centre Ct, Suite 6, Mountain Home, AR 72653
800-980-OGRR (6477)
www.ogaugerr.com

×
×
×
×
Link copied to your clipboard.
×
×