I’ve been asked by a couple of fellas in previous threads how I did my Pittman swaps.....This weekend, I attended the Greenberg’s show in Va. Beach, and low and behold I ran into yet another Mohawk. She had a just a tiny bit of cosmetic damage on her pilot....The seller is a good friend who I purchase quite a bit from, so we haggled a little, and we came to good deal...a real good deal!....Thanks John!.....anyways, I brought it home, and set it on the track and ran it as it was to get a base line on the upgrades....It ran .....well...ok, as to be expected for a Pullmor AC growler, ran it for about 15-20 minutes, as it got warm dragging a 25 car consist, it did the usual speed up slow down thing as all of these do when the temps rise....So time to tear down. I’m gonna skip right to the good stuff as most of y’all know how to get a shell off.....I’ll start by adding I’ve done bunches of these, so I know right where to cut, and right where to shave....first thing is to pucker up, and start cutting....I just slowly and methodically lop off the entire back of the motor/ body mount, I’ll fabricate new body mounts in a bit, and post them as I update the thread......next thing to do is fab the new motor mount from a thick 1/2 inch washer that I’ll machine for counter sunk screws. I use a thick nylon spacer between the new motor mount and the chassis (serves two purposes 1st it cuts down motor noise, 2nd, I find a spacer necessary for cab clearance) I still have some trimming to do on the nylon block as evident in the picture.....Don’t laugh at my tiny flywheel coming up in updates!! ...it’s just enough to keep the locomotive from jerking to a stop, and that’s all I need .....as the units get finished, I run the snot out of them with a rectifier, then once they perform like I want, then I’ll add ERR and all the goodies.....finished, out the shops, with ERR, fan driven smoke, and a railsounds package, I can keep the cost very comfortable....and I must add, not having traction tires, working these pups on a long drag with some wheel slip is a heck of a lot fun and very dramatic....looks neat as ......you know what............Pat


Replies sorted oldest to newest
Very elegant Pat. The Pittman appears to be angled slighty down in front. Did you cut the back of frame at some angle and if so what is that angle?
Pete
Norton posted:Very elegant Pat. The Pittman appears to be angled slighty down in front. Did you cut the back of frame at some angle and if so what is that angle?
Pete
Pete, yes....the the back of the chassis is cut at an angle. Actually, I sneak up on this measurement with a good ol’ fashioned angle finder. The purpose of the tilt is for some critical spacing. First, the bottom of front side of the motor and mount have to be at that point..obviously some clearance has to be made in the shell casting to allow the Pittman to fit. The Pittman is at its lowest point to still allow clearance for the drawbar pivot point, and not having to hog out so much of the shell casting up near the cab where the material thickness gets critical. So, from that point, the motor is tilted 12 degrees up in the rear to allow just enough clearance for the second trailing truck pivot to swing and the ash pan to sit back in the factory location...thus, no outward modification is necessary to it. When I fab the new body mount, a small tab will be added to it to fasten the ash pan and trailing truck assembly right back at its factory location. Which is simply enough on even with the bottom of the chassis. The angle of the motor works fine through a lot of testing. The bell mouth of the drive shaft and motor shaft couplers is forgiving enough not to tear up driveshafts. I experience no binding or galding of the driveshaft. Obliviously this is a very invasive repower, so I want to keep all the cutting and hogging at least down to a dull roar!...hence the angle is the least invasive...as can be anyways....but well worth the effort as these run super smooth when finished........Pat
Hi PAT,
Looks great!!! Question for you,. I have a Lionel Mohawak, 18064 would this motor work in that? What is the number on this motor and where can I find one if it would work? The Mohawk is a Pullmore motor same as the 18009 but it has TMCC. Thanks for your time.
This promises to be a great thread; can't wait to see more.
And yes Pete: "elegant" is the exactly the right word for this. ![]()
"LAZ1957": it looks like #9234(?)
Mark in Oregon
I too am interested! I have my CSS I would love to convert to a Pittman motor. Please post up all the parts information as you go.
I do notice that in one picture the motor says 12v dc. Is this a problem since we're using about 18vac and then converting it through a DC Commander? Just curious.
laz1957 posted:Hi PAT,
Looks great!!! Question for you,. I have a Lionel Mohawak, 18064 would this motor work in that? What is the number on this motor and where can I find one if it would work? The Mohawk is a Pullmore motor same as the 18009 but it has TMCC. Thanks for your time.
This is exactly the same set up as the 18064. I’ve already converted 2 of those locomotives, as the NYC fielded a bunch of Mohawks, so I have about a dozen, with 7 completed so far....I’ll post up part numbers a little later, as I’m running around doing holiday stuff for my wife....the 18064 is already tmcc, so with an ERR cruise M, a R4LC board and a little re-route on the mother board, this is easily swapped over to Cruise M and you can retain IR sensor, and all the factory railsounds. Only thing I add to all the Mohawks is a MTH PS1smoke unit. The antique puffer system has got to go...no bueno!....Pat
Jayhawk500 posted:I too am interested! I have my CSS I would love to convert to a Pittman motor. Please post up all the parts information as you go.
I do notice that in one picture the motor says 12v dc. Is this a problem since we're using about 18vac and then converting it through a DC Commander? Just curious.
No, it’s not an issue, I never see a full 12 volts on the motor, if it did...it’d be doing Mach III .....LOL!............Pat
laz1957 posted:Hi PAT,
Looks great!!! Question for you,. I have a Lionel Mohawak, 18064 would this motor work in that? What is the number on this motor and where can I find one if it would work? The Mohawk is a Pullmore motor same as the 18009 but it has TMCC. Thanks for your time.
George, here is your 18064 mohawk, this one has a 9234 Pittman, ERR cruise M and MTH PS1 smoke unit, smoke element is wired to the TMCC and the fan driver is simply wired via track power through an on/off switch. I just use a micro switch on a bracket that runs off the original smoke lever to put it in time with the chuff...I have all the super chuffer and chuff generator to install in this unit, I just haven’t done it yet, it’s not due for servicing yet...I’m only at 30 some odd hours, at 50 hours it’ll be due a PM anyways, so then I’ll install that....this thing runs real good!....at least I’m happy with it....Pat
Attachments
The flywheel is so tiny that I can't even see it! ![]()
![]()
gunrunnerjohn posted:The flywheel is so tiny that I can't even see it!
Go play with your loop on the floor!!!......Haaaaaaa!....![]() ....Pat....I’m just joking ya John!
....Pat....I’m just joking ya John!
It's the only loop I have right now. ![]()
gunrunnerjohn posted:It's the only loop I have right now.
Here’s your plug John, what possibly could enhance the action of the Mohawk in the video above......Hmmmmmmm.......annnnnd go!
Well... The Chuff-Generator will need that flywheel that I can't seem to find. ![]()
![]()
gunrunnerjohn posted:Well... The Chuff-Generator will need that flywheel that I can't seem to find.
Ok, got it...I’ll get the flywheel done....geeeeeezzz Louise!.....give the man the golden opportunity at salesmanship.......and FAIL....LOL!.........Pat
Pat if it will help, I have one off that old scale parts J.
SPFord27 posted:Pat if it will help, I have one off that old scale parts J.
Yes!....get it over here now!....John is waiting!...tic toc!....LOL!
harmonyards posted:laz1957 posted:Hi PAT,
Looks great!!! Question for you,. I have a Lionel Mohawak, 18064 would this motor work in that? What is the number on this motor and where can I find one if it would work? The Mohawk is a Pullmore motor same as the 18009 but it has TMCC. Thanks for your time.
George, here is your 18064 mohawk, this one has a 9234 Pittman, ERR cruise M and MTH PS1 smoke unit, smoke element is wired to the TMCC and the fan driver is simply wired via track power through an on/off switch. I just use a micro switch on a bracket that runs off the original smoke lever to put it in time with the chuff...I have all the super chuffer and chuff generator to install in this unit, I just haven’t done it yet, it’s not due for servicing yet...I’m only at 30 some odd hours, at 50 hours it’ll be due a PM anyways, so then I’ll install that....this thing runs real good!....at least I’m happy with it....Pat
WOW PAT that is an awesome sounding and running engine. Looking forward to the steps it took to get this way. Man that is super!!! I have a TAS smoke unit will this work, with the super chuffer, in this engine?
laz1957 posted:harmonyards posted:laz1957 posted:Hi PAT,
Looks great!!! Question for you,. I have a Lionel Mohawak, 18064 would this motor work in that? What is the number on this motor and where can I find one if it would work? The Mohawk is a Pullmore motor same as the 18009 but it has TMCC. Thanks for your time.
George, here is your 18064 mohawk, this one has a 9234 Pittman, ERR cruise M and MTH PS1 smoke unit, smoke element is wired to the TMCC and the fan driver is simply wired via track power through an on/off switch. I just use a micro switch on a bracket that runs off the original smoke lever to put it in time with the chuff...I have all the super chuffer and chuff generator to install in this unit, I just haven’t done it yet, it’s not due for servicing yet...I’m only at 30 some odd hours, at 50 hours it’ll be due a PM anyways, so then I’ll install that....this thing runs real good!....at least I’m happy with it....Pat
WOW PAT that is an awesome sounding and running engine. Looking forward to the steps it took to get this way. Man that is super!!! I have a TAS smoke unit will this work, with the super chuffer, in this engine?
George, I’ve never used any TAS products, so I can’t say yes or no.....hopefully GRJ will see this and lend his expertise....Pat
Pat,
Does the conversion put the rear of the motor close to the inside of the backhead? I can sure appreciate the neatness of execution and simplicity of the new mount. I have a feeling I'll be basically copying your methods when I tackle my CV Hudson.
BTW, have any experience using Faulhaber motors? I put one rated at 24V into a C&O L1. Under CC the top speed is rather lazy but the silence is a pure joy. Finally, an engine worth running!
Bruce
Hey Bruce, first..on the Mohawks 18009, and 18064, there is still a little room between the motor and the back....they’ll be enough room on these particular models to add firebox glow, which down the road I intend on doing....Pete (Norton) has already done his CV Hudson. Hopefully he’ll see this and post up a few pics of his conversion, which I must add puts my simplistic work to shame....I’m still trying to get to his level, as his craftsmanship is just jaw dropping....I don’t mind at all if he contributes his work on this thread, it’s just that nice...I haven’t tackled my CV yet. I’m still pumping out Mohawks .....I haven’t tried the Faulhaber motor, so please, post up pics and a video if you can Of your work, I’d love to see it and see what you’ve done...it’s no picnic snatching Pullmors out of these models....also, give us some more info on those motors....the Mohawks I’ve swapped to Pittmans, when testing silent with no electronics installed yet, just a rectifier, can drag a 25 car train on an 081 dog bone loop 10 -12 hours easily, @ 8 volts and never draw more than an amp....the Pullmor would have given up at lunch time...let’s see what you’ve done Bruce...I’m excited..........Pat
Thanks Pat.
I'll be happy to post some pics tomorrow with a little in-depth description. I recently posted a few in the " What did you do on your layout today" topic. I followed Pete's work on the CV here.....exquisite craftsanship...way beyond my pay grade. Right now the L1 is going through the shakedown period with maybe about 10 hours total on it. The nickel plating is almost wore off the drivers. Fingers crossed.
Bruce
brwebster posted:Thanks Pat.
I'll be happy to post some pics tomorrow with a little in-depth description. I recently posted a few in the " What did you do on your layout today" topic. Right now the engine is going through the shakedown procedure with maybe about 10 hours total on it. The nickel plating is almost wore off the drivers. Fingers crossed.
Bruce
Cool, I’ll make popcorn!.......Pat
Pat,
Set you an email.
Also, Would an MTH BE-0000030 motor (Pittman 9434J434-R1) and flywheel BE-0000031 fit?
Jayhawk500 posted:Pat,
Set you an email.
Also, Would an MTH BE-0000030 motor (Pittman 9434J434-R1) and flywheel BE-0000031 fit?
I’ll check it out when I get back home Chris, I had to actually work today....![]() .....Pat
.....Pat
Really excited to see this thread! @Jayhawk500 personally I would sacrifice some torque for a bigger flywheel (or ANY flywheel), since I don't believe these Mohawks have back-drivable gears. So I would use a shorter Pittman 9432, especially if you can find one with two shafts. I believe the MTH Premier 2-8-0's use a single-shaft version of this motor. Also check popular auction sites.
Note the lack of coasting isn't as much of a deal-breaker unless you're also planning to groove the wheels for rubber tires. In that case careless use of the direction button amounts to a literal train wreck!!
Ted S posted:Really excited to see this thread! @Jayhawk500 personally I would sacrifice some torque for a bigger flywheel (or ANY flywheel), since I don't believe these Mohawks have back-drivable gears. So I would use a shorter Pittman 9432, especially if you can find one with two shafts. I believe the MTH Premier 2-8-0's use a single-shaft version of this motor. Also check popular auction sites.
Note the lack of coasting isn't as much of a deal-breaker unless you're also planning to groove the wheels for rubber tires. In that case careless use of the direction button amounts to a literal train wreck!!
Hey Ted, I did try a 9432 in a 18009 Mohawk, I just wasn’t happy with the lack of torque. It ran ok, but in conventional, pulling a train, it surged and slowed down even on 081 curves. 9234’s are just brutes, I’ve figured a way to get a flywheel on the front side by cutting a troth out for it ride in. Although small, it’s just enough to coast down.....I haven’t had a chance to widdle one down on the lathe yet, I’ve been busy helping my boys at work.....I saw the lathe, but just couldnt get to it....LOL...hopefully Friday I can get there early and make my flywheel before they get there and beat me up.........Pat
Seems to me that"Bob2", a master builder of 2 rail stuff, won't use a Pittman that doesn't start with the numeral "9"...or maybe it's the second number that's critical.
Perhaps he'll chime in and verify (or correct) this. Bob? ![]()
Mark in Oregon
I hope he does too, Mark....He’s another great builder, these guys are like EF Hutton, when they speak everybody listens!...........when I grow up I hope to be just like Pete, Bob, Dave, George, and John....I’m sure I’m missing some.....but y’all get the point.....Pat
All I know is, my Chessie with the Pullmor doesn't run like the one in the above video. Even thou I just cleaned and lubed everything, even the motor. it's noisy and jerky, totally disappointed.
Jayhawk500 posted:All I know is, my Chessie with the Pullmor doesn't run like the one in the above video. Even thou I just cleaned and lubed everything, even the motor. it's noisy and jerky, totally disappointed.
I sent you an email Chris....did it come through?.......Pat
I hope @bob2 does chime in, but I think his preference is for something other than a "1" in the 3rd position, which designates more powerful rare earth magnets.
I prefer the smaller Pittman 8000-series motors which will rev to 10,000 RPM. Unfortunately, scale die-cast steam locos even to this day have toylike gear ratios that work best with a slow-turning motor. The way they're designed, it's nigh impossible to install a different gearbox, so the choice of motor ends up being a compromise to fit the existing system. (Using a 24-volt motor is another trick to keep the RPM in the right speed range, and usually nets smoother starts!) Speed control was just a high-tech band-aid that came along at the right time and saved companies the cost of retooling.
Just once I would like to see someone get everything right: Top-quality motor in the firebox, big flywheel, separate worm shaft, ~30:1 ball-bearing gearbox with a torque brace, and replaceable wheels and axles held in place by pedestal binders or a "bottom plate." In 2-rail O scale, Lobaugh, Max Gray, US Hobbies had all of this figured out by the 1960s: a robust design that gives hobbyists ample opportunities for repair and customization. 60 years on, it hasn't yet made the jump to 3-rail die-cast ![]()
The only thing that will entice me to buy another one is to build something better than what I already have!
Hi Pat,
With simplicity in mind, the pullmor propelled C&O gives plenty of room for the addition of a can. Not having a backhead means no major chassis modifications are needed. No problem fitting a flywheel too although I haven't got one to install. Rather than a big description, this picture shows pretty much all that's required in modifications.
Hidden is a flat cut on the round retaining ring collar of the motor front that helps seat the motor into the original mount. The sloppy grinding shown would have been unnecessary had I possessed a long enough mounting screw. Yep, one screw "hangs" the motor in place. I fashioned a drive coupler mimicking the original on the motor out of brass tube, a washer and 2 machine screws. A flat on the armature shaft was solder filled onto the tube to keep the new driveshaft in position.
The Faulhaber power was pure happenstance. I was aware of them ( used in some European G engines ) but never curious enough to search them out. I found this type, Faulhaber model #3557K024C, while scouring a big box store up here called Princess Auto at $10. ea.....that's $7.30 ea. USD. 24 volts and no perceptible cogging certainly made them worth a try. This was my second Faulhaber install, the other into a real basic '60's Japanese 2 rail Atlantic, and under DCC it has become a respectable smooth runner, although it has had no long term testing. The L1 still has a slight noise at a crawl that I haven't figured out but appears to be going away as the miles pile up. Yes, top end is not blinding but the leisurely speed suits me fine. Different gearing could change that but I wasn't going to delve into the unknown when what exists is already back-driveable.
Sorry if I can't be more technical but ask anything you like and I'll do my best to answer.
Bruce
9234 simply designates its a Pittman DC040B-3. DC040Bs, of which there are 6 variations are all rated for 40V max but have different windings. After that the buyer can specify bearing, brush, and magnet type. Those are numbers and letters that follow 9234.
Here is some info, don't spend too much time here or your eyes will glaze over.
https://www.haydonkerkpittman....hed-dc-motors/dc040b
Pete

 Well, since we’re all here, I did manage to fab the new rear body mount, and begin touching things up. The rear mount is made simply enough from 16 gauge sheet metal bent with two tabs, and slotted to make the rear cab height back to OE. Once I have the proper height established, I drill and pin the mount as a locator, should it ever need to come apart again....I keep one Mohawk all original for a study piece, but yes I do run it....call it a living model....
![]() .......Pat
.......Pat
Attachments
brwebster posted:Hi Pat,
With simplicity in mind, the pullmor propelled C&O gives plenty of room for the addition of a can. Not having a backhead means no major chassis modifications are needed. No problem fitting a flywheel too although I haven't got one to install. Rather than a big description, this picture shows pretty much all that's required in modifications.
Hidden is a flat cut on the round retaining ring collar of the motor front that helps seat the motor into the original mount. The sloppy grinding shown would have been unnecessary had I possessed a long enough mounting screw. Yep, one screw "hangs" the motor in place. I fashioned a drive coupler mimicking the original on the motor out of brass tube, a washer and 2 machine screws. A flat on the armature shaft was solder filled onto the tube to keep the new driveshaft in position.
The Faulhaber power was pure happenstance. I was aware of them ( used in some European G engines ) but never curious enough to search them out. I found this type, Faulhaber model #3557K024C, while scouring a big box store up here called Princess Auto at $10. ea.....that's $7.30 ea. USD. 24 volts and no perceptible cogging certainly made them worth a try. This was my second Faulhaber install, the other into a real basic '60's Japanese 2 rail Atlantic, and under DCC it has become a respectable smooth runner, although it has had no long term testing. The L1 still has a slight noise at a crawl that I haven't figured out but appears to be going away as the miles pile up. Yes, top end is not blinding but the leisurely speed suits me fine. Different gearing could change that but I wasn't going to delve into the unknown when what exists is already back-driveable.
Sorry if I can't be more technical but ask anything you like and I'll do my best to answer.
Bruce
Bruce, how does the 24 volt perform on take off? Does it ease out without any jerking or loping? And do you know at what voltage it begins to move? ......Pat
harmonyards posted:Jayhawk500 posted:All I know is, my Chessie with the Pullmor doesn't run like the one in the above video. Even thou I just cleaned and lubed everything, even the motor. it's noisy and jerky, totally disappointed.
I sent you an email Chris....did it come through?.......Pat
Got it, Replied back. Thanks Pat.
harmonyards posted:Bruce, how does the 24 volt perform on take off? Does it ease out without any jerking or loping? And do you know at what voltage it begins to move? ......Pat
Initial run in hasn't concluded but smoothness of operation seems to be continually improving. Because the engine was such a poor performer under Pullmor power it barely had a few hours run time before the conversion. Had the engine operated smooth as butter before the conversion then judging the improved characteristics over the Pullmor would have been easier.
It now starts off in speed step 1 at a ridiculous crawl. Roughly it covers 1.5 scale ft. per second. Step 3 through 5 sets up a low volume vibration that is sometimes there and at other times not. A slight jerky motion sets in around step 20 but this seems to be lessening as the miles pile up. Whenever I acquire a flywheel to fit I hope it reduces such vibrations and roughness by dampening what I assume are pulses at the armature.
I had hoped to have sounds installed by now but a faulty RS board from ERR delayed things. When that installation commences and maintenance is performed then I will take some readings. Again, as it becomes more fully broken in, the accuracy of the readings will hopefully be more stable throughout the speed range. I really intend to get the best performance I can before a flywheel is installed.
Bruce
brwebster posted:harmonyards posted:Bruce, how does the 24 volt perform on take off? Does it ease out without any jerking or loping? And do you know at what voltage it begins to move? ......PatInitial run in hasn't concluded but smoothness of operation seems to be continually improving. Because the engine was such a poor performer under Pullmor power it barely had a few hours run time before the conversion. Had the engine operated smooth as butter before the conversion then judging the improved characteristics over the Pullmor would have been easier.
It now starts off in speed step 1 at a ridiculous crawl. Roughly it covers 1.5 scale ft. per second. Step 3 through 5 sets up a low volume vibration that is sometimes there and at other times not. A slight jerky motion sets in around step 20 but this seems to be lessening as the miles pile up. Whenever I acquire a flywheel to fit I hope it reduces such vibrations and roughness by dampening what I assume are pulses at the armature.
I had hoped to have sounds installed by now but a faulty RS board from ERR delayed things. When that installation commences and maintenance is performed then I will take some readings. Again, as it becomes more fully broken in, the accuracy of the readings will hopefully be more stable throughout the speed range. I really intend to get the best performance I can before a flywheel is installed.
Bruce
Itll be interesting to see if a flywheel will help that 24 volt motor try and consume some more energy........might try a couple different flywheels and see if you can get that 24 volt motor to really perform like you want it.......Pat
More importantly, your method of mounting a can onto a Pullmor chassis cleared a huge mental roadblock I had against putting one into my CV. It's great to have a plan of attack rather than experimenting.
Re: Flywheels. I left the flywheel on the small China drive motor I installed into a Lionel 18000 B6. It sticks out of the back of the cab but the silent running and ERR cruise makes the whole affair so much fun! A more than fair trade off IMHO.
Bruce
brwebster posted:More importantly, your method of mounting a can onto a Pullmor chassis cleared a huge mental roadblock I had against putting one into my CV. It's great to have a plan of attack rather than experimenting.
Re: Flywheels. I left the flywheel on the small China drive motor I installed into a Lionel 18000 B6. It sticks out of the back of the cab but the silent running and ERR cruise makes the whole affair so much fun! A more than fair trade off IMHO.
Bruce
First time I cut the whole back side of a Mohawk chassis off, I thought to myself, oh god what have I done!...the first cut on the chassis never gets any better!....but you can breathe a little easier once you get the motor mount on...![]() ......Pat
......Pat
Norton posted:9234 simply designates its a Pittman DC040B-3. DC040Bs, of which there are 6 variations are all rated for 40V max but have different windings. After that the buyer can specify bearing, brush, and magnet type. Those are numbers and letters that follow 9234.
Here is some info, don't spend too much time here or your eyes will glaze over.
https://www.haydonkerkpittman....hed-dc-motors/dc040b
Pete
Not true. 9234 is a specific size pittman from the original co. They have moved to a new numbering system with the ownership change. Each number has a specific meaning wrt size, type of connection (wire or Terminal). There use to be some old file on the web that spelled everything out. If I remember right the 2 meant wire leads out of motor. Where a 9434 had terminals that wires connected to like the typical MTH engine of the early versions. There also are smaller length pittmans of the 9000 series. I think the MTH Premier Atlantic may have used it, or the G5. Can't remember which.
It is true the other series of numbers was necessary to know what voltage, rpm, etc... G
- G, 9234 simply designates the size. It doesn't tell you anything else about the motor,not even the voltage rating. 9234 is now a DC040B. DC040B also just tells you the size. Its the numbers and letters that follow that give information on voltage rating, etc.
9234 on page 3.
That is what I said. You said it tells you nothing but that it is a pittman in your original post. That is not true. Also look up a 94 number, you will see that the 4 was a terminal connection. Each number has some specific meaning, similar to Mabuchi motors. But yes, the other requirement early on was knowing voltage as I stated. G
Update on some changes and some progress...decided to go with a 15 volt PIttman, double shafts, to accommodate a rear mount flywheel. I still have not turned down a flywheel from stock yet, but I did manage to figure final mounting of the motor. I was able to use stock Lionel coupling and unaltered stock driveshaft. My only concern with this set up would be rearward pivot for the truck assembly, but I’ll cross that bridge when I get there...I really like the cleanliness of this set up...
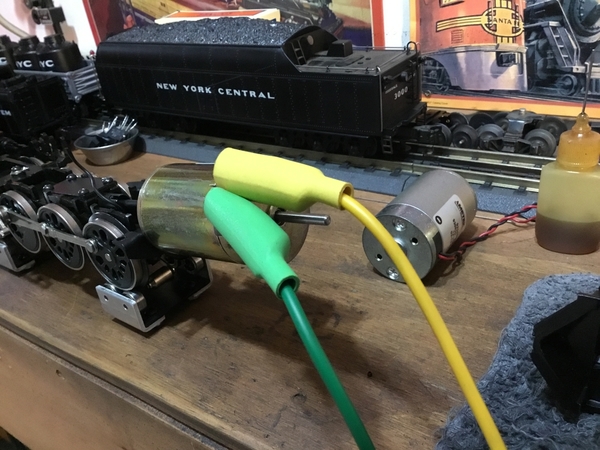
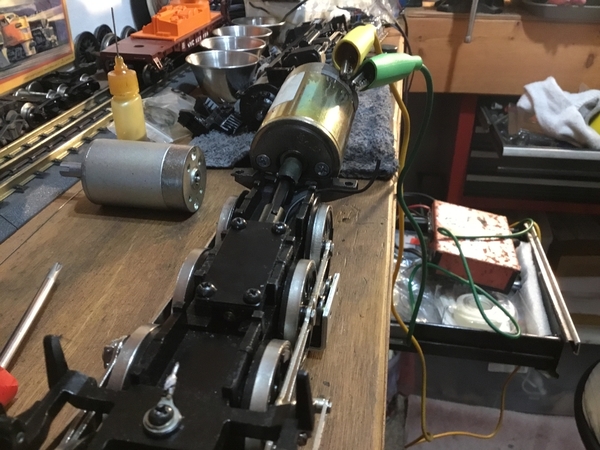
Attachments
Here's a short video on the rollers, I’m using a junker HO DC pack to run the motor straight....so far so good...everything seems to be nice and true...time for a flywheel...
Attachments
Great work! Curious about where you sourced the motor from, dual-shaft and other than 12V winding can be hard to get...
Ted S posted:Great work! Curious about where you sourced the motor from, dual-shaft and other than 12V winding can be hard to get...
Ted, I got lucky on the bay!...somebody listed a 15 volt for 40 bucks or best offer...double shaft...they’re a little weird, as the rear shaft is oddly long compared to the front, anyways, I made an offer at 18 bucks....and they bit!...turns out they had 8 of them....I gobbled them all up!........Pat
harmonyards posted:Ted S posted:Great work! Curious about where you sourced the motor from, dual-shaft and other than 12V winding can be hard to get...
Ted, I got lucky on the bay!...somebody listed a 15 volt for 40 bucks or best offer...double shaft...they’re a little weird, as the rear shaft is oddly long compared to the front, anyways, I made an offer at 18 bucks....and they bit!...turns out they had 8 of them....I gobbled them all up!........Pat
Pat,
Hold one of those motors for me pleaseeeeeee! Patiently watching and waiting.
Pat, I have some leftover 3rd Rail rear mount flywheels if you want a large one, and MTH ones that are about 30mm. Unless you want to make one for the fun of it. ![]() G
G
GGG posted:Pat, I have some leftover 3rd Rail rear mount flywheels if you want a large one, and MTH ones that are about 30mm. Unless you want to make one for the fun of it.
G
Thanks George, I’ll take you up on the 3rd Rail flywheels you have, they’re easily chunked up in a lathe and knocked down to where I need them....see you in Suffolk?.......Pat..
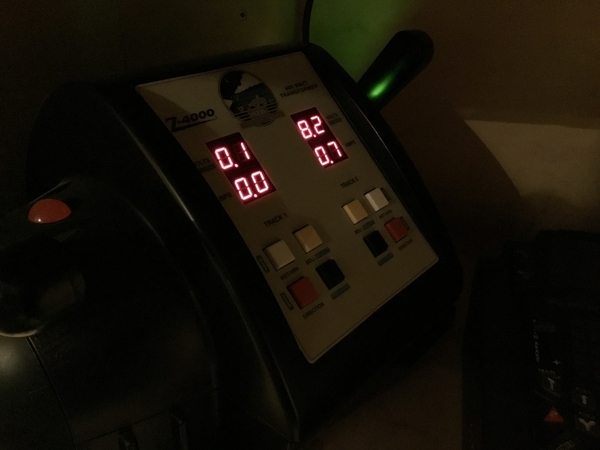 Update on the Mohawk.....so we’re a little over straight 8 hours run time (been running nonstop since 7 am) .....I’m still in what I call mock up, she’s back dressed up and I’ll leave her run and make sure no issues develop. I for got to take pictures of the shell being clearanced for the big fat Pittman, but nevertheless I’ll do that when I add the electronics package....right now she runs on a rectifier ( I add the headlight back just because) so far, I’m barely pulling 3/4’s of an amp dragging this train around, no heat, no speeding up and slowing down, just a nice steady pace in conventional. This means when I add the package, I’ve got a proven performer with no hick ups...next I’ll add the package and I’m sure the draw will come up some, but at least I know mechanically I’m sound.....you couldn’t run a pullmor this long at not have to touch the throttle at some point.....
![]() .........Pat
.........Pat
Attachments
Pat,
I have really enjoyed your post. Trying to figure out how I might be able to do this with typical tools? How did you go about drilling/aligning the holes into the frame for mounting the washer?
Thanks,
Mike
Hump Yard Mike posted:Pat,
I have really enjoyed your post. Trying to figure out how I might be able to do this with typical tools? How did you go about drilling/aligning the holes into the frame for mounting the washer?
Thanks,
Mike
Mike, it might of helped if I showed that step!....in the case of the mohawk, the bottom of the motor mount or in this case the washer has to be as flush with the bottom of the frame as possible, if it did poke down a wee bit, no worries, just file it off....I reverse image the back of the frame with masking tape on the washer....I put a piece masking tape across the washer, I lock the washer in place on the back of the chassis where I want the washer to sit with a woodworkers sliding C clamp...I use a small Xacto knife and trace the frame member out of the tape....now I have a perfect mirror image of the frame on the washer. I can draw on the tape with a sharp pencil and measure out where I want my holes to land. I drill the washer first, making pilot holes on the drill press...with the tape still applied to the washer, I reclamp the washer to the frame, and use a drill to mark the frame where the machine screws will land....this method has never let me down....after that, it’s just a matter of drilling, tapping And countersinking for 6-32 machine screws. I cheat very badly when it comes to mounting the motor to the washer, I have an old face from a Pittman that I can clamp right on the washer and drill right through the face and onto the washer for a pilot hole....all of this work can be done with common tools, with patience and careful measurements, I just so happen to have a machine shop at my garage so I have access to lathes, band saws, high speed cutters, and carbide cutting tools....although my sons always seem to be occupying the machines I want to use!....![]() .......Pat
.......Pat
Thanks Pat. I having some trouble visualizing how you clamp the washer to the frame. Do you have any pictures of this?
Mike
Hump Yard Mike posted:Thanks Pat. I having some trouble visualizing how you clamp the washer to the frame. Do you have any pictures of this?
Mike
No, but when I pull it back apart to add the electronics I certainly can show you then...it’s just a slide type C clamp, long enough to go from the front of the chassis to the back...nothing extraordinary, use whatever it takes to clamp the washer to the chassis....Pat
Hey Pat
Did you ever get around to completing this project? This has got to be one of my all time favorite threads...
Mark in Oregon
Strummer posted:Hey Pat
Did you ever get around to completing this project? This has got to be one of my all time favorite threads...
Mark in Oregon
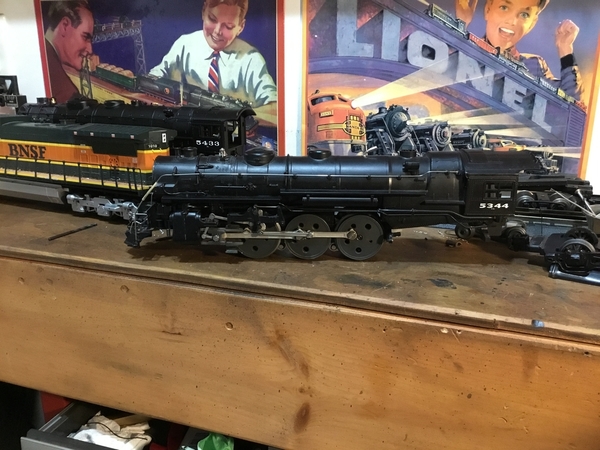
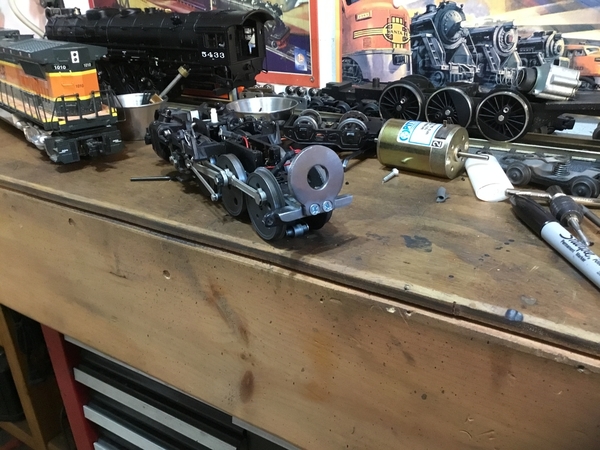
I haven’t added the electronics to it yet Mark, I’ve been busy building other folks stuff, and finishing some more Pittman swaps of my own....one of these days I’m going to have to break bad and place a big ol fat order with Scott Mann....that’ll be a good day for him!....I did finish up this Pullmor Hudson (6-18056) swapped it over to Pittman power.....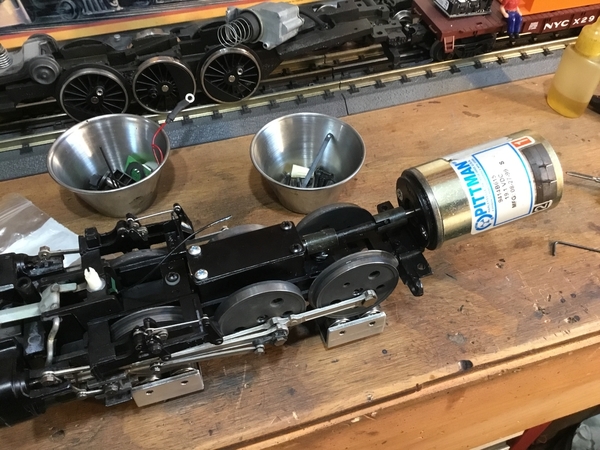
Attachments
Good to see you're keeping yourself amused. ![]()
By all means, please keep me (us) informed as to your progress. In this world of "plug and play", I find these types of threads most helpful and inspiring...
Mark in Oregon
I'm searching for a flywheel from MTH BE0000031. They are out. I looked at Lionel and found one that may work for a Legacy with a Canon motor. I'm not sure what shaft diameter that has?
I'm searching for other Lionel models that may have a matching flywheel for me that fits the Pittman, and up pops this post on my search!
More great work from the Harmon shops. ![]()
Carry on....
Most all the TMCC scale steam engines made 1998-2007 use Pittmans. Look up those engines and you will find a few flywheels still available. They will likely have magnets on them but will work. Pittmans have a 4mm shaft. I believe Canons have some smaller so you could use those after enlarging the bore.
Pete


