First of all, thanks to LaidOffSick for his inspiration and help on this project; especially his YouTube videos, and to Ron H for the work he's done on his PAs.

This is a project that I've been working on for a few weeks, and have finally been sent to be 3-D printed.

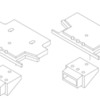
They are front and rear pilot spacers for a Lionel GP30, and pilot inserts with Kadee mounting holes to make it all one unit.  You can see from the front pilot spacer that there is a slot (with countersink on the bottom side for screw head) which will affix the whole assembly to the frame.  For the back one, I haven't figured that out yet, but it will probably involve drilling new holes into the frame.
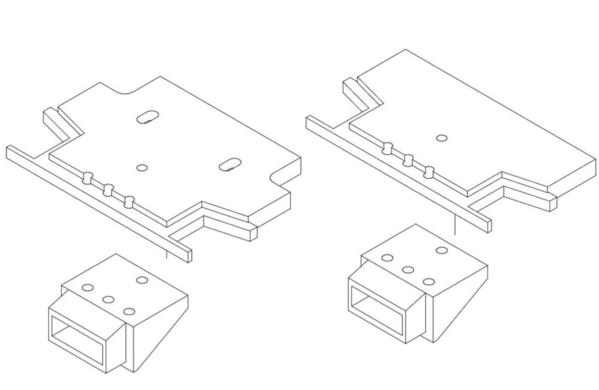

Lionel GP30 Front, Rear & Pilot Spacers

They are stepped to fit up inside the body and flush against the frame.

As for the pilot filler block, it is designed specifically to fit the opening in the pilot, and have the Kadee 740-series coupler at the proper height above the railhead (0.781") and the whole assembly drops the pilot 0.010" closer to the railhead.  The filler block is also designed to have the uncoupling lever right above the pin in the coupler, an the holes in the coupler block have an extra 0.001" play to allow for movement.  The whole assembly, with the coupler box inserted though the block, and affixed to the bottom of the pilot (holes will need to be drilled through the factory pilot) and into the spacer, which have slightly undersized holes and is designed to use 2-56 self tapping screws.

I should have a pilot example by next week... But I can't hold my excitement, so I had to share it.

I'm not keeping this idea to myself, if you have access to your own 3-D printer, I can email you the .STL file.  Don't worry, I'll be offering these as sets, as soon as the engineering is finished.

Thanks,
- Mario

PS - Once this project is finished, here's a list of future pilot spacer projects, in probable order:

  • Atlas GP35s - DONE!
  • MTH GP35s - See Thor's work!
  • Lionel RS11s - DONE!
  • Lionel Legacy GP7s - DONE!
  • Lionel H16-44s - DONE!

Attachments

Images (4)
  • Lionel GP30 Front, Rear & Pilot Spacers
  • image
  • image
  • image
Last edited by CentralFan1976
Original Post

Replies sorted oldest to newest

I can't wait to see these things Mario, and the engine after they have been installed. I'm gonna look for a couple more Lionel GP30s now. The only reason I hadn't is because I didn't wanna go through the hassle of Kadee conversion AGAIN. This is going to make life so much simpler.

Ray,


I will be doing the Legacy GP7s, so I bet that they would be the same for the GP9s.  Maybe I'll have to do those next.


As for the Legacy GP35s, I don't know how different that they are from the Atlas or MTH, but we'll find out soon enough.  The big thing is to design everything so the top of the coupler box is at the right height off the railhead.


LOS, These are designed for almost plug-and-play, so should be very easy.  The first sets will be printed in white, so it'll be easy to paint to match.


Thanks,

- Mario

Last edited by CentralFan1976
Originally Posted by Laidoffsick:
I'm pretty sure the Legacy GP30 and 35's are the same. I have both and converted both, my guess is that it will take the same pieces.


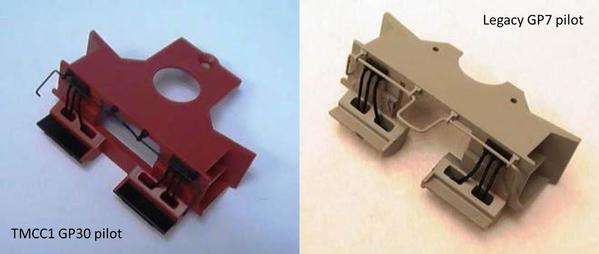
I agree that the 1st Gen TMCC GP30 (With tongue), the 2nd Gen TMCC and Legacy GP30s (no tongue), and the Legacy GP35 (no tongue) all use the same dimension pilot.  Although the mounting is different in each.


See below...


Picture1


In fact, I'm going to have to cut the tongue off mine anyway... so you're a step ahead!


Thanks,

- Mario

Attachments

Images (1)
  • Picture1
Originally Posted by AGHRMatt:

This is very interesting Mario, and I'm definitely interested as this would save me a lot of time. Good job! 

Matt,


Thanks for the words of confidence.


My primary goal in this whole escapade is twofold; have machine-made spacers to convert my personal locomotive fleet (I'm not talented enough to hand make precision pieces) and make it easy for others to do the same.  I'm going for a factory-fit type of solution here...


The more people in 3RS, the better.

Fantastic work Mario! I was hoping someone would get to this before I could.This is the perfect example of how 3D printing can be a game changer for model railroaders.


Would you be kind enough to send me the files? I'd like to load them to Shapeways and get them printed. Come to think of it, you know you could do that yourself and make some money off of each printed part for your trouble. I would be happy to purchase them from you through Shapeways.


Thanks,

Jonathan

Centralfan1976 posted:


I'm not keeping this idea to myself, if you have access to your own 3-D printer, I can email you the .STL file.  Don't worry, I'll be offering these as sets, as soon as the engineering is finished.


Thanks,

- Mario


PS - Once this project is finished, here's a list of future pilot spacer projects, in probable order:


  • Atlas GP35s
  • MTH GP35s
  • Lionel RS11s
  • Lionel Legacy GP7s
  • Lionel H16-44s
  • Lionel PW GP7


Mario,


When you get to the Atlas GP60's  I'll need 4 pair.

Last edited by SantaFeJim

Very nice work. This looks promising. fabricating spacers and filling in around the draft gear box are among the most tedious chores in fixing pilots. After an initial flurry a few years ago to do the engines I most care about, my enthusiasm for these projects kind of waned. I guess I'll need to find someone with one of those 3D printers.


RM

Originally Posted by Gregg Laiben:

Very neat idea - please put me down for two pair of the Atlas GP35 spacers.


Over the last 3 nites, I decided to tackle my first fixed pilot (Atlas GP15).  After taking the _entire_ engine apart, realized I could have probably removed the pilots with only 2 screws!  Oh well, nice learning experience.

Gregg,


This is the type of thing that I'm trying to avoid... Over-working a project that should be just a few steps.


I know that on engines like the Legacy GP7s, the pilots attach to the trucks, and the Liondrive trucks just twist off and this whole conversion could probably be done without even taking the body off the frame (except maybe to pull the electro-coupler plug from the PCB).


Stay tuned for the prototypes to come from the printer, early next week probably.


Thanks,

- Mario

Originally Posted by Ray Marion:

Mario


    Wonderful work so far. Do you know where the screws attaching all to the engine will be? Will they be inside the body or outside through the decking?


Ray Marion


Ray,


The GP30 front pilot is going to be the easiest...


The current body mount screws will come up from the bottom on the spacer, through the slotted holes.  The spacer is 0.172" at this area and designed to fit flat against the underside of the frame.  The slots are countersunk on the bottom side by 0.072" to allow for the pan head screws to be up inside the spacer and out of the way of the truck swing.


As for the pilot filler block, it is designed so that the coupler box sits flush against the inside of the square opening and the holes are 0.095" (0.002" over sized) for clearance around a 2-56 x 1/2" screw, with some adjustment / tolerance space.  All 5 holes in the spacer (above the pilot) are 0.090" (undersized for tapping / threading), and this would hold the pilot to the spacer.


If you look at the thicknesses:


  • 0.172" thick coupler box
  • 0.134" thick pilot fill block
  • 0.100" pilot thickness
  • 0.110" pilot / body spacer

With a 2-56 x 1/2", there is ~0.037" head space on the front screws so the screw won't bottom out on the bottom of the frame.  There's even more on the back one.


If you want to use the filler block and pilot, but still keep it swinging, a 2-56 x 3/8" will leave a ~0.055" head space above the screw so it won't pop through the top of the pilot.


In the rear, I haven't done as much of the engineering because there are no chassis / body mount screws to piggy back their use and attach the spacer to the frame.  But if you want to use Kadees in the swinging pilot, the installation front / rear will be same.


I will design something a little smoother for the rear once I get the prototypes back from the printer and disassemble the unit.  Once this engineering is finished, then I will update the drawings to a new revision level.


In both cases holes will have to be drilled in the pilot; 3/32" through holes to allow the 2-56 x 1/2" to pass through it and tight into the spacer, and 2-56 drilled / tapped holes in the pilot if you want to keep it swinging.  I'll probably pass at least one of the coupler mount screws through the spacer into the frame to provide a third attachment point for the whole shebang.


Whew... the engineering was almost a nightmare.


Thanks,

- Mario


PS - bad news for Legacy GP7/9/35 owners, the body mount screws are not present in their design, so some other ways of attachment will have to be engineered; probably drilling out the spacer holes to 3/32" and drilling / tapping into the frame.


We shall see...


Last edited by CentralFan1976
Originally Posted by AGHRMatt:
Originally Posted by CentralFan1976:

IPT and STL files uploaded for your use...


Good luck.

Are you sending them out to Shapeways or doing them at home?


Neither, I have a friend that has one (demo unit that I'll probably buy when he's done with it).


I know that at least one other has sent them to Shapeways, though.


Thanks,

- Mario

Originally Posted by Ray Marion:

Mario


    Wonderful work so far. Do you know where the screws attaching all to the engine will be? Will they be inside the body or outside through the decking?


Ray Marion


Sorry, I should have said none of the screws will protrude.


They "should" all come up from the bottom and stop before the deck; if I designed it right.


This should help:


[Untitled]001

Attachments

Images (1)
  • [Untitled]001
Last edited by CentralFan1976

I would gladly accept temporary custody of your motive power and/or rolling stock to design a specific spacer to fit it perfect...


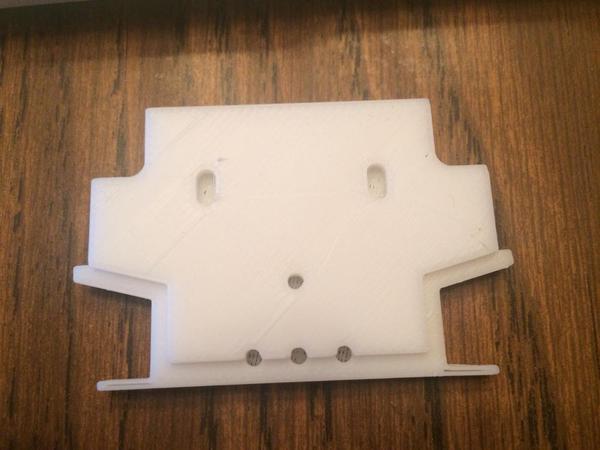
Here's the first prototype up:


IMG_0353


I haven't seen it to play with, but I know I have to pop out the center of the coupler box opening. (It's upside down)


But, as you can see; the finish and bulk look great!


Thanks,

- Mario

Attachments

Images (1)
  • IMG_0353

Looking good Mario. as the pilots attach to the swinging trucks, how are you dealing with that. Are you cutting the trucks down or the pilot? I have GP 7, 9 and 35 and they all attach the same way. Attached is a picture with arrows pointing to where the pilot inserts into the truck. How are you modifying the truck and/ or pilot?


Thanks


Ray Marion

13


Attachments

Images (1)
  • 13
Last edited by Ray Marion
Ray,

LOS and I were having this exact conversation.

I'd you look at the close up of the mock up, the design is about 0.090" from being drop in and having both an unmodified truck being having clearance to swing and a Kadee coupler mount.

I was debating how I would finish this design. I could either shorten the filler block or trim the tabs off the truck and I think I'm going to leave it as is. For me, I'm going to trim the tabs off the truck, but since the blocks are plastic, if the user wants to keep the rucks stock, then the trimming of the blocks will be the way to do that.

So, to answer your question, it's up to the user of the spacers and pilot filler blocks, you can either trim the truck or the block.

Thanks,
Mario

On my engines, I cut off all the extra junk on the trucks, especially if I have the unit completely apart. I don't worry about ever going back to stock, and if you ever sell them, they will fetch more money with a Kadee conversion anyway.


14

Attachments

Images (1)
  • 14
Last edited by Former Member

Great point on the truck swinging out with the pilot interference. The pilot will need to be ground down to allow the truck to swing, especially with the 6-axle Variant. I bought a bench grinder to grind down the inner portion of the cast pilot to allow the truck room to swing. To swing inward requires some of the pilot to be removed. 

Add Reply

Post

OGR Publishing, Inc., 1310 Eastside Centre Ct, Suite 6, Mountain Home, AR 72653
800-980-OGRR (6477)
www.ogaugerr.com

×
×
×
×
Link copied to your clipboard.
×
×