
Howdy all,

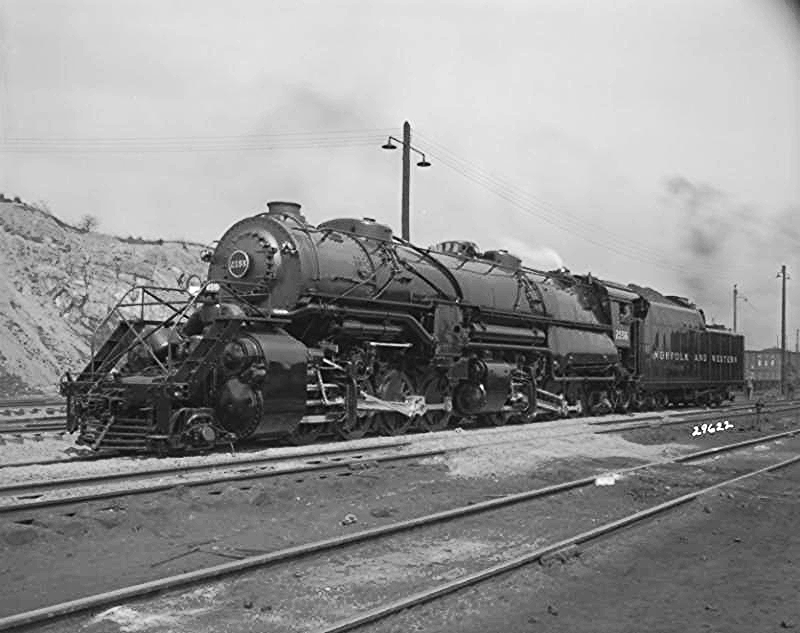
This will be the post where I add updates to my conversion. I will be photo etching and scratch building a few parts. A few parts are in the mail. I will roll a new unlagged smokebox out of brass and solder the detail pieces on. The running board will need to be stepped down over the Worthington feed supply. Kohs made a y6a with lagged smokebox but I can't find any information to back this up. Maybe Hot Water or Big Jim would know?


To start with, the entire engine needed to be disassembled down to an empty boiler. A few detail pieces removed and more to be added. I started with removing the air pump from the fireman's side to be added to the engineers side. Pics to follow. The boiler, if using a lagged box will need to be shortened and new mounting tabs made. If using the unlagged, like the 2156 represents, the smokebox will need to be cutoff and a new tube rolled and soldered to the existing boiler.


Lets have fun

Original Post

Replies sorted oldest to newest

Other projects have have taken over but this one is almost finished and ready for paint.  I’ve cut the walkways, lowered the walkway past the feedwater, temporarily placed the plumbing in line. It will need trimmed and lengthened. The 2nd air pump needs installed on the engineer side. After a little more filing, sanding, and smoothing it will look much better. 


Attachments

Images (2)
  • CF41ECDE-5B53-4870-B013-312B8007D376
  • 0FF7E65B-A043-471D-ACD5-4EDC65D32C98
Last edited by n&wsteamfan

The boiler needed to be shortened by roughly 1/2”. The walkways in turn needed to be changed. The boiler has already been shortened and the smokebox cover installed. In addition to the boiler being shortened it also had to be reshaped. The lower half needed to be made round and allow for the new piping from the feedwater heater. 

The boiler is still in the rough stages but by this weekend it will be smooth and ready to finish. 


I do my own scratch building and casting but mostly in Z scale. I made a Z scale y6a in brass photo etching at home. I have a shop with all the tools needed to do this project.

I am always open to comments and critiques  


56349C42-AB24-4FAE-B46C-1AFB04E74ADD


Attachments

Images (1)
  • 56349C42-AB24-4FAE-B46C-1AFB04E74ADD
Hot Water posted:

I rechecked the Sunset/3rd Rail website, and see that they offered models of both the Y6a AND Y6b, however their model of the Y6a did NOT have the lagged smokebox (only the Y6b did). I also remember Big Jim pointing out that the model of the Y6a should NOT have had the Worthington cold water turbine pump, but it was easy to remove.

I actually have a 3rd rail y6a 2165. I wanted something more reliable to run. I had to send it back because the brass drive gears stripped out under load. It has become a shelf queen. That’s one reason I went with the lagged smokebox.  

pennsy484 posted:

I second what Gunrunner said. Very enjoyable thread. I am in awe. Not a lot of people who can cut a half inch slice out of a die cast boiler, among the other things you are doing  Thanks for sharing. 

Thanks!. The cutting was the easy part. Making it look like it came from the factory this way is the hard part. Hopefully after a bit more sanding and filing the boiler will be good to go.

After talking to Big Jim he pointed out a few differences. The whistle mounting and operation is different on the y6a. The whistle has a support bracket and the rod routing is significantly different. It goes through the sand dome. As can be seen in the third picture. More changes coming  


I removed the ordinal Lionel whistle as it just wasn’t correct. This whistle is from a MTH class a. 

1B618E0E-EF09-4307-A9D5-C3059C817D31

04A4B427-7AC9-47DD-99D5-86EE4F3430C6527CE6FE-9DAB-4B25-B960-655BFB9AC319

Attachments

Images (3)
  • 1B618E0E-EF09-4307-A9D5-C3059C817D31
  • 04A4B427-7AC9-47DD-99D5-86EE4F3430C6
  • 527CE6FE-9DAB-4B25-B960-655BFB9AC319
Last edited by n&wsteamfan
Big Jim posted:

Aaron,
That brass box should be the "Cab Signal" box used on the Shenandoah Div. north from Roanoke to Hagerstown.

Thanks Jimmy,

Would it be accurate to model without it? Would engines that had the box went to Portsmouth-Cincinnati? 

I have the drawings completed to etch the pieces with the details for the actual box. 

I am certainly no expert on Y6a vs Y6b variations. However (and you may already know this) one of the differences is in the stack. I think the Y6a stack was a different diameter and is tilted. 

You're a brave man tearing into the Lionel JLC 2200. I have one as well. It is an excellent locomotive. This is going to be an interesting build to follow.

Last edited by Gilly@N&W

Aaron,
It is OK to do without the box. Only a certain number of engines with the box were assigned to the north end.

Gilly,
All of the Y class engines with the multiple bearing front end throttle had the slant stack. It was something that needed to be done so the throttle would fit between the stack and the flues.

Last edited by Big Jim
gunrunnerjohn posted:

That'll make it even better!

I hope so. It’ll be my first engine with it. Several years ago I used a reed switch and magnets on a Lionel scale J for the 4 chuff rate. I didn’t like how it sounded at higher speeds. It sounded like a machine gun. Your product seems to be a much better option. I’ll do this engine and if it goes how I think it will I have a few more engines to operate on. 

On my quest to have an accurate O scale y6a I decided to photo etch some parts tonight. A more accurate smoke box, and a new rolled boiler. The boiler was a flat photo etched at home brass sheet that I made and then rolled into shape, unlike the Lionel boiler this engine will not have a sheathed smokebox. I also made a new feedwater box that was more accurate for the y6a. The box has the correct angle. I etched lines on one side so it was a simple matter of just bending the sides into place.


2EF87186-0245-4DEF-BDE0-616D1E9CAA555B6F3639-2BF4-4513-8ADD-DF2BFA98C1AD049DD36C-B4F0-410A-A33A-0F4F2BDA6E37651D59DC-C8B2-4B34-B0FB-5C96AFC823941C5F045D-9988-49BB-96E9-38DFA3A203C08C496B44-FC14-46DB-BA5A-4BE1799A344FD94BF863-E361-4CC2-A3D5-5AE26F4BC8D1

Attachments

Images (7)
  • 2EF87186-0245-4DEF-BDE0-616D1E9CAA55
  • 5B6F3639-2BF4-4513-8ADD-DF2BFA98C1AD
  • 049DD36C-B4F0-410A-A33A-0F4F2BDA6E37
  • 651D59DC-C8B2-4B34-B0FB-5C96AFC82394
  • 1C5F045D-9988-49BB-96E9-38DFA3A203C0
  • 8C496B44-FC14-46DB-BA5A-4BE1799A344F
  • D94BF863-E361-4CC2-A3D5-5AE26F4BC8D1

Well, now - I can throw together a presentable bit of scratch bash on occasion - but this kind of work and skill is way beyond me. Really beautiful - and I like the fact that you wanted a Y6a rather than a Y6b. The visual differences between the two are real, but most would be just fine with the "b". These projects I think of as "long walks off short piers", as the work and research required is not reflected in the apparent changes to most eyes - but you can see it. That's really modeling for yourself. I just finished such a project. Not your level of workmanship, but I may post a short thread on it soon.

(Isn't it a shame that we dumb ol' 150 mph 3-railers don't know anything about operation, prototypes and modeling? Huh?)

D500 posted:

Well, now - I can throw together a presentable bit of scratch bash on occasion - but this kind of work and skill is way beyond me. Really beautiful - and I like the fact that you wanted a Y6a rather than a Y6b. The visual differences between the two are real, but most would be just fine with the "b". These projects I think of as "long walks off short piers", as the work and research required is not reflected in the apparent changes to most eyes - but you can see it. That's really modeling for yourself. I just finished such a project. Not your level of workmanship, but I may post a short thread on it soon.

(Isn't it a shame that we dumb ol' 150 mph 3-railers don't know anything about operation, prototypes and modeling? Huh?)

Thank you! 

I feel that a lot of people don’t really have a good understanding of how in-depth scrath building can be. I put in hours of research before I ever touch the model. It might not be for everyone but I am thankful to know there is someone else who appreciates how much work goes into a model like this.

Is it perfect? No, but it’s what I wanted and the time involved makes it worth it to me. The y6a is my absolute favorite engine of all time. I don’t consider myself to be anything but an average modeler, but I thank you for the nice compliment! 

I figured I might as well do it right the first time. Smoothed out the rough walkway that was filled in and the holes around the boiler. The lower half is getting a brass sheet that will be held down by screws inside the boiler. This will give it a perfectly round boiler shape and allow me to solder the new walkway and brass details on

8EB13D77-7E41-4DC2-A26F-F521D9E9A864


Attachments

Images (1)
  • 8EB13D77-7E41-4DC2-A26F-F521D9E9A864
Last edited by n&wsteamfan
pennsy484 posted:
n&wsteamfan posted:

A day off spent etching parts. Number board, walkways, and other detail parts etching. I really like how the number board turned out. 

I don't know anything about etching.  Would you mind explaining how you do the etching (and possibly show the tools), for example the number board?

I'll second that request. Also, that is the front number PLATE, not "number board", which turned out VERY nice too.

The photo etching process can be difficult and there is certainly a learning curve to it but once you get through the learning stages you can create almost anything. Different parts can be layered to make a 3D effect. There aren’t any special tools to do this. A design needs to be drawn with a front and back. It’s printed on a special transparency and the brass is exposed to it under UV light. 

I don’t want to get ahead of myself though. The brass needs to have a special film applied to it called photo resist. This is laminated on the brass. The brass can then be cut to different sizes so you won’t waste any as the prep work to laminate the brass is labor intensive and very time consuming. One mistake and you’ve wasted time, money, and have to do it all over again. 

After you get expose your brass it needs to be devoloped. This is done with a diluted solution of sodium hydroxide. The diluted sodium hydroxide removes all the unexposed areas that were not hit with the UV light. The UV light hardens the resist areas and the unexposed areas wash away. 

Now you are ready to etch. I use ferric chloride for my etching solution. Timing depends on the thickness of the metal and how many details you have. 

C4626D2F-E0CE-4FC2-89DA-C7975FABAEEFFCFDB1F7-F8E5-41F8-AE61-D10EC1C4A31C9F3A3DF8-EEFA-43CE-9A7C-F57940F85D5EBC76B90B-3754-4CC5-8F1D-03A4223D8DAA4D796FA0-D736-472A-AD24-133E784B8E80

Attachments

Images (5)
  • C4626D2F-E0CE-4FC2-89DA-C7975FABAEEF
  • FCFDB1F7-F8E5-41F8-AE61-D10EC1C4A31C
  • 9F3A3DF8-EEFA-43CE-9A7C-F57940F85D5E
  • BC76B90B-3754-4CC5-8F1D-03A4223D8DAA
  • 4D796FA0-D736-472A-AD24-133E784B8E80

I made a new batch of etching solution. I ruined the fireman’s side walkway trying to etch with old, well used enchant. I’ll have to make a new piece to etch, hopefully this evening. When the etching solution is used the etchings take much longer and they don’t etch evenly as is the case of the walkway. The center etched too much while both ends weren’t etched enough. 

I spend hours searching through google and the nwhs page for picture references. What I have found shows that the y6b engine also had the rear railing on the pilot by the smokebox. I haven’t found a picture of one without it yet. Even the last y6b 2200 shows one. It’s really interesting to me to see the different variations of the y6b. It’s interesting to see 2171 with a swinging bell too  

I have a oval smokebox door that I had always planned on modifying a model to represent the early version 

ECE5EBAD-EBF9-499F-9490-811A1274482FBBB33CA6-7977-442D-9D53-9C7B432BBA2777A1F09B-563E-4972-8638-F2089143AB900C5C5CA8-BC45-413C-B35D-B9619D350D35366D055F-AF72-4A23-8ACD-16CB2831063BFA781E8C-A903-433B-893F-BFC687CB52B63A7C9BAB-1D98-4C13-B68E-298DEE81460E

Attachments

Images (7)
  • ECE5EBAD-EBF9-499F-9490-811A1274482F
  • BBB33CA6-7977-442D-9D53-9C7B432BBA27
  • 77A1F09B-563E-4972-8638-F2089143AB90
  • 0C5C5CA8-BC45-413C-B35D-B9619D350D35
  • 366D055F-AF72-4A23-8ACD-16CB2831063B
  • FA781E8C-A903-433B-893F-BFC687CB52B6
  • 3A7C9BAB-1D98-4C13-B68E-298DEE81460E
gunrunnerjohn posted:

I'm guessing there's a lot of people that will have no idea how much work goes into something like this, I'm sure it'll be a magnificent locomotive when you're done.

Now this comment means a lot to me. I think so few people realize just how much work goes into doing something like this project. The time involved with research, drawing it on autocad, making the parts, soldering, redoing parts...etc. Now take into account I’ve taken a $1000 model and chopped it up just hoping it’ll look like a y6a when I’m done 😁

It might sound crazy but I’ll usually paint a model 3-4 times when I’m doing something like this before it’s finished. Little imperfections or details missed show up when the paint is applied. It doesn’t take long to strip and repaint. I made an oops on the smokebox paint anyways so it will have to be stripped. 


I want to create a new walkway on the engineers side that matches the fireman’s side. Same diameter holes. Curved edge. Shorter mounting strap. 

Your work on this I would say is the same as an Amish furniture craftsman. I know when I was I  High school, I made a small cherry table and worked on that nearly the entire time until my teacher said I had to finish it. He had said if I polished it up any more it would disappear.

What you are doing is amazing, finding the right tree to work your craft in a sense. I know that I wouldn't be able to do this, I'd be driving up the wall. This will be so special not just to you, but to everyone watching.

TrainMan1225 posted:

I wish I had your level of skill and craftsmanship. I've been following this thread for a while, and your work is very impressive. But how come you don't use a Legacy Y6b?

I have a legacy y6b. It’s still too expensive of a model to chop up. I had the JLC version and used it instead. The brass 3rd rail will actually be easier to do becuse it can be soldered and I already have the parts to do it. 

Add Reply

Post

OGR Publishing, Inc., 1310 Eastside Centre Ct, Suite 6, Mountain Home, AR 72653
800-980-OGRR (6477)
www.ogaugerr.com

×
×
×
×
Link copied to your clipboard.
×
×