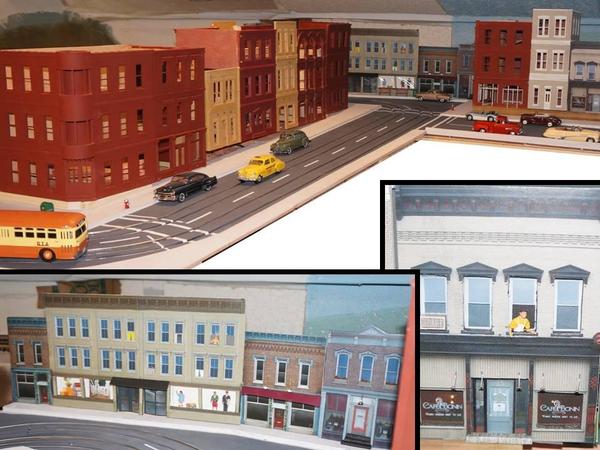
The new section of my downtown, San Beattadaise, is shaping up nicely. 

I've completed all the Superstreets-based city streets escept for adding the drains in the gutters and reinstalling a few manhole covers.  Because this is a newer section of town (both actually and in the imaginary world I model) the asphalt is newer and therefore I made it a slightly shader darker.  I was surprised when I went to paint the street that I had mixed exactly the color and shade that Superstreets roads are cast in- but of course I painted all of it anyway, not just the wooden parking lanes I add: when painted, it loses that plastic sheen so it's flatter and a bit more realistic looking, and Ialso  had several sections of EZ-Streets mixed in, which wasdarker still). 


Ultimately I made five foamcore board building fronts: the one I posted last week and three others I used as a block front at the top of the hill. None are more than 1/2 deep.  One I made into a 3D building (zoom picture with the guy leaning out the window).  The large department store (I'm printing up a Woolworth's sign for it tomorrow) has 1/4 inch deep display windows with plastic figures posed as mannequins behind plastic film windows.  That gives it a good 3D look. 


I'm now about to begin the stage I love best, which is fitting out the buildings in real detail (I try to match the detail in Woodland Scenics built ups or better) and adding street detail: cars realistically parking with wheels turned to the curb, fire hydrants, mailboxs, bus stop benches, parking meters, street signs, etc., etc. -- even litter in the street, etc. 


Lower San Beattadaise in the foreground, Upper portion of downtown circled in red.Old and New Downtown
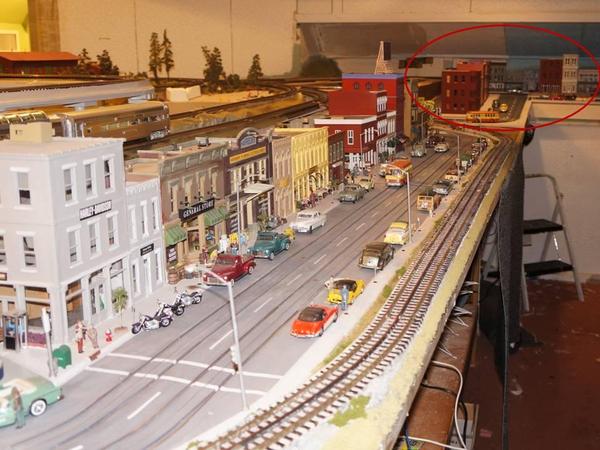


New section downtown

Attachments

Images (2)
  • Old and New Downtown
  • New section downtown
Original Post

Replies sorted oldest to newest

Originally Posted by RetiredToRail:

Just where did the name San Beattadaise originate from?

I made up the name.  The town and buildings represent my memories of small town 1950 America, but are based partly on memories I have of Trinidad, Colorado - where my Mother grew up and where I stayed with grandparents for several wonderful weeks each summer growing up.  Trinidad, even in the '50s, had "seen better days" as my Dad would often remark. 

Originally Posted by kj356:

You might try printing out some street drains and man hole covers.


You can either take a photo of the real ones or look for on line editions you can copy.

Scale to correct size print on your printer and use thin double sided tape to hold them on.

They really add that finished touch to the streets.

I've made a jig to drill out and shape actual holes for curb drains - I do it after the streets are done and the filler and paint hardened, because I wait until they are done and the crosswalks in, etc.,  to decide where they will look best.  I have all the small plastic manholes covers that came with the Super-EXStreets roadtrack and will just use them, painted rust color - they are smaller than scale - about only 18" wide, but they fit the holes where the screws go .

Originally Posted by coach joe:

Lee,


The building flats look great in the pictures.  Did you put all the buildings on one long piece of foam core board or did you do each one individually and then connect them together?


Joe

Each building is on its own separate board piece.  I put each individually in place, trimming the last one (to the far left, to fit to the 1/16th inch.


They look good in person, too, as long as one is about two feet of more away.  Where they are located on the layout, a person looking at them cannot get closer than about 3 feet, so it works out well.  


Incidently, some of the photos were free downloads from websites specific to model trains, but the best photos actually came from the website of the city of cambellsville, Ky, which has orthogonal pictures of numerous quaint old buildings in its downtown area on its website.


I'm not sure I am going to do more photo-based foam core buildings in the future, for use as here or against backdrops.  They are VERY fun to building and certainly economical and quick to build.  They look very good. However, they look different - they have a very discernably different look and "feel" - texture, whatever, compared to the plastic/resin/kit buildings I have.  Even though it would cost more, I think against backdrops, and maybe eventually here, I will use Ameritown, DPM, and similar building fronts, painted and otherwise fitted out, instead.  It will better match the look and feel of the rest of my town.

I have had the same experience as Lee.  Last February when I was looking into making a background there was some CardStock discussion here on OGR.  

I ended up with a mix of stock building fronts from http://familygardentrains.com/.../building_fronts.htm


and I bought a bunch of building from Clever Models, but only constructed them as fronts.  Clever is continually making better models, which I will probably buy a bunch more soon.  I am laminating the printouts on Foam Core.


Using the Card Stock method with Foam Core can really improve the results.  I like how Lee is using people in the windows, that even adds more realism. 

Originally Posted by Russell:

Lee;

Just something that popped into my head about your last post.

Have you considered using decopage (sp) on the flats?

I have a large Photo with that treatment and everyone thinks it's an expensive oil painting!

Properly done it can add a great deal of texture to any surface.

I would add some texture - that's a super idea.  But I think it would still look a marked contrast to all the plastic buildings: I'm goingto stick with plastic building fronts painted and fitted with windows just like I do on the 3D buildings for "2D" buildings from now on. 


Originally Posted by coach joe:

Lee,


Speaking of the rest of your town, the corner building in the second picture appears to have a rounded corner just above the bus.  Is this from a kit or is it scratch built?  It makes for a an intersting corner.


Joe


It is made from three Ameritown building kit building fronts and sides (the back and side facing the buildings to its right are just Evergreen brick-face styrene).  The corner, with its 45 deg double door facing the corner is a plastic door kit Ibought at the LHS and custom fit at that angle, and the two-story turret above is made from PVC pipe, basswood window frames, etc.  


I've got it on my workbench now and am starting to finish it.  Painted all the window sills and such today. I'm going to put just a bit of a mansard type edge roof on it to make it more distinctive still.  


The building will be called The Union Monitor Building - because it has one big turret.


Last edited by Lee Willis
Originally Posted by TMack:


and I bought a bunch of building from Clever Models, but only constructed them as fronts.  Clever is continually making better models, which I will probably buy a bunch more soon.  I am laminating the printouts on Foam Core.


Using the Card Stock method with Foam Core can really improve the results.  

I have heard good things about clever models, but never used any of their kits.  I think I will stick with plastic - that I paint - that gets the same texture and patina as my other, 3D buildings.

Lee,


I'd like to do the same, however this is mostly a backdrop project for me too.  I still have younger kids so time is hard to free up and these can be constructed fairly quickly.  

I really appreciate all the knowledge you have given so freely on Superstreets and your other endeavors.  My deepest thanks and gratitude for your submissions on OGR.

-Ted 

Originally posted by coach joe: "I like the historical significance of your choice for the building name."


I've decided to go whole hog with the name. It will be the Union Monitor building, and the Union Monitor will be one of two local newspapers in the town - I'm detailing in like a newspaper office and a sign of the roof, etc.  .  The other newspaper in townill be located in a building uphill and across the street - a newspaper that targets mostly people in the southern part of the town - will be the Christian Science Merrimac.  

Probably - hostile takeovers and unsavory business practices are, unfortunately, rather common in my little model town.  John Beresford Tipton Jr. owns the Union Monitor and Thurston Howell III owns the Christain Science Monitor - you never know with those two . . .


By the way, the building next to the Union Monitor will be one I have been wanting to make for ages and my biggest gag: Schultz and Schultz Building - Bob, he's a taxidermist and, Mary she's a veterinarian - got married and decided to combine their two businesses at one address: over the door is their slogan: "Either way you get your dog back."  

Post

OGR Publishing, Inc., 1310 Eastside Centre Ct, Suite 6, Mountain Home, AR 72653
800-980-OGRR (6477)
www.ogaugerr.com

×
×
×
×
Link copied to your clipboard.
×
×