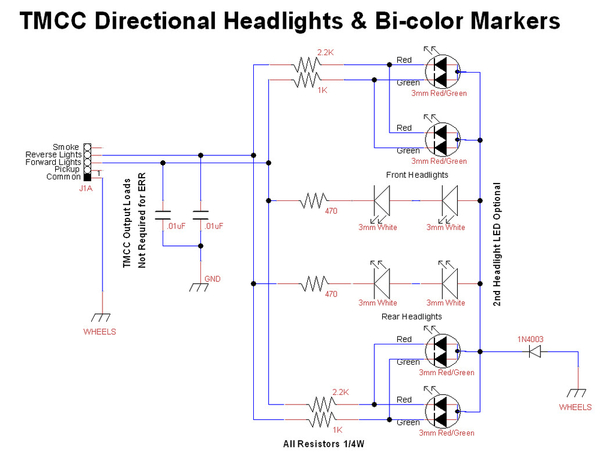
A short while ago gunrunnerjohn posted the following wiring diagram for basic TMCC headlights and directional markers. I figured the circuit was a neat idea and perhaps a set of pcbs would make installing this lighting in an engine a whole lot easier than individual wires running everywhere. Plus there were some other enhancements I wanted to be able to make.
The result is this set of new boards that will directionally turn on/off the headlights/rear lights, and optionally ditch lights, and switch bi-directional marker leds from red to green and back depending on direction of motion.
They will also support led cab lighting that extinguishes when in motion; and number board lights that can also be directionally controlled if desired. Here is a picture of a completed set of boards (sorry the quality is not great):

They do all this in response to the forward/reverse lighting outputs from any standard R2LC/R4LC equipped engine. That covers all TMCC engines after the LCRU era, from 2000 on, as well as early Legacy engines up to about 2012.
The main objective of these boards is to make it easy to connect all the leds, resistors, diodes and other components needed, so as to avoid a rats nest of wiring inside the engine. None of the attached led sets need additional resistors in the wiring; its all done on the boards.
There are two boards, one for the front and one for the rear per the picture. Both have similar functionality but differ in several aspects. You can use only a front board, or only a rear board depending on the particular engine and what you want to do. You can select a variety of functions and options on either board, depending on the engine.
You can also use a front board in the lead unit of an A-A pair of F-3’s/F-7’s for instance, and the rear board in the trailing A unit, so that both units operate in unison. All connected units behave as if they were one engine. The main candidates though are any modern era diesels as well as switchers, boxcabs, GG1’s, metroliners, subway cars, etc, etc.
A minimal installation would be directional led headlights and alternating marker leds at each end. You need only install components for those lighting options you wish to use. There are only 3 wires connecting the boards to the R2LC mobo lighting output circuits in the engine, and the boards are permanently inter-connected in the shell by a 3 wire ribbon cable.
I am currently testing them in the 2006 TMCC SD-90 diesel pictured below. The boards are only 33 x 17mm in size so they will fit in most any size engine shell. Here is the SD-90 nearing completion, and on the tracks ready for a test run:
In the above pic you can see the board mounted up front, the strip led cab lighting, and the ribbon cable running to the back board.
And here is a short video clip of it running. You can clearly see the cab lights extinguish when motion starts, plus the headlight and ditch lights, and the markers changing color. I didn't get a video of the back end but it also has 2 headlights as well as the color switching markers; nothing else.
The plan is to convert a few more engines in the stable as time and ambition permits. I did a limited run of boards and I can make a few sets available for anyone interested. All components are inexpensive and readily available. There is no current plan for kits or pre-fabbed boards at this time, but anything is possible. ![]()
I need to gratefully acknowledge gunrunnerjohn's assistance early on sorting out a few TMCC issues, plus other guidance along the way as the project developed.
Rod


