HENNING'S TRAINS & JW&A (gunrunnerjohn) would like to introduce a new Passenger Car LED Lighting Kit


JWA20110d

Item #20100, Passenger Car LED Lighting Kit


Passenger Car LED Lighting Kit
Enhance your passenger cars with low power adjustable lighting
.
Contains components to light two 12 to 21 inch passenger cars.

This LED lighting kit is a set of components to allow you to easily upgrade your passenger cars to low current LED lighting. LED lighting offers a number of enhanced features over the incandescent lighting currently used in most production O-gauge passenger cars. This kit has been designed with command operation in mind. The lighting module works correctly when supplied with from 12 to 19 volts AC.. 

Features:
 -  Low Power LED Lighting
 -  Easy Solderless Installation
 -  MTH DCS Compatible
 -  Adjustable Lighting Intensity
 -  Flicker Free Operation

Developed by John Will & Associates (gunrunnerjohn)
Any questions or comments contact us at  lighting@will-enterprises.com


For a limited time (until end of year)we are offering an introductory price to all of our OGR friends a discounted price of $29.99 by entering the promo code: OGR20100 during checkout.


Also now available

Item #20110, LED Constant Current Lighting Regulator

Available Now Exclusively through Henning's Trains


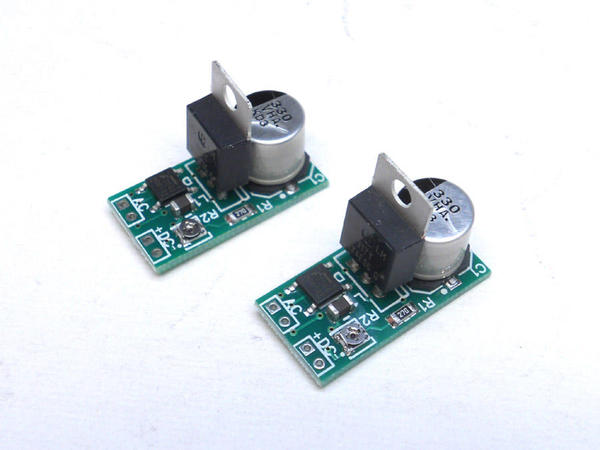
LED Constant Current Lighting Regulator, 2 Pcs.

 JWA20110

The LED Constant Current Lighting Regulator (LEDCCLR) is a board designed to convert track voltage AC to constant current DC for LED lighting. LED lighting offers a number of enhanced features over the incandescent lighting currently used in in most O-gauge accessories and rolling stock. The lighting module works correctly when supplied with from 5 to 19 volts AC, the minimum operating voltage is dependent on the configuration of the LEDs connected to the module.

LEDCCLR Features:
 -  Requires a small fraction of the power of conventional lighting
 -  Provides adjustable lighting intensity
 -  Storage capacitor on module provides flicker-free operation
 -  Designed to be MTH DCS compatible
 -  Simple connections to power and LEDs


The LEDCCLR is fabricated on a printed circuit board with the dimensions of 1.1" x 0.55" in size. The overall LEDCCLR height including components is approximately 0.8" tall.


The LEDCCLR can supply constant current to one or more LEDs from 5ma to 45ma, the current is adjustable by a small adjustment potentiometer on the board. The LED’s can be connected either in series or parallel to accomplish the lighting goals. The LEDCCLR requires AC voltage higher than the DC voltage requirement of the connected LEDs. For example, three white LED’s connected in series require about 9 volts DC, the LEDCCLR with this configuration would require 10 volts or more of AC power for correct operation.


An easy way to mount the LEDCCLR is by use of double-sided foam tape to any convenient location in the car or accessory that it is to be employed in.


The LEDCCLR requires very simple connections. Four solder connection points are provided to the PCB, they’re illustrated below on the right hand side labeled AC and DC.


The AC connections are for incoming AC (or DC) power to the regulator circuit. The DC connections are for the constant current output to the LED(s) being powered by the board. Note the + pin on the DC connector goes to the positive side of the attached LED(s). Note that there is no common ground on the DC side of the regulator, so neither of the output wires should be connected to AC common.


Includes two (2) LEDCCLR boards as shown.


Once again for a limited time (until end of year)we are offering an introductory price to all of our OGR friends a discounted price of $15.99 by entering the promo code: OGR20110 during checkout.

Attachments

Images (2)
  • JWA20110d
  • JWA20110
Last edited by Bill Henning
Original Post

Replies sorted oldest to newest

They work with any brand passenger cars.  I've installed LED's in MTH, Lionel, K-Line, and Williams cars.  All you need is track power and a clear place on the ceiling of the car to stick the lights.  The strip of lights that comes in the kit is about 19" long, sufficient for 21" cars.  You can cut them down at 2" lengths to fit any size car.  The MTH DCS compatibility indicates that they won't affect the DCS signal, but that doesn't exclude their use in other environments.


The first kits have warm white strips, in the future I plan on having the option for the bright white. 


Originally Posted by jpcommons:

I might do this just to get rid of the flicker.  Any photos of how the lights look on a car after installation.

 I don't have any photos yet, but I'll do that soon.  It's a pretty simple installation as you can see from the instructions.


I've attached the instructions to this post so you can see the installation procedure.

Attachments

Last edited by gunrunnerjohn

Sounds like just what I want for the Atlas passenger cars I have on order.  But I have a question: the website explicitly states that this kit is "designed with command operation in mind."  Fine, but I run conventional-only.  And my passenger cars will be pulled by a Lionel 283, which reaches its maximum scale speed at 20 volts.


What value resistor should I use to keep the lighting modules from exceeding their rated 19 volts?


I only run MTH DCS and keep the transformer around 19 to 21volts.  However, sometimes a mistake occurs and the transformer throttle might be moved to higher than 21 volts.  Is that going to burn out the LED strip?  I have incandenscents in my cars now.  And there is no issue when there is an occasional burst in voltage. 


So as I understand it:


1) At 10 volts the LED is not damaged but the LEDs dim in light output but no damage will occur to the LEDs.

2) No problem from 12 to 19 volts.  This is the design point.

3) What happens above 20volts, say 25 volts 


Please advise. 


I would like to buy these only once.  I have about 40 cars to convert.  I don't want to find out these LEDs are voltage sensitive and creates problems I do not have now.

Last edited by ptalar
Originally Posted by gunrunnerjohn:

The problem with conventional is that the LED strips take around 10 volts to light.  Making the constant current power supply boost voltage involves quite a few more components and runs up the cost of the module.  That being the case, I made the decision to start with the simpler option for command operation.


Okay, thank you.  I'll wait for the conventional version.


Originally Posted by ptalar:

I would like to buy these only once.  I have about 40 cars to convert.  I don't want to find out these LEDs are voltage sensitive and creates problems I do not have now.

It's not the LED strip that's at risk, but rather the capacitor on the regulator board, it's rated at 35 volts.  If you take 1.4 times the input AC voltage of 25 volts, you're right at 35 volts across the capacitor.  That's OK, but any more will be a problem I expect.

Originally Posted by sinclair:

I am also wondering what would need to be changed or added to make them conventional.  But unlike Balshis, I'm pulling with a MTH PS-1 equipped locomotive, so the train is traveling at speed under 10 volts.

The separate-sale version does not require a 12V LED strip.  You can modify a 12V LED strip to become a lower-than-12V strip with a soldered jumper wire.  Not plug-and-play like the kit version, but would allow conventional operation. This was discussed in the Electrical Forum.

Originally Posted by gunrunnerjohn:

The Lighting regulator is a constant current regulator with adjustable output from 5ma to around 45ma.  At the low setting, the LED strips are pretty dim.  A single LED on this module would probably be fairly bright, but you can parallel a 330 ohm resistor across the single LED and then adjust it for the brightness you need.


Thanks, looking at minimum of 3 in a section and full strips for heavyweights.

I've never opened up any of my passenger cars...been lucky and had no burned out lights.  So, my question is from the perspective of a total newbie for doing something like installing LED lighting. 


I read the instructions (thanks very much for posting GRJ) and they seem quite clear for a standard passenger car.  How do you install the LED lights in a passenger car with a vista dome (either standard or full-length dome)?

A dome car, two-level car, or one with running lights is a more custom installation.  For folks that don't want to get involved in soldering and customizing the wiring, I recommend having someone do those upgrades for you.  There are many different wrinkles, depending on the brand and exact configuration of the car, I didn't feel I could do justice to all the situations with a canned solution.


I use the same regulator board in such installations, but there is more customization of how they're wired.


grunj,  The box on my screen shows the product, but the order box says this item is out of stock.  Then when I try to  order two and hit the cart box, I still get the message.  Go back, 0 items available.  What does your screen look like?  Maybe I can just call Hennings tomorrow.  Thanks

Add Reply

Post

OGR Publishing, Inc., 1310 Eastside Centre Ct, Suite 6, Mountain Home, AR 72653
800-980-OGRR (6477)
www.ogaugerr.com

×
×
×
×
Link copied to your clipboard.
×
×