
Long time, no update! Between a super busy spring, my Jeep project taking a lot of my mental capacity, work travel, and a tree limb falling into our garage, I finally got some time to start moving modules!

This won't be a big update, but, HOPEFULLY, by the end of today, I'll have all of the modules in the new train room and can start building out the last section and get the last bits of track. This thread is going to help me be accountable, so feel free to challenge me to get it done.

My main constraint right now is how to give enough room to the sump pump + battery back-up. I should have enough room, but I just want to make sure I can get to if needed.

Current status:

Train room: loading.......

Attachments

Images (1)
  • mceclip0

@Mark Boyce Its all a learning experience right? And at least now it pushes me to get the Jeep done to get out of the garage and my garage gets a nice little make over and roof! haha (Gotta look on the bright side, right?) And right? This wasn't a problem just a few months ago, but I think I have a solution to the prob


@RSJB18. You hit the nail on the head. Ultimately, I may build this module with just 1x4 to make it light. I'll be bolting it to the other two modules, with the goal of making it so IF I ever need to get to the sump pump, I can remove it pretty easily.  I'm also leaving it off the wall on that side incase I need to get to the battery. I actually may start working on it this afternoon.


As a quick update, I think I have the finalized track plan for the Corner Variation.  This is adding a 42x55 module (in blue) to connect to two pieces.  I spent about a few hours making sure I could make O-48 curves work on all of the pieces, and I did! I also added an extra passenger siding in the lower right hand corner. I think it would be fun to park some extra cars, or the RDC Budd cars I have on there.


And this is what I want the true future of the layout to be. This will be an extra little staging yard and above that, I will put a level of houses that will have a trolley track run in front of them.  Ultimately, the trolley track will go into the "down town" area to connect it. The thought is to use super streets and a Z stuff controller for the trolley. I may also try to blend in an abandoned coke oven scene by the staging tracks. Heres the vaporware version of it!


Attachments

Images (2)
  • mceclip0
  • mceclip1

Hey Everyone! I wanted to give a little update.

All of the modules are officially in the newly christened Train Room. I'm currently working on spacing them properly and aligning them up. I still need to build the 5th module, but the track plan will work with O48 curves. I need to decide my construction style for the new module. I want it to be light weight so I can lift it out if I need to get to the sump pump, so should it be 1x4s with additional buttressing in the corners or do I just stick with how I currently built the rest (2x4s)? I'm open for thoughts here.


I also put in some new investments in the pike as well. I was able to snag a Fastrack Truss bridge off of Facebook marketplace for a great deal. I've been playing around with it because I don't have any track yet, but it looks amazing and I can't wait to get it on the full build.

The other big addition was I pre-ordered the new DCS system from @MrMuffin'sTrains. I missed out on a used DCS system with a remote a few months ago for a steal of a price and really want to have DCS capability on my layout. I figured, by the time they come in, I should be at the point where I'm wiring blocks and running trains.


Attachments

Images (3)
  • mceclip0
  • mceclip1
  • mceclip2

Justin, the truss bridge looks great!!!

Are you referring to the blue module on the track plan that needs to be lifted out for access to the sump pump?  If so, it looks to be 4 feet by 4-1/2 feet.  It would be too unwieldy for me to lift out with the modules on two sides and the walls on the other two sides.  Of course I am pushing 66, have an artificial knee, rods and pins in my back, and arthritis in my hands.    I would have to make it in two pieces even if I used 1x3s.  It doesn't look like there is room for two people to get at it to lift.  All that to say, please explain your plan for removing it, since I think I am missing something.  Not uncommon for me. 

I have a Fastrack truss bridge on my layout and it's a great focal point! Glad you were able to find one to incorporate into your layout.

Looks like you have lots of space around the layout - why not just put the whole thing on casters and roll it out of the way for access to the sump pump?

@Mark Boyce I'm actually still brain storming that. It may come down to just adding casters. I was thinking about maybe building it in two sections and trying to get fancy with things like hinges and pulleys.


To @Mike0289's point, casters were part of my original thought. The big issue was we have a really uneven floor in the basement. I put leveling feet on each leg which has been perfect. I also could not find leveling casters anywhere that weren't a months long wait or insanely expensive.

My challenge would still be cost (20-24 legs). I'm seeing 4 packs of casters at $40, which would mean I'd need 6 packs at a minimum, so I'd be looking at $240 just in casters.  I'm open to suggestions on casters too. I may need to think this through a little more.

I put casters on my 4x8 and it makes it so easy to slide around the basement if needed. I did use one of those caster sets from Amazon. They do get a little pricey but it’s a convenient option if you can make it work with the floor leveling. Just run all locomotives with speed control so those inadvertent grades won’t matter. 😂

Where are you thinking about incorporating the bridge? I thought it might be a little tricky with that plan as is. Would it fit? Or were you thinking of adding an elevated line somewhere?

A lot has happened, but it still doesn't feel like much.

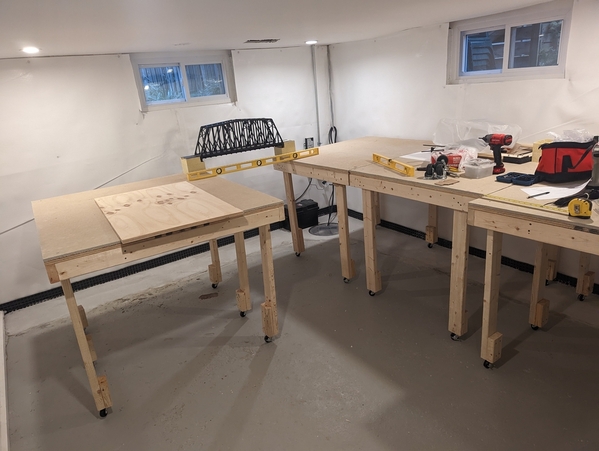
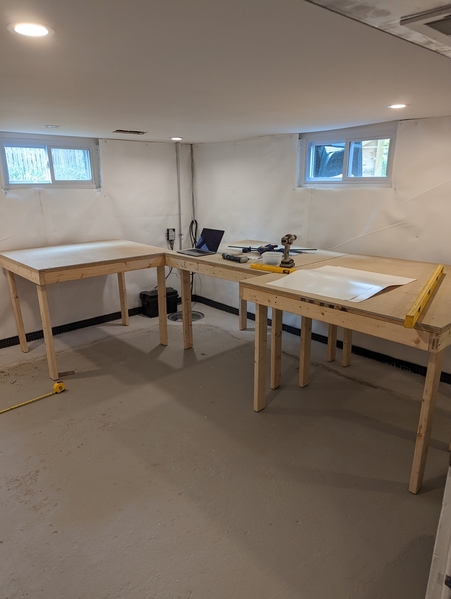
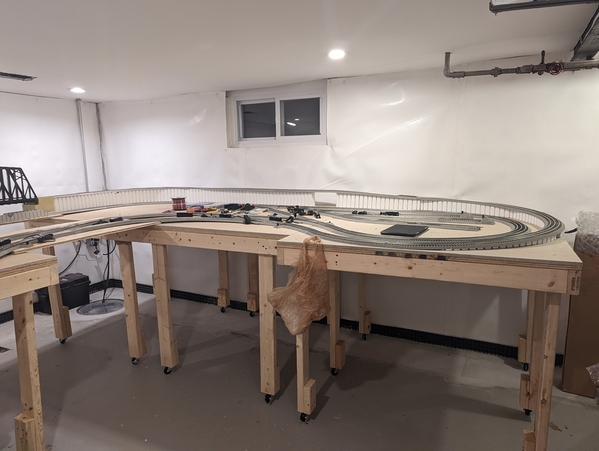
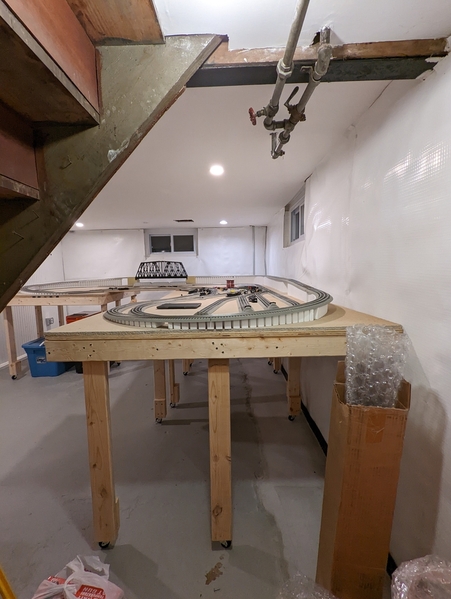
First off. I realized something about the new room: The floor is actually much more even than I originally thought. Like, almost dead even where I need it to be. After 2 months of fits and starts (and a 2 week trip to Scandinavia in the middle of it), I finally got the casters on every table leg. I ended up replacing the adjustable feet with casters and this has made my life so so so easy! I should've done this from the beginning


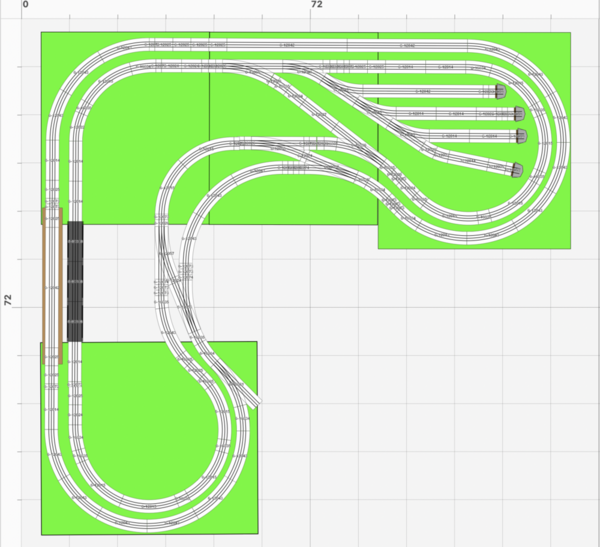
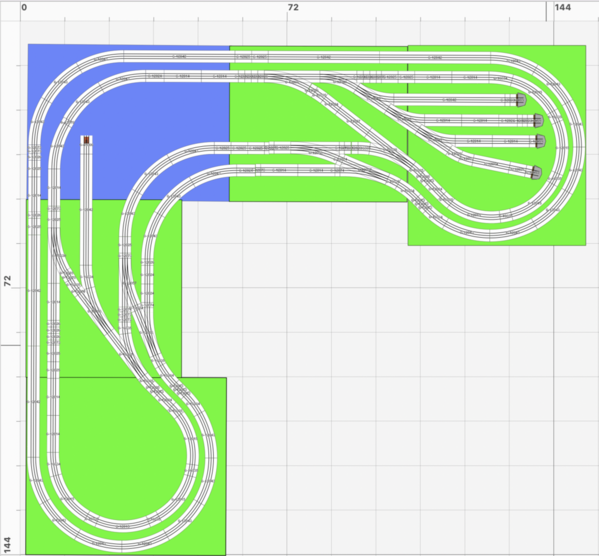
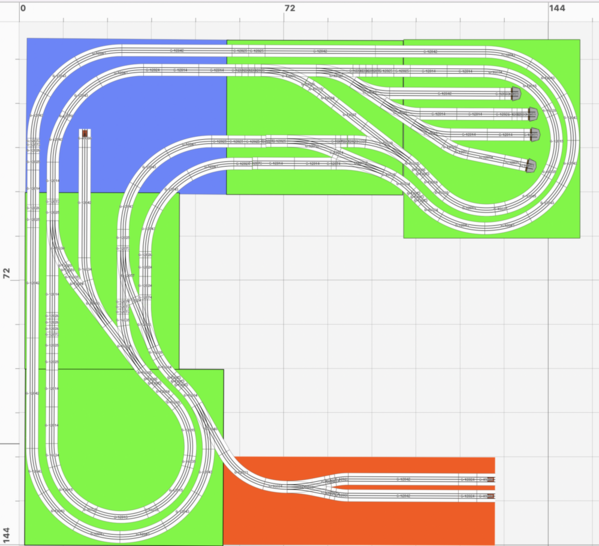
The second, and probably most detrimental thing is the layout design. After going back and forth, and getting a little overwhelmed by having to build more benchwork, my wife said "why don't you try to build something with what you have?" I was so hyper focused on a more detailed, larger plan, that I was missing out on the joy of actually running trains. So, with that, I scooted the modules around, and went to RailModeller, and....Voila! Version 5 of the layout. haha

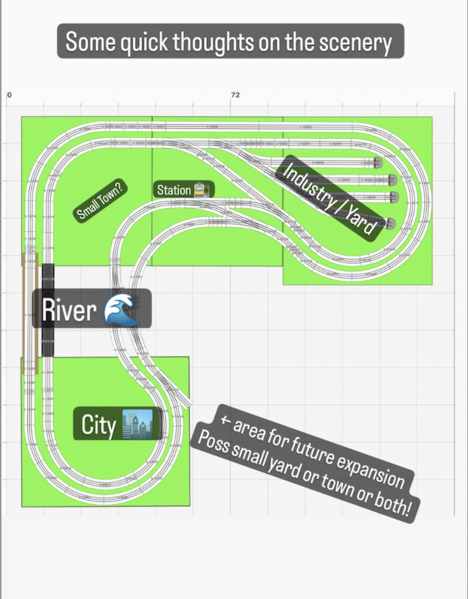
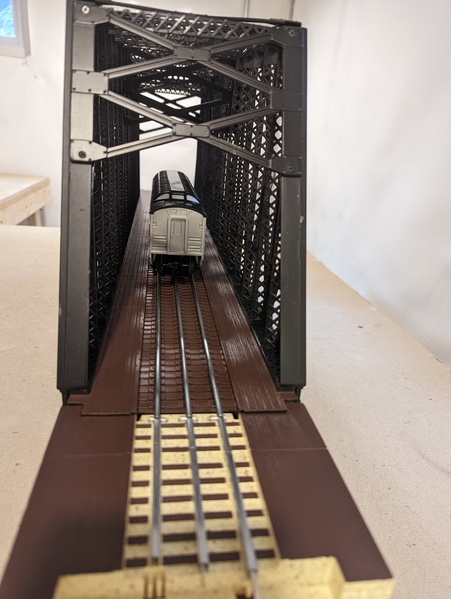
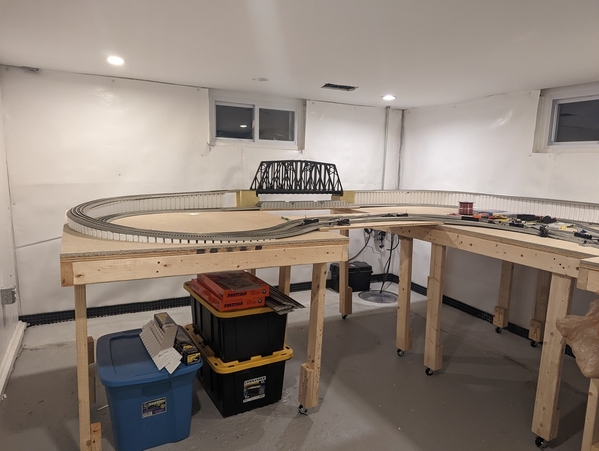
It uses all of the existing modules, but adds in the Fastrack Truss Bridge, 3 Fastrack girder bridges, and one I'll need to build one bridge.  The new goal will be to add a river scenery module under the bridges there to make a pretty cool scene with some depth.  Here are a few pictures of the new track plan, and what it looks like in the room.  The best part, I've got enough room to get to the sump pump and can even roll the layout away from it if needed. Win, Win, Win!


Attachments

Images (3)
  • mceclip3
  • mceclip4
  • mceclip5

I'm writing this as I hear a CSX freight passing by our house on the Camden Line towards Baltimore.

Big progress on the layout! I was able to finally get all of the track pieces in place, risers, bridges, and bridge placeholders. I'm really like the shape the layout is taking. I haven't been able to run any trains yet, but I'm hoping to have some power running to the pike tomorrow. Here are some pics of everything in place.

My next project is going to be wiring. Before I start drilling holes and running wires under the layout, I'm going to draw out a good schematic on where each drop is going to happen, and the direction of them going to the to be designed control panel. I'll be running DCS via the WTIU, whenever they ship from MTH. I don't have the system yet, but I'm planning with that in mind.  I'd love to see some suggestions / pictures of wiring panels and some best practices. Wiring terrifies me, but I really want to do it right (and be super organized in doing it). I think I've got the majority of my supplies in. I just need to get some wire strippers and terminal blocks.

Attachments

Images (5)
  • mceclip0
  • mceclip1
  • mceclip2
  • mceclip3
  • mceclip4

The layout is coming along nicely.  One note of caution about the unopened roll of wire you have pictured.  The brand name on it indicates it may be CCA (copper clad aluminum). It is typically less expensive than pure copper, but is not recommended for train wiring.

While I don't personally have experience using CCA wire, GunRunnerJohn strongly recommends against using it.  If it's unopened, you may still be able to return it and find something else more suitable.  There are lots of other good choices.

@SteveH posted:

The layout is coming along nicely.  One note of caution about the unopened roll of wire you have pictured.  The brand name on it indicates it may be CCA (copper clad aluminum). It is typically less expensive than pure copper, but is not recommended for train wiring.

While I don't personally have experience using CCA wire, GunRunnerJohn strongly recommends against using it.  If it's unopened, you may still be able to return it and find something else more suitable.  There are lots of other good choices

Happy Friday everyone!

Thanks, @SteveH!  That's a great call out. I actually never thought of checking. Something is going back to the big A-warehouse this weekend.

Thanks @Mark Boyce! I definitely want to do this right and plan it out. When I planned out the bench work I had under a foot of scrap wood. I like efficiency and cutting waste in projects. I guess my wife has rubbed off on me.

On the wiring front, what is the suggested gauge wiring when using DCS and Fastrack? I've seen a lot of recommendations for 14 gauge, but it's too big to fit in the .110 female wire connectors I need to attach under the track. Would 16 gauge work, or is it too small?

Here is a quick, really really rough sketch out of the wiring schematic (if you can call it that, more like chicken scratch).

PXL_20221105_003014373

Another Q: I currently have a new WTIU on order from @MrMuffin'sTrains.  I never planned on an AIU, but I'm considering it. Do you all think it's worthwhile? I see the benefits of using it for switches but I can easily build a control panel for them (only 8 total on the pike).

Lastly, I took a trip to Engine House Hobbies in Gaithersburg, MD and picked up a URR gondola I haven't seen in the wild before.

PXL_20221104_235714388

Here is to getting some wires down this weekend and trains running before the work week hits.

Attachments

Images (2)
  • PXL_20221105_003014373
  • PXL_20221104_235714388

The recommendation for 14 gauge minimum pertains to bus wiring.  Assuming you plan to use a star wiring scheme with dedicated home runs, in my novice understanding of DCS wiring, I believe 16 gauge wiring should be fine given the size of your layout.  Others with greater DCS knowledge can confirm or deny my supposition.

To able to use larger than 16 gauge with Faston connectors you'd need to either change to the 187 series (or larger) or alternatively step down the wire's size just before the 110 Faston connector.  For what it's worth, I've found that even the 250 series (1/4 inch) without the shroud around the connector end will fit into the FasTrack tab and make a secure connection.

See page 8 of the following resource for compatible wire gauges and ampacity of Faston connectors:

TE Connectivity Faston Connectors

Last edited by SteveH

Very nice layout design.

I am building a similar size layout with Fastrack and the same bridge. The wiring design is very similar also.  I have two loops powered with a 180w Lionel brick for each.  I installed both DCS and TMCC.  The TMCC will eventually be replaced with a new Base 3 when shipped.  I used the same power blocks you have, one for each loop and wired it in the star pattern that was recommended in Berry's  DCS book.  The wire I used was 16g solid copper black and red insulated speaker wire.  Made it easier to run the wires since they're joined together.  I have been satisfied with the results so far.  Plenty of power.

To minimize flickering and future problems, I did take the time to practice some and solder a 22g jumper wire between most pieces of Fastrack when I installed it.  The main reason is my design required me to use many 1 3/8" and 1 3/4" track pieces.  They have a history of current issues over time.  By soldering a jumper between them I could Guarantee continuity and significantly reduce the number of drops necessary to give consistent power.

I have been very pleased with the results.  Passenger cars that used to flicker constantly on my temporary layout have no noticeable flickering now on the new layout, even through the switches and crossing.

Add Reply

Post
The Track Planning and Layout Design Forum is sponsored by

AN OGR FORUM CHARTER SPONSOR

OGR Publishing, Inc., 1310 Eastside Centre Ct, Suite 6, Mountain Home, AR 72653
800-980-OGRR (6477)
www.ogaugerr.com

×
×
×
×
Link copied to your clipboard.
×
×