- Feature reset via DCS - No Change
- Factory reset via DCS - No Change
- Factory reset via Z-4000 in conventional mode on test track - No Change
- Ran in conventional mode on test loop with Z-4000, ensured smoke volume pot turned up - No Change
- Ensured Tender/Boiler drawbar connection - No Change
- Ensured no obstruction in smoke stack
Replies sorted oldest to newest
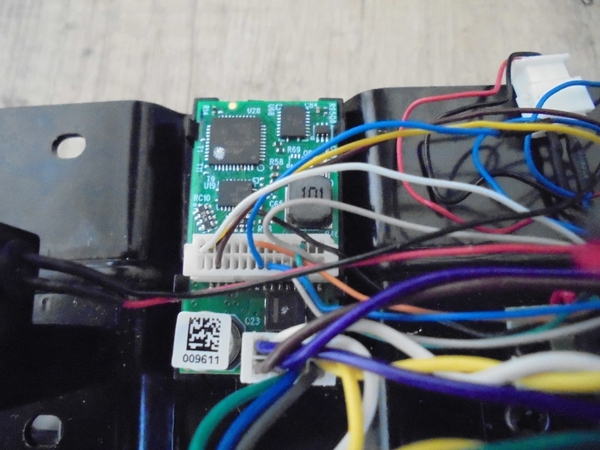
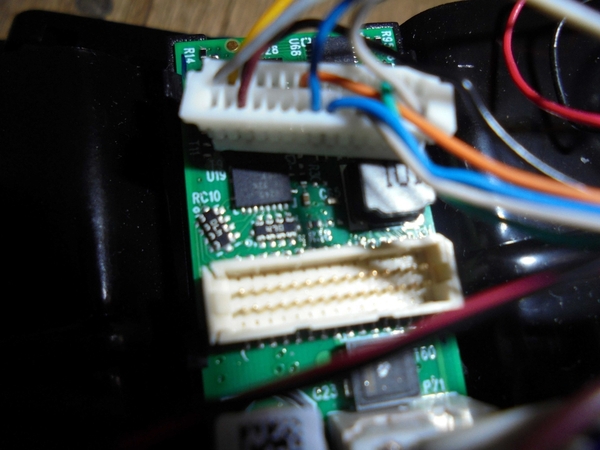
I experienced the same thing with my new Rail King "Big Boy". After a lot of back and forth with Don at MTH Parts, and some photos of the "boiler board" in my loco, it was discovered the fan motor wire was installed in the wrong plug on the board, right out of the factory. It was one position out, and there was no power getting to the motor to drive the fan.
I had to carefully remove the fan motor wire from the socket on the boiler board, and re-position it one socket along (No. 3 position), and everything came together, and it now smokes like a trooper. I had to undertake this repair myself, as I live in Australia, and returning the Big Boy back to Maryland was out of the question.
I hope the answer is as simple as mine was, but in the end, you may have to return it to the dealer, as the loco shell has to come off to get to that boiler board and wire harness.
Good luck!!!
Peter (Buco Australia)
Peter...thanks for the response. Sounds like a possible solution to similar problem. I take diesels apart all the time but not so much big steamers, especially one of this size. Maybe our Big Boys fell victim to a "first day" trainee on the assembly line! I will contact the dealer tomorrow and see what options I have before tearing into a brand new locomotive and start poking around without a wiring diagram/schematic, etc.
@Kevin MacDowell posted:Peter...thanks for the response. Sounds like a possible solution to similar problem. I take diesels apart all the time but not so much big steamers, especially one of this size. Maybe our Big Boys fell victim to a "first day" trainee on the assembly line! I will contact the dealer tomorrow and see what options I have before tearing into a brand new locomotive and start poking around without a wiring diagram/schematic, etc.
FWIW, the Railking BB isn't that difficult to take apart. There are six screws to separate the boiler from the chassis, then the boiler will lift right off. See the illustration below, they're just missing one arrow to the other screw at the front. ![]()
Consult with Peter for the specific wire to move. ![]()
Attachments
Hi John! Thank you much for the insight and confidence boost on shell removal. So it's not that big of a deal ???? Like I said, I tear down diesels all the time but this Big Boy looked sort of daunting and delicate...I may give it a try. Getting the shell off is one thing, determining the wire to move without a wiring diagram is another thing! Yes, I will consult Peter, maybe he has a picture of his ordeal.
Thanks,
Kevin Mac
I would possibly consider moving the wire taking this from "not a big deal" (example classic the wick blocking the airflow and just normal rebuilding of the smoke unit- that's even in the manual) but again changing the wiring harness or wire order- becomes "a big deal" to the novice user IMO.
If it is in fact the wire harness being built wrong- then MTH and the dealer need to resolve this.
Hi Kevin:
Like gunrunnerjohn said, getting the loco body off the chassis is no big deal,,,,just follow his instructions to get to the six screws that hold it in place, but Vernon's words should not be ignored!!!
Here is a copy of my E-mail conversation with Don Lockwood at MTH, and the photos I sent him of the boiler board and the wiring harness.
Don: "I see the problem. The green smoke fan wire is in pin 5. It should be one spot closer to the end in pin 3. It is currently plugged into front coupler, which lights the LED on your test fixture for a moment at power shut down. For reference, one row is odd, and the other even. The white and yellow wires are in 29 and 27"
Getting the green wire (with the Molex female metal connector attached) out of the plug is not for the faint-hearted!!!
You need high magnification with good lighting to see into the slot of the plug, and then use a strong pin to collapse the barb on the metal connector, so you can then pull the wire and metal connector out from the plug.
Once extracted, it can then be re-inserted into the correct position on the female plug, being sure to bend the "barb" back up to catch the inside of the plug, before you re-insert it.
Test run the loco and tender now to make sure everything is working as it should, and smoke is coming out of the smoke unit.
One strong word of caution/advice.......be very, very, careful when reinstalling the die-cast loco body back onto the chassis, as the power wires to the front motor will want to get trapped between the chassis and the shell every time!!!!
Don't ask me how I know......albeit I have a very strong, healthy respect for ensuring ALL wires are well out of the way when reattaching loco shells!!!!!
Kevin.....I think in the end you are better off taking the "Big Boy" back to your dealer for them to converse with Don Lockwood at MTH re the possible fix to your problem. Like I said, I would have returned mine to TrainWorld in a heartbeat if it wasn't for the fact I live on the other side of the world, and "down-under" as well!!!
Peter......Buco Australia.
Attachments
Hi Peter...this is fantastic documentation, thanks for sending. Will keep this in my hip pocket just in case...but I agree with you and Vernon, my first step is to go the route of the dealer & MTH to resolve the issue. Who knows, the problem might be something else...there's no reason for me to be in there poking around on a brand new expensive steamer just off the water and out of the box.
*IF* the wire position as you experienced is indeed the problem, I'm confident (based on above documentation) that I could make the repair. ...temped to pull the shell and take a look at the position of that green wire!
Thanks,
Kevin Mac
Curiosity got the best of me...I had to know if the leads from the smoke fan were in the correct positions on the Molex connector. I removed the boiler from the chassis and found the wires in the correct pin positions...all looked good and wires were secure. I proceeded to inspecting the smoke unit and spotted a gray wire under the smoke fan not connected to anything. Sure enough, it was the gray power lead from the Molex connector to the fan motor.
I removed the fan, soldered the connection, put the locomotive on the track, powered-up, hit the smoke button on the remote and heard the fan spin-up and smoke was pouring out the stack.
I suspect they broke the solder connection at the factory when they snugged the zip-tie around that bundle of wires up front...noticed that the green wire had a lot of tension on it when the fan unit was mounted in position. I was able create some slack in the two leads coming from the other end and reduced the stress on the leads at the fan motor.
Thanks for the above info guys...it was enough bread crumbs to point me in the right direction!
Kevin Mac
Attachments
Great news Kevin. Glad you got it fixed. Mine has been great so far.
Brad
Hi your very lucky had the wire shorted to ground you would have blown the electronic board! Glad you were able to repair it and not have to send it back!
Alan
one note when these engines get older the small wiring becomes stiff and can easily break off if moved, it gets so still you had to replace it and also when it gets stiff and old very hard to tin with solder!
Alan
@Buco posted:Getting the green wire (with the Molex female metal connector attached) out of the plug is not for the faint-hearted!!!You need high magnification with good lighting to see into the slot of the plug, and then use a strong pin to collapse the barb on the metal connector, so you can then pull the wire and metal connector out from the plug.
Once extracted, it can then be re-inserted into the correct position on the female plug, being sure to bend the "barb" back up to catch the inside of the plug, before you re-insert it.
Actually, the proper way to remove those contacts is to use an X-acto blade or similar to slightly lift the plastic tab and then gently pull the contact out. You shouldn't have to deform the contact to get them apart.
@Alan Mancus posted:Hi your very lucky had the wire shorted to ground you would have blown the electronic board! Glad you were able to repair it and not have to send it back!
Alan
Boy no kidding...very lucky indeed! What a mess that would have been.
Kevin Mac
That is so good to hear Kevin......and it looks like it's now smoking like a trooper!!!
You were extremely lucky that loose wire didn't ground-out and blow the boiler board, or even worse, the main board in the tender, as well!!
Just be very careful putting that shell back on, and keep those front motor wires well tucked-up and away from the center screw fixing point.
Peter....Buco Australia
Thanks for the tip John about getting those little suckers out of the Molex plugs.
I have since invested in a genuine Molex wire extraction tool sold here in Australia by my second favorite electronic store.......Element 14. ($42.00)
Peter....Buco Australia
@Buco posted:Thanks for the tip John about getting those little suckers out of the Molex plugs.
I have since invested in a genuine Molex wire extraction tool sold here in Australia by my second favorite electronic store.......Element 14. ($42.00)
Peter....Buco Australia
That's not a Molex plug, the 1.0mm connectors on the PS/3 boards are Chyao Shiunn connectors, Spec sheet attached.
Chyao Shiunn PS3 Connectors.pdf
I have lots of crimp and extraction tools for various connector families, sometimes there is no substitute.
Attachments
You're right John......sorry for my confusion about the type of connectors on the PS3 board.
I have attached a link to the Molex pin removal tool, and think it will also work on these connectors as well.
https://www.farnell.com/datasheets/2644978.pdf
The bulk of my circuit board work is on the early PS1 boards, like the ones I purchased from you a couple of months ago.
I have become quite proficient in making new wiring harnesses using the Molex plugs and the female pins....I purchase these from Element 14 as well. I also now have the special crimping tool you recommended to attach the wires, it makes the job sooo easy, and it looks professional too.
Thank you again John.
Peter.....Buco Australia


