What I'm about to describe is, for me, the most challenging model railroad project I have undertaken in 25 years.

First, I will describe what I currently have.

My current wiring system was of my own invention.

My O Gauge Postwar tubular track layout with O22 switches is long and narrow: 35 feet long, 3 to 4 feet wide, around 3 of the 4 walls in the playroom and laundry room of my basement.

It is powered by an MTH Z4000 to power the 2 interconnected and independently powered main lines (left throttle for inner loop and right throttle for longer outer loop), and another Z4000 to power the independently powered 9 sidings using heavy duty O scale Atlas switches to turn each siding on and off. I have a ZW to power the sixteen O22 switches, and another ZW to power the numerous Postwar accessories.

I have hooked up the MTH DCS remote system to the 2 main lines and 9 sidings, and love DCS.

I run Postwar and Proto 1 engines conventionally, Proto 2 and 3 engines using DCS, and several LionChief Plus and 1 Legacy using the LionChief dedicated remotes or universal remote.

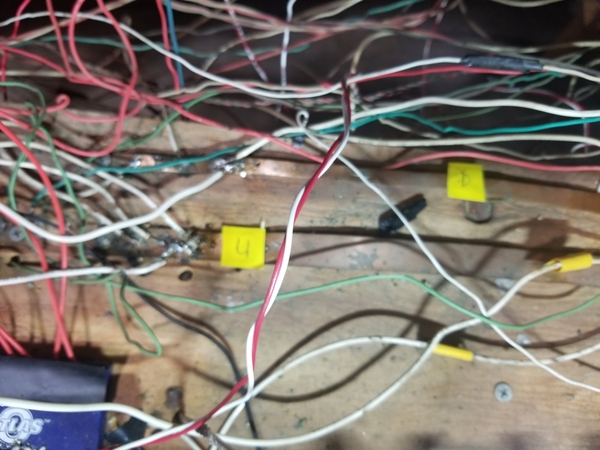
Here is my invention. I have many feeder wires going to every few feet of track of the 2 main lines. In order to connect these feeder wires to the U (Common) and A and D (Hot) transformer terminals, I installed bare copper strips (each one about 12 inches long and one-half inch wide) in front of the Z4000 transformers. A short 16 gauge solid copper wire is connected to the appropriate transformer terminal on one end and soldered to the appropriate copper strip on the other end.

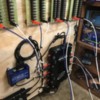
Here is a photo of my invention:

20211022_101726

It's obviously a rat's nest, which needs to be organized, but at the outset I am interested in your opinions regarding the use of the copper strips. The one on top is wired to the D terminal (left throttle) of a Z4000 (hot rail for inner main line loop) and the bottom copper strip is wired to the U or Common terminal of the same Z4000.

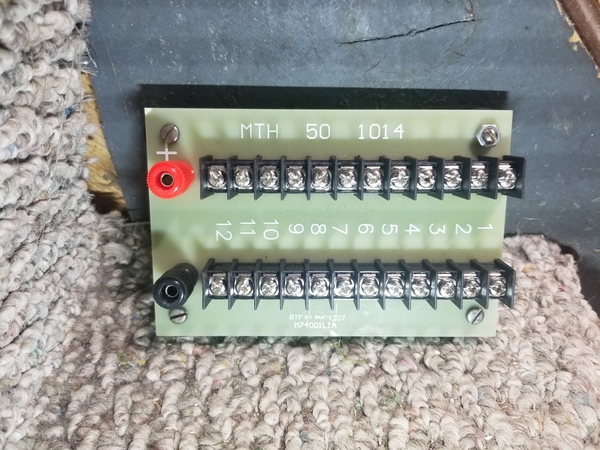
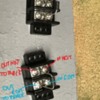
First question, and I have several, is should I continue with my copper strip approach or use an MTH terminal block, shown below:

20211022_102725

Next question is about the feeder wires from the copper strip (or terminal block) to the numerous track lock-ons: should I keep my currently used 16 gauge solid copper feeder wires or replace them with 14 gauge stranded copper feeder wires? Keeping my currently used feeder wires will save much time and some money, and the 16 gauge solid wires fit (barely) into the lock-ons. Lowes near me has no 16 gauge wire and no bare wire. If I change the feeder wires to 14 gauge copper stranded, which Lowes has, will such thick wire fit into the lock-ons?

I know soldering wire to the track is better than lock-ons, and although I can solder, I'm not crazy about doing it.

If I go with the Terminal Blocks, which I have, I will also solder spade locks on the end of each feeder wire that is attached to the terminal block.

I'm 90% sure I know the answers  to the above questions, but before I embark on this project, which is overwhelming for me, I thought it best to get some feedback by asking them on this forum. Arnold

Attachments

Images (2)
  • 20211022_101726
  • 20211022_102725
Last edited by Arnold D. Cribari
Original Post

Replies sorted oldest to newest

IMHO, you should replace the bare copper strips. I realize it is an enormous task and that you have successfully operated your layout this way for a while, but I believe they can lead to shorts and are potentially dangerous.

As far as feeder wires, you can stay with 16 gauge in my opinion and 14 gauge is not necessary.

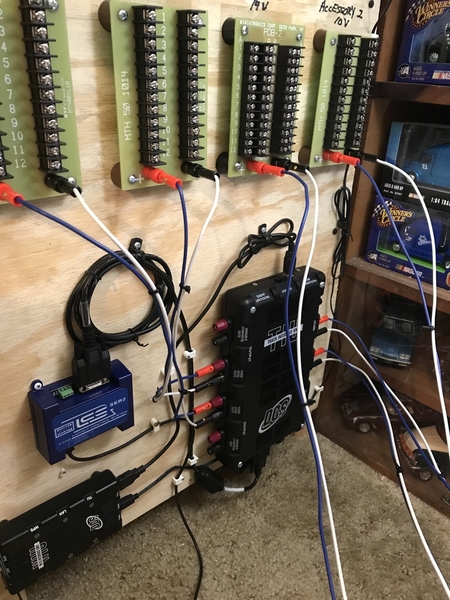
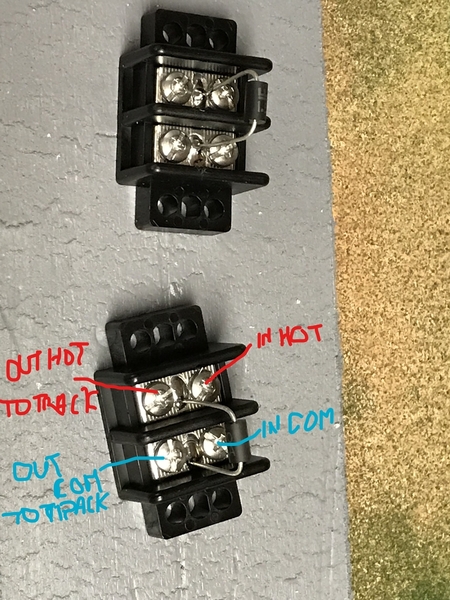
I would go with the MTH terminal blocks. I have a similar setup using a Z-4000 as my track power source for two loops, each powered by one handle of the transformer. As you can see from the attached pic, I mounted four (4), twelve port MTH blocks with one for loop 1, one for loop two, one for 14v accessories from the 14v transformer tap and one for 10v accessories from the 10v transformer tap. 

I also run Legacy with a command base and DCS with a remote and wi-fi. You can see from the pic that the accessory MTH terminal blocks have blue/white wires going into them directly from the transformer accessory taps and the TIU has two inputs from the transformer and two outputs - one set for each of the loop MTH terminal blocks.

Obviously, I have 12 feeders/drops from each terminal block to twelve feeder locations on each loop which is enough for my layout. You can use the 24 port MTH terminal block if you think you need more drops. I also installed a two terminal block under the plywood at each feeder location to connect the wires coming from the MTH terminal blocks and then short 18 gauge feeders from that block to the underside of my Fastrack. They provide a nice location to solder in a TVS suppressor, but they are not necessary.

I also used crimped spade connectors at the ends of each wire going to the MTH terminal blocks.

Just my $0.02.

ELECTRONICS 4InkedTERMINAL BLOCKS_LI

Attachments

Images (2)
  • ELECTRONICS 4
  • InkedTERMINAL BLOCKS_LI
@Richie C. posted:

IMHO, you should replace the bare copper strips. I realize it is an enormous task and that you have successfully operated your layout this way for a while, but I believe they can lead to shorts and are potentially dangerous.

As far as feeder wires, you can stay with 16 gauge in my opinion and 14 gauge is not necessary.

I would go with the MTH terminal blocks. I have a similar setup using a Z-4000 as my track power source for two loops, each powered by one handle of the transformer. As you can see from the attached pic, I mounted four (4), twelve port MTH blocks with one for loop 1, one for loop two, one for 14v accessories from the 14v transformer tap and one for 10v accessories from the 10v transformer tap.

I also run Legacy with a command base and DCS with a remote and wi-fi. You can see from the pic that the accessory MTH terminal blocks have blue/white wires going into them directly from the transformer accessory taps and the TIU has two inputs from the transformer and two outputs - one set for each of the loop MTH terminal blocks.

Obviously, I have 12 feeders/drops from each terminal block to twelve feeder locations on each loop which is enough for my layout. You can use the 24 port MTH terminal block if you think you need more drops. I also installed a two terminal block under the plywood at each feeder location to connect the wires coming from the MTH terminal blocks and then short 18 gauge feeders from that block to the underside of my Fastrack. They provide a nice location to solder in a TVS suppressor, but they are not necessary.

I also used crimped spade connectors at the ends of each wire going to the MTH terminal blocks.

Just my $0.02.

ELECTRONICS 4InkedTERMINAL BLOCKS_LI

Ritchie, this is very helpful, thanks, Arnold

Arnold- I'm no expert on proper DCS wiring (just what I've read on here), but I am an expert on wiring of all types, sizes, etc.

I would defer to the DCS experts but I would recommend following the proper methods for setting up DCS (star, home runs, etc). Pick up Barry's book on DCS wiring.

After that is settled, a think 14 gauge wire for main feeders (because of the length of you runs), and 16 gauge for the drops would be fine. Many guys have used the suitcase style connectors to connect the drops to the main feeders. These eliminate cutting and splicing the mains at each drop.

250) QUICK SPLICE LOCK SUITCASE WIRE CONNECTORS ELECTRICAL WIRE SPLICE TAP USA! | eBay

I'm a big fan of terminal strips. Since you should focus on the DCS wiring methods, then the MTH terminal boards are a good idea.

Switches and accessories will need to be run individually since you need separate control for each. Pick a uniform set of wires for each system so that they are easily identifiable when you have to troubleshoot in the future.

I use Cat 5, and telephone cable for accessories and switches. Cat 5 has 4 pairs of wires that are color coded. Phone cable can have 2-3 pairs depending on what you use.

Label things and keep a log of what you run. Pick a numbering/ lettering system and stick to it. Home Depot/ Lowes sell these (or similar)  numbering sets in the electrical section. A P-touch label maker would work too.

LOT OF 46 CARDS BRADY WIRE MARKERS LETTER J WM-J .25 x 1.5 36 / CARD 662820111092 | eBay

A good assortment of crimp on connectors are advisable as well for connections under screw terminals. Again, HD/ Lowes items.

Ferrule wire copper crimp connectors kit. Insulated cord pin end terminals. Electromechanic linking equipment. Various sizes and colors sorted in box Stock Photo - Alamy

There are many sources for all the items you will need on-line as well.

Remember to build in room for expansion. Just when you think you covered everything, you will discover that you missed things, or decided to add new accessories, etc.

Sounds like you will be busy for a while. Keep us posted and post questions as they come up.

Bob

Attachments

Images (1)
  • blobid0
Last edited by RSJB18

Anything for a fellow member of the bar

A quick question and two observations:

1. Do you use the 14v accessory terminal on the back of the Z-4K to power any of your accessories, in addition to the ZW ?

2. I don't think it's necessary to solder the spade connectors to the wires at the end where they connect to the MTH terminal blocks. I've just used the crimp ones with a pair of large linesman pliers to squeeze them tight and have never had an issue. Just make sure to get the proper (smaller) size connectors - the larger ones don't fit the MTH block.

3. I also have a yard on one of the loops with 8 sidings and switches and use one port of the MTH block to power all 8. 

@Richie C. posted:

Anything for a fellow member of the bar

2. I don't think it's necessary to solder the spade connectors to the wires at the end where they connect to the MTH terminal blocks. I've just used the crimp ones with a pair of large linesman pliers to squeeze them tight and have never had an issue. Just make sure to get the proper (smaller) size connectors - the larger ones don't fit the MTH block.

Crimps are better than solder. Firstly, the soldering causes the stranded wire at the terminal to become stiff and prone to breaking. Also the crimp as opposed to solder, properly done, is superior as to conductivity. Be sure to use a quality crimper tool…the best ones crimp with a measured force and release when that force is reached.

Last edited by cjack
@Richie C. posted:

Anything for a fellow member of the bar

A quick question and two observations:

1. Do you use the 14v accessory terminal on the back of the Z-4K to power any of your accessories, in addition to the ZW ?

2. I don't think it's necessary to solder the spade connectors to the wires at the end where they connect to the MTH terminal blocks. I've just used the crimp ones with a pair of large linesman pliers to squeeze them tight and have never had an issue. Just make sure to get the proper (smaller) size connectors - the larger ones don't fit the MTH block.

3. I also have a yard on one of the loops with 8 sidings and switches and use one port of the MTH block to power all 8.

Ritchie, I don't use the 14 volt accessory terminal on my Z4000. Instead, I use a ZW for my many Postwar signals, crossing gates and other accessories, and set the voltage at the desired amount.

Last edited by Arnold D. Cribari
@cjack posted:

Crimps are better than solder. Firstly, the soldering causes the stranded wire at the terminal to become stiff and prone to breaking. Also the crimp as opposed to solder, properly done, is superior as to conductivity. Be sure to use a quality crimper tool…the best ones crimp with a measured force and release when that force is reached.

Thanks for the advice, cjack, I'll get one st Lowes nearby.

I have this one.  I like it a lot.

https://www.amazon.com/gp/prod...le?ie=UTF8&psc=1

It crimps the ferrule tips into a hex (which is close to round).  They have ones that crimp it into a square.  The tool is great and they give you 1900 ferrules.  They work really well with Euro style terminal blocks or in the case of the other type (like MTH) where the wire goes under the screw head, the ferrule tips fit in there very well if not too thick.

John

Last edited by Craftech

Arnold,

You are getting good advice above to use the terminal blocks, solderless crimp connectors, investing in a good crimp tool, keeping your existing lock-ons and existing feeder wires. You can also use that same crimp tool to connect two wires together (without using the terminal strip) by using a crimp butt connector.

th [1)

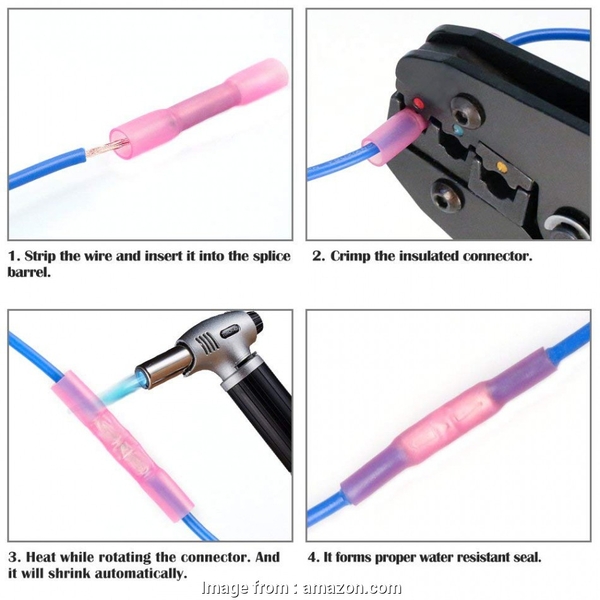
Another solderless trick-of-the-trade used in marine and automotive work, if you need to connect two wires together, is to use a shrinkable butt connector. It is a clear plastic tube with a ring of solder in the center.

th

You insert your stripped wires at each end of the tube, overlap the bare wires within the solder ring, and then use a hair dryer to melt the solder and shrink the tube around the wire. I don't even bother to crimp in most cases! The two wires are effectively soldered together without the need to bring a soldering tool under your train table (and avoiding having solder drops falling on your hands or face!)

how-to-splice-24-gauge-wire-amazon-com-airic-100pcs-waterproof-heat-shrink-butt-splice-connectors-22-16-gauge-marine-automotive-electrical-straight-wire-crimp-connectors-kit-40-8619


Attachments

Images (3)
  • how-to-splice-24-gauge-wire-amazon-com-airic-100pcs-waterproof-heat-shrink-butt-splice-connectors-22-16-gauge-marine-automotive-electrical-straight-wire-crimp-connectors-kit-40-8619
  • th
  • th (1)

Great advice, Bruce.

Thanks to all you guys, I now have the information and knowledge I need to re-wire my layout. I have also bought the supplies I need for this project, including a good crimping tool that I just bought from Lowes. I also have fork/spade lugs, the terminal blocks and screws to mount the terminal blocks and TIU on a plywood board.

I will definitely replace the copper strips with the terminal blocks, and will color code the wiring, after which I will decide whether to keep my current feeder wires or replace them.

Concerning timing, part of me wants to get started immediately, and part of me wants to wait until I get a couple of locomotives back that are being repaired. Also, I know that once I disconnect the wires from the copper strips, my layout will down for a while, but I'm not sure how long.

I will give updates periodically.

Arnold a few thoughts. Are you planning on keeping the operation of the layout the same? As far as existing blocks, switch locations, operating tracks, etc? If so, I would start with attempting to draw an as built wiring configuration drawing as you trace out and disconnect the wiring. Next I would redraw it in a more organized fashion based upon how you are using the terminal strips and power supplies. In doing so, you can develop your wiring color code, labeling system and organize your wire routing. Good luck and don’t procrastinate the sooner you begin the sooner the trains will be running again!

Last edited by Rich Wiemann

Arnold, I greatly respect you for even considering rewiring your layout. It is a lot of work that for the most part is not visible. Done right it makes the layout reliable and facilitates repairs, upgrades and additions. The track power is actually fairly simple to install and keep organized. in my experience it is all the accessory power and control wires that seem to end up a tangled mess.

Not mentioned is the possibility of tagging the wires during installation. Color codes help, but do not identify what the wire is powering or controlling. Having tags on the accessory wires has saved me a lot of time and headaches over the years. I eliminated a lot of wiring by using the LCS exclusively for accessory control but even with LCS there are a lot of wires under the layout. In addition to the tags I have lists of all the power feeds with devices and color codes for reference. It is like the old joke about no job being done until the paperwork is completed.

My layout has a separate power cart that parks under the layout since it is not needed during operation. It is on a 12’ coiled tether to allow moving it anywhere in the room without disconnecting anything. I have a smaller layout room than yours. My wife is the official label maker in our family so I just give her a list of all the labels or tags I need.

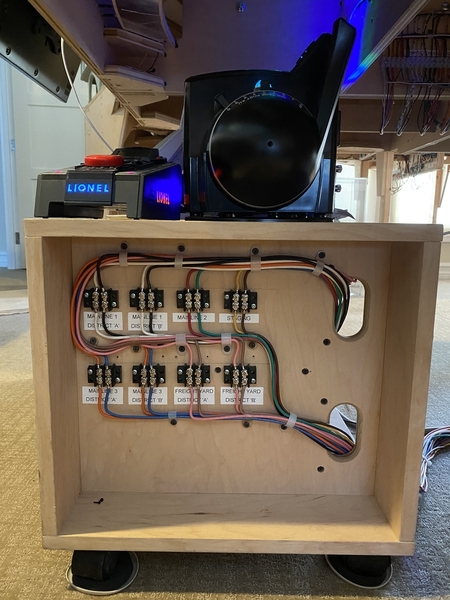
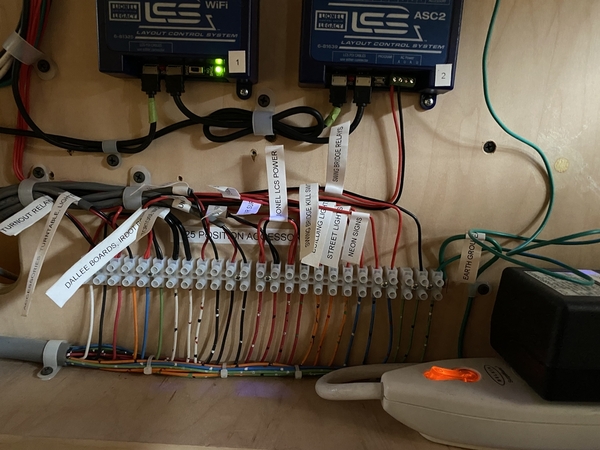
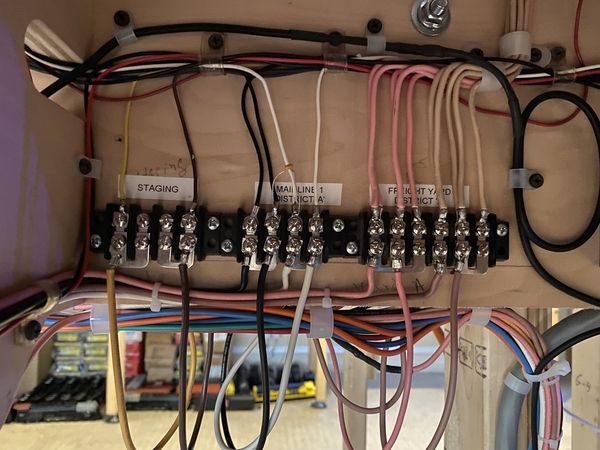
Here are a couple of pictures that show the labels. By the way, I hate those euro terminal blocks and would never use them again. I would use all barrier strips.

The first picture is the power wiring for the eight power districts leaving the cart. The second picture is the accessory power at the cart.


0F5AA439-A09A-422E-AE2C-E7148A8F69CA279E2624-1663-454D-9317-D10443EAA553A35F8A3C-8601-4E2C-89BD-2778A5A4F6E8

Attachments

Images (3)
  • 0F5AA439-A09A-422E-AE2C-E7148A8F69CA
  • 279E2624-1663-454D-9317-D10443EAA553
  • A35F8A3C-8601-4E2C-89BD-2778A5A4F6E8

Arnold a few thoughts. Are you planning on keeping the operation of the layout the same? As far as existing blocks, switch locations, operating tracks, etc? If so, I would start with attempting to draw an as built wiring configuration drawing as you trace out and disconnect the wiring. Next I would redraw it in a more organized fashion based upon how you are using the terminal strips and power supplies. In doing so, you can develop your wiring color code, labeling system and organize your wire routing. Good luck and don’t procrastinate the sooner you begin the sooner the trains will be running again!

Well thought out and well stated, Rich.

I plan to keep the same track configuration and have the operation of the layout the same, but may expand it by adding 2 more sidings on the far left side of the layout. Those sidings will have a 2 stall engine house and a large custom built Lionel Factory I got 2 months ago from a LHS.

The expansion, if it happens, will happen after the layout is re-wired in a way the provides for the potential for that possible expansion.

Drawing the wiring configurations and labeling the wires are great ideas.

Last edited by Arnold D. Cribari

I understand that 14 gauge stranded wire is better and provides more power than 16 gauge solid wire, especially for long wires further away from the transformer.  This would certainly be applicable to the hot wires that go to the center rail.

But what about the cold or common wires that go to the outside rail? Does it make any difference to change those wires from 16 gauge solid to 14 gauge stranded?

Arnold

Add Reply

Post

OGR Publishing, Inc., 1310 Eastside Centre Ct, Suite 6, Mountain Home, AR 72653
800-980-OGRR (6477)
www.ogaugerr.com

×
×
×
×
Link copied to your clipboard.
×
×