Bruce
Thanks for taking us along for the ride. Happy Valley is going to be a prosperous railroad indeed.


|
|
Bruce
Thanks for taking us along for the ride. Happy Valley is going to be a prosperous railroad indeed.
WOW!
That is really fine work, Bruce!
Peter
Thanks, Mark, and Peter, and Jon! Sometimes I think I'm falling way behind, so I have to remind myself how far the project has come since April of last year, when the slab was poured for the addition that became the new train room. From this point forward, with lots of scenery and structures and lighting to complete, the project will still take years.
Bruce, very enjoyable video, thanks for posting
That's a great logo and I'm a little jealous of your trees/rocks! Would you happen to have the link to the tutorials you used? Or did you kind of pick from a few tutorials?
@BillYo414 posted:That's a great logo and I'm a little jealous of your trees/rocks! Would you happen to have the link to the tutorials you used? Or did you kind of pick from a few tutorials?
Thanks for the compliment! The rocks/foliage were pretty much experimental. I don't recall any specific links for the backdrop tutorials. I watched a bunch of YouTube vids under the general heading of "how to paint backdrops." Most of them were related to model railroading, not surprisingly. One thing I just thought of: I purchased a cheap artist's "start up" kit of acrylic paints from Amazon (tons of choices) there. They came in a box with something like 16 fairly large tubes of all different colors. My advice is to get a foam knife, some foam insulation sheet, and the finishing products from Scenic Express and experiment!
@BruceG posted:Thanks for the compliment! The rocks/foliage were pretty much experimental. I don't recall any specific links for the backdrop tutorials. I watched a bunch of YouTube vids under the general heading of "how to paint backdrops."
This is pretty much what I figured I would wind up doing. Good to know I'm on the right path!
Bruce,
Thanks for pointing me to this thread! I had not seen it before. Excellent work! Great minds must think alike, b/c some of your ideas I've already used. Like the Menards bridges. I literally just finished my kitbash. I plan to submit an article to Alan on how I did it. I ran into many of the same issues you did, and for the same reasons. But mine is a bit longer: It took 3 Menards bridges. I'm not posting pictures for 2 reasons: 1) this is your thread, and 2) I'm using some for the article.
Chris
LVHR
@BruceG posted:Thanks for the compliment! The rocks/foliage were pretty much experimental. I don't recall any specific links for the backdrop tutorials. I watched a bunch of YouTube vids under the general heading of "how to paint backdrops." Most of them were related to model railroading, not surprisingly. One thing I just thought of: I purchased a cheap artist's "start up" kit of acrylic paints from Amazon (tons of choices) there. They came in a box with something like 16 fairly large tubes of all different colors. My advice is to get a foam knife, some foam insulation sheet, and the finishing products from Scenic Express and experiment!
I’m glad this thread popped up today. I just joined a couple of days ago. I built a 6x8 table in our basement for our son last November. He’s made a model railroader out of me!
If you want to feel better about the progress of your layout, I posted yesterday about mine. It’s just tracks and a roll of grass with some randomly placed trees and buildings right now. I came here for some inspiration and I am glad I did.
Your layout is ingenious. I read through the whole thread and it was really enjoyable to follow your progress. Thank you for sharing and good luck!
@lehighline posted:Bruce,
Thanks for pointing me to this thread! I had not seen it before. Excellent work! Great minds must think alike, b/c some of your ideas I've already used. Like the Menards bridges. I literally just finished my kitbash. I plan to submit an article to Alan on how I did it. I ran into many of the same issues you did, and for the same reasons. But mine is a bit longer: It took 3 Menards bridges. I'm not posting pictures for 2 reasons: 1) this is your thread, and 2) I'm using some for the article.
Chris
LVHR
Thank you, Chris! I'd definitely like to see some photos of your 3-bridge arrangement. This thread already has all sorts of pics from other viewers, including some that got off topic (but were still fun--namely the gearhead stuff). The main point is that we're sharing ideas.
@NeophyteMRR posted:I’m glad this thread popped up today. I just joined a couple of days ago. I built a 6x8 table in our basement for our son last November. He’s made a model railroader out of me!
If you want to feel better about the progress of your layout, I posted yesterday about mine. It’s just tracks and a roll of grass with some randomly placed trees and buildings right now. I came here for some inspiration and I am glad I did.Your layout is ingenious. I read through the whole thread and it was really enjoyable to follow your progress. Thank you for sharing and good luck!
Thank you! I can completely relate to where you are, just starting out. Can't tell you how many years I drooled over other peoples' layouts and gathered ideas and inspiration for the day that I could start my own miniature empire. It finally got underway 11 months ago; here's a photo from mid-December 2019.


Bruce,
I'm impressed that you painted that background yourself. Way to go! I've thought about doing the same thing, and have actually practiced on a 4'x4' piece of cardboard. But I'm not at the point where my work passes the 3' test. I'm interested in more detail about how you actually did it. Paints, colors, brushes, etc. Also please post a closeup of the double ridge section below. Remember: Copying someone else is the sincerest form of flattery!
Chris
LVHR
Bruce,
You’ve made some excellent progress in a fairly short time. It’s all relative I guess. My progress comes in spurts, so I know how you feel. You have a nice space and are using it well. Great work so far, and I can’t wait to see more. Nice work, keep it up.
Andy
Howdy, everyone. After a long hiatus I'm finally getting back to work on the HVRR. For about the past year and a half I ran trains occasionally but didn't accomplish much in the way of scenery projects, mostly because other hobbies and commitments kept getting in the way. It's great to be back, so to speak.
I posted earlier about the mountain that occupies one end of my 10 x 28 layout, with its lift-out sections for access to the track. To me it always looked a bit too much like a curved tube--a huge worm--so I relocated trackage to a single spur and added some volume to the side of the mountain.

Construction consists of insulation foam board and Shaper Sheet (Woodland Scenics). It's really quite cost-effective and covers a lot of area (a big 18" x 72" roll is currently about $25) and working with it couldn't be simpler. I use generic hydrostone rather than the expensive Woodland Scenics plaster, mixed to the consistency of paint. It can literally be that thin because the bonded fabric and aluminum give the material its strength after the plaster dries. I add a drop of tube acrylic black paint and some white glue to the mix and apply it with disposable brushes.
This is NOT the finished result, just the first layer, but it shows what can be done with little fuss or mess.
I painted a Lionel operating icing station and am scratch-building a narrow ice house to go with it. The latter is made of 3/16 foam board that will be covered with Evergreen siding and roofing.
At the same time, I'm integrating the scenery over and around my workbench. The fascia is vinyl plank flooring, which is easy to bend and cut.
Hopefully I'll be more consistent with updates as the Happy Valley Railroad gets back on track.


@BruceG Hello, it's great to have you back and to see your new progress!!! ![]()
Bruce, I’m glad to see you back working on your layout! The new mountain is looking much better than the old one already! Nice fascia idea! I need to do something for mine, as of yet nothing!
Welcome back Bruce.
Good idea- put a train in front of the scenery you are trying to mask. ![]()
Bob
I like the looks of the WS shaper sheet. I might need to get some for my current trestle bridge build.
@Mark Boyce posted:Bruce, I’m glad to see you back working on your layout! The new mountain is looking much better than the old one already! Nice fascia idea! I need to do something for mine, as of yet nothing!
Thanks, Mark. The fascia idea came from the fact that I have a few boxes of 8" x 48" vinyl plank left over--it's the same indestructible (almost) stuff that's on the floor of the train room. It's quite sturdy, especially when backed with polystyrene foam followed by scenery material. It will eventually wrap around the layout and should make for a pretty slick look when finished. The green painters tape looks hideous, but you can get an idea of the look from this view:

@RJ Shier posted:I like the looks of the WS shaper sheet. I might need to get some for my current trestle bridge build.
It really is simple to work with. Cuts with household scissors and can be stuck to stuff with staples, hot glue, or gorilla glue. Leftover cuttings can be used to fill in small areas, so there's very little waste. Once the cloth layer is coated with a thin layer of plaster (I spritz it first with water and a drop of dish soap in a spray bottle), the scenery shell dries rock hard and sturdy.
Hey Bruce,
Very cool to see a fellow historian be a "model train guy" as well. I have a smaller, permanent layout that will be greatly expanded in a few years - Milwaukee Road, Hirail. But, I need to finish my next book first!
Cheers,
Ron W.
Bruce,
I really like how you incorporated your work area into the layout. It's very classy and clever. It's a great way to watch trains while working if you wish. My work area is near trackside but I found it pretty distracting to have a train running while working on anything. Maybe I'll try it without sound, lol. Thanks for sharing your progress.
Dave
Hey Bruce,
I ordered a roll of the WS shaper sheet over the weekend. On Saturday I prepped the area where it will go.
How easy is it to add trees when using the shaper sheet?
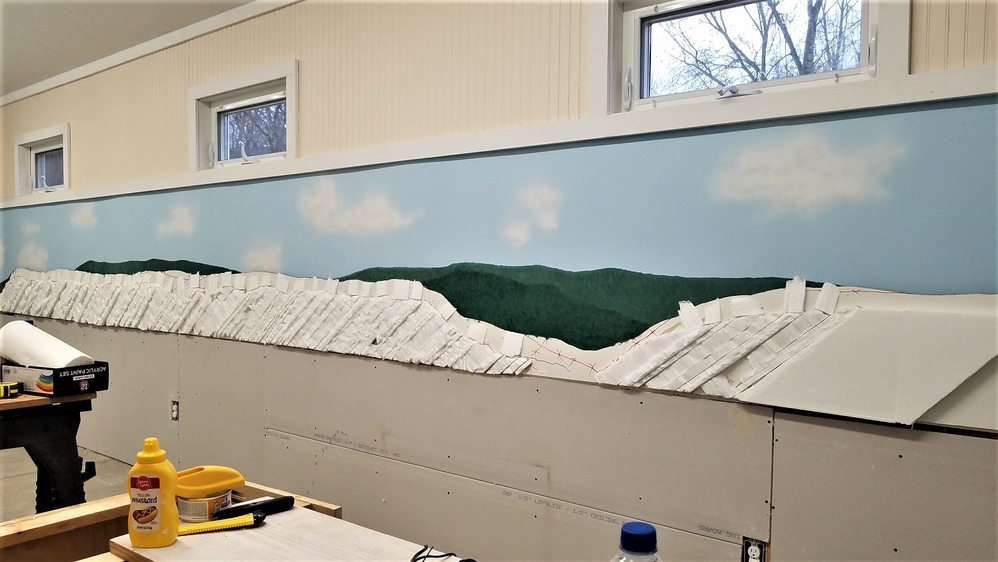
UPDATE MARCH 24, 2022. I'm getting back into the groove of steady work on the HVRR. Spent the past couple of days on scenery aspects of the 084 and 096 curves at both ends of the layout. One end is dominated by a large mountain and portals, while the other will have a combination of structures and industrial flats. I painted more mountain scenery on the backdrop (see the before and after photos) using household latex paint and some drybrush techniques. Probably 90 percent of the new mountains will eventually be hidden by structures, but oh well.
The Lionel "Davis House" kit was a fun build, a gift from my older brother. Davis is a family name, so it has some personal meaning. I added floors with foam board, printed some venetian blinds on my computer, did a bit of light weathering, and wired it with two LEDs.
The Lionel icing station was painted with tube acrylics and weathered, with a velcro-mounted foam board covering the mechanism. Obviously it's not a prototypical structure but the kid in me loves watching the little worker (he'll be painted soon) shove plastic blocks of ice into the reefer--and the grandkids will love it even more. A scratchbuilt ice house will go alongside.
The final photo shows how easily the work area can get cluttered. That's one advantage of working from the back of the layout towards the front--the "foreground" serves as a workbench at this stage.


Bruce, Nice work on the house and mountains. IT looks to me like enough of the mountains will show up behind buildings to warrant you spending time finishing them well. You will see different portions of the mountain sides behind the buildings as you move from side to side. One Forum member says he likes to finish all sides of a building even though no one else will ever see the back. He will always know it is done.
@Mark Boyce posted:Bruce, Nice work on the house and mountains. IT looks to me like enough of the mountains will show up behind buildings to warrant you spending time finishing them well. You will see different portions of the mountain sides behind the buildings as you move from side to side. One Forum member says he likes to finish all sides of a building even though no one else will ever see the back. He will always know it is done.
Thanks, Mark. I haven't figured out yet where the various structures and flats will be placed permanently, so that was another reason for doing a fairly complete job on the painted mountains. There will definitely be a few glimpses of them between buildings. I might add a few HO or even N scale backdrop buildings, printed on cardstock, for a bit of forced perspective. We'll see!
Bruce, I have one HO and several N scale buildings left over from my smaller scale days. Here is an HO house that I did not build. The N scale buildings are buried in a box in a cupboard in the garage that my wife has blocked with a mountain of stuff. When I get a fork lift in to clear a path, I'll see what I had packed away. LOL
At last, a breakthrough! Progress on the HVRR had stagnated for a long time, in part due to the pandemic but also because I had reached a plateau thanks to my limited reach from a wheelchair. I knew from the very start that I’d need help with scenery in the corners and wiring under the benchwork. The solution was to hire Dave Bennet of Train Installations to accomplish several important tasks.
Dave, who crisscrosses much of the East and Midwest installing layouts for private as well as commercial clients, lives less than two hours from me in Georgia. On April 19 he arrived in his tricked-out van and spent two full days working on the layout. He installed a 24-inch Millhouse River Studio turntable, did some wiring, and worked on some scenery to really get me over the hump. He accomplished a lot in those two days, and I'm glad I decided to hire a professional.
To recap for those who aren’t familiar with the HVRR, it's an around-the-walls layout measuring approximately 10 feet by 28 feet, built on cantilever benchwork. I chose Fastrack, which has its pros and cons, but I’m quite satisfied with its performance, and my Legacy locomotives work fine on it. I especially like the fact that the turnouts are kid-friendly and forgiving (I have three grandsons). The overall concept is sort of a hybrid between elements of realism and the fun of animated accessories, which are especially appealing for kids and kids-at-heart. There are five Lionel operating accessories--icing station, sawmill, coal tower, water tower, and rotating beacon—plus the MRS turntable and a couple of operating track sections for dumping coal loads and logs. Due to the narrow limits of the shelf-type layout, I decided to set the coal tower at 90 degrees to the intended placement. The chute can unload coal into a dump truck rather than a hopper or gondola. Additionally, I’m altering the toylike appearance of the Lionel structures to make them look a little more prototypical.
The layout got underway at the beginning of 2020, just before COVID hit. A lot of progress has been made since then. Trains are running smoothly, but there’s a long way to go regarding scenery and structures to bring the HVRR to completion—though it’s never really “finished,” is it?


I really like the layout and what you did with the back drop.....and great 67. Partial to mustangs myself...

@RJ Shier posted:Hey Bruce,
I ordered a roll of the WS shaper sheet over the weekend. On Saturday I prepped the area where it will go.
How easy is it to add trees when using the shaper sheet?
Not to hijack the thread but, because the sheet tends to dry hard, you will have to puncture the surface. I used a drill with a sharp bit slightly undersized to the diameter of the tree trunk I was inserting and used rapid set CA glue to hold it in place on this mountain I made on a table and then set into an unused corner.


Bruce, that is a really unique customized van Dave has. ![]() I'm glad he was able to help you get the turntable, do wiring, and get those hard to reach corners sceniced nicely! The layout is really looking great for only starting the beginning of the pandemic! I'll look forward to seeing your continued progress now that Dave got those things done.
I'm glad he was able to help you get the turntable, do wiring, and get those hard to reach corners sceniced nicely! The layout is really looking great for only starting the beginning of the pandemic! I'll look forward to seeing your continued progress now that Dave got those things done.
Congrats, @BruceG on the burst build! Also, inquiring minds want to know - did Dave let you ring the bell on his van?!!
@Hannibal-St Joseph RR posted:Congrats, @BruceG on the burst build! Also, inquiring minds want to know - did Dave let you ring the bell on his van?!!
Ha-ha, no, I didn't ring the bell, but Dave played a very cool MP3 file of a steam loco sequence through a loudspeaker mounted on the roof of his van. The whistle blasts are LOUD!
@Arcadebrothers posted:I really like the layout and what you did with the back drop.....and great 67. Partial to mustangs myself...
Awesome Shelby!
@Richie C. posted:Not to hijack the thread but, because the sheet tends to dry hard, you will have to puncture the surface. I used a drill with a sharp bit slightly undersized to the diameter of the tree trunk I was inserting and used rapid set CA glue to hold it in place on this mountain I made on a table and then set into an unused corner.
Glad you answered the question, Richie, since I haven't added any trees or other details to the shaper sheet yet. It certainly is amazingly hard material but drilling holes for trees should be easy. Even a dab of hot glue (the slow-dry version) should work well when gluing trees. Yours is practically vertical!
@Mark Boyce posted:Bruce, that is a really unique customized van Dave has.
I'm glad he was able to help you get the turntable, do wiring, and get those hard to reach corners sceniced nicely! The layout is really looking great for only starting the beginning of the pandemic! I'll look forward to seeing your continued progress now that Dave got those things done.
Thanks, Mark! The work that Dave accomplished has given me plenty of motivation (and inertia) to keep the progress moving forward.
@BruceG posted:Glad you answered the question, Richie, since I haven't added any trees or other details to the shaper sheet yet. It certainly is amazingly hard material but drilling holes for trees should be easy. Even a dab of hot glue (the slow-dry version) should work well when gluing trees. Yours is practically vertical!
You're right, Brue - it is pretty vertical ! I needed something big to stick in that unused corner before laying track that I wouldn't have to fiddle with later on because I'd never be able to get in there after the track was laid and a "shaper sheet" mountain seemed to fit the bill. It actually looks better in person than the photo's show.
I agree, hot-glue would also work well to hold the trees in position.

Access to this requires an OGR Forum Supporting Membership
