Norm,
It so happens that a couple of days ago one of our friends from the forum emailed me regarding the Turntable-Hatch project, and whether I had any additional recommendations now that I have had the TT-Hatch for a while.
Please refer to this post for pictures:
https://ogrforum.ogaugerr.com/t...rs-34-inch-turntable
My Reply:
-------------------------------------------------------------------------
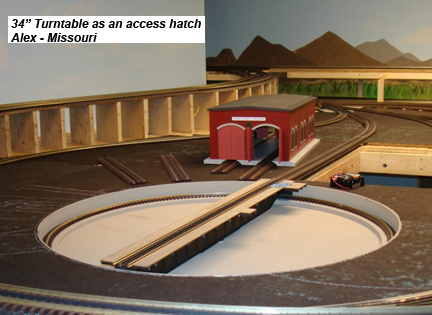
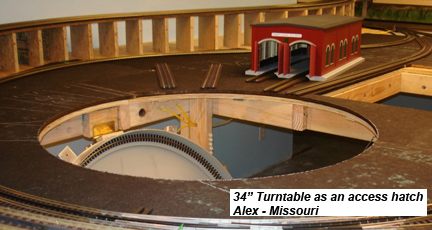
• The smaller hatch next to the turntable is a must unless the turntable is close enough to an accessible edge of the layout to allow removal of the TT bridge. Even though the bridge may stay in place when the TT is lowered (I did not find out), I was concerned that if I left it in place I would surely bump into it when I used the opening as a hatch, so I always remove the bridge before I lower the turntable.
• The holes to put the six screws and the two nails to put the wing nuts also are a must.
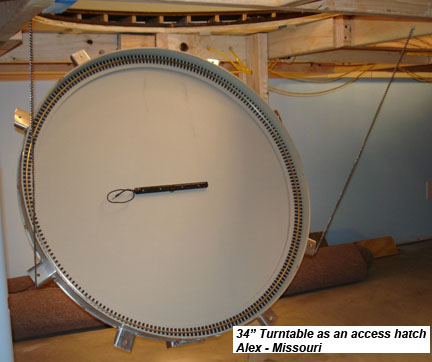
• For lowering and raising the hatch, I recommend you cut a piece of wood (could be a 2x4, 1x4, 2x2, 1x2) to fit as a post between the aluminum TT main brace and the floor, but cut it about an 1/8” longer. To lower the hatch, wedge the post between the floor and the TT so the TT will be securely supported while you remove first the six screws, and then the two wing nuts. When all of these are out, hold the TT with your hand, and remove the post. To raise replace the TT, raise it and hold it in place with the post, and now you have both hands free to install the wing nuts and then the screws.
Also, before I remove the bridge to lower the TT, I set two pieces of Styrofoam strategically placed so I can just set the bridge on them after I remove it. Any support will do, but be sure to plan where you will put the bridge while the TT is used as a hatch.
• I plan to someday add an automatic controller, but for the time being I still rotate and align the TT with switches, manually. I use a two-speed power supply and select the high of low speeds. Power comes from a 6-VDC, 500ma wall wart. High speed is the 6-v, and for low speed I added five diodes in series to lower the voltage. I also used an 8-position rotary switch to power only one of the whisker tracks at a time. I have seven whisker tracks, and the eighth switch position is off – no track.
Thus, my small control panel has a four control switches.
(1) A three position TT-power toggle switch – center off, down is low speed, and up is high speed.
(2) A two position, momentary position switch – right is CW and left is CCW.
(3) A two position track-power toggle switch – down is track power off, up is on.
(4) And the 8-position rotary switch to power the tracks.
Before I move selector switch (4), I turn the power to the tracks off with switch (3) so the tracks will not be powered even momentarily when I turn (4).
I can’t think of anything that I would have done differently; it has worked fine for me and I have indeed used it quite a few times as a hatch.
Track alignment has been no problem, but I added very thin shims under two of the whisker tracks after they were in use for about two months or so as they evidently settled down a bit. If anything, set the turntable a tad higher initially as it is easier to raise the tracks to match than to lower them.
But now that you raise the topic of track alignment, I would have done something differently, and still may change it. I installed the small control panel for the TT under the edge of the layout such that I could easily see the TT align with the whisker tracks, and this works OK. However, I have difficulty seeing the alignment with the feeder track. What I could have done was to make the small control panel as a pendant so I could move it and stand where I had the best view to manually align the TT with the whisker tracks AND the feeder track. Just a small detail. . .
I hope the above is of some help
---------------------------------------
Alex