Spent last week in Altoona, PA & the surrounding areas getting some sweet shots.
Here's a small sample -


|
|
Spent last week in Altoona, PA & the surrounding areas getting some sweet shots.
Here's a small sample -

A few shots of trains near my place in Australia.


The Sunday before York, I managed to get this shot down near Sand Patch:

It is pretty high on my all-time favorite pictures that I have taken over the years.
Andy
The Sunday before York, I managed to get this shot down near Sand Patch:
It is pretty high on my all-time favorite pictures that I have taken over the years.
Andy
High on my list too, Andy, Great shot.
....New Lionel Big Boy


I can't wait for this to arrive!
Having saw it in person, how did it sound? The youtube clip is incredible!
One weathered car more.


As soon as the bridge building crew took a break and moved their equipment out of the way, the traffic started flowing again on the mainline. There is a slow order in the construction zone and these trains slowly passed each other on the span.
Art

Again, great progress, Art.
As soon as the bridge building crew took a break and moved their equipment out of the way, the traffic started flowing again on the mainline. There is a slow order in the construction zone and these trains slowly passed each other on the span.
Art
I have a real weakness for concrete and stone arch bridges. I like where this one is going. How are you planning to finish the surface? By the way, I was in Home Despot last weekend and they have started stocking some tile squares that are basically a net with smaller stones glued in place. The stones are almost small enough to be used as a surface for an O scale model railroad bridge. It seems a shame to waste such good material on something like a kitchen back-spash. ![]()
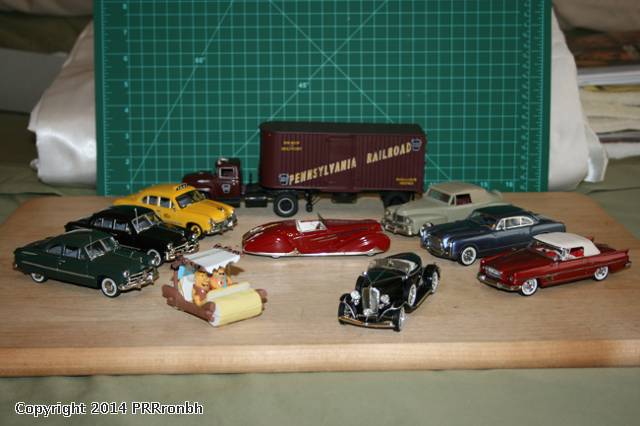
My years of O Scale motor vehicle acquisitions. Of particular interest to railroad fans is the red job in the middle. A 1939 Delahaye Type 165 Cabriolet-the 1939 NY World's Fair' car. The same 1939 World's Fair where the Pennsy S1 was actually running on a dynamic stand. Albeit the S1 wore the moniker of American Railroad instead of Pennsylvania RR if I recall correctly.
Ron
Ron,
Great collection!!
Did the Pennsy have a Flintmobile also? It is always said, they had one of everything!
Seriously, I love the Flintmobile. Where did you get it? You will probably tell me in a Burger King Kids Meal or something like that. ![]()
Art:
This is a major breakthrough for your fabulous layout. The mains are now back in business, although now at slow speed. Nothing like a future run session to put the ole pressure on.
This is a very impressive start. ![]() I can see a TM Video Production in the near future.
I can see a TM Video Production in the near future.
New for October: The O Scale Freight Car Guide to Steel Side, Bunkerless and Mechanical Refrigerator Cars!


Nice Pics, Scot. Your just a mere shadow of yourself in this one...

My years of O Scale motor vehicle acquisitions. Of particular interest to railroad fans is the red job in the middle. A 1939 Delahaye Type 165 Cabriolet-the 1939 NY World's Fair' car. The same 1939 World's Fair where the Pennsy S1 was actually running on a dynamic stand. Albeit the S1 wore the moniker of American Railroad instead of Pennsylvania RR if I recall correctly.
Ron
Ron,
Great collection!!
Did the Pennsy have a Flintmobile also? It is always said, they had one of everything!
Seriously, I love the Flintmobile. Where did you get it? You will probably tell me in a Burger King Kids Meal or something like that. ![]()
Mark, if I recall off of eBay. But have seen it in Diecast Direct catalog also.
Ron
As soon as the bridge building crew took a break and moved their equipment out of the way, the traffic started flowing again on the mainline. There is a slow order in the construction zone and these trains slowly passed each other on the span.
Art
Great focal point. ![]() That is going to be a real crowd pleaser.
That is going to be a real crowd pleaser. ![]()
My years of O Scale motor vehicle acquisitions. Of particular interest to railroad fans is the red job in the middle. A 1939 Delahaye Type 165 Cabriolet-the 1939 NY World's Fair' car. The same 1939 World's Fair where the Pennsy S1 was actually running on a dynamic stand. Albeit the S1 wore the moniker of American Railroad instead of Pennsylvania RR if I recall correctly.
Ron
Ron,
Great collection!!
Did the Pennsy have a Flintmobile also? It is always said, they had one of everything!
Seriously, I love the Flintmobile. Where did you get it? You will probably tell me in a Burger King Kids Meal or something like that. ![]()
Mark, if I recall off of eBay. But have seen it in Diecast Direct catalog also.
Ron
Diecast Direct! Thanks!
My favorite tank car. Gee, I wonder why? LOL


As soon as the bridge building crew took a break and moved their equipment out of the way, the traffic started flowing again on the mainline. There is a slow order in the construction zone and these trains slowly passed each other on the span.
Art
That looks great Art. Symmetrical arches on curves are difficult. You nailed them good job.
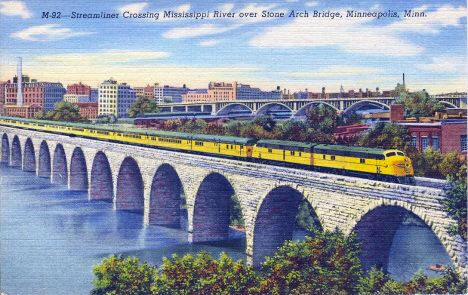
Jon - I have wanted to make a trip to Minneapolis to see and take pictures of the real bridge but haven't made it yet. I wish I could have seen it when it was still an active RR bridge.
Matt - I had planned to use real stone from Home Depot but didn't like the looks of it at the last minute. It would have been very cool to have had real stone on it. But I am now planning to use 1/4" thick flexible foam that is used for insulation under metal siding.
Brian - Thanks for your kind comments and usual excellent support. As you know this bridge is in a focal point in my train room and I really want it to standout. I am pleased with my current progress and hope the major issues are behind me.
Mathhew - Thanks. Getting arches to look right on a curved bridge was a bigger challenge than I expected. I decided that I would keep the arches uniform in size and vary the width of the legs, with the inside legs being 1 inch wide and the outside legs 5 inches wide.
Art


Art...as you know, I love bridges ( got a great one at York this time )....and your bridge is going to be beautiful. I love the arches...one of the most graceful yet strong architectural elements. You are doing a great job!!
Alan
The Second World War has ended and the Santa Fe is converting some of their freight FT's for passenger service to help with heavy post war passenger traffic.

Those new 3rd Rail FT's sure do look nice ![]()
What a great photo to start my train related morning. Love the Sante Fe and your new Ft's.
Thanks Laidoff and PTC. 3rd Rail did a very nice job on these engine.
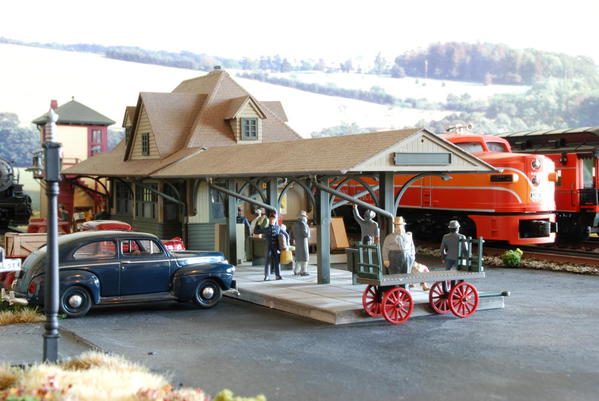
Can you believe it! Both Daylights are at the station!
Boin106,
Superb modeling. The station and details, the Daylights, the track! Exquisite! ![]()
Farmer Bill,
Great pictures. As a Pennsylvanian, I had to look to see where Glen Rock is. Out East I figured. York County I see, no wonder I didn't know it, I've never been to York. Shame on me!!
boin106; from all the photos I've see of your layout it certainly is a work of art. Can you give us some dimensions of it, Length, width, # of levels, etc.
We lined up two fabulous engines for the TM video production this week.

Oh NO Brian, where is the Texas Special??????????? Just kidding. Great looking shot, can't wait until I can get my hands on the new video of your layout.
Steve, Lady and Tex
Well, I can let this go by unless I posted a Texas Special photo this morning. Enjoy.

Steve, Lady and Tex

I found out that there was another photographer snapping pictures as these two trains met. I think he must have been either a passenger or a crew member of the California Zephyr. The UP coal train may have had someone taking pictures too? He also caught the Milwaukee Road local on the upper branch line.
Art

Walt
The wiring you set up each year is amazing. No wonder you capitalized LOTS of Planning!! Any tips as to how you keep track of what goes to where?
I always enjoy your contributions here.
Sam
It's not all that hard.
For track power, I have a hand-drawn diagram with markings where I want power connections. From the centrally located distribution point I just run 2 wires to each spot where I think the lockon will be and am really just guessing at exact location. But i get it pretty close. Using masking tape, I mark the lockon so I know what's what.
For the AIU, I have all ports' usages written down ahead of time so I know what each SW and ACC port will control. Using the hand-drawn diagram, which also has where I want houses, lights, etc, I run wires from each AIU to the location for that SW or ACC port. I then use masking tape and mark the very end of the 2 wires where the ACC will be so I know what those 2 wires are for. As for the switch wires, I get out the needed switches and hook them up to the wires as I go, again guessing where each switch will be.
Here's 2 samples from a prior year:


Access to this requires an OGR Forum Supporting Membership