


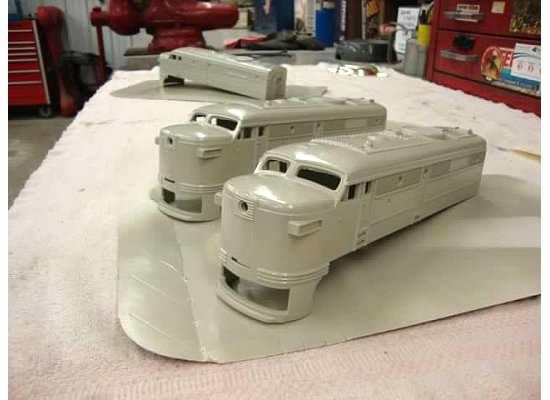
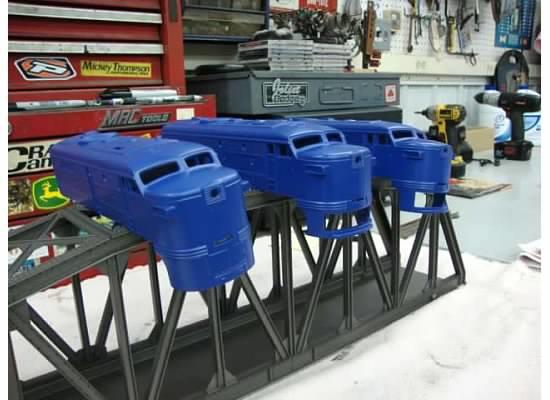
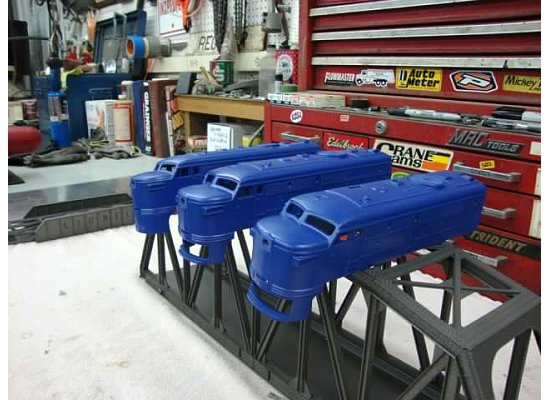
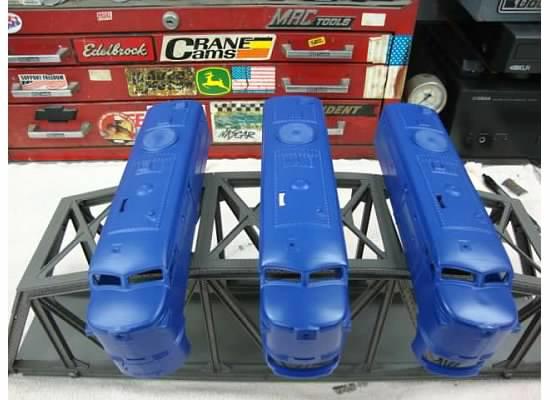
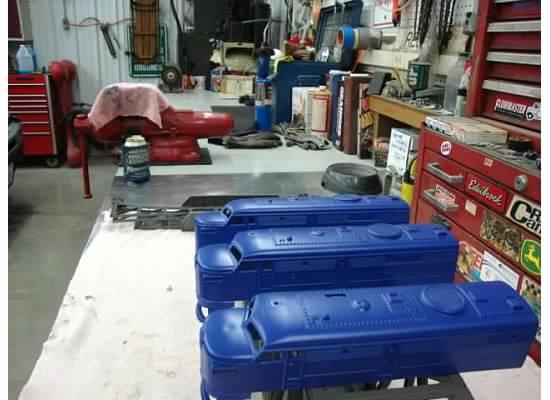
Not much on the layout but did get the Lionel ALCO 200 series A-A set wired and running. A nice puller but need to decide on a paint job for them???? Any Ideas? Want them to pull RMT NS passenger cars that have the same paint of older NW cars.
Been reading quite few posts here but lots to do on the layout.
P51: I think I have had some moments like yours about getting my layout fairly complete. Even though I see scenic things that are never going to be as polished on my layout as the true artistic folks have done, I am so fortunate to have what I have.
Today I made more progress to copy a simple card type schedule system to operate. It is challenging to modify it for my layout. I also completed my order for an ERR command upgrade that I plan to install in a steam switcher.
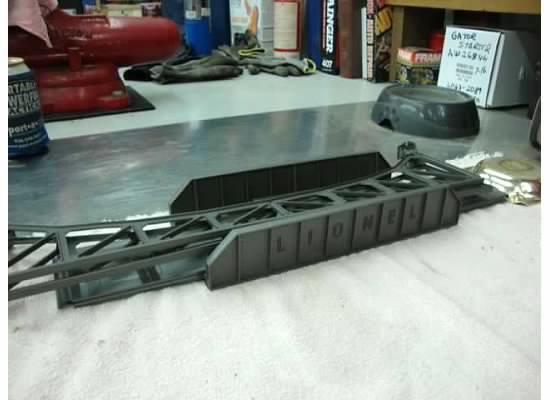
Was still working on the last of the house projects but I managed to fire off a question on the forum and got some good replies. So I took the time to get in an order to Gar Graves for some pre formed 0-32 curves along with some track pins and I found they still make transition pins to go from Gar Graves to 0 gauge tubular which I wanted to use on the fast track on the die cast bridge. I guess all and all it was a good day. Looking forward to the Medina Ohio show on Sunday and hope to find something good there along with waiting for the track so I can start working on the power plant area..............Paul
paul 2 posted:Was still working on the last of the house projects but I managed to fire off a question on the forum and got some good replies. So I took the time to get in an order to Gar Graves for some pre formed 0-32 curves along with some track pins and I found they still make transition pins to go from Gar Graves to 0 gauge tubular which I wanted to use on the fast track on the die cast bridge. I guess all and all it was a good day. Looking forward to the Medina Ohio show on Sunday and hope to find something good there along with waiting for the track so I can start working on the power plant area..............Paul
Paul, can you share the info for the Medina show?
Thaddeus, the Medina Ohio show happens about four times through the year. It is not a total train show there are also toys and models there too. I usually go because you never know what will be there. There are a few layouts running. Here is some basic info and a web site that lists just about all the train shows through out the year......Paul
Cleveshows
www.cleveshows.com/
2017 Feb. 5
| Medina Train and Toy Show Medina Fairgrounds, Medina, Ohio 44256 9 am to 3 pm Adm. $6.00 Phone: 330-948-4400 |
M. Mitchell Marmel posted:RSJB18 posted:Installed the first few street lights. Grabbed a couple of my son's Hummer's for the pictures
Now that the wiring and terminal boards for the layout lighting are done the rest is easy...
The streetlights need, well, decoration...
Mitch

LOL ![]()
Big_Boy_4005 posted:mike g. posted:Elliot, one question. Do you have an emergency stop button to kill all power if needed?
There are two light switches at the entrance to the layout. One is for track power, and the other is for everything else. I'll be continuing to add devices to the second switch. Track power is a done deal.
Elliot- you may want to put covers over those switches. Some unsuspecting visitor could accidentally hit them and bring the entire operation to a screeching halt. Love the progress so far. You are not only building the layout of your dreams but ours too.
Bob
Big_Boy_4005 posted:The dispatcher's corner is really starting to take shape. I started my day by running to Menards to pick up the counter tops. Got them home and into the basement without incident. They're standing in a quiet spot out of the way. I hope to get them up this weekend.
My wife helped me hang the two big screens.
The one on the right is acting as my computer monitor right now. That's the ATCS monitor, but my version is out of date, and I have to fix it. What you are seeing is very similar to what my layout is representing. My panel will be done using JMRI. Very soon there will be a second computer sharing this TV.That will be the one running the layout.
I don't need my cheaters to read this screen!
Now I can bring my photos down to this computer on a memory stick, and use them to refer to when working on the scenery.
The monitor on the left will display all the security cameras. Once I move the hidden yard controls, both yards can be operated from the desk.
Finally, I put all 16 cameras on the big hub.
- big hidden yard stopping zone 1
- zone 2
- zone 3
- zone 4
- zone 5
- yard ladder
- yard throat
- big helix
- south wall looking up behind the backdrop
- east wall looking north which has yet to be closed in
- east wall looking south which has yet to be closed in
- yard under the bluff looking east
- yard under the bluff looking west
- small helix
- small hidden yard entrance ladder
- small hidden yard exit ladder
The plot thickens!


All I can say is WOW! I'M LOOKING FORWARD TO THE FULL LENGTH MOVIE TOUR. Very impressive.
RSJB18 posted:Big_Boy_4005 posted:mike g. posted:Elliot, one question. Do you have an emergency stop button to kill all power if needed?
There are two light switches at the entrance to the layout. One is for track power, and the other is for everything else. I'll be continuing to add devices to the second switch. Track power is a done deal.
Elliot- you may want to put covers over those switches. Some unsuspecting visitor could accidentally hit them and bring the entire operation to a screeching halt. Love the progress so far. You are not only building the layout of your dreams but ours too.
Bob
Mission Control...We have a problem...![]()
New revenue for the GNRW:
Some 'cost effective' builds.


Attachments
Images (3)


You know this hobby is all about fun, and the humor we each try to show each other with our layouts, so, I like the Street Light with the beautiful model on display. WOW, thank you RSJB18!! You are Creative...
After cleaning some track I went to the train room. to tinkerstarted the trains up let it run around the track while I wired in more feeders. had to stop the train to make a track change I added 2 more little sidings and wired in 2 buildings one which didn't have lights so I had to add them . here is the progress.


Attachments
Images (7)
A pleasant surprise today. Another Weaver TOFC landed on my doorstep. I knew it was coming but USPS said delivery on Monday. Had to take it out of the box and add it to the rest of them. But while in the attic I found some sheets of brick I can use as the foundation brick on some buildings that I hope to start on. A pic of the new addition............Paul

Attachments
Images (1)
JHAINER, your layout is coming along nicely. I enjoyed the video. Especially the way the train winds through all the areas. Keep up the good work.....................Paul
leapinlarry posted:You know this hobby is all about fun, and the humor we each try to show each other with our layouts, so, I like the Street Light with the beautiful model on display. WOW, thank you RSJB18!! You are Creative...
leapinlarry- That was @M. Mitchell Marmel's lamp post. (Personally I would have expected a gi-raffe ![]() )
)
Thanks for the kind words though.
Bob
I put in a dead end isolation spur. My ole Wabash Cannonball fits right in there with room to spare. Wired it to transformer and it acted up. Wired it to the other side of isolation cut and found out the switch was dirty. A little working it and it was fine. Ran my old conventional DT&I switchers and the Wabash today. PE is on the fritz!!
RSJB18 posted:Big_Boy_4005 posted:mike g. posted:Elliot, one question. Do you have an emergency stop button to kill all power if needed?
There are two light switches at the entrance to the layout. One is for track power, and the other is for everything else. I'll be continuing to add devices to the second switch. Track power is a done deal.
Elliot- you may want to put covers over those switches. Some unsuspecting visitor could accidentally hit them and bring the entire operation to a screeching halt. Love the progress so far. You are not only building the layout of your dreams but ours too.
Bob
Thanks Bob. Nah, they're OK. People can't even find them when I tell them where they are. They aren't on the wall, they're on the layout leg, set fairly far back. You'd have to have a pretty bad accident to hit them.![]()
started some scenery on one side. really don't like the joint compound/paper towel method. so it made me mad so I went out and put a 4 inch lift on my suburban instead. only got the rear done . I put the stock wheels back on with the 35's I don't think it will be able to pull out of the garage to tall .


![20170205_013836[1]](https://ogrforum.ogaugerr.com/fileSendAction/fcType/0/fcOid/12129987997660671/filePointer/71256347263613601/fodoid/71256347263613595/imageType/LARGE/inlineImage/true/20170205_013836%255B1%255D.jpg "20170205_013836[1]")
Attachments
Images (3)
![20170205_013836[1]](https://ogrforum.ogaugerr.com/fileSendAction/fcType/0/fcOid/12129987997660671/filePointer/71256347263613601/fodoid/71256347263613595/imageType/LARGE/inlineImage/true/20170205_013836%5B1%5D.jpg "20170205_013836[1]")
Big_Boy_4005 posted:The dispatcher's corner is really starting to take shape. I started my day by running to Menards to pick up the counter tops. Got them home and into the basement without incident. They're standing in a quiet spot out of the way. I hope to get them up this weekend.
Elliot, I know its been said before but WOW!
Big_Boy_4005 posted:RSJB18 posted:Big_Boy_4005 posted:mike g. posted:Elliot, one question. Do you have an emergency stop button to kill all power if needed?
There are two light switches at the entrance to the layout. One is for track power, and the other is for everything else. I'll be continuing to add devices to the second switch. Track power is a done deal.
Elliot- you may want to put covers over those switches. Some unsuspecting visitor could accidentally hit them and bring the entire operation to a screeching halt. Love the progress so far. You are not only building the layout of your dreams but ours too.
Bob
Thanks Bob. Nah, they're OK. People can't even find them when I tell them where they are. They aren't on the wall, they're on the layout leg, set fairly far back. You'd have to have a pretty bad accident to hit them.
I should have known, with all the planning you put into this layout, that you wouldn't have let something that obvious happen. ![]()
scale rail posted:Snap shot of the new rock put in yesterday. Dry brush painting is almost finished and a temp. track for positioning. I have the upper level to fit rock in and a larger lower area that goes to the floor. That will just about finish this huge canyon that is about 18 or 20ft long. All made of molded rock and two large trestles. It includes three mines. This will be the main line and it's about eye level with a mining line below. Both will have overhead wire. I made more molded rock this morning. They should be dry in about two days. Fog is still bad outside. Don

Don, excellent tight work and the results are amazing. What do you use to adhere the rock faces and what colors for the paint. Really great color contrast with the retaining wall that makes both pop. Well done.
Jhainer posted:started some scenery on one side. really don't like the joint compound/paper towel method. so it made me mad so I went out and put a 4 inch lift on my suburban instead. only got the rear done . I put the stock wheels back on with the 35's I don't think it will be able to pull out of the garage to tall .
I sympathize with what to do when scenic things don't work out. I don't have better ideas on grout unfortunately. But I am wondering about your reference to soldering in your signature. Have you overcome that? I will need to solder one little wire to a command board for an upgrade. I plan to study and experiment a lot before I actually perform it on the board. Have you tried soldering lately?
Aside from that, your layout is looking good. Hope to see more of your progress. I get inspired and enthused to work on my layout from the posts on this thread.
Pennysnut, First off most of my molds are large and heavy when they are cast. I let them try in the sun for a few days, then they are really light to work with. The back of the molds are not even and the area that I'm placing them is not even so I glob on lots of joint compound to the back of the mold. It holds the molds to the base and the extra fills any gaps around the edges. Then I stray paint them flat black. When that dries I start dry brushing every lightly with a black and white acrylic mix to get the gray you want. Then again lightly dry brush a little burnt umber, raw sienna, and mix white in sometimes so it's not all one color. You want the black to show in the cracks so use a light touch. The paint is acrylic other than the black spray can base. Then I very lightly dry brush white just on the edges of the rocks. If you don't like the look just repaint the rock black again and start over. It seems like it's a lot of work but once you get the hang of it, it goes very fast. Don't put the white on tell everything is dry. Hope this helps. Don
Attachments
Images (1)
Former Member
Jhainer posted:started some scenery on one side. really don't like the joint compound/paper towel method. so it made me mad so I went out and put a 4 inch lift on my suburban instead. only got the rear done . I put the stock wheels back on with the 35's I don't think it will be able to pull out of the garage to tall .
The drawback with using joint compound is that if it gets wet or damp it softens again and can grow mold. You would be better to try Structolite. It's the brown coat plaster that goes on before the white coat. It's more granular than joint compound, but that may be a good thing. It hardens like any other cement based product but it's much lighter in weight.
Home Depot sells it in 50 # bags.
This past week I have taken leave from scenic projects and track cleaning to research and make preparations for a loco upgrade and a modified card operating system. My car card/waybill research took me to this youtube of a "simple car card system" published in another model rr mag, model rr hobbyist. Tom Driscoll explains the system for his N scale operations as trains are built, then road switchers take the train to the destinations to drop cars off and pickup other cars. I won't try to restate the concept in any detail as the vidoe is well done, except to note that it involves treating a type of car (box, flat, gondola etc. with exceptions) as a generic type car as opposed to a specific car by road name and number.
After a lot of thought about operation time and complexities, (there are a lot of complexities!!!) I wrote up a few "train cards" to begin the experiment. I have made up preliminary designs for the cards but nothing worth showing yet. The more cards and logistics this involves for me, the more I may understand the various operation systems. It is a puzzle for sure, but fun for me.
Using this system, I am outlining 6 basic scenarios. I don't have to complete all or any part of a scenario. I can pause operations with a mere paper clip. At any time I can just run the passenger/mail trains, through freights and even switching trains without formal operations so long as I return the trains to the last spot.
The 6 scenarios will vary. I call them "Sessions" (S1, S2, S3 . . .) that involve making trains for switching; switching; making trains for through freight; running through freights; making passenger trains; running passenger trains; making fast mail trains; running fast mail trains; running the static oil tank train consist. The freights, passenger, mail and oil tank trains are alternatively run east/west bound to add variety. The operations in each session are identified on specific "Order" cards. My sessions always involve making freight trains for switching and switching. In addition, each session will involve two different "through trains", one EB and one WB. I have mixed them up as best I can at this point among the following types of trains as well as direction for through freight; through passenger; through mail; through oil tankers.
S1: "Yard Orders" card specifies (1.building freights for switching. 2. building freights for through trains, building passenger/mail trains . . .)
S1: "Switch Orders" card specifies (1. the delivery, hold or transfer of freight cars for industries on my layout. 2. Transfer of passenger/mail consists for road loco. 3. other transfers . . .
S1: "Road Orders" card specifies (1. direction, number of loops, stops for water, last spot at destination city for through freights, oil tankers and passenger/mail.)
S1: "Start Order-Freight" card specifies the businesses on the layout and the cars initially spotted at each business.
S1: "Start Order-Through Trains-Engines" card specifies the spots for those.
The idea as expressed my Mr. Driscoll is that each session will begin where the last ended as far as the spots for virtually all the locos and rolling stock except for specific cars. This is because, the system is based on a box car is a box car and a flat is a flat, not a specific road name and numbered car. The exception eg. might be for meat reefers. At the end of (S6), the types of freight cars at businesses will be the same as on the S1 start card. So, a start card is not necessary for each session.
My inspiration is others have commented that moving trains with some idea of operation, no matter how informal, should add interest to running the continual round about. I am still in the develoment stage of this but it is enjoyable so far. I don't yet have an idea on the time for a session so undoubtedly I will modify the plan. As in life, everything is subject to change.
Thanks Don. Great ideas and explanation.
Seemed like a good time just to 'run trains' ![]()
video:
https://www.youtube.com/watch?...amp;feature=youtu.be
Got some ballast at the Medina show. Talked with some friends there. Got home and found out the wrong ballast was in the box. So Monday I'll exchange it for the right stuff. Nothing done on the layout. I am waiting for my order of Gar Graves curves to come so I can work on the next section. Little bit it will be game time and hopefully some great commercials........Paul
samparfitt posted:Seemed like a good time just to 'run trains'

video:
https://www.youtube.com/watch?...amp;feature=youtu.be
WOW! That is a great video of great everything. Layout, scenery, train and realism. Those trees are really nice, and the train moving through that pass is so neat. Inspires the imagination.
Thanks,
I've got a little 'how to' on the following thread: page down and there are two locations on tree making.
https://ogrforum.ogaugerr.com/t...thern-railway?page=6
Had to change out the contact arm on my PW 275W ZW. What a PIA that is, I am lucky I had a spare, other part was broke and trans running hot....
Marty
I'm ready to start scenery
Attachments
Videos (1)

Ran some recently acquired rolling stock (RK Pennsy K4, various freight cars and my two most recent gi-raffes, numbers 19 and 20)...
Mitch
Attachments
Videos (1)

Yesterday, I had my handyman install some of the glenn snyder shelves. These were badly badly needed as I had too many (YES) trains just sitting in place they should not have been.


Looks good Mo! You could always take different colored tape and put on the awning till you found the color you like.
I'm not sure if this counts, but since it is all for my layout, I guess it may?
This is the small room I have to work with. Previously, it had external raceway power (removed, but location shown in blue), you can also see it behind the desk a little bit. Also, someone had built out a box for what looked like old lines running for the A/C unit, I'm not sure why (in red circle).
Last night I finished the patching and installed my new lights.

Attachments
Images (2)
mike g. posted:Looks good Mo! You could always take different colored tape and put on the awning till you found the color you like.
Thanks Mike,
The yellow is electrical tape. I had all the sections done in it, but that was way too bright. I pulled them off to alternate, then gave them a spray with Dulcote. I was trying to stay with MTH colors.
Mo985 posted:mike g. posted:Looks good Mo! You could always take different colored tape and put on the awning till you found the color you like.
Thanks Mike,
The yellow is electrical tape. I had all the sections done in it, but that was way too bright. I pulled them off to alternate, then gave them a spray with Dulcote. I was trying to stay with MTH colors.
![]() Mo, I like the idea of staying with MTH colors, you could always add a little whit and blue, or try black and yellow? just a thought!
Mo, I like the idea of staying with MTH colors, you could always add a little whit and blue, or try black and yellow? just a thought!
Attachments
Images (1)
RSJB18 posted:M. Mitchell Marmel posted:RSJB18 posted:Installed the first few street lights. Grabbed a couple of my son's Hummer's for the pictures
Now that the wiring and terminal boards for the layout lighting are done the rest is easy...
The streetlights need, well, decoration...
Mitch
LOL
I'm looking for the blushing gi-raffs ![]()
![]()
![]()
Got an email from gar graves that my track just shipped today so until that gets here on Wednesday I just ran some trains tonight and looked for stuff I know I have but can't remember where I put it. Tomorrow morning heading to Menards to pick up my tanks. I was hoping that the other things I ordered would of gotten there but such was not the case.............Paul
This morning I glued some grass and gravel on the painted foam in my problem corner. I have to spray it with wet water and then diluted glue tomorrow. I also installed an ERR cruise commander M in my K-line B6. I just have to solder one wire to the R2CL and hopefully it will work. Details are on my thread in the electrical forum if you are curious. My first install and it was quite difficult.
Great day working on railroad! I have a new helper!![]()
Saturday I installed the ledge cleats to the walls, so the counter tops could be fastened to it. Our first task of the day was to add two support brackets, which we lag bolted to the studs.

Here's the left section loosely set in place.

This is Scott (forum name Miggy) already laying down on the job. He fits right in. I have a knack for capturing my helpers in compromising positions.![]()

Actually, what he was doing down there was attaching the clamps to the seam.

Using an Allen wrench, he tightened the clamps, pulling the two pieces together.

Nature abhors a vacuum. Corollary: new counter space must be filled. In reality I set Scott up to start a project of his own.

He added lead wires to all of the uncoupler magnets, as the first phase of the installation process.

While he was working on that, I was busy marking exact locations for magnet placement over at Hiawatha. I added some glue to the two ties that had to be cut to make room for the coil.

I installed most of the magnets over at Red Wing many years ago. The worst part of that process was cutting the ties. Thanks to modern technology, there is a new tool that makes quick, clean work of that task.

Here we see the ties cut and the rail segment rough cut. I still need to get the Dremel and clean up the ends. Once that is done, I need to drill a hole for the wire, add GarGraves pins to both rail ends and drop in the magnet, crimping the rail over the pins. Then simply repeat 70 more times.![]()
![]()

Attachments
Images (10)
pennsynut posted:This morning I glued some grass and gravel on the painted foam in my problem corner. I have to spray it with wet water and then diluted glue tomorrow. I also installed an ERR cruise commander M in my K-line B6. I just have to solder one wire to the R2CL and hopefully it will work. Details are on my thread in the electrical forum if you are curious. My first install and it was quite difficult.
I am curious about the ERR, I will have to take a look. Though my 40+ year career has been in electronics (I just work in Engineering doing documentation now) I always find the first time I do something difficult.
Last night I created this scene on one of my team tracks.

Attachments
Images (2)

Attachments
Images (1)
As you can see working on the Auto Rack area.
Nice work and great looking there Poconotrain!
Nice looking! Where did you get the automobile ramp? It is gorgeous!
Eliot,
Like your dispatcher corner. Very professional looking. Can I hire you to do our Kitchen over? VBG
poconotrain posted:
Amtrak Autotrain Station, Lorton Va.


Attachments
Images (2)


Randy T posted:Eliot,
Like your dispatcher corner. Very professional looking. Can I hire you to do our Kitchen over? VBG
Thanks Randy, but sorry. Two kitchens in one lifetime is enough for me.![]()
![]()
The Automobile ramp is scratch built by a friend,got it for Christmas 2 years ago
Earlier this evening, I framed up some original paperwork from the ET&WNC and hung it up in the layout room. I then put some other stuff along one of the other walls too, all related to the railroad.

FYI, below the RR herald (made by Stoddard Art) is a 1943 ET&WNC timetable, and then a 1943 train order flimsy (next to a ET&WNC employee timecard in the same frame) and at the bottom is a 1880s ET&WNC stock certificate. All these items are originals.

Attachments
Images (2)
Scratch building a freight platform to go between a couple of sidings. Loosely based it on Lionel's Truck loading dock.


Attachments
Images (3)


After months of experimentation, I've perfected my FastTrack brakeman actuator!
Whether this means a chorus line of brakemen in the future, well... COULD BE! ![]()
Mitch
Attachments
Videos (1)

M. Mitchell Marmel posted:After months of experimentation, I've perfected my FastTrack brakeman actuator!
Whether this means a chorus line of brakemen in the future, well... COULD BE!
Mitch
Mitch,
They are blue! They would go right with the Gi-raffes!! ![]()
If so, I have a couple brakeman cars I can donate to the cause! Let me know!
Mark Boyce posted:Mitch,
They are blue! They would go right with the Gi-raffes!!
If so, I have a couple brakeman cars I can donate to the cause! Let me know!
Mixed consist? Gi-raffe-brakeman-gi-raffe-brakeman! I love it! You're on! Drop me an email, please! ![]()
Mitch
No work on the layout today but that will change tomorrow. Went down to Menards to pick up my package and when I got home my package from Gar Graves was sitting on the steps. I was in Limbo till that came. I needed some tight curves and they had 0-32 which will work for me. The curved track is for behind the power plant. Two sidings one going through the plant and the other going right beside that. The curves are for behind the building so I can push hoppers onto both tracks but they will be hide behind other buildings. So tonight I opened all the packages. It's like a belated Christmas LOL. Anyways some pics. The pic with the track shows what I had in mind. The curves will be on the back side of the plant going in the other direction ...........Paul


Attachments
Images (8)


Video:
Great Northern railway in the cascades mountains.
Another railroader brought over his micro camera and we mounted it on a car and pushed it along my layout.
Bad news; it sure shows all your discrepancies:
The good news: at least my new trees look nice! Laying down individual wooden ties definitely give a random tie appearance.
Don't need to watch after the camera goes into the tunnel for the last 30 seconds.
M. Mitchell Marmel posted:Mark Boyce posted:Mitch,
They are blue! They would go right with the Gi-raffes!!
If so, I have a couple brakeman cars I can donate to the cause! Let me know!
Mixed consist? Gi-raffe-brakeman-gi-raffe-brakeman! I love it! You're on! Drop me an email, please!
Mitch
Sounds like a plan...can't wait to see a video of all of the hopping gi-raffe's and brakemen! ![]()
samparfitt posted:Video:
Great Northern railway in the cascades mountains.
Another railroader brought over his micro camera and we mounted it on a car and pushed it along my layout.Bad news; it sure shows all your discrepancies:
The good news: at least my new trees look nice! Laying down individual wooden ties definitely give a random tie appearance.
Don't need to watch after the camera goes into the tunnel for the last 30 seconds.
The video looks great! I left a message on YouTube!
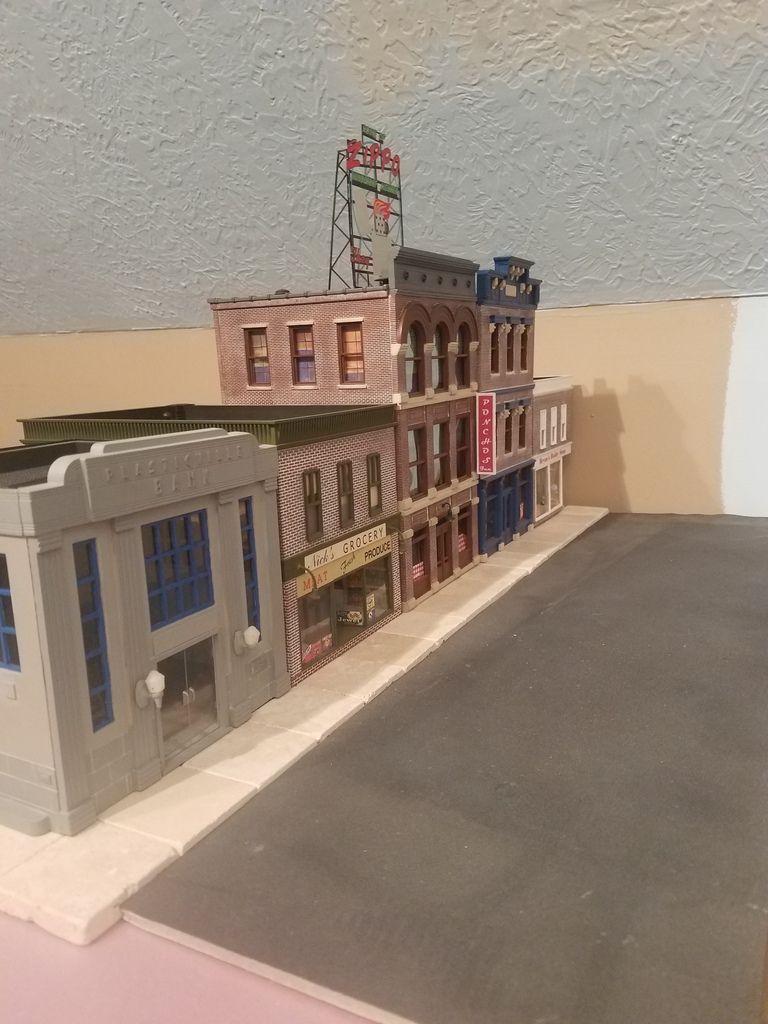
Working on a city scene this week....
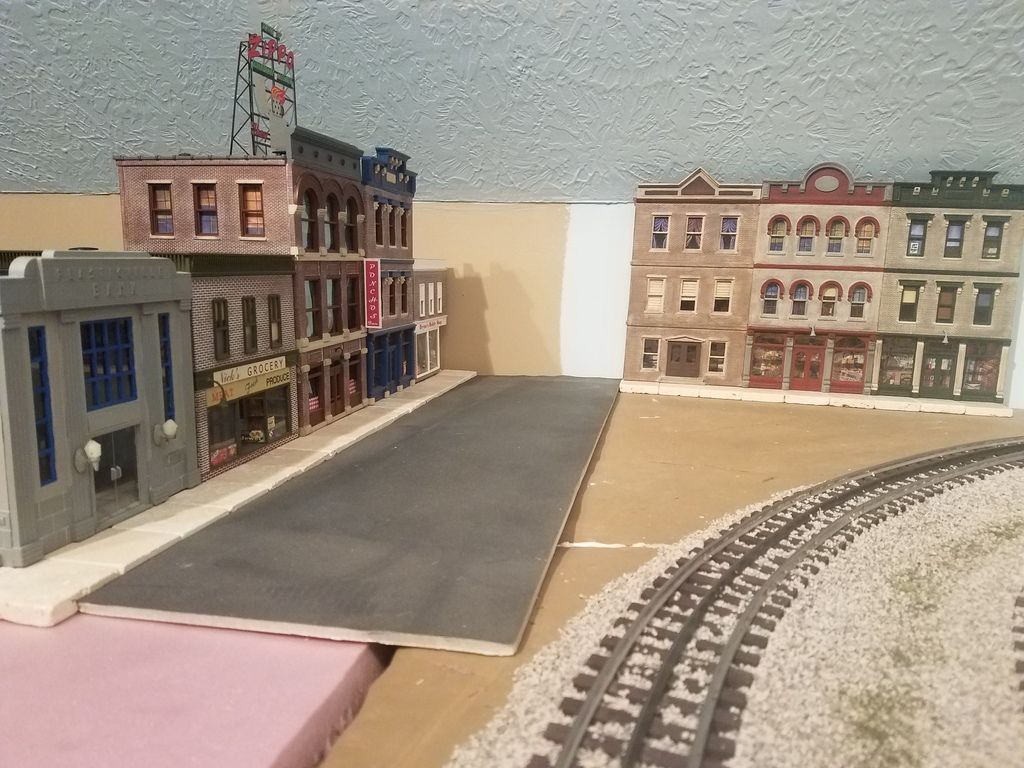

Paul
Work has been crazy busy and I haven't had any layout time. I did order a few posters of mine to be printed to hang on the walls in the layout room. All of the 1225.
Looks great, Paul. I love the way that you worked the Plasticville Bank in the scene.
Art
Paul, I like your city scene. Nice assortment of buildings working together. Good way to fill in a corner..........Paul
I have yet to get to the basement. Had a few things to finish and the wife has a 3:00PM Cavs game so that gives me my window for working on the layout. I found a Weaver flat car and placed two Menards tanks on it. I know the tanks are not 1/48. So should I work with this size flat car or go for a smaller flat with one tank per car. Pics of the flat and tanks...........Paul


Attachments
Images (2)
UGH! Wiring under the table. Will take some pics when I get top side. Time to shovel some snow so we can get to Happy Hour at the neighbors. Cheers!
I didn't work on anything per say last night. But I did take the time to take each of the 57 pieces of rolling stock I bought out of the box for a minute to check them out. Got 3 covered hoppers, two Christmas cars that just happen to be the years my kids were born. 5 cars with sprung trucks. 8 alcohol related boxcars. 2 road runner gondolas that the coyote chases the road runner around. A bugs bunny car that he and another figure bob up & down. 3 operating hand cars, santa and mrs clause, railroad guys, snoopy and Woodstock. A big green giant billboard box car. A very old Fort Knox gold car in a box the says "lionel New York and Chicago. A cool tank car. And a bunch of other boxcars. All but two were new in the box. Two of them had gotten hot or something and the bodys were warped up. Overall very happy with them!
Jim
If you didn't think ahead 30 years, you will, eventually, need one of these!
Topside creeper.
Purchased it from micromark. I thought it was made for modeling purposes but the manufacturer (traxion engineered products) shows it for access to your vehicle motor, etc.
The hardest part was getting the 77 lb box from outside down to the basement.
It went together quickly: probably an hour.
I can now access that track that is 5' high and 3'-4' back along the wall ![]()
The front casters has locking tabs.
The upper step section has 3 adjustment locations for tilting the upper section.
The height is also adjustable.
For storage, I had to angle, rotate the base to get through the laundry room 32" wide door.
Some release pins allow the base legs to fold up into a tidy, vertical position.
The legs tend to fall forward so I'll put a bungee cord around them.
Very well made and sturdy.


Attachments
Images (6)


I really like the creeper Sam, I should probably invest in one now so that when I do need it I won't have to worry.
Paul
Well, snow day here today. Fingers crossed my plow guy shows up because I didn't go outside ![]()
spent a couple of hours on my scratch built 4 stall engine house. It is pretty ambitious for my first build, but you gotta start somewhere.
Programmed and tested my new Trackside Crane and Crane Sounds House. It was a frustrating experience until I remembered Sandjam's YouTube video. Watched it again to be reminded that, you cannot program it as an Accessory, the Cab2 key imagines are those of the TMCC Crane Car not as pictured in the manual, the rear light is only a lense with no bulb and there is no explanation about activating the magnet. Once I had that information it was a piece of cake. Not sure what makes it a Legacy Crane
It is one cool accessory, just like my new Gantry Crane.
Mike
EricBuzz posted:Well, snow day here today. Fingers crossed my plow guy shows up because I didn't go outside
spent a couple of hours on my scratch built 4 stall engine house. It is pretty ambitious for my first build, but you gotta start somewhere.
Sure like to see a photo of it.
Serows1 posted:I really like the creeper Sam, I should probably invest in one now so that when I do need it I won't have to worry.
Paul
Ha.. Some of us 'old' guys need one now... lol
Neel
EricBuzz posted:Well, snow day here today. Fingers crossed my plow guy shows up because I didn't go outside
spent a couple of hours on my scratch built 4 stall engine house. It is pretty ambitious for my first build, but you gotta start somewhere.
Wow.. I thought we had a bad day here.. 47*, sunny, but the wind was blowing 20 mph.. But alas, the wind is supposed to die down and be 75* on Saturday!!
Neel
Woodson Shops was refurbishing a couple cars today.. Added Kadees and changed out some trucks.. Have to wait for warmer temps to paint.. Next up is waiting on the 'Electronics guy' (me) to hook up Legacy.. 990 arrived last week and USPS delivered my Legacy Powermasters late this afternoon.. I guess I'll need to put my 9 yr old Grandson on the payroll to show me how to operate it!!
Neel
pennsynut posted:EricBuzz posted:Well, snow day here today. Fingers crossed my plow guy shows up because I didn't go outside
spent a couple of hours on my scratch built 4 stall engine house. It is pretty ambitious for my first build, but you gotta start somewhere.
Sure like to see a photo of it.
When I get a bit further along... Still kind of shy ![]()
Paul I think that Union Pacific hopper is one of the best looking cars I've ever seen! Great purchase from Menards!


Continued work on the freight platform. Added some gravel around my streets. Painted the board before the freight platform is installed, ballast is next. I will post some more pix soon. Debating between paint or a dark stain for the platforms. I am leaning toward the stain because I want the wood grain to show through. Any opinions/ advice welcome.
Oh- shoveled 14" of snow.....twice..... on two houses ( In-laws are down the street). I was just putting the snowblower away when the town plows came through again and buried the driveway and sidewalk.
Bob
Since I finished the train room on Wednesday, I laid out the track plan from SCARM on the floor just to see what it would look like. Of course I had a helper/shadow.

Attachments
Images (1)
Looks like it's going to be a fun layout, and you seam to have a great helper! My helper would eat everything in site! LOL
mjrodg3n88 posted:Since I finished the train room on Wednesday, I laid out the track plan from SCARM on the floor just to see what it would look like. Of course I had a helper/shadow.
The layout is nice but that beautiful blond sitting in the middle is gorgeous!!!
If Mike G's helper is like Shadow and our Annie, he/she will always be sitting where you want to work!
mjrodg3n88 posted:Since I finished the train room on Wednesday, I laid out the track plan from SCARM on the floor just to see what it would look like. Of course I had a helper/shadow.
Looks like he is sitting in the ROW. Better move him before the train rolls through ![]()
p51 posted:I couldn't sleep, so I put down some static grass mats on the layout tonight.
Jeepers! I was leaning back in my chair, glanced at the screen and said "Huh! Why's he posting prototype photos in this thread?"
Then I sat forward. Wowsers! NICE work! ![]()
Mitch
mjrodg3n88 posted:Since I finished the train room on Wednesday, I laid out the track plan from SCARM on the floor just to see what it would look like. Of course I had a helper/shadow.
Between the various doggies and kittehs in this group, it's amazing ANY railroading gets done! ![]()
Mitch
p51 posted:
I couldn't sleep, so I put down some static grass mats on the layout tonight.
Lee as usual nice work. This just gets better with time. As a belated congrats on the magazine articles.
p51 posted:
Exceptional panoramas, sir; beautiful landscaping.
AND, having that one track partially overgrown is inspired (and inspiring!)
FrankM.
Big_Boy_4005 posted:Great day working on railroad! I have a new helper!
Saturday I installed the ledge cleats to the walls, so the counter tops could be fastened to it. Our first task of the day was to add two support brackets, which we lag bolted to the studs.
Here's the left section loosely set in place.
This is Scott (forum name Miggy) already laying down on the job. He fits right in. I have a knack for capturing my helpers in compromising positions.
Actually, what he was doing down there was attaching the clamps to the seam.
Using an Allen wrench, he tightened the clamps, pulling the two pieces together.
Nature abhors a vacuum. Corollary: new counter space must be filled. In reality I set Scott up to start a project of his own.
He added lead wires to all of the uncoupler magnets, as the first phase of the installation process.
While he was working on that, I was busy marking exact locations for magnet placement over at Hiawatha. I added some glue to the two ties that had to be cut to make room for the coil.
I installed most of the magnets over at Red Wing many years ago. The worst part of that process was cutting the ties. Thanks to modern technology, there is a new tool that makes quick, clean work of that task.
Here we see the ties cut and the rail segment rough cut. I still need to get the Dremel and clean up the ends. Once that is done, I need to drill a hole for the wire, add GarGraves pins to both rail ends and drop in the magnet, crimping the rail over the pins. Then simply repeat 70 more times.
Elliot. the dispatcher corner has turned out nice. As with the rest of the recently completed work. Of course I cant believe you are allowing helpers to laydown on the Job. Then again with all the recent work being done taking a 30 sec nap under the guise of working under the layout is an old army trick. ![]()
THe brains behind the whole thing !
Kind of took a mini vacation from my trains and OGR since the holidays . But have been following this thread and others. Today its been catch up on threads that I follow. As usual a lot of great work and progress on layouts. Made a new video and now time to play catch up on projects.
p51 posted:
Great looking Lee, You have to tell us more about the mats you have and where you got them!
RSJB18 posted:mjrodg3n88 posted:Since I finished the train room on Wednesday, I laid out the track plan from SCARM on the floor just to see what it would look like. Of course I had a helper/shadow.
Looks like he is sitting in the ROW. Better move him before the train rolls through
Would that be a BOW ROW WOW? ![]()
Mitch
Lee, you nailed it. Looks so real. You do darn good work when you can't sleep. I also would like to know where you got your static grass mats.............Paul
Thanks for the kind words on my scenery, everyone!
The mats were made by Heki, found at a Portland hobby shop. I intend to order more, here: http://www.sceneryexpress.com/Heki/products/1053/
Add Reply
Sign In To Reply
