


After taking time to do some yard work I managed to get the bridge abutment repositioned, screwed down and the Styrofoam placed back and glued. Once my plaster gets here I can do some patching. By taking my time taking up the foam around the abutment I did not lose much of anything.............Paul
paul 2 posted:DECOYNH, RSJB18, and MIKE G I got the bridge at York last year. I was thinking about this bridge for awhile but York made it easier because I got it for a really good sale price. However when I got it home and took it out of the box and set it up I knew it would not work as is. The two bridge abutments made it harder to work it into scenery so I ordered two girder bridges along with two bridge abutments from ( from Scenic Express ) and that work better into the scenery. I also bought two transition tracks to go from fast track to gar graves. To mate them I got gar graves pins that go from tubular to flat for gar graves. The footprint needed came out to more then 60 inches because I was doing an angle. Now on to MIKE G, thanks for requesting pics. When I placed the bridge on the abutments I found that with the scenery work had caused some kind of shrinkage or movement and the bridge no longer fit. I think the plaster wrap with the plaster caused the boards to sort of pull back or something. So on the one bridge abutment I had to take up the foam and plaster around it and now I have to reposition it. Glad I caught this now rather then later after I put all the scenery down. One more thing. A freight going over the bridge would make a nice shot but in the distance only the power station will be there. That is permanent. I only placed the Morton Salt there to compare the two side by side...............Paul
Paul, I've been following this build with interest also!! I may have missed it or forgot, are you building this as a lift out or duck under??
WOODSON, from the start I was building this as a lift out. Until I get the layout running I am not sure how much I will be lifting it out. I will have access to both sides without lifting it out. It will be through there as my only way to get to the hot water tank and furnace to replace them. The bridge connects an L shaped island so the rest of the layout will eventually go around the outer walls..............Paul
Hi,
I did not do much today, removed one section of the elevated line and then I added rail and road bed and will let it dry overnight then put it back on and take off another section tomorrow.
If I can keep up with one section a day I should be done in a week or two.

![]()
Attachments
Images (3)


KRM posted:Hi,
I did not do much today, removed one section of the elevated line and then I added rail and road bed and will let it dry overnight then put it back on and take off another section tomorrow.
If I can keep up with one section a day I should be done in a week or two.
Looking good, I cant wait to see it all assembled! Bet its going to be a great addition!![]()
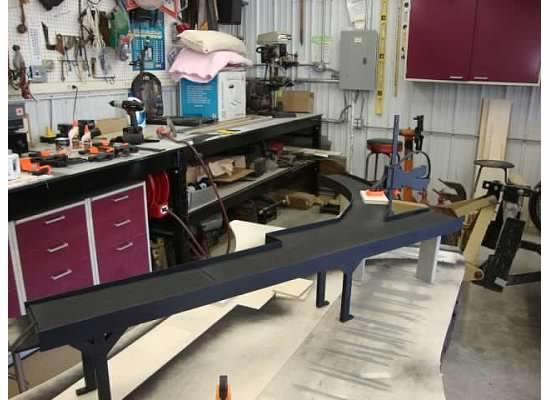
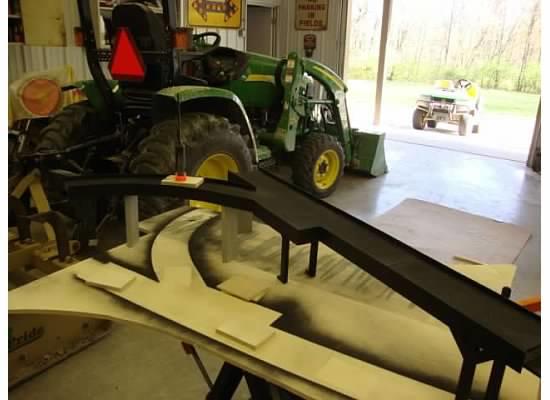
Greetings All,
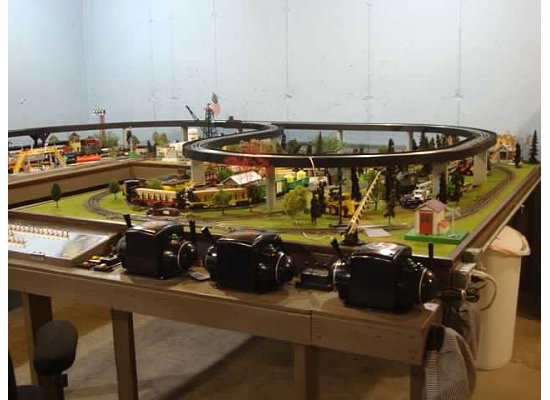
Well, after a few recent trips to the hospital for kidney stones and spinal surgery (not the "Non-Invasive" kind either) I finally got the new layout to where I felt it was somewhat presentable. I started building this layout in July 2016 when I realized my original layout just wouldn't do. As you can see, it is an "Around The Room" style with a lift-up section for access to the middle.
Most of the construction is L-Girder with the last 2 sections being standard frame style using 1 X 4's with 2 X 4's for the legs and braces which help speed up completion of the bench work. The "sub-roadbed" is 1/2" interior BX Plywood with 1/2" pink Styrofoam sheet to help deaden the sound of the Fastrack (which IMO seems to work OK).
Instead of trying to design a track plan to fit my space, I built all of the bench work first and fit the track to what was available. I like to refer to it as an "Adjustable" track plan because I've made a boat load of changes since I started. I know it's not the best way but it is working for me and I'm having all kinds of fun! When finished, I will have 3 separate "loops" of track. The elevated track which has O72 minimum curves. This loop isn't connected to the 2 loops on the main level because I didn't have adequate space to construct the proper gradient for the trains to travel. The bottom 2 loops are electrically isolated from each other but both can be accessed via cross-over tracks. The lower outside loop is O60 Minimum radius and the lower inside loop is O48 Minimum radius. All track work is Fastrak with Command Control turnouts. Minimum mainline turnouts used for access to either lower loop is O60.
I am using both MTH DCS and Lionel 990 Legacy Command Set for locomotive control. I employed "Star-Type Wiring" as described in The DCS O Gauge Companion. Currently, only the lower level mainline with O60 minimum curves is operational and I can run trains when I need a "fix". Obviously, this is a work in progress and I will try to add updates as time permits. Thank You for looking.


 Chief Bob (Retired)
Attachments
Images (10)
PUFFRBELLY, looks like you have things moving along. Great pics of an up and coming layout that will be enjoyable to run...........Paul
Pufferbelly,
I am glad you are recovering from a couple nasty physical conditions and able to get to work on the layout. I can see some of the L-girder. It looks good and sturdy. What are the overall dimensions of the layout?
Looking good Bob, just take your time and enjoy yourself! That's what it is all about anyways!![]()
The other day I added labeling to my control panel. I'll most likely add some decals to this or save the space incase I decide to expand...
Attachments
Images (1)
Mark Boyce posted:Pufferbelly,
I am glad you are recovering from a couple nasty physical conditions and able to get to work on the layout. I can see some of the L-girder. It looks good and sturdy. What are the overall dimensions of the layout?
Hi Mark,
Thanks for the encouragement. ![]() It was a tough road at first but it gets easier each day!
It was a tough road at first but it gets easier each day! ![]() The overall dimensions of the layout are approximately 15' X 20' with a 36" X 13' aisle on the right that allows access to the door leading to the utility/laundry room.
The overall dimensions of the layout are approximately 15' X 20' with a 36" X 13' aisle on the right that allows access to the door leading to the utility/laundry room.
Chief Bob (Retired)
mike g. posted:Looking good Bob, just take your time and enjoy yourself! That's what it is all about anyways!
Thanks for your encouragement Mike! ![]()
Chief Bob (Retired)
paul 2 posted:PUFFRBELLY, looks like you have things moving along. Great pics of an up and coming layout that will be enjoyable to run...........Paul
Thanks for the kind words Paul. ![]()
Chief Bob (Retired)
mjrodg3n88 posted:The other day I added labeling to my control panel. I'll most likely add some decals to this or save the space incase I decide to expand...
Great looking work there Mike! When the time comes I might be picking your brain on how you wired everything!![]()
Got my plaster from scenic express this afternoon. This morning took a trip to the Depot and got a sheet of Masonite. Had them cut it in half long ways for me so I didn't have to cut it at home. That was it for today. Another Tuesday night train crew get together tonight. So tomorrow I'll get back to work on the layout........Paul
I placed a SF 2353 AA with some 6464 size boxes with REA type paint, and some 2400 SF passenger cars. Have a Railsounds box in REA. And setup did not blow up 6 feet down the track.
While waiting for the next batch of track to be delivered, thought I'd get busy on naming my new railroad. Here's what options have bubbled up so far:
South Norfolk and Fork Union - The SNAFU Line
Chesapeake Richmond Ashland Petersburg Railroad - "Tired of driving? Take the CRAPR!"
Lackawanna Urban and Metro Petersburg Independent Transit - "If you need a good ride you can LUMPIT!"
Mayor Magoo posted:While waiting for the next batch of track to be delivered, thought I'd get busy on naming my new railroad. Here's what options have bubbled up so far:
South Norfolk and Fork Union - The SNAFU Line
Chesapeake Richmond Ashland Petersburg Railroad - "Tired of driving? Take the CRAPR!"
Lackawanna Urban and Metro Petersburg Independent Transit - "If you need a good ride you can LUMPIT!"
Either 1 or 2. ![]()
Good afternoon,
I am working on the last section of the north end elevated loop. Roadbed, pillar paint and side rails.. Should have it done tonight and back installed tomorrow. Then the south end. Slow but sure and getting better on every section. By the time I am done I will know what I am doing. ![]()
Nice work everybody picked up another Burlington/C&S U30C (Odessey1)off the bay. On testing discovered there was no sound. So instead of sleeping this morning after the school runs, I started trouble shooting and found that the Rail sound 4 power supply board was dead do to shorting out. The black cushioning tape was missing causing the capacitor and heat transfer thingy on the board to touch the top of the rail sound 4 board making contact with metal points. The Rail sound 4 board also had shorted and although engine sounds worked when I swapped in the power supply board. There was a lot of buzzing in the back ground all but drowning out the engine sounds. So I also swapped in the other Rail sounds board and buzzing went away. Donor replacements came from another U30C that the Odyssey 1 had died and had been waiting patently for its turned to be repaired.. Now the donor will get an complete upgrade to EER.
Now to install Kadees and renumber from CB&Q/C&S 891 to 893
Dead parts


Attachments
Images (3)
Razorback Traction Co. (neé Bethlehem Steel) 72 sits in the shops after having a Swiss-style pantograph installed for overnight coal-less heating of the boiler.

Next up will be the removal of the Bethlehem Steel markings and application of RTC markings.

Naturally, since Norma Bates Kitteh is fast asleep, Fortescue has to get into the act:

Fortescue is just lucky that thing isn't energized... ;-)
Mitch
Attachments
Images (3)
You could hang laundry on the pantograph when not being used !!
M. Mitchell Marmel posted:Razorback Traction Co. (neé Bethlehem Steel) 72 sits in the shops after having a Swiss-style pantograph installed for overnight coal-less heating of the boiler.
Next up will be the removal of the Bethlehem Steel markings and application of RTC markings.
Naturally, since Norma Bates Kitteh is fast asleep, Fortescue has to get into the act:
Fortescue is just lucky that thing isn't energized... ;-)
Mitch
Darn new EPA regs. ![]() Are you sure there is no residual power as Fortescue eyes look like their bulging outward and seems to be glowing
Are you sure there is no residual power as Fortescue eyes look like their bulging outward and seems to be glowing ![]()
Still working on the diorama for the corner... Several photos of what finally dried enough today to photograph.... Tried a completely new technique I found on Youtube... applying fiberfil batting over the pink foam, instead of laying down pounds of plaster..... The first time trying something new always takes longer, but I am pretty pleased so far... Still have a bunch of "puff ball trees" to anchor to the backdrop, but I am getting there.....


Attachments
Images (4)
I didn't do much, but Max was trying to figure out how to use the control panel...

Attachments
Images (1)
chris a posted:Still working on the diorama for the corner... Several photos of what finally dried enough today to photograph.... Tried a completely new technique I found on Youtube... applying fiberfil batting over the pink foam, instead of laying down pounds of plaster..... The first time trying something new always takes longer, but I am pretty pleased so far... Still have a bunch of "puff ball trees" to anchor to the backdrop, but I am getting there.....
I would be very pleased too. It looks great, Chris!
mjrodg3n88 posted:I didn't do much, but Max was trying to figure out how to use the control panel...
This simply HAD to be said... ;-)
"PUSH THE BUTTON, MAX!"
Mitch
Thanks to Mark and the other members who liked the posting... Figured I ought to share the Youtube video that I watched several times before deciding to try the No Plaster, Fiberfil Low Loft batting method.... There are two videos in the short series, the link attached is to the first one... Youtube will queue up the next one in the sequence. Sorry it's not a live link, just copy and paste into the URL - Chris a -
I powered up my new MTH PRR Alco RS-11 that arrived today. The raspy, rattle-y prime mover sound was fun enough, and then the smoke unit got going. I'm looking forward to putting it in a lash-up with my GP-9, where I will have the Alco's smoke unit on and the Geep's smoke unit off. Once again, art imitates life.
As an aside, I don't find the sound volume lacking at all in the Alco. In fact, right away I turned it down 2 notches. I wonder if the PS3 sound volume issue that's been discussed in this forum is specific to certain loco models.
As another aside, I'm really happy to have the horn sound like what's on the roof, I'm guessing a Nathan M3. That has bugged me in the past, to have, for example, a 3- or 5-chime horn on the roof but the horn sound is a single-note honker. MTH, thanks for getting this detail right. Now if only they would use the prime mover sounds from SRR #6133 in their F-units!
Only did one section of the elevated loop today but it was a 1/4 72" curve. So I am down to the home stretch. No layout work tomorrow. Going haul gravel for the lane if the weather allows. I need a break anyway. Getting burnt out. But it is looking good. Or at least to me. ![]()


What is left to finish.

Attachments
Images (4)


I inserted the boiler and cab front into the front of the steam coach shell, glued on the stack, and glued headlight mountings to front and rear of roof. Just have bell, whistle, other small details, paint touch-up and dullcoat, and will have a steam coach. Since it is larger than that pictured in the station at Shelburne, Vermont, and takes a wide radius, l am planning to follow it with a closer model of that one.
chris a posted:Thanks to Mark and the other members who liked the posting... Figured I ought to share the Youtube video that I watched several times before deciding to try the No Plaster, Fiberfil Low Loft batting method.... There are two videos in the short series, the link attached is to the first one... Youtube will queue up the next one in the sequence. Sorry it's not a live link, just copy and paste into the URL - Chris a -
Chris,
I would have never thought of that, but I love it!! I'm already familiar with using batting on a Christmas layout, but never glued it down! Yours looks as good as his! Thank you very much for posting the link!!
I had to take apart the motor of my Mianne Lift-Gate to take the spool out for a trip to York next week. Tim is going to install a new cable at York...even though this was not a Mianne problem. The issue was due to my own stupidity and Tim has been VERY helpful in making sure I get the motor and cable repaired.
BTW. The Mianne Lift Gate is one of the better ideas in the model train world in decades. Take a look in the Orange Hall next week.


Attachments
Images (4)
Seized the one sunny non-raining day in months (with another month of rain in the forecast) and FINALLY got the 150' of new Gargraves and three new ROSS turnouts painted with track-paint!! Don't care about the weather any longer. Many dry days of track laying and wiring ahead for the upper level in the warm cozy layout room.
Past couple of days I have had a lot of running around to do. Today work out by being a bit too cool to do yard work. So I was able to mount the Masonite which took a bit of figuring out how to hold it in place since I put the table up first and I wanted to make it curve with the wall. Sometimes I just like a challenge. Once I had that secure I applied white. While that was drying I mixed up some plaster and finished the cliff. I had plaster left so I did the plywood in front of the Masonite. I'll go back later and apply the blues. A couple of pics..............Paul


Attachments
Images (5)
My son Chris and I removed 3 switches from the layout to be sent to our repair man for cleaning and lubricating. We still have 3 more to remove. One of them is under a tunnel which will prove to be a challenge to get.
Kerrigan posted:Seized the one sunny non-raining day in months (with another month of rain in the forecast) and FINALLY got the 150' of new Gargraves and three new ROSS turnouts painted with track-paint!! Don't care about the weather any longer. Many dry days of track laying and wiring ahead for the upper level in the warm cozy layout room.
Finally! Success on the track painting!
I did do another section of the finish of the elevated level today. About 4.5' on the south end switch and straight. I did not do any pictures because you have all seen enough and know what is going on. Only 3 sections left,,,,so next week it should be done.
I did buy a Ford Ranger 2003 or 04 Edge today, "4 wheel drive", 150K miles. It needs a right front wheel bearing and some TLC. I got it from Butch next door for 1K. I don't think I can go wrong. Some fluff and buff and it will be a good back up ride for me. Save the 2011 Silverado. Will get me away from the train room to. ![]()
I've just noticed this very nice thread. ![]()
Always late to the party. ![]()
I'm working on making some sea . . .

Attachments
Images (1)

I finished flipping the train room door to open OUT, instead of in-to precious train room space. Not the best carpenter but it works and seems plumb. Tomorrow will be more layout-oriented - trying my hand at making some clouds on my newly painted sky-blue angled walls.
. . . and today I finished the gel coat.

Now to wait another two days for it to set up.
Attachments
Images (1)

MaxSouthOz posted:...I'm working on making some sea . . .
Exceptional, Max, every square inch of the vignette. You even have barnacles at the feet of the pylons!!!!! And the aging of the wood itself is perfect, IMHO.
FrankM, Moon Township, USA
Max, you captured so much detail in the scene. The way you did the water makes it look like it is moving. Great job............Paul
Thanks, Guys.
It's all in the thread link under my signature - if you can stand it. ![]()
MaxSouthOz posted:. . . and today I finished the gel coat.
Now to wait another two days for it to set up.
Just went through your recent posts Max. Looks great so far. Almost makes the trains secondary to the water front scene.
Bob
I started working on converting the basement layout from conventional to TMCC. I ordered the 6-14194 CAB 1 and controller. I am also taking this opportunity to replace most of my old wiring. That is going to be a slow go as I am still recovering from spine surgery and every year thaey put that floor further and further away.
This morning I got my basic blues on. Lighter blue bottom and darker on the top. Once the dark dries I'll go back and put a coat of the light on it. So to let the paint dry I will fill the idle time with a little yard work. Pics..........Paul


Attachments
Images (4)
RSJB18 posted:MaxSouthOz posted:. . . and today I finished the gel coat.
Now to wait another two days for it to set up.
Just went through your recent posts Max. Looks great so far. Almost makes the trains secondary to the water front scene.
Bob
Bob has a good point! Museum quality in my opinion! Though I won't do a sea port scene there is a lot here to digest for a mountain railroad as well!
ChooChoo1972 posted:I started working on converting the basement layout from conventional to TMCC. I ordered the 6-14194 CAB 1 and controller. I am also taking this opportunity to replace most of my old wiring. That is going to be a slow go as I am still recovering from spine surgery and every year thaey put that floor further and further away.
I haven't had surgery, but I agree on the floor becoming further away. And I am fairly thin and nimble for being over 60. I pray you recover well.
Now to trains. I think you will find the wiring well worth the effort. I have TMCC on my Ceiling Central RR and DCS on the Christmas layout. I just moved from conventional about 3 years ago, and love both systems. I plan to run DCS on my new layout with it controlling my TMCC engine and my Legacy engine.
Masked off and handpainted over the Bethlehem Steel logos on my pantograph powered 0-6-0. Fortescue J. Giraffe likes to think he helped:

Razorback stickers installed!

Fortescue inspects the pantograph from a slightly safer distance than last time:

"Let's go!"

Mitch
Attachments
Images (4)
RSJB18 postedJust went through your recent posts Max. Looks great so far. Almost makes the trains secondary to the water front scene.
Bob
Thanks, Bob.
I just had to figure out a way to include my RC tug boat. ![]()
paul 2 posted:This morning I got my basic blues on. Lighter blue bottom and darker on the top. Once the dark dries I'll go back and put a coat of the light on it. So to let the paint dry I will fill the idle time with a little yard work. Pics..........Paul
Paul,
Your blue looks very good! Looks similar to the shade I picked. I like watching your progress!


Attachments
Images (2)


That colour is going to fit well, Mark.
Well this was supposed to be the weekend of making and planting some trees. This was to be done mainly on the mountain. Well after I finished making the trees I was planting along when I saw this terrible gap in the terrain. ![]() Here's the before and after.
Here's the before and after.


Attachments
Images (7)

AnthonyK, this is nice, from the looks in the picture you have very wide radius curves...Looking really good! Keep the pictures coming....
I finished the roof and the windows in my church. As I posted previously, the shake shingles are from Wild West Scale Models. The stained glass window inserts came from a web image. I altered the aspect ratio of the original image to fit my window openings, and made minor alterations to the perspective. Then I copied and pasted the image to get 8 copies per sheet, and printed the result first on paper, adjusting the printed size until the images filled the window openings. Then I printed it on transparency film. Once installed in the openings, I had another of those "art imitates life" issues to deal with: I could see into the church even though the prototype window is translucent. I fixed that problem by placing a piece of matte (invisible) tape on the inside of each window. Interior illumination is from a pair of GOW lamps suspended in a wooden "beam" about 16 scale feet off of the floor, high enough that there aren't any hot spots in the windows when the room lights are off. This was a lot of work but IMO the result is totally worth it.
I've had this kit since about 2007 and it was high time I finished it. Now I have but one Plasticville house to work on, and then I will run out of excuses for not starting my scenery. ![]()


Attachments
Images (3)
Excellent, Joel. ![]()
Wiring...Lots and lots of wiring...nine hours of wiring.
I have been re-doing the Super O layout that my father built for me for Christmas of 1960. I completely re-did the track plan, moved the switches around, etc. I spent the day wiring the switches and re-wiring the loops of track for DCS. About 2/3 done now.
Some more sea. This time down at the slipway end.

Attachments
Images (1)

I went under the table and dug out a Girder & Panel kit. Built a nice little oil refinery with it. It has valves and everything. It's designed to work with water, so I'll just dye the water brown or black...
I have to say it looks great. I would weather it a bit, if you like scale stuff.

Haven't posted in a while. Haven't really made much progress on my layout.
Last week I bought plane tickets to spend Memorial Day Weekend at my Dad's to help him wire his layout. I'm really looking forward to it. It's been three years since I last helped him on his layout and most of that time was spent trouble-shooting his first PLC. Now it's time to go hard on wiring to get it ready for landscaping and models. I plan to take and post a ton of pictures! If you remember my earlier post "A shipping test," you'll remember Mr. Gene. He's going to get to work making more models for Dad and the wiring is lagging.
My layout?
I'm ready to start serious planning. I had an electrician over Saturday to look at the basement. Next Saturday he'll be coming back to add a sub-panel and run the main electrical to the future home of the railroad. We decided on 2 20A feeds for power. That should be enough. We're going with a sub panel for future flexibility. I believe I can use the lighting I have for now, but I might want to add another circuit just for light. I'm using about 25% of the basement for trains but all of the lighting is on the same 15A feed. If I build walls and make the train area it's own room, it might be more convenient to make lighting it's own breaker.
We're also adding receptacles to the corner of the basement where the treadmill and elliptical are. Going to add a TV and mini-fridge to hopefully help us get through the workouts easier (and hopefully more often!).
Here is a picture of the construction in progress on my mountain:

Attachments
Images (1)

Anthony K posted:I was testing DCS signal tonight and running a few trains.
Here a B&P local running light is passed by a CR empty slab train.
Very nice Anthony! I'm glad to see local trains and am glad you have progressed enough that you can run them.
RETINPA posted:I finished the roof and the windows in my church. As I posted previously, the shake shingles are from Wild West Scale Models. The stained glass window inserts came from a web image. I altered the aspect ratio of the original image to fit my window openings, and made minor alterations to the perspective. Then I copied and pasted the image to get 8 copies per sheet, and printed the result first on paper, adjusting the printed size until the images filled the window openings. Then I printed it on transparency film. Once installed in the openings, I had another of those "art imitates life" issues to deal with: I could see into the church even though the prototype window is translucent. I fixed that problem by placing a piece of matte (invisible) tape on the inside of each window. Interior illumination is from a pair of GOW lamps suspended in a wooden "beam" about 16 scale feet off of the floor, high enough that there aren't any hot spots in the windows when the room lights are off. This was a lot of work but IMO the result is totally worth it.
I've had this kit since about 2007 and it was high time I finished it. Now I have but one Plasticville house to work on, and then I will run out of excuses for not starting my scenery.
Joel,
I think the church looks excellent! It reminds me of one we went to when we went to camp when I was a child!
MaxSouthOz posted:Some more sea. This time down at the slipway end.
DerSuhrhersagten0868 posted:I went under the table and dug out a Girder & Panel kit. Built a nice little oil refinery with it. It has valves and everything. It's designed to work with water, so I'll just dye the water brown or black...
I have to say it looks great. I would weather it a bit, if you like scale stuff.
![]()
Mitch
#JOHNF "I love the Mountain..... I bet the first time you tried it, it was something like this..."?? (Please Please tell me you did... and that someday, some where, I will have a mountain like yours...... oh and some very tiny folks to get in and rescue my Gi-Raffe when they derail....... IN the mountain,
Attachments
Images (1)
#JOHNF "I love the Mountain..... I bet the first time you tried it, it was something like this..."?? (Please Please tell me you did... and that someday, some where, I will have a mountain like yours...... oh and some very tiny folks to get in and rescue my Gi-Raffe when they derail....... IN the mountain,)
Thanks Miggy. My first attempt at a mountain was a total disaster. This is my 4th layout, and I am finally getting a little better.
I got DCS 5.0 and then 6.0 installed. It went smoothly once I found a solution to the "device cannot be started" error from my recently-purchased RS-232 to USB adapter. It turned out that the current driver won't work with older Prolific chips at Windows 8 and above, which led me to believe my adapter was manufactured in the Windows 7 era. Per an entry in someone's tech blog, I had to replace the driver with a 2008-vintage driver that for reasons I don't understand is compatible with Win 8 and higher. If not for that, I might still be getting the "There are no COMM ports installed on this PC" error from the DCS loader program.
DerSuhrhersagten0868 posted:I went under the table and dug out a Girder & Panel kit. Built a nice little oil refinery with it. It has valves and everything. It's designed to work with water, so I'll just dye the water brown or black...
I have to say it looks great. I would weather it a bit, if you like scale stuff.
Nice still, I mean refinery. ![]() Of course now it has me thinking about some of the coaling towers people's layouts.
Of course now it has me thinking about some of the coaling towers people's layouts. ![]()

MaxSouthOz posted:Some more sea. This time down at the slipway end.
That came out great and the lighting really makes the scene pop. ![]()
Thanks. I'm still faffing about with it. ![]()
I've finally got to the end of making sea - still faffing with the beach. ![]()

And now with the working table back in place.

The right hand half is plate glass for making structures. The glass is removed for operating sessions.
Attachments
Images (2)


Well, I made "something ". At least it's off the floor. 
The 4 x 8 table will likely become 6 x 8 before anything else is laid out. The entire point of this is to play with different ideas until I finish the basement. To that end, everything will stay away from the walls and be temporary sections.
For now this is my first ever o72 loop, and I just didn't foresee how much room they take up in the corners.
Attachments
Images (1)
Videos (1)

A fine start, JH.
The track looks like it's good and smooth. ![]()

Ran trains! Did a bit of a switching operation and took a few photos. Put my new Atlas O ( new to me via eBay ) pulpwood flat cars on my Mountain Division. They look awesome in humble opinion![]()


Attachments
Images (4)
Can you see the water on the rocks, just past the breakers?

Not even by squinting?
Attachments
Images (1)

Max, Max, Max.... YES!! I Can see the water on the rocks, and to think this was started because you saw a very COOL �� Boat! Very well done, I look forward to your posts and, I must confess, I did not see the water �� on the rocks , even when squinting, on the first go... I'm on my third scotch and now, it quite clearly presents itself . (Salute)
He he! Thanks, Frank.
Now I know what to do. ![]()
. . . where's that bottle? . . .
Installing grade crossing signals. Still have to hook up the wiring....tonight I hope.


OK so I had "helpers"
Attachments
Images (3)


I got in a couple of never seen before Model T Ford models, in plastic, that will be painted and severely weathered, to be sunk down to their axles behind a gas station or at an old mine. Also got in a Matchbox Model A wrecker for this or other gas station. It will be relettered for Frontier Oil or other regional oil co. Much time was spent researching a future railcar project kit bash. Looks like models exists, that can be bought at an affordable price, that will be much easier to modify, and l can use original planned power chassis for something else. This is a future effort, to fill a square, and won't happen fast.
Been a while since I posted here, but not for lack of working on the layout. On the contrary, I've been very busy getting ready for hosting on our NMRA division layout tour. Ballasting operations wrapped up for this first batch about a week ago, so track could be cleaned and returned to operation.
Walt came by last Sunday, and we ran trains. It was a good thing too, because right out of the gate we ran into a big problem. One block on the upper deck had a short. But this one was extra tricky. Using GarGraves track, I have one ground rail, and the other outside rail is for detection. The detection rail has three segments, one at the east end (3'), one at the west end (3') and the middle (in this case 24'). It took a while to realize that the train was making it past the east detection OK, but shorting out when it hit the middle detector. We did a visual inspection of the track, and couldn't see anything. Finally, I started cutting the wire that was tied to each 3' section of track, as well as the pins in the rail. After three cuts, the search was narrowed to a single 3' piece. Then I found it, a black 2-56 screw, the type I use to connect the knobs on the manual switch throws, was wedged between the detection rail and the center rail. The strange part of this was, I had run trains through that block at least 30 times without trouble. Thank god we found it during the test run. Something like that could have ruined my day Saturday. Fingers crossed!!!!![]()
Not only did the train room need cleaning, but the room between the stairs and the train room, where I had my chop saw set up, really needed cleaning. There are no before pics, but here's what it looks like now.
Chad (Chester7) made this beautiful sign for me. I think this is the perfect place to show it off.

There's a story behind all of the signs I have. I'll have to tell the one behind the Burlington Route sometime. For now, suffice to say that's where the chop saw used to be.

Scott (Miggy) helped me finish ballasting Interstate last week.


Still lots to do before Saturday. After that, I think I'm going to collapse.![]()
![]()
![]()
![]()
Attachments
Images (4)


Attachments
Images (1)

Marvelous stuff Elliot! looks great.... see you saturday mr Elliot! ![]()
"DAWGS, git ur Hot Dawgs...>" Yessir, I'll take two.
Fun photo sir.
I don't think my caption stuff got inserted. I had some fun with my Frosty Bar, my favorite Plasticville piece, based on a place in Mackinaw City Michigan which has a 60 foot long hot dog on their roof.
Big_Boy_4005 posted:Been a while since I posted here, but not for lack of working on the layout. On the contrary, I've been very busy getting ready for hosting on our NMRA division layout tour. Ballasting operations wrapped up for this first batch about a week ago, so track could be cleaned and returned to operation.
Walt came by last Sunday, and we ran trains. It was a good thing too, because right out of the gate we ran into a big problem. One block on the upper deck had a short. But this one was extra tricky. Using GarGraves track, I have one ground rail, and the other outside rail is for detection. The detection rail has three segments, one at the east end (3'), one at the west end (3') and the middle (in this case 24'). It took a while to realize that the train was making it past the east detection OK, but shorting out when it hit the middle detector. We did a visual inspection of the track, and couldn't see anything. Finally, I started cutting the wire that was tied to each 3' section of track, as well as the pins in the rail. After three cuts, the search was narrowed to a single 3' piece. Then I found it, a black 2-56 screw, the type I use to connect the knobs on the manual switch throws, was wedged between the detection rail and the center rail. The strange part of this was, I had run trains through that block at least 30 times without trouble. Thank god we found it during the test run. Something like that could have ruined my day Saturday. Fingers crossed!!!!
Not only did the train room need cleaning, but the room between the stairs and the train room, where I had my chop saw set up, really needed cleaning. There are no before pics, but here's what it looks like now.
Chad (Chester7) made this beautiful sign for me. I think this is the perfect place to show it off.
There's a story behind all of the signs I have. I'll have to tell the one behind the Burlington Route sometime. For now, suffice to say that's where the chop saw used to be.
Scott (Miggy) helped me finish ballasting Interstate last week.
Still lots to do before Saturday. After that, I think I'm going to collapse.
Looking Good Elliot. Your in the home stretch now. Hope all goes well Saturday and I certainly hope you will be posting videos of the op session.
Finding a little black screw under all that ballast was pure luck ![]()
Bob
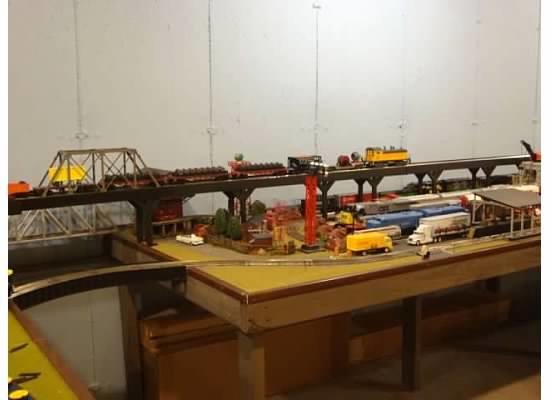
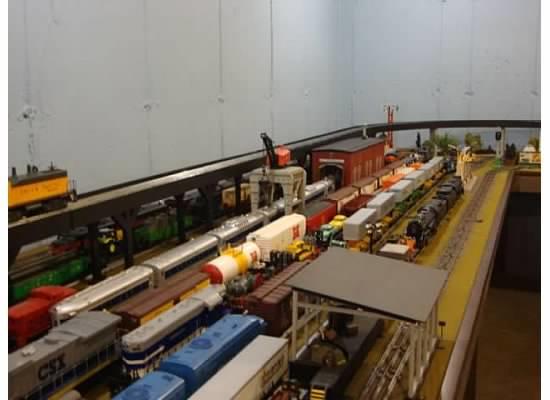
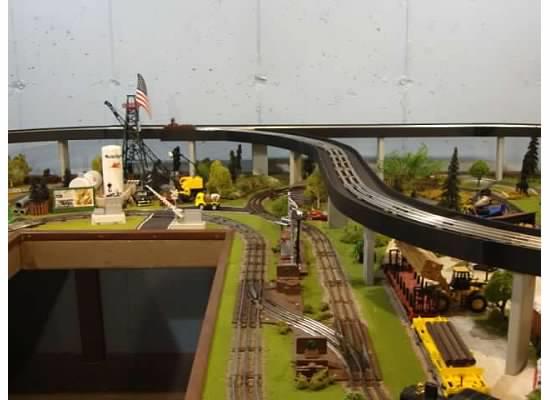
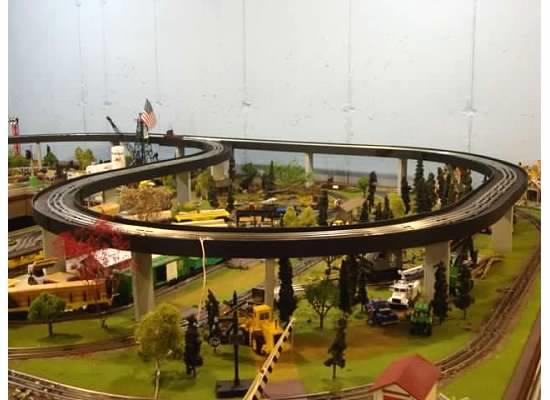
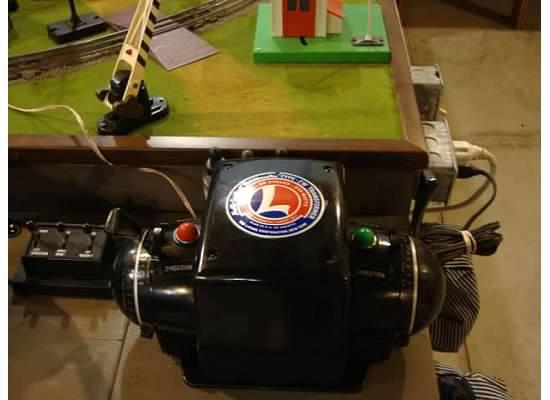
KRM posted:At last,,,,,,,,,,,,,,,, Here is the completed elevated level less the Lockon wire up. That will come in the next few days as they are calling for rain.
Also the new back up ZW.
Bet your grandson can't wait to run trains on the new line! Looks great!
Bob
Miggy posted:Marvelous stuff Elliot! looks great.... see you saturday mr Elliot!
Great job! So you are checked out on ballast. If you come visit my layout in planning in a 130 sq ft room, you could probably ballast the whole thing in a day!
RSJB18 posted:KRM posted:At last,,,,,,,,,,,,,,,, Here is the completed elevated level less the Lockon wire up. That will come in the next few days as they are calling for rain.
Also the new back up ZW.
Bet your grandson can't wait to run trains on the new line! Looks great!
Bob
Thanks Bob, The word is he is coming out on Friday so I had to put it on push!!! ![]()
At least it is all up and running. Last night wifey and I ran trains for about an hour before bed. Works great considering there is only one power tap for now.
Work continues almost daily on the new club facility mostly by Harold, the proprietor. His 'style' of construction has made it quite difficult to get any decent photos of progress due to the mess, but we are coming along nicely.
Last evening we shot a few photos for our new business card and brochure so we cleared off a space near a MTH station and shot this old PW 773 Hudson.
Our lady graphics designer will 'light' the headlamp and use this in her work for us. She's a smart, nice-looking blonde Trump supporter who is painting all the wall murals and likes trains!

Attachments
Images (1)
Thanks guys!
Bob - This isn't an operating session, at least not the way I see them. This is an open house for a specific audience, with display running. An operating session is when a small group of people come over and trains are made up and broken down, with cars being switched at industries. I hope to host at least one of those before 2018. ![]()
Good luck Saturday, Elliot. ![]()
Looking real good C.Sam. ![]()
Big_Boy_4005 posted:Thanks guys!
Bob - This isn't an operating session, at least not the way I see them. This is an open house for a specific audience, with display running. An operating session is when a small group of people come over and trains are made up and broken down, with cars being switched at industries. I hope to host at least one of those before 2018.
As long as trains are running Elliot you have been successful! Good luck.
Bob
Thanks Pat.
Bob, that's the real trick. Murphy's Law of model railroading: trains don't run when guests are present.![]()
![]()
![]() (Hope I didn't just jinx myself)
(Hope I didn't just jinx myself)
<crosses fingers, toes, eyes and knocks on wood>
Big_Boy_4005 posted:Murphy's Law of model railroading: trains don't run when guests are present.
Too true.
The last op session I had, I had tested everything that morning and when people showed up and I hit the master switch, nothing. Turns out, one of my throttles was causing the DCC system to re-boot, and was an easy fix. Thank goodness the guy who wired my DCC originally was one of the people running that day!
Add Reply
Sign In To Reply
