


Lee, I will one day! I know your just down the road! Would be a day trip I think!![]()
mike g. posted:DEUCE, Sorry about work taking you away , but it sure has to be nice when you get home! I love it that your son wants to come out and run trains with you, soak it in cause it might change! I was wondering if you have thought that maybe the wife bought you a surprise and put it on your layout to see if you would notice!
Heh, fat chance of that happening. She always thinks I buy too much, no way would she willingly add to what she already considers a money pit ![]()
I her defense, I do (spend too much), and it is (a money pit). Or at least I used to. I haven't purchased anything (aside from $2 on a diecast forklight that shipped for free from China) in a month or two.
Lee, very nice pics. In order to get great pics you have to have a great layout and you got one. By the way, hope I read this right. In the new issue of OGR you have a pic. Nice shot. I love doing the laundry because it gives me time to work on the layout. So while that was going on I finished off painting the concrete color on the flats. And Mike I am going to paint the doors. Just got my Scale Coat paints from Minuteman Models. I'll let them dry and later go down and pick a color for the doors. Pics...........Paul


Attachments
Images (2)
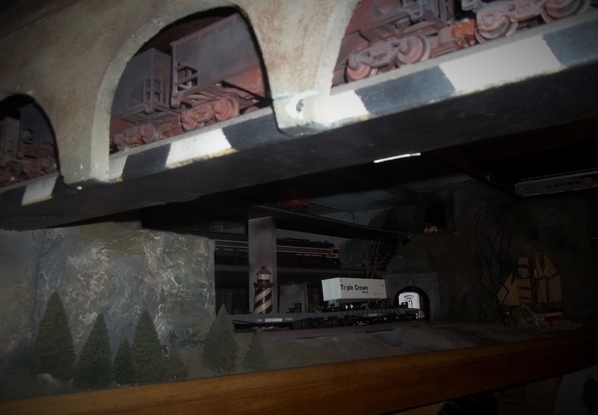
Well, I finally did it. I finished spreading ballast over the entire Shoreham section of the layout. Most of it is glued too! I just have to clean the rails on the mains, then I can do a little rail paint touch up, and I can set my building flats, add a little greenery, and this section is officially done. Then I can hang my valance!


Everything from the stick to the left of the bumper, is glued.

Just have this section around the switches left to glue. It won't take long.


There's still a lot of rail to clean before I try to run anything. I've added that to my computer punch list. Company's coming in a couple weeks. Next week is full of medical stuff. Gotta get a move on.
P.S. Last time Patrick came over, he thought one of the outside rails on main 2 (the middle track of the three near the backdrop) was bent. He even showed me a picture, and it looked bent. However, I checked the gauge with my calipers, and it was fine. It must have been an optical illusion created by the uneven paint on the rail head. That would have been a pain to fix. Dodged one there.
Attachments
Images (6)
Eliot, Looks great, it's got to feel good to be that far along with the ballasting ! I am moving at a snails pace on mine. Two questions: What color are you spraying the track with ? Assuming it might be a custom mix, is there a formula you could pass along ?
2nd question: are you spraying that color before putting down the ballast ?
Thanks, Chris A
Thanks Chris, it does feel good. Only thing is, the layout has 22 sections. A few don't need ballast, but most do. This is only the second section to reach the 100% mark. Newport got finished last month. The good news is, a bunch of others are close to done.
The color is called potting soil. I don't have the can handy to give you the formula. I bought 4 cases of GarGraves from a forum member who had painted them. They needed a lot of touch up, so from visual memory, I picked it from the chips at Menards. About a half shade off, but it's fine.
Yes, ties and all, once the track is screwed down. Then ballast and touch up.
paul 2 posted:Lee, very nice pics. In order to get great pics you have to have a great layout and you got one. By the way, hope I read this right. In the new issue of OGR you have a pic. Nice shot.
Really? Cool! I had no idea. I'd submitted it not too long ago because I wanted to contribute something as I am here often and usually buy the magazine from the local book store. Can't wait to see it!
My plan is to go to Portland tomorrow (for a military collectible swap meet) and I was going to hit the good hobby shops there anyway, hopefully they'll have it on sale. But maybe this is a case of the subscribers having it first and in retail will be a while?
I really need to work up a pitch for an article for OGR on my layout; maybe I need to get off my backside and do that!
Elliot, the ballasting is looking good. You sure can get a lot of ballast done with a good system. Tonight as per Mike's instructions LOL I got the first coat of paint on the doors. The camera didn't take a good pic The color looked better under the light. Tomorrow morning I'll put the second coat on and then I can start gluing all the windows in. Still have to get some paint made up for the fixed windows. Hopefully I can get out tomorrow to do that. Pics............Paul


Attachments
Images (4)
Finished my P&LE yard and relocated my Heinz Field.

Attachments
Images (2)


Fantastic!!
Thanks Mark.
Elliot, must feel good to have finished Shoreham! Sure is a lot of area there. What section is next for your wonderful work!![]()
Very COOL Lee! I cant wait to see it in OGR I bet it is going to look as great as your layout does!![]()
Looking good Paul, you moving right along. I think the doors look great! Next thing you know they will be up on the layout and you will be adding grass to the cracks in the sidewalk! LOL Nicely done!![]()
Aliquippa & Southern, Very Impressive, I really like the night shot, brings out a lot! Nice work!![]()
Got the second coat on the doors this morning. I forgot I have an afternoon train get together. Hope to get back to the flats this evening and start gluing in the windows. Pics.........Paul


Attachments
Images (4)
Nice Paul! Have fun with the group!![]()
Coming along nicely, Paul!! Have a great time with your group!!!
Attachments
Images (3)


Another nice collection Brian!![]()
thanks Mike...
Attachments
Images (1)

Thanks Mike and Paul.
Mike - Next up is cleaning enough track so I can get a train around for company next Saturday. That one came up suddenly, as I got an email yesterday. I'm also having company in two weeks. Then I have two months before the convention.
Paul - I'm just gluing the very last bit of Shoreham. Ten minutes worth of work. ![]()
Chris - Potting Soil B11-1 Company FB - PPG - Dutch Boy
Formula for a gallon:
Colorant OZ 48
KX White 1 18
B Lamp black 5 23
F Red oxide -- 14
C Yellow oxide 3 41
ran a few trains last night... ![]()

Attachments
Images (3)


In a somewhat similar fashion to Mark Boyce, I've been granted a new section of real estate for expansion! The 4'x8' layout that has moved from the dining room table to the office / boy's room to sharing space in my wife's sewing/craft room will be moving again, hopefully for good now. Our son and his fiance have found a place, and will be moving out at the beginning of July. (They moved into the office/boy's room almost exactly a year ago, about 4 months after he had moved out, after problems with the house they were sharing with some friends.)
The overall space is about 20' x 11', however, since I will be putting my office area back, adding a workbench, a chest freezer, and a storage cabinet, I'll be left with about 14'x11', less a corner about 5'x6'. A whole lot more than 4'x8'!! First up will be new flooring to replace the old tile, patching and painting the walls and ceiling. My wife says she will do some scenic backdrop painting for me, I'm excited about that!!
No longer will the layout be on the dining room table, I will be building a "real" framework!
Brian, I bet its fun to run trains at your place! You need to have Clem come over so he can do a ops night and give a review or report! LOL![]()
SlowHands, that's great news, so you have a few holes to fill, paint a room, new flooring! I hope you put carpet and some great padding under it! LOL I know your going to have a great time moving it and building more, so please keep us posted!![]()
Not that I've turned this old Railking PRR RS3 into a dummy unit:
1) Install cab figure: Check.

2) Install LED headlight. Check.

3) Install on/off switch for headlight. Hmm...had to get creative. Not much room underneath. ![]() Since it's a dummy, there's no sound, no speaker anyway. This old slider switch just fits in between the speaker grille openings. Check.
Since it's a dummy, there's no sound, no speaker anyway. This old slider switch just fits in between the speaker grille openings. Check.

Attachments
Images (3)


Very nice job, Ralph!! Good spot for the switch!


Attachments
Images (8)


You certainly run a smoky, railroad dirty mood there Brian!!
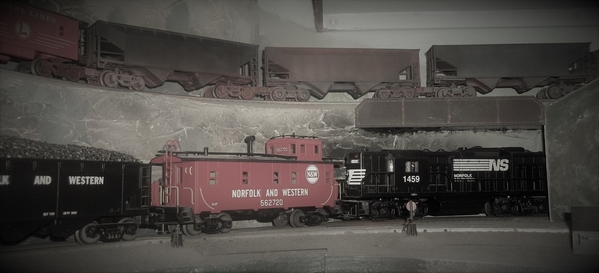
Lubed four locomotives, put together a fifteen car coal train of fifty ton hoppers pulled by a Norfolk and Western mallet, began weathering three fifty ton hoppers, put together a short freight pulled by a WbB forty four tonner. Ran trains.![]() I really enjoyed the time with my trains.
I really enjoyed the time with my trains.![]() I've not been able to spend that much time with them for a couple months now, due to my work schedule.
I've not been able to spend that much time with them for a couple months now, due to my work schedule.
SLOWHANDS, congrats on acquiring more real estate for the layout. It's always a good thing when we have an understanding CEO. Today I made sure to get to Home Depot to get some paint. I took a painted window with me and I looked for a colors but couldn't find one so I waited my turn at the counter, gave the window to the associate and ask if she could find a match. She got me a very, very close second which I was happy with and I also picked up a few bottles of Gorilla super glue gel to glue the flats together. The only place I have left to paint is on the three flats I just did on one side a downspout is molded on so I have to paint concrete on the sides of it and with the Aluminum paint I just got I can do that for the downspouts. I'm taking the wife to Cracker Barrel for dinner so maybe that will get me some time after dinner to do some more painting. Pics.............Paul


Attachments
Images (4)
Slowhands posted:In a somewhat similar fashion to Mark Boyce, I've been granted a new section of real estate for expansion! The 4'x8' layout that has moved from the dining room table to the office / boy's room to sharing space in my wife's sewing/craft room will be moving again, hopefully for good now. Our son and his fiance have found a place, and will be moving out at the beginning of July. (They moved into the office/boy's room almost exactly a year ago, about 4 months after he had moved out, after problems with the house they were sharing with some friends.)
The overall space is about 20' x 11', however, since I will be putting my office area back, adding a workbench, a chest freezer, and a storage cabinet, I'll be left with about 14'x11', less a corner about 5'x6'. A whole lot more than 4'x8'!! First up will be new flooring to replace the old tile, patching and painting the walls and ceiling. My wife says she will do some scenic backdrop painting for me, I'm excited about that!!
No longer will the layout be on the dining room table, I will be building a "real" framework!
Yay!!! Congratulations on the new space!! I'll look froward to seeing what you do with it!!
I am working on this Carolina Matters Mill kit, which with exposed rafters has a lot of small parts. It is designed with an undershot wheel, but l prefer overshot, so will build it as such. It has a waterwheel kit which l will use, although since l have scratchbuilt several mills, l have developed a technique for building mill wheels. One reason not to build it undershot is that not enough Chooch "stone" for that is included, and it is a long drive to a shop that might stock some.
Elliot, thanks very much for posting the color formula for the Potting Soil color.... I went to the Menard's web site and figured you were talking about the Dutch Boy Paint color... I don't see Dutch Boy paint at all in the northeast anymore. Ironic because it's the only paint my dad would buy. I used more than a few gallons of it painting our entire house in Oradell, NJ when I was in high school. We won't talk about how many decades ago that was !!!
Chris, if you take the formula to Menards they may be able to make it up in the store. One time I found a color chip from Benjamin Moore but took it to the Depot because I myself like Behr paint and they matched it. I would assume that as long as you have a formula they can make it up.................Paul
Chris, you're welcome. I see you are well outside Menards range, but armed with that formula, anyone should be able to make it, in any brand. It is technically a Dutch Boy formula and name. The alternative would be to take a close up picture of rail, and bring it in for color matching, or simply pick a close dark brown from the available swatches wherever you buy paint.
I think PPG is the parent company of Dutch Boy, if you can find them. That 48 column in the formula is for 48ths of an ounce. If you only need a quart, all values need to be divided by four.
chris a posted:Eliot, Looks great, it's got to feel good to be that far along with the ballasting ! I am moving at a snails pace on mine. Two questions: What color are you spraying the track with ? Assuming it might be a custom mix, is there a formula you could pass along ?
2nd question: are you spraying that color before putting down the ballast ?
Thanks, Chris A
Another color option for track is Rust-O-Leum Camouflage 1918 Earth Brown. Yes, spray track and ties before ballast application.
Dave


Attachments
Images (4)


Dave, thanks for the comment.... I have been spraying all my track with the Rust Oleum Camo. Brown. For the most part I like it, it does a good job of "muting' the black center rail, but it is very dark and I'd like to find a way to lighten 10% of the ties, without spending the rest of my days hand painting individual ties... been there tried that.
Been working on final weathering of the clapboard buildings on the "mine run", planting remaining trees and vegetation, and I got my new static grass applicator this past weekend. Spent a lot of time, fun time for the most part playing with the static grass, working on my static grass application technique... While I was waiting for grass adhesives to dry, I did some more ballasting.
There are more photos below, chose not to take up an entire page with photos in the post.
")
")
")
Attachments
Images (10)
: New 6mm and 12mm static grass to left of building, pre-made Silflour buffalo grass tufts around the tracks")
: 4mm, 6,mm and 12mm static grass mixed")
")
")
")
: First attempt at making individual tufts with the applicator")
")
")
")
")
Since I did not have to be anywhere this morning, I ran trains immediately upon waking this morning..... before having coffee too.![]() Started clearing some of the piles that have accumulated in the train room. Good times
Started clearing some of the piles that have accumulated in the train room. Good times![]()

Attachments
Images (1)

Worked on the three flats with the downspouts. Once dry I can go back and do some touch up. Later today windows start going in the flats. Pics................Paul


Attachments
Images (3)
Looks good Paul!! Have a great day hanging windows!
Chris, I am not sure. I was looking at different ways of doing it. I tried the latex paint watered down but did not like the way it turned out. That was the only thing I tried so far. Sort of in limbo with this. Maybe I'll try the spackling. Know the flats need something just leary about trying it.............Paul
Hi Paul, I deleted my post, because I got to looking at the photos more closely and saw that the brick lines were showing some mortar....
I'd give the spackling a try... I know these flats are a ton of work, and you start feeling like you'll never get done... Try cutting up an old credit card, or one of the many promotional thin plastic cards that come in the mail to make yourself a small 1/2 inch wide x 2 1/2 inch long, hobby putty knife, it makes it easier to only put the spackling where you want it, and get it out of the inside corners. Do make sure to clear coat the test area before you apply it so the red brick color doesn't bleed into the spackling and turn it pink.
chris a posted:Dave, thanks for the comment.... I have been spraying all my track with the Rust Oleum Camo. Brown. For the most part I like it, it does a good job of "muting' the black center rail, but it is very dark and I'd like to find a way to lighten 10% of the ties, without spending the rest of my days hand painting individual ties... been there tried that.
Been working on final weathering of the clapboard buildings on the "mine run", planting remaining trees and vegetation, and I got my new static grass applicator this past weekend. Spent a lot of time, fun time for the most part playing with the static grass, working on my static grass application technique... While I was waiting for grass adhesives to dry, I did some more ballasting.
There are more photos below, chose not to take up an entire page with photos in the post.
Very Nice
I guess this topic and discovery lends itself to what I have done on my layout today.
https://ogrforum.ogaugerr.com/...l-90-degree-adaption
Leroof
Chris, The buildings and scenery look great!!
Leroof, That is quit a project you undertook and made an excellent crossing!!
Yes, Chris A, Your work is great, I love all the pictures you have posted. It certainly takes lots of thinking, also lots of time and dedication to accomplish this quality of work. I commend you.
Trumptrain,I also love your great pictures and creative scenes. Your the man.
Briansilvermustang, you have an enormous engine Collection, keep the pictures coming.Your Layout is cool to..
Mike G, where are the recent pictures of your new train room. I hope all is well.
Paul 2, I love your pictures and reviews. You are amazing at building your railroad.
Ralph M, I like your layout very much to. Great pictures above....
i ran some trains today for the first time in months...


Attachments
Images (7)
Virtually doubled the capacity of the lower staging yard which we call Hidden Lake.


Attachments
Images (4)


Attachments
Images (8)


Thanks Mark. You always have appreciative remarks.
Working on the smoke unit of my Lionel 18009 NYC Mohawk, to improve smoke output. Now I have to make some time to visit an auto parts store and get some liquid gasket, to replace the gasket on the smoke unit that always breaks when you take it apart.
Leroof, You're welcome! I like to offer encouragement and really like when someone presents a new idea or solution as you did!
Chris A.The Clipper Mill building looks great along with the 2 other buildings! You sure have an eye for detail for vegetation and trees! Looks wonderful!![]()
Brian, some cool pictures there! Keep them coming!![]()
Paul, Great work on the flats! They are going to look outstanding on your layout!![]()
LEAPINLARRY, I just love seeing pictures of your layout! You must have been at this for a while!![]()
Sorry it's been awhile for pictures, I am doing fine, but I ordered Sheetrock last week for delivery on Friday so I would have the weekend to work on it! I went with 4 x 8 sheets instead of the 4 x 12 cause all my help bailed! Well low and behold Friday came and went with no sheetrock, I called the store and they said someone bought them out, even though I had already paid for them! ****ed me off! So comes Monday and now I get sheetrock. So I was up till 9 last night hanging sheetrock. Here is what I got done! LOL Silly me I ended up 2 sheets short!![]() Sheetrock is not an older guys game just so you all know! Leave it to the young!
Sheetrock is not an older guys game just so you all know! Leave it to the young!

Attachments
Images (2)
Mike, That is incredible work!! Yes, I agree it isn't for older guys, I wouldn't even think of doing it! What you have done looks great!!!
your room is looking GREAT Mike !! ![]()
I see you're getting the bridge ready for the doorway... ![]()
rolling right along ! ![]()
Thanks Mark and Brian! I will start mudding either tonight or tomorrow and get the last 2 sheet on Friday! To be honest this is one part of a build I really hate! LOL![]()

Attachments
Images (1)


that is a sharp looking steam engine Matt !!
Last night I did a series of shots on the layout (with various cars, locomotives and a couple of locations I rarely photograph) for a project I'm keeping secret for now, but if it works out, you'll all be seeing the results...
Yes, that's intentionally cryptic.
Mike G: Train room is looking fantastic.... Been there, done that with the "help" that volunteered, but never showed up.... You have some serious perseverance to move and hang sheet rock by yourself. I hung my last sheet of that stuff about 15 years ago !! Great job !!!
Doug N, Mark, Mike & LeapinLarry: Thanks for all the positive comments, and to those who posted "likes".... As this scene coal mine and mine run is pretty much front and center in the main room, I want to make the scenery as good as I am capable of.... It's definitely a fun challenge, but I learn something new most every day.
LeapinLarry, great to hear from you, we haven't corresponded in a long time. I am anxiously awaiting major shoulder surgery on July 16th to repair 3 roto-cuff tendons, and do something with a dislocated out of it's track bicep tendon.... So that's why I have had so much time this year to work on the layout. Should be working restoring historic windows, but no can do with one arm !
BTW Mike G: I ordered one of those 300W LED dimmer switches that you recommended, haven't hooked it up yet, but decided to purchase it from HD before they ran out of stock.
What did I do on my layout more of last night instead of today. Started to take all my rolling stock off my layout. Though I did run trains for a bit. I am planning on redoing my layout to maybe work better for what area I have. Though some point in the future will be talking down the whole thing and build a bigger maybe better layout, but that is still a quite a ways down the road. I need to clear out my basement before I can even consider starting that.
LEAPINLARRY, nice layout pics. Mike G, you room is turning out great. Mudding is not at the top of my like to do list. Today I decided to work at mortaring. Chris talked me into it. So I started off taking all the flats out to the garage. I set up the band saw to cut off a blade width off all the sides to even them out. Once that was done I layed them out and sprayed them with a sealer coat. Through my own fault I have a couple of gift cards from TOYSRUS which I forgot I had. I am going to cut them into narrow strips for applying the spackling the the bricks. Not sure if I will get to that tonight I want to make sure the sealer is real dry. After that is done I'll start gluing in all the windows. Pics.....Paul


Attachments
Images (3)
looking GREAT Paul !! ![]()
They look good Paul! At least you can get some use out of the plastic cards. You are putting a lot of effort into these, but they will be nice when done!
Very impressive!
Found a substitute but inferior plastic "stone" sheeting to continue with the foundation on this Carolina water mill kit. Also got in structure photos that l promised, when l get around to loading them. Chose dark barn red with white trim as a color for this wooden mill. Most of others, in photos to be posted, are "stone".
Chris A. Thanks for the kind words! If I have waited for all the help that said they would be here I would still only have a concrete floor! I have done everything but the concrete by myself, some days were good and some days were killer! Yesterday was a little of both, good to have most of it done, but killer on the body! LOL![]()
I Hope that dimmer switch works out for you! All I have to do is buy the track lighting system to go with mine! LOL![]()
Paul, I would have to say it looks like your on the right track! Things are really looking nice, Plus if you have any problems or questions you always have Chris A. to bounce ideas off of! Chris is a wealth of knowledge !![]()
This evening after dinner I sat at the kitchen table and did one flat. Sure takes a long time. I only have thirteen more flats to go. Pics...............Paul


Attachments
Images (2)
Paul, Looks good! Yes, I was thinking of the number of flats you have to do any of the tasks on, Congratulations on your diligence at trimming window openings, painting, and now mortaring!
Paul, looks good! I feel for you having 13 more to go, but I know you really enjoy it!![]()
Thanks Mark. Mike you are right. I'm a glutten for punishment LOL. Looks like I'll be at the kitchen table today ( not eating all day LOL ). Looks like I finally got a rain day. We'll see how many I can get done today..........Paul
WOW Paul, from what I have been seeing on the news, everyone from the Midwest to the East has been getting tons of rain! Your just getting yours now?![]()


Attachments
Images (3)


Today I have finished rebuilding 3 tyco billboard reefers and one bachmann caboose to go with my steam era train. The tyco boxcars are amazingly detailed for their build date. The trucks are getting all new walthers turned metal wherlsets and kadee 148s. I find that these older unwanted cars can be modernized and have detail added to the point where they are a lot more realistic and reliable than before.
Paul- the flats look great. I'm sure Mike G would rather do that then the joints in all that fresh sheetrock in his train room ![]()
Bob
RSJB18 posted:Paul- the flats look great. I'm sure Mike G would rather do that then the joints in all that fresh sheetrock in his train room
Bob
One day Bob!![]()
After breakfast I got three more flats done. Pic...........Paul

Attachments
Images (1)


Attachments
Images (9)


Well guys, I've got some bad news on a couple of fronts. Might as well start with the worst first. The toe is toast. The doctor took a pair of tweezers and plucked out a piece of bone. He did a follow up x-ray and showed me the one from 5 weeks ago side by side. It was quite obvious that it was going downhill, and there was no chance for recovery, due to infection. That's in spite of massive doses of antibiotics. The damage was too severe. I've had time to wrap my head around this, and it is the logical decision in every way. I'll adapt. In the grand scheme, it won't have a real effect.
For me, the worst part is I'm going to have to stay off it for a month after the surgery. I want to just get in and get it done, because I have things to do on the layout (among other things).
So, the less bad news. Things were going along nicely on Saturday. I had finished gluing the last of the ballast at Shoreham, and started cleaning the track, in the hopes of getting a test run over the whole layout done. Everything was going along great, got out of the big hidden yard, up the helix, around the whole main level, up the hidden hill and back onto the helix, to start the run around the upper level. Got through Frogtown, Midway and East Minneapolis, and was rounding the curve at the end of peninsula two, heading into Shoreham. I'm following along with the cab-1 in hand, even with the back of the train, when I hear a thud. I rushed around the corner to find the locomotive upended sitting atop the track cleaning car, and billowing smoke (not the good kind).
I had left a fan and some building flats on the track, forgetting that they were on the main. I'm 99% sure what the source of the smoke was, without even opening up the engine. I have seen this once before. Even though the layout has over current protection, it won't protect from an over current situation INSIDE the engine! The source of the smoke was the wires inside. I had burned the insulation off them. The wires are too small to handle the full track current, when the wheels and rollers are directly shorted. It's no problem under normal circumstances, because the wires are rated for the motor load.
The solution is to put polyfuses with about a 2 amp rating in line with BOTH rollers. It's a lot of work, but so is rewiring an engine. Sucks, because I really liked that engine. It was a nice Atlas. Maybe that's a project for when my foot is healing.
This is where I was standing when it happened.

I put the smoldering locomotive on the concrete floor, just in case.

I grabbed another Atlas to pull the train. Maybe I can continue the run later today. Visitors coming on Saturday.

In the lower right are the building flats I ran into, but there's another reason for this picture. I had to touch up the blue paint around the seams of the backdrop. For some reason, it had faded. Additionally, Patrick had gone back and refilled them with some clear caulk when they had cracked, and it just wasn't as pretty as it could be.

More backdrop touch up. The only evidence is there's a little paint on the ceiling. Patrick isn't that messy of a painter, but it isn't going to matter in the end when I install my valance.

I've got a plan to make this hole less obnoxious. I get to it soon.

The ballast and the backdrop all the way down Shoreham.

Attachments
Images (7)
Don’t know if I should have hit Like Elliot, but it means I care! I’m sorry about the toe. Is this the big toe? My father in law lost all but his big toe, and did okay once healed! I’m praying for you and your surgery!
Sorry about the engine too
Elliot, so sorry to hear the bad news about the toe. When is your surgery???. Once you have it done do you have to stay off your feet completely for a month or will you still be able to get around?? On the lesser note sorry your engine took a dump. Electronics make everything so real until your zap the electronics then the nightmare sets in. From the pics you got a lot more done. Keep us posted. Once you have your surgery I hope you have a very speedy recovery...............Paul
Elliot, hope things move quickly on resolving your toe situation so you can get back to working on the layout ! take care and good luck with things...
get well soon, track, ballast and layout looking GREAT !!
Sorry Elliot, I just could not click the "Like Reply" this time! The layout is looking great. Here's to a speed resolve of your toe issue!
Elliot, Very sorry to hear the bad news on the toe. Really admire your positive attitude about the whole situation. I suppose this is one of those situations where you, and your doctor want to get the surgery done as soon as possible so the infection doesn't spread any further ? Take care of yourself. Chris
briansilvermustang posted:
Looking great!
thank you Pete !
Got three more flats done this afternoon. Only 11 more to go LOL. Done for the day I am going to reward myself with a steak on the grill LOL. Pic.....Paul

Attachments
Images (1)
Thanks guys! I consider you my friends even though we haven't met IRL. I should be meeting some of you soon, when we take our trip in September. That's another huge reason to get it done. The trip will be a lot more enjoyable without having to worry about that.
Mark - I didn't take your like the wrong way at all. I view likes beyond the literal sense. They are also a signal that a person has read a post, and possibly replied. Both true here. Yeah, it's the left big toe. Least it's not my driving foot. That would suck more. Ever the optimist, right?![]()
Paul - I don't know when the surgery is yet. I promise it won't be before the 7th. If the cards fall right, it'll be the following week. That'll be the soonest. Mobility remains to be seen, the concern is to not tear the stitches out. They'll probably be in for 3 weeks. I'm already scheming on layout projects that can be done at the workbench, all I have to do is get there. I've got lots of ideas.![]() I guess I was really planning ahead when I had a stair lift installed last year. Haven't really ridden it much yet. We've given more rides to visitors and inanimate objects, than I've taken myself. That's about to change. I don't think I fried the electronics, just the wires. That can be another project for my down time.
I guess I was really planning ahead when I had a stair lift installed last year. Haven't really ridden it much yet. We've given more rides to visitors and inanimate objects, than I've taken myself. That's about to change. I don't think I fried the electronics, just the wires. That can be another project for my down time.
Brian- Thanks, there really is a lot to do before the convention. I'll just add, lose toe and sit on butt for a month to my list. Might as well have a sense of humor about it.![]()
![]() Trust me, it's better than my cancer diagnosis 11 years ago. That crap messed with my head for 5 years.
Trust me, it's better than my cancer diagnosis 11 years ago. That crap messed with my head for 5 years.
Dave - Like I said to Mark, it's OK to hit the like button, even if the post isn't all rosy. At least speaking for myself, I understand. As you can see, I really have no secrets. Maybe you can come up after my month long time out. There will be plenty to do.
Chris - Thanks, it just doesn't pay to be all glum about this. I tried that once, it's less fun. Yeah, I want to get it done, but next week is not good as I have long standing commitments. The following week is wide open, and that's what I want to shoot for.
Thank you for the update, Elliot!! Your attitude is encouraging!
Sorry to hear the bad news Elliot. At least you can get this behind you and move on. Your attitude is amazing and is an inspiration to all of us. Keep up the good work and it will help pass the time. Sorry about the loco too. With a layout as big as yours it's not hard to miss something.
Bob
Paul, your like an assembly line! Things are looking good, keep er going!![]()
Elliot, I am sorry to hear about the big toe! But do agree its a hell of a lot better then the cancer thing! I hope you will have help while your sitting around to help keep the dream moving forward! As far as the engine goes, If you need another one I bet you could ask Briansilvermustang for a spare, I think he could find one sitting around! LOL![]()
Elliot to bad about the toe but being a diabetic it could have been a lot worse. you do stay busy to bad about the engine going poof but with luck only the wires took the hit it still looks good!
the layout looks really nice amazing what ballast glue and a lot of hard work can do to enhance an already outstanding layout. I'm waiting for the day you post a video of the dispatcher board working and trains running with the computer setup you plan on installing to detect trains and so on.
take care am sure your better half will spoil you the next month !
Brian, sorry to hear about your toe. My thoughts are with you, buddy. You seem to have a good attitude about it. Hang in there.


Attachments
Images (5)


Built and weathered the retaining wall behind the service station... Had a senior moment and built the first one "mirror image" as the jig is set up to build them face down !!! Took out 3 shades of gray and weathered the service station roof, then sealed it and weathered it with india ink and 91% alcohol..... and decided after watching some youtube videos to take a stab at weathering a die-cast truck that I have been wanting to weather for some time now.... The technique the individual used was really easy and straight forward. I chose not to strip all the paint off, but other wise I followed his steps... Dull coat the vehicle, very thin coats sprayed from 15 to 20 inches away so the finish is rough....weather light to moderately with rusty pastels, repeat same steps about 3 to 4 times, or until you've reached the level of surface rust you're looking for ... it was amazingly easy, especially not having to strip it first. I did rough it up with some 180 grit sandpaper....
")
")
")


Attachments
Images (5)
")
")
")
That retaining wall is superb. Very realistic!!
Chris, you have a gift for buildings and scenery. Looks good. Brian, in your last pics the Northern Pacific in two tone green is one of my favorites. Mike, how is the mudding going and did you get to last two sheets of drywall up. Mark have you gotten in any layout time. Today I had to cut the grass. Let it go as long as I could. I only had a chance to do one flat but somehow it finally hit me. I was using old charge cards to apply the spackling. Each one was taking a long time because I was only working with two different sizes. This huge 3 watt lightbulb went off in my head to make up some tapered pieces. That did the trick and now the time to do wach flat is shorter. Pics............Paul


Attachments
Images (2)
Elliott sorry to hear about your toe. I hope you have a speedy recovery.
Brian, great pictures! I know one day I will start making nice pictures like that! Heck by then they might even have a camera I can work! LOL![]()
Chris, your wall looks Great! Please don't laugh at me but it took me a while to figure out what truck you were talking about! DUH!! It looks like it has been sitting out forever! Nice work all around!![]()
Paul, even one flat is better then none! great idea about different sizes for your credit cards! As far as the mudding is going, I had to work the last couple days down at the store. But I have to get my butt in gear cause the daughter and 4 kids are going to take over my train room for a week as a hotel for the 4th plus some days, so there will be no working in it. ![]()
Tomorrow I have to finish the sheetrock, start taping and mudding the seams, move all my train stuff to a safe location from the grandkids if I still want something in one piece when they leave! But Hey what are dad's for! LOL![]()
ModelTrainsparts: Thanks, Once I built the jig it made making these a breeze.... I just cut up some 3/16" inch plywood scraps, about 1.75 inches wide, anchored them to a base, leaving gaps for 1/4 x 1/4 inch stock ( 1 ft. x 1 ft in O scale). The same jig enabled me to make the support trusses for the Coal Mine Tipple loader I built last year.... I attached a photo of the jig below as well as the trusses I built with the same jig.... It works well for trusses and retaining walls. I don't have a photo of it but I made a similar and easy to cut jig to hold (1/16" stock) joists in place on their edge to make decking, or I suppose it would make roof rafters... Just use a fine tooth 7 1/4 inch Frued 60 tooth blade in a 10 inch table saw, the blade thickness is just about perfect and don't cut any deeper than 1/8 inch grooves on 3/16" centers.
Paul, thanks for the positive feedback... Good news, is that these model building skills aren't some miracle gift..... When I look back at what I was doing 2, 5 , 10 and 15 years ago, it's clear that with practice, a bunch of trial and error, sometimes lots of errors, and perseverance, and some time doing some research ..... modeling skills like any other learned skill definitely improves. Glad to hear about the Ah, Ah moment about cutting up more cards to make tools of different sizes and shapes to apply and remove the spackling.
Mike G: Trust me, I am not laughing at you !!! I was pretty embarrassed when I took my first retaining wall to the layout only to find out it was built backwards. Here's some photos of what one can accomplish with a simple plywood jig....


Attachments
Images (3)
Add Reply
Sign In To Reply
