


Jeff, could you look at your post about the Clever Models again. I am not able to see your photographs, and I do want to see how they turned out!!
Mark - re-posted. It did act funny when I first posted. Photos show up when I look at the post. Odd but not the first time. Should be 4 pics. Let me know. Jeff
Jeff, I can see! I can see! I’m on the phone. I’ll comment further once I see it all on the PC! Thank you!!
No real progress from me today, but I did get the materials to build the table. It's too hot to do anything today. Maybe tommorow will be better...
Jeff, I see your photographs well now, and can see what you mean about the V and the stiffeners alignment. Still, without you pointing out the issues, at a cursory view I would say it looks great! I have two bridges, but am going to need some kind of bridge for a third location once I get to it on my layout. Thank you for the photo analysis.
nice which clever models disk had the bridge
Thanks Mark. I was pretty amazed at how easy it really was, but nice to do a test build at pretty much a cost of my time. The card stock is pretty strong with a vertical load, but it has little stiffness for twisting. I know the creator says you can put a 10 pound engine across, which you probably can, but not any of my expensive engines. I would not trust the glue bond between the girder and decking. I would probably laminate to thin plywood or styrene for at least the plates. In my case this is going on the sides of 1/2 plywood road bed, and that is plenty stiff all by itself. If you have the room, this can be flipped to make it a deck bridge. I would add cross bracing for stiffness to twisting. In my case I had to go up, to keep clearance for the track underneath. Regardless, buildings and non-operating bridges would turn out great. I am going to find more uses for this technique. Jeff
@marty track posted:nice which clever models disk had the bridge
Ah, I found just the bridge design - O Scale Half Through Girder Bridge S71 on page 16. My invoice shows Item# 2-371. It is also on the Steel Industrial Buildings collection. Website could use a better search function. Jeff
Did a little work on my control panels. Haven't got my switch controllers hooked up yet
Attachments
Images (6)


Quitting for tonight. I have been putting Preiser 65602 Seated People I painted into the second Funeral Train passenger Car, the "Overland" Dining Car. Not everyone is wearing black. Some passengers plan to change clothes before the graveside service.
Mixing passengers in a variety of clothes also allows me to run the Funeral cars with my Union Pacific Excursion cars.
Have a good evening.
Sincerely, John Rowlen

Attachments
Images (6)


Last few weeks I have been very interested in mail trains and read a lot about them. So much so that I have been working on a kitbash of a K-line baggage car. (So-so results) The flat red Rusto primer looks OK in some light but not great in other places. It also sticks out in my mail train because I don't weather my cars. I would like to darken the color a little but probably need to clear coat the car first so I can wipe it off easily if I want to adjust that. I'll have to test weathering of the primer on something else first. I posted on the "what have you bought lately" thread that this week I splurged and bought a used GGD PRR heavyweight B70 baggage car and a Weaver New Haven B60b baggage express car to replace two K-line RPOs in the mail train. The green B60b will add some interesting color to the train I think. Been reading lots of posts on the forum when I'm not catching up on never ending house projects. Cheers.
Scouting Dad, nice job. When I have a plywood under base I paint it flat black. That obscures it's presence.
Farmerjohn, the control panels look so neat and functional. Also, your green girder railing looks great, very prototypical. Thanks for posting. Here’s some more pictures of your area, it’s amazing. Happy Railroading 


Attachments
Images (3)
Scouting dad; here are some photos of flat black painted plywood sub frames. I do not rely very much on the Atlas bridges for being very durable when used in a lift out setting so I set them on a plywood sub base then paint them.
On these double bridges they are on a flat tray:

You can just barely notice the flat black plywood.

On the red single track bridges I made a faux girder style sub frame, again the plywood is recessive IMO.


Attachments
Images (6)


Very nice effect, Tom! That is certainly strong for a lift up bridge.
My grandson came over to run some trains.......
Attachments
Images (1)
I am doing a 200 sq ft expansion on my 250 sq ft layout. I got tired of tripping over extension cords going to my wire brush Dremel tool, solder station and vacuum cleaner as I was installing drops to my track. So, I stopped the insanity and extended my run of 120 Volt outlets on my existing layout to my expansion. The problem is I originally ran a twenty amp circuit to my layout which calls for 12AWG wire. There is a world of difference running 12 AWG versus 14 AWG Romex to the outlets. When I started the layout I asked for suggestions as to what to run to the layout if I was using Four Transformers (two for Track Power, one for powering switches and one to power my TMCC control boxes) and the answer was that I should use a twenty amp circuit. Oh well, lesson learned.
Thanks Tom Tee for the idea of painting the wood super sub-structure black. All my liftouts are on 1 x 4 pine, so I do not have as much to hide. I have an earlier post with photos of those bridges.
Had the day off and took the afternoon to build another paper girder bridge. Printed in color this time and extended the length so one end would rest on a pillar. I'll have to carve out a space for a bridge bearing later and paint the exposed plywood flat black. Unlike the first bridge, the inside stiffeners are now quite a bit shorter, so that the girder now hides the edge of the plywood. You can see a bit of it peeking out on the right. This is also the point where this bridge swings toward the viewer so I have to leave a bit of a gap between the girder and the truss bridge.

So it took about 4 hours to get this bridge built. Did not even glue my fingers together this time, but did manage to get some on the kitchen table - a quick wipe with acetone - and gone - whew!.
This is a shot of the external stiffeners cut to match up better. However there is no longer enough glue surface for the base plate (without the other side) so its hard to get a good fit here. In retrospect, I should have laminated the baseplate before attaching (would have been straighter) and anticipated the glue surface problem. Next time I'll put a angle plate at the bottom of the girder plate, like I did with the top plate. Still have to make a girder section for the other side of the track. : )

As I mentioned yesterday, the design was intended to be offset leaving space for the internal deck. The black line locates the top of the deck leaving enough of an offset to completely hide the plywood deck - no black paint needed here. I'll put a laminated card stock deck beneath these stiffeners to provide an attachment point. These stiffeners go all the way up to the top plate, unlike the external stiffeners which are too short to go all the way up.

Lessons learned - CA is no friendlier with color laser ink than b&w laser ink. If it gets on the ink, it it will smear. Second - Especially for the stiffeners, color the white edges with a marker once cut and shaped, but before being glued in place. So what takes so long? Each of the stiffeners needs 5 separate fold scorings, minute trimming, multiple folding steps and a 2 step gluing process. There are 18 of these bad boys. Also buy another hemostat - really useful for locking the joints together.
Attachments
Images (3)

Got out my MTH 20th century limited cars that still haven't got an engine to run them since I bought them. Please lionel, vision line Dreyfus Hudson's.
really need more New York Central in my fleet I don't even have a single engine.
Also fixed a noisy smoke unit on My Lionel 611.
Attachments
Images (2)


Packed up my Preiser 65602 Seated People I painted and took inventory. I combined the Chinese figures of similar people with the Preiser in individual boxes. There are 30 different people and three variations of the people. The thirty-three boxes of people will be packed away until winter weather when I will continue painting.
Not only have I painted the Preiser 65602 Seated People, but I found 25 bags from Chinese figures that each had contained 50 Unpainted Figures. That's 1,250 more people I painted. As I organized my work area, I discovered 14 more unopened bags of 50 seated people from China tucked into the bottom drawer of my paint cart. . . . and I just ordered three more bags on Wednesday night. Evemodel on Ebay has changed the figures in their packages, and I now get only two (instead of eight) of needed figures in each $9.99 bag. Preiser stopped making some of these 1/50 figures that fit nicely in the Lionel Dining Cars.
Have a good weekend.
Sincerely, John Rowlen

Attachments
Images (5)


John, have you ever used the 1:43 scale people from evenmodel? Their latest sets look better than usual. Their 1:50 are tall enough but no bulk to them so they seem too thin. Inside passenger cars, I think they are fine and fit well seated, but they look odd outside. The 1:48 people which come 25 (or more) to a bag seem to be bulkier and more usable, but need face detailing at least. Thanks ... Jeff
Urban Renewal for my buildings on the new layout. Using a damp rag I wipe off 15 years worth of dust from the old layout. Then replace bulbs and wire up. Shore up any needed repairs.
It’s rewarding making old favorites good as new.

Attachments
Images (1)
@ScoutingDad posted:This is a shot of the external stiffeners cut to match up better. However there is no longer enough glue surface for the base plate (without the other side) so its hard to get a good fit here. In retrospect, I should have laminated the baseplate before attaching (would have been straighter) and anticipated the glue surface problem. Next time I'll put a angle plate at the bottom of the girder plate, like I did with the top plate. Still have to make a girder section for the other side of the track. : )
Lessons learned - CA is no friendlier with color laser ink than b&w laser ink. If it gets on the ink, it it will smear. Second - Especially for the stiffeners, color the white edges with a marker once cut and shaped, but before being glued in place. So what takes so long? Each of the stiffeners needs 5 separate fold scorings, minute trimming, multiple folding steps and a 2 step gluing process. There are 18 of these bad boys. Also buy another hemostat - really useful for locking the joints together.
I like the bridge, very nice! I can see how folding those stiffeners can take some time. I've done a few paper builds and have found it easier to laminate the cardstock print before cutting and assembling if possible. Gotta keep the piece flat until it dries or it will curl too.
I used to work in theater set design and construction. Flat black was our go-to paint to make something disappear to the eye.
I just finished this building flat (all paper), and I wanted to raise it up off the board a little to get the height to look right against the factory building. I used a black strip at the bottom to hide the wall behind.
Bob

In the proper lighting you don't really "see" it.

Attachments
Images (2)


HI Bob, my 3 sons were all in theater in high school - on stage and on the sets doing all the background activity. I forgot about the flat black, amazing how the eye is fooled. Is the building flat paper or just the riser? I really like the darkened look of the window panes. My guess is the bricks are laminated on foam core with the edges wrapped and the inset is another piece similarly laminated. Nice detailing. Jeff
Jeff- Yea I grew up on Long Island and did theater in HS and College. I wanted to work on Broadway doing lighting and set building. Getting into the stagehand's union (IATSE) was virtually impossible unless you had family in already. I did work for a local company doing trade shows and New York Fashion Week for several years but then I met my wife to be and became an electrician, the rest is history.
The flat is built up in a few layers to give it depth. Here's a few more photos. I bought the prints from a guy in the UK who runs this blog. He has lots of nice stuff. They are scaled for HO but I just enlarge the image before printing to get the scale right. I have a really nice ink-jet printer in my office that does 11X17 prints.
Thanks,
Bob


The fence is a print too, posts are 1/4" balsa and stringers are styrene.

Attachments
Images (4)


Bob sounds like the large format printer is a real help. I keep seeing several guys with their 3D printers and laser cutters. I think I am back in the stone age. I might still have access to the 3D printers at the university, I'll have to learn the CAD programs to print detail parts.
Last lesson learned on building the card stock girder bridges. DO NOT USE LASER PRINTING !!! I was making the other side of my bridge and laid in a support section before I should have. So I was preparing to cut the section out. Much to my surprise, with some gentle pulling the section came off with minimal damage to the section or the bridge. The CA glue had bonded to the laser ink, not the paper substrate. I was able to pull off the laser ink from the paper. End result the joints end up being very brittle and will break when stressed.
Good news, the finished girders look pretty good and are cosmetic only. I'll eventually coat with a dull clear coat after touching up the cut edges. Then wait to see how long they stay together. Never even thought about how weak the ink fusion process is. Strong enough to keep the ink on the paper but that is it. Jeff
Jeff,
I have had to use Evemodel's 4802 1/50 Seated People because Preiser stopped making the six figures in their original 6-person 1/50 package. I was fortunate to find some of the Preiser 1/50 factory painted figures five years ago, but have used Evemodel's since. Evemodel has recently removed two figures from the 48-pack (8 of six different figures) and put in two 1/45 figures. Unfortunately I use the man with arms crossed and the woman/girl with her head turned to the left.
I now have to buy the 4806 pack of 1/45 seated figures with 2 of 25 different poses in the 50-pack. The Evemodel figures take an extra coat of paint to hide the fleshy plastic and an unusual greying that applying acrylic paint causes at the edge of the painted area. It is a reaction of the paint to the mold oils used in making the figures I believe. A second coat of paint eliminates the problem.
Unfortunately, the only way to get the people with the babies is to buy the Preiser 65602 24-pack with one of each figure. The current price is $30.81 and $18.00 shipping for one pack, or $37.95 for the six people with babies in the factory painted 6-person pack, plus shipping from Germany. It is expensive. I figured I saved $120.00 dollars on painting each 65602 Unpainted Seated People 24-pack. The five separate Preiser factory painted six and four-packs cost over $150.00 plus shipping for the 24 figures, if you can find enough of them at one dealer. (They are often out-of-stock.) The factory-painted figures only come in two color combinations, A or B. I paint in five colors or more with often greater painting detail.
Have a good weekend.
Sincerely, John Rowlen


Attachments
Images (2)
@RSJB18 posted:Jeff- Yea I grew up on Long Island and did theater in HS and College. I wanted to work on Broadway doing lighting and set building. Getting into the stagehand's union (IATSE) was virtually impossible unless you had family in already. I did work for a local company doing trade shows and New York Fashion Week for several years but then I met my wife to be and became an electrician, the rest is history.
The flat is built up in a few layers to give it depth. Here's a few more photos. I bought the prints from a guy in the UK who runs this blog. He has lots of nice stuff. They are scaled for HO but I just enlarge the image before printing to get the scale right. I have a really nice ink-jet printer in my office that does 11X17 prints.Thanks,
Bob
The fence is a print too, posts are 1/4" balsa and stringers are styrene.
Bob - ever print the windows with transparency film or vellum? I would think you could get a really neat effect with a back light. I went to the site UK and will have to dig a bit deeper for the prints.
I was basically a stage dad, but stayed out of the way and helped when asked. Really fun to learn about how a stage really works. Have never gotten out to Broadway to see a show, that's on the bucket list. Saw many when they came to Chicago. One of my sons got accepted to the theater program at Michigan Tech (out of 4 incoming freshmen) and then decided theater was not for him. He now owns and runs his own coffee shop in the Grand Rapids Mi area. I ended up in engineering - paid better than marine biology at the time. Jeff
@ScoutingDad Jeff- I've only used the prints as they were produced. I could see printing on acetate for windows. May have to try that on the next one. Tx.
Still working on George HW Bush Funeral Train cars. I have run the Dining Car and Dome Dining Car and see the need for some adjustments to the cars.
The Dining Car has a few more people installed since last seen. I have posted pictures.
The Dome Dining Car has a lot of empty space and boring beige walls inside, until the six tables at the end of the car with seated people. I am putting a few people in the Lounge Area, Probably a woman smoking a cigarette and someone for her to talk to. The flashes of color from the passengers makes the passing passenger car interesting.
The next/third car is the "Kenefick" Business/Observation Car. The car will need major surgery on the Conference Table Area that is out of place and needs to be cut and rotated 180 degrees. As manufactured, the people in the aisle-side chairs are obstructing the aisle.
My progress is slow, as other priorities have taken my time. Added a Woodland Scenics figure to the Kitchen Loading Door.
Have a good week.
Sincerely, John Rowlen

Attachments
Images (9)


Hi guys, I have to make this quick as I am on my tablet. I was able to work in the train room today and buile a cart to store my off track cars. Here are a couple photos, please forgive the poor photos! Its hard to take them with a tablet as my Cell Phone died! When I get to my home computer I will check more things out! I hope you all had a great weekend!


Attachments
Images (7)
Mike, That is super! You sure did that quickly! It would have taken me ages! Congratulations!!!!
Mike, I could fit more cars on one the same size, two bay hoppers, 40 foot boxcars, and short flat cars and tank cars. Hmmm.
Hi Mike - nice job on the shelves. If you build a general purpose cart without the shelves, you can store all the stuff on the floor. As we get older, it's harder to crawl down there when you need to retrieve something that you need right away.
Nice job! What will you be using to keep the rolling stock from rolling?
Mike G., another novel invention, a super space saver storage unit that makes good Sense. Yes, we’re getting older and this will not only save your back, but make it easy to add and take off the layout cars not needed. Your design is really neat, thanks for the pictures. Fantastic. I just played with some switches yesterday. I hope everyone has a great week. Happy Railroading Everyone.
Attachments
Images (1)
Yesterday my son did his first scratch build...he wants a tiki hut over our water scene...so started with mocking up a boardwalk section...Dad did the cutting of pieces (still not quite ready to let him use sharp blades just yet...almost there), Christian did the assembly...he's pretty proud of it!


Attachments
Images (2)
Happy Monday........NOT ![]()
I had one of those OH S*#% moments that we all suffer through from time to time when working on our layouts. I'm almost done with the light pole I'm making for the new siding. I wanted to scope out where I can grab the power from yesterday so I turned on the lights for the layout and noticed that the light over the loading dock on the building was out. I started digging and my first stop was the terminals under the building to check power. All good there. I knew what was next, I had to take the building off the layout to dig deeper.
Here's where it gets bad. Against my better judgement, I glued everything together when I finished the building and couldn't take it apart easily to check the light. I basically had to cut all the wires to get the floor out and see what happened. I finally got the fixture out of the wall (also glued in place), and it looks like one of the wires broke where the hood meets the arm. The arms on these don't attach to the hoods and are very sharp. I know I've hit the hood more than a few times so it must have cut the wire.
So now I have to put it all back together.
OH S*#% ![]()
This is the offender

This is what was left after dismantling the bottom of the building.


Attachments
Images (4)


@Canes RR posted:Yesterday my son did his first scratch build...he wants a tiki hut over our water scene...so started with mocking up a boardwalk section...Dad did the cutting of pieces (still not quite ready to let him use sharp blades just yet...almost there), Christian did the assembly...he's pretty proud of it!
GREAT work, Christian!!!!!
Adjusting the interior of the Union Pacific "Kenefick" Business/Observation Car.
The conference table in the Business Car is rotated 180 degrees as molded at the factory. This puts the chairs for one side of the table in the main aisle of the car, obstructing people walking by. I scored the floor along the walls and cut the section out, rotating it on 1/4" .060 Plastruct rails with Krazy Glue.
Now the serious detailing can begin.
Update: I removed the seven Lionel Little People in order to paint the interior. I need another coat of white and to razor paint marks off the walls where needed. I will then place some Preiser 65602 Seated People in the car.
Update #2: The people are in the car. The seats, chairs and beds are three different heights that cause problems in getting the people to look good through the windows. The beds are higher than other Lionel passenger cars. The chairs at the conference table are very low. I will have to check my "Lone Star" Business Car I did three months ago for height problems.
Have a good week.
Sincerely, John Rowlen


Attachments
Images (18)


This past weekend I constructed an O scale code 100, two rail 19 degree cross track.
I have built several turnouts and shelved them for the future revival of my harbor front switching layout. Back in 2006 the former layout was decommissioned (to the dump) with a hope that simplification in the future would make it more useable. The cross track was the most challenging to make. It has eight (8) frogs that were cut, and soldered. This cross track build was attempted and failed several times about 8 years ago. So, it is with great pleasure that the final piece of the layout puzzle has come off the bucket list!

Note: Happily I ran my Lionel postwar layout during breaks from the O scale build.
The Ozone tranquilization was definitely needed!
Attachments
Images (1)
@RSJB18 posted:Happy Monday........NOT
Here's where it gets bad. Against my better judgement, I glued everything together when I finished the building and couldn't take it apart easily to check the light. I basically had to cut all the wires to get the floor out and see what happened. I finally got the fixture out of the wall (also glued in place), and it looks like one of the wires broke where the hood meets the arm. The arms on these don't attach to the hoods and are very sharp. I know I've hit the hood more than a few times so it must have cut the wire.
So now I have to put it all back together.
Bob, I can sympathize with you! This sounds exactly like something I would have done. I 'paint myself into corners' all the time.
Over the weekend I prepared to add the switches and track for the lower level car barn/car storage tracks. I'm not going to report what I had to do to get the supports for my top level removed to open the way, but you can now see through from the tangent track to the storage location marked by the caboose in the distance. The 054/064 switch will be removed and an 054 switch will be installed with the straight lead going away from the camera.

I did place an order today for the wye for the upper level and 2 switches I need to put in the lower level car holding tracks.
Attachments
Images (1)

@mike g. posted:Hi guys, I have to make this quick as I am on my tablet. I was able to work in the train room today and buile a cart to store my off track cars. Here are a couple photos, please forgive the poor photos! Its hard to take them with a tablet as my Cell Phone died! When I get to my home computer I will check more things out! I hope you all had a great weekend!
Excellent storage option. Well done Mike!
Cheer, Dave
Guys everyone’s work looks great
John. You have enough people to start your own nation lol
Christian. I agree that look very good
Mike. I made a rolling stock cart this winter I’m using my Grandma & Grandpa’s old TV stand from the sixties I’ll get you a pic of it
Mark. Your switches look nice and tidy
Leroof. The cross track looks like it’s coming along
Bob. Hope you get that lined out that’s a nice building
Larry. Nice pic and the switches look good


 Well I finally got this old Tootsietoy International RC done. I hand painted it Mopac Eagle Blue and added some Missouri Pacific Truck lines decals now for a piggyback trailer for it. This will be going on my new O27 layout I’m trying to keep it traditional as I can
Attachments
Images (5)
I added two more whisker tracks to hold my last two locomotive additions (Premier ATSF 2900 class Northern and a Premier SP ABB PA set). I'll figure out how I want to scenic it over the next couple of weeks. I've run out of storage room on the layout so I'm going to have to build some shelves for extra rolling stock and locomotive storage.


Attachments
Images (2)
Lee, The MoPac truck looks nice. Have a good week.
John Rowlen
Still doing trackwork. I figured out that one switch I put in on a curve coming out of Avery yard is in a BACKWARDS orientation!! So now I have to rip it out and put in the correct switch. My 3-track passenger platform from TW Trainworx has one platform that fits between the tracks no problem. But the other platform is too wide and will have to be cut down widthwise to fit. No big loss. I sure can't relocate the track because it is track 3 out of 5 and would have a ripple effect requiring half of the yard to be moved!
I have the two Lionel Bascule bridges installed, face to face. They are behind (in the sense of how the fake river flows underneath) the **** Gate bridge and at the same height. So I figured out (call me rocket scientist!) that the whole installation MAKES NO SENSE. If the boats going underneath will clear the **** Gate bridge, why would they not clear another regular bridge behind it? The lift action of the bascule bridges is (prototypically-speaking) completely unnecessary. Also, they meet in the center of the "river" at a stone pier which in modeling terms is required. They cannot just meet over open air and magically lock together strong enough to support a train. So the center pier is a must-have. But again, this means that a standard truss bridge would have served (in a prototype sense) just as well. There is no justification for having bascule bridges there other than the fact that I bought them and I want to use them! I decided not to care. There they are and there they stay.
These are the perils of doing NO real track planning. But I decided up front that this thing was a toy, not a prototype model. I will still enjoy watching those bascule bridges going up and down even if the USS Missouri isn't going undeneath them to accept the Japanese surrender! Hmmmmm.....the Missouri....has possibilities....
All the best!
Don
@Loose-Caboose posted:I am doing a 200 sq ft expansion on my 250 sq ft layout. I got tired of tripping over extension cords going to my wire brush Dremel tool, solder station and vacuum cleaner as I was installing drops to my track. So, I stopped the insanity and extended my run of 120 Volt outlets on my existing layout to my expansion. The problem is I originally ran a twenty amp circuit to my layout which calls for 12AWG wire. There is a world of difference running 12 AWG versus 14 AWG Romex to the outlets. When I started the layout I asked for suggestions as to what to run to the layout if I was using Four Transformers (two for Track Power, one for powering switches and one to power my TMCC control boxes) and the answer was that I should use a twenty amp circuit. Oh well, lesson learned.
As I mentioned, I am working on an expansion to my existing layout. Since I am in the limelight of my years this will be my final expansion. This picture shows 1 of the 5 outlets I installed to eliminate the need for extension cords. Three of the outlets are installed along the perimeter as this one is demonstrating. Two others are underneath the layout to provide power for the anticipated installation of some Menard's Buildings
Attachments
Images (1)
Masked my two LIONEL 15" offset dome cars to spray the dark green for the Lowey livery.
Sprayed the pair (Scalecoat II) then promptly removed the mask at the color separation line. Looks pretty good; minor paint lift on a plastic car end on one side.
Will leave in my purpose-built drying/paint curing room for 24 hours per Scalecoat's directions and remove the rest of the masking tape. Then get on to the white, 1/16" Microscale water slide striping decals and see if I can make a straight, white line of 15" or so four times.
Attachments
Images (2)


@Pingman posted:Masked my two LIONEL 15" offset dome cars to spray the dark green for the Lowey livery.
Sprayed the pair (Scalecoat II) then promptly removed the mask at the color separation line. Looks pretty good; minor paint lift on a plastic car end on one side.
Will leave in my purpose-built drying/paint curing room for 24 hours per Scalecoat's directions and remove the rest of the masking tape. Then get on to the white, 1/16" Microscale water slide striping decals and see if I can make a straight, white line of 15" or so four times.
I just ordered scalecoat II PRR Tuscan Red on spray cans for my K-line projects. Let me know how many coats for coverage, please.
@Don Merz 070317 posted:Still doing trackwork. I figured out that one switch I put in on a curve coming out of Avery yard is in a BACKWARDS orientation!! So now I have to rip it out and put in the correct switch. My 3-track passenger platform from TW Trainworx has one platform that fits between the tracks no problem. But the other platform is too wide and will have to be cut down widthwise to fit. No big loss. I sure can't relocate the track because it is track 3 out of 5 and would have a ripple effect requiring half of the yard to be moved!
I have the two Lionel Bascule bridges installed, face to face. They are behind (in the sense of how the fake river flows underneath) the **** Gate bridge and at the same height. So I figured out (call me rocket scientist!) that the whole installation MAKES NO SENSE. If the boats going underneath will clear the **** Gate bridge, why would they not clear another regular bridge behind it? The lift action of the bascule bridges is (prototypically-speaking) completely unnecessary. Also, they meet in the center of the "river" at a stone pier which in modeling terms is required. They cannot just meet over open air and magically lock together strong enough to support a train. So the center pier is a must-have. But again, this means that a standard truss bridge would have served (in a prototype sense) just as well. There is no justification for having bascule bridges there other than the fact that I bought them and I want to use them! I decided not to care. There they are and there they stay.
These are the perils of doing NO real track planning. But I decided up front that this thing was a toy, not a prototype model. I will still enjoy watching those bascule bridges going up and down even if the USS Missouri isn't going underneath them to accept the Japanese surrender! Hmmmmm.....the Missouri....has possibilities....
All the best!
Don
Don, It is your layout and whatever suits your fancy is THE way to do it!!!!
@pennsynut posted:I just ordered scalecoat II PRR Tuscan Red on spray cans for my K-line projects. Let me know how many coats for coverage, please.
I'm the wrong guy ask about "how many coats?" I paint with a heavy hand despite knowing better.
Also, I "sprayed" using a single-action Badger airbrush @25 psi.
Good luck with your project.
Detailed the Bush Funeral Train Baggage Car.
I used a wet blend of Sand, Yellow, Dark Tan and Red Earth to create the floor.
Lionel cut the door opening too deep, removing the bottom door track raised piece of plastic, causing the black chassis frame to show through the open door. There is a plastic sheet as a protective window. It could be a magnet for finger prints obstructing the view. It is a nice car. It could be better with a better cut door and the correct 50-star American Flag.
Have a good week.
Sincerely, John Rowlen

Attachments
Images (7)


Lou. Your track looks good and that’s a great pic of your Engines
John. Thanks you as well.The Funeral car looks nice
Jim your expansion looks good
Carl keep us posted on your paint job I’m curious how it turns out
As for me nothing tonight just to tired to sit at the bench maybe tomorrow I’ll have something
Set up the Gantry Crane Sound Work House by Lionel tonight. Finally found a Work House at Phil's Trains in Wheeling WV. I called so many places to locate the Sound House this summer and had given up and an OGR associate of ours put me onto one of our advertisers and fortunately Phil's had one in stock and at a really good price as well. The decision where to locate the work house and drilling the holes for the wires took much longer than the connection, installation, and programing the work house.
Now my grandson will hear the men running the crane talking and the sound of the motors running as he empties the gondolas full of metal scrap! He was six when he began operating the crane and then the Texas Special with the Legacy Cab2.
I'm impressed with the work house sounds. Just as I am with the sound diner cars from Lionel.
Have a good week OGR Members
My friend's 1950s diesel hasn't run since the 1950s. A little clean up and touchup got it going again.
Correcting my mistake from prior post. OGR advertiser is
Patricks Trains located in Wheeling WV
Thanks,
Seth
I've bought from Pat's trains before, in person, and online, and have been satisfied every time, with every purchase, to date. He has a good selection to choose from, I wish I lived closer to Wheeling, so I could shop in person.
Rusty
Ditto to all Rusty said.
Mike G. you have inspired me. I have in my garage two pallet-sized wooden frames made very sturdy with heavy wide wheels on the bottoms. I think there were used to transport drink refrigerators into a drug store across the street. But no matter. With a tiny bit of work, I could put sides on them and use them for boxed rolling stock storage with the boxes on the ends so I can read what is in them. Each one will probably hold 40-50 cars. Then they will roll right under the layout! Nice! This will free up a TON of shelf space for me. I want to take down some of my shelves.
So thanks for the idea!
Don
Decided to build shelves for my small collection of engines and rolling stock. So far five 8' shelves done and filled. Nice to be able to see everything.
Got home from short extended trip and my neighbor brought me two boxes left at my front door. GGD PRR b70 and Weaver New Haven b60. Unboxed, inspected, compared with my K-line kitbash project, put on track, ran around the main, through town, back and forth through tunnels, bridge approaches for clearance. Worked great. The mail train now consists of 7 cars front to end, prr b60, prr bashed to b70, a New Haven b60, another prr b60, ggd prr b70 and finally two faux K-line rpos destined for kitbashing. BTW, it's a heavy train and I have 2.25 percent grades. I had a roller incident years ago with a K-line passenger car so I removed all the rollers on my cars. So this afternoon I removed the rollers from the new cars.


Attachments
Images (4)
This past Sunday I got the next section of the layout built and started laying out the track. Should be an interesting section, I'll have 3 different elevations coming together to make two double track mains for a high line and low line.
Stay Safe,
Scott

Attachments
Images (1)
Thanks Everyone for the nice comments about my storage cart! I would like to thank Dave AKA (Darlander) and Matt AKA (decoynh)! They both suggested rolling carts!
Matt, I thought about that and will probably build a couple with no shelves just for that. It would be nice to get things off the floor!
Tom Tee, To keep the rolling stock from rolling off the ends I installed 3/4" X 1/2" wheel stops at each ends of the shelves!
Crane RR, You and Christopher did a great job!
Bob, Sorry for your broken wire, but it couldnt of been that bad. You got it fixed!![]()
John R. Great work on your business/observation car! But thats nothing new coming from you. You always do great work!
Leroof, very impressive! Nice work.
Mark, Things are really looking good! I am happy to see your moving right along!
Lee D. Wonderful work on the international RC truck!
Don M, I am with Mark, its your layout so do what makes you happy! As for the cart I got the idea from Darlander & Decoynh we both have to thank them!
Pennysnut, your mail train is looking outstanding! Keep you the wonderful work!
Scott, your correct. Looks very interesting! Keep us posted!
Well I did get a little more time in the train room been switching out my freight train for my military train and had one of Bob's Oh no moments! LOL My flat car with a chinook helicopter would not fit under my scratch built parking lot for my Menards Power & light building. So I thought I would check it out around the rest of the layout. Worked fine in all the tunnels, but come to find out it would not fit under the Menards Morton Salt and Power and Light buildings. I really like the helo so it make things work I just took the wheels off and there is it, well almost I still had to plane the under side of the parking lot. But it all works fine now!~
I hope you all are well and being safe! But I really hope you all are finding time to have fun with your trains on your layouts!~
@B&O Fan posted:This past Sunday I got the next section of the layout built and started laying out the track. Should be an interesting section, I'll have 3 different elevations coming together to make two double track mains for a high line and low line.
Stay Safe,
Scott
Scott
I like those risers looks good
Thank you, Mike!! I had one of those moments today also. Last evening, I removed the curved switch that faces the wrong way for the car storage tracks in anticipation of my order of 3 switches arriving today. I also glued down some leftover HO cork strips butted side by side for the storage tracks. The switches arrived; wye will go on the enginehouse level, the 054 switch will fit in place of the curved switch nicely. I opened the 042 GarGraves switch for the storage yard, and got one of the 042 switches I bought for the earlier rendition of the layout. They are both left hand. Here I thought I had two 042 RH switches, and needed a LH and a RH for the yard. Now I have three LH and only need one. Add them to the collection of switches I'll be posting for sale here one day. ![]()
@Mark Boyce posted:Thank you, Mike!! I had one of those moments today also. Last evening, I removed the curved switch that faces the wrong way for the car storage tracks in anticipation of my order of 3 switches arriving today. I also glued down some leftover HO cork strips butted side by side for the storage tracks. The switches arrived; wye will go on the enginehouse level, the 054 switch will fit in place of the curved switch nicely. I opened the 042 GarGraves switch for the storage yard, and got one of the 042 switches I bought for the earlier rendition of the layout. They are both left hand. Here I thought I had two 042 RH switches, and needed a LH and a RH for the yard. Now I have three LH and only need one. Add them to the collection of switches I'll be posting for sale here one day.
Well Mark, look at this way. 1 is better then none!![]()
Started my 8x8 table today. I settled on 28 inches height. That allows me to sit comfortably and still have a nice view of the entire table. It also allows me to prop one hand on the table and lean to reach the center without needing a cutout. So far I have the corner legs and some braces holding the outer frame. Tomorrow I hope to get the rest of the legs and framing done, so I can put the plywood on. I'd like to get around to adding a protruding shelf for my ZW. If I get that far, I'll be able to start figuring out my track design. Tom sent me a really nice box of layout goodies to get me started andI can't wait to put them to use! If all goes well, I'll at least be able to run my trains by Saturday, might even have a station and some nice lamp posts lit up around the track too!

I made adjustments to my Bush Funeral Train Dome Dining Car by adding five people to the Lounge and two more to the lower dining area. There are now 19 people on the lower level. Lionel had only installed 6 Little People. The additional people make the car more interesting to watch as it passes by.
Tomorrow I will pull the cars with the Bush 4141 Engine.
Have a good evening.
Sincerely, John Rowlen

Attachments
Images (5)


Spent portions of my day installing 1/16" white stripes along the lengths of 2 LIONEL 15" aluminum offset dome cars (1 stripe per side) and cursed the eBay vendor who sold me stale/old product that broke apart about 50% of the time for the 12 or so decal stripes I used, often multiple times for the same decal piece.
I was already in a foul mood because I'd messaged him at the time of the purchase requesting he insert stiff card board to protect the decal sheet; he ignored my request; shipped in a bubble envelope with no reinforcement; and, the decal sheet arrived with a deep crease that won't go away.
Rather than return the sheet, even with the crease there was 3X the amount of stripes for my small project. What I had not expected was the staleness of the product.
My happy ending is the stripes went on eventually and, to my 72 year old eyes, are fine for this Lowey two-tone green, NP North Coast Limited paint job.
I managed to get over half of my Benchwork done today, then ran out of screws. I have horrible luck with regular screws. I use the more expensive "star" head screws and try not to buy more than I need. The Benchwork has been a learning experience, to say the least. Tomorrow the other half of the frame should get finished and the other sheet of plywood can go on. Then it's a matter of making the area for the ZW to sit and mounting the hub that will turn on and off everything in the room. It's similar to a surge protector, but it's a large flat steel box with a 15 amp breaker and power switches with red LEDs for each outlet.
I'll try to post a few pics tomorrow night.
Pingman: So Carl, from your description you decaled with dry transfers? How did you line up your stripes to be even/level. When you hit a snag, how did you correct it? I'm curious because I am going to jump in to dry transfer in the future after I read lots about how to do it and tricks and things to avoid. Thanks for the heads up on stale decals.
Received a postwar Erie Alco loco AA set today which had some issues, three issues to be exact. Two of the issues I knew about beforehand, but I noticed a short in the dummy engine. Found the short right away after opening the unit up, which was two bare connected wires touching the frame (shown below). Then to fix the powered unit which has its headlight out. I will be fixing that Saturday. The bigger job is trying to fix the battery operated horn and another loose wire that appears to go to the truck (and where does that go?) I will have to look at some wiring diagrams to find out.

Attachments
Images (1)
Upgrading wiring on layout. Small layout but adding power drops anyway.
Not so much what I did on the layout but what I did off the layout. The other day a Locomotive that I can depend on to run anytime, just was not acting good. I removed the engine to take it into the shop to see what was going on. I for some reason while it was sitting on the layout but off the track, I mistakenly turned it on its side and the problem became very evident. There was an ungodly amount of grunge on the wheels and pickup rollers. I took my Dremel with a wire wheel and cleaned the junk off. It ran much better. I started looking at other Locomotives and none were as bad but still there were layers of grunge. All my Locomotives are now scheduled for a cleaning and I am not looking forward to cleaning all my track.
@Pingman posted:...I was already in a foul mood because I'd messaged him at the time of the purchase requesting he insert stiff card board to protect the decal sheet; he ignored my request; shipped in a bubble envelope with no reinforcement; and, the decal sheet arrived with a deep crease that won't go away.
Rather than return the sheet, even with the crease there was 3X the amount of stripes for my small project. What I had not expected was the staleness of the product.
My happy ending is the stripes went on eventually and, to my 72 year old eyes, are fine for this Lowey two-tone green, NP North Coast Limited paint job.
I understand your frustration with the lack of care when sending items to us. Along with that I also dislike not accurate descriptions for items being sold and defective items. It can ruin a perfectly good day working on our trains.
@pennsynut posted:Pingman: So Carl, from your description you decaled with dry transfers? How did you line up your stripes to be even/level. When you hit a snag, how did you correct it? I'm curious because I am going to jump in to dry transfer in the future after I read lots about how to do it and tricks and things to avoid. Thanks for the heads up on stale decals.
Should have said I was using Microscale PS 1-1-16, white, 1/16" waterslide decal stripes.
Sparing everyone the details, I decided to start over with new paint and go from there.
Plus, I now have a train club where I can run long passenger trains, so I've decided to add two more domes to my NP North Coast Limited train (per the prototype which had 4 domes) and an A unit for an ABA F-3 set. The two add-ons were recent purchases on eBay; and, are already disassembled with the domes packaged to be shipped to Christine Braden for paint. An 8 or 9 car NP NCL with ABA F units will make a nice train.

Here's a couple pictures of my latest paint project. I finished it late today while staying in out of the heat! Hope you like it. Well,....... I guess i'm not out of the woods yet, I want to build a potash train so only,......Maybe 12-14 more cars to go. That's not too bad, is it? 

Attachments
Images (2)
I would like to see that myles! Great work.
I got the Benchwork done and the plywood on yesterday. 8x8 seemed big enough until I threw a test track on it last night. It doesn't look that big now. I was going to run it like this for a while, due to financial restraints, but the noise is pretty bad, so it looks like something will be going over the plywood. I've still got to run around the edges of the table with a sander and so some other little odds and ends. I'm glad the table is together. It's been a rough week. I haven't done this much in years and I'm really feeling it. All the track I had cleaned and stored a few years ago has gotten a little rusty, so I have a lot of re-cleaning to do. I also noticed that some of my track isn't quite even. Some rails seem to be made of a thicker metal so there's a bit of a bump where they meet up. I have enough track to switch them out, so that's high on my to do list today, after a few hours of relaxing of course.
Aam4378, one thing I learned through hard experience is that the BRAND of track matters. I originally wanted to do my layout all in Lionel tubular track. Then I discovered that you can get twice as much layout in the same space--and maybe more!--in other brands. So after many months of research and planning, I settled on Gargraves track with Ross switches for my limited space. Being able to bend the Gargraves gives me infinite flexibility. And he fact that Ross offers a full line of curved switches allows me to fit track in place that it otherwise would not fit. If you have a small space, Hargraves and Ross are your friends.
Don Merz
Don M.
I wish I could agree with you coming from experience, but alas, I can't. When I started purchasing Atlas track many years ago it was relatively easy to acquire at a decent price. With my last expansion, which I am currently working on, it was excruciating to acquire unless you wanted to pay MSRP. With your selection of Ross/Gargraves, you don't have to worry about the product finding its way to a container and then wait for a slow boat across the ocean.
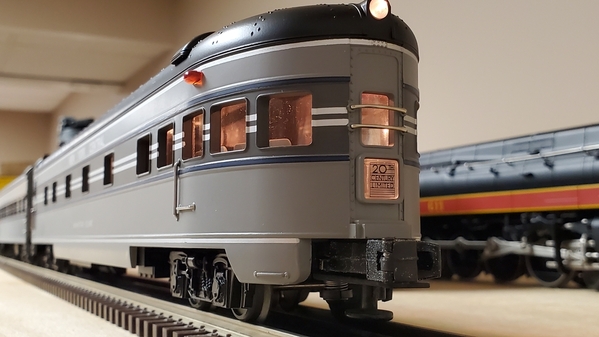
I had fun today running the Lionel George HW Bush Funeral train with the addition of the Lionel Excursion 2-Pack #3 on the front end of the four-car Funeral Train.
I overcame a smoke issue with the engine by adding 60 drops of smoke fluid after the smoke initially stopped. The wick must not be touching the bottom of the smoke fluid reservoir. I used a needle smoke fluid applicator to add the final smoke fluid through the hole in the engine funnel top on the smoke unit.
I am happy with the set and hope to add Union Pacific #9096 to the train. The passenger cars match nicely with my Union Pacific Excursion cars.
Have a good weekend.
Sincerely, John Rowlen
Attachments
Videos (1)

Here is another view of the George HW Bush Funeral Train with Union Pacific Excursion 2-Pack #3 at the front of the four passenger cars..
Sincerely, John Rowlen
Attachments
Videos (1)

I did some digging through the boxes of track I had. Some was clean, some wasn't. I did come across a large amount of loinel that had more ties under it. It was in good condition and clean. I must have gotten it in one of the lots I bought back in 2015 and forgotten about it. It was enough for the large loop around the table, with some to spare. If runs smooth and seems much more quiet. I still have around 300 feet of track left (estimate). For my plans, it's going to be more than enough. Now I have to sort out some under-table storage for all my engines and rolling stock. I'm starting to be able to imagine the scenery now. I'm thinking 1950s desert. The left rear corner will be a large mountain, with a tunnel. Over top of the mountain will be a large flying saucer, lit with color changing LEDs. There will be a chain link fence in front of the mountain with lights and some armed soldiers or men in black. On the right rear corner a small base for the soldiers or MIBs. Halfway up the right side, a canyon, either dry or a tiny bit of water, going under the track where there will be a small bridge with a few lights. I'll leave the middle o the table and the front unfinished while I figure out some buildings, like a diner, gas station and such. Once I have those I'll add them and a road with a lit crossing, street lamps, etc. So far I'm liking how it looks in my mind, and keeping it simple should keep it cheap and easy to work on as I go. Like I mentioned earlier, I'll try to post some pictures, but I've been so busy and then sleepy. I just haven gotten around to it.
John. What a beautiful train really liked the videos thanks for posting
John, I agree with Lee completely! It is a beautiful train!
Lee and Mark, Thank you for your response. The George HW Bush Funeral Train is a nice running set and the cars blend well with other Union Pacific 21" passenger cars.
I have two Norfolk Southern Coaches that need painted people and I will be done. Two Preiser 65602 sets of 24 Unpainted People that I purchased on Ebay arrived today. I will put the first coat of paint on them tonight.
Have a good weekend. The summer is flying by.
Sincerely, John Rowlen
@John Rowlen posted:Here is another view of the George HW Bush Funeral Train with Union Pacific Excursion 2-Pack #3 at the front of the four passenger cars..
Sincerely, John Rowlen
Great video John! Love the music and visuals.
Loose caboose--heck, I hadn't even thought of shipping issues! Yikes. Let us know how that gets resolved!
Don
I have the wiring task coming right up. I hope against hope that it goes smoothly.
Don
Hi Don M.
After a bad scenario with my normal supplier, I tried fleabay and again a bad experience. Finally, I contacted Mr. Muffins Trains after contacting others with no success. They had what I needed. Kudos to Jeff at Mr. Muffins. He was very accommodating. Thank goodness I have no more real estate in the basement as this is my last expansion.
@John Rowlen posted:Here is another view of the George HW Bush Funeral Train with Union Pacific Excursion 2-Pack #3 at the front of the four passenger cars..
Sincerely, John Rowlen
Beautiful train John. Your attention to detailing your cars really shows.
Bob
Not on the layout but for the layout.
I picked up some plastic storage drawers for my rolling stock that is not on the layout. I like to switch out what I run on my small layout and have been storing the extra cars in a pair of tubs. They are a PITA to dig through when I'm doing a change. These stack together and should give me plenty of space. The CEO found two that were clearance and she had coupons for the retailer we were in. Net cost under $60 bucks.


Bob
Attachments
Images (4)


Bob. Very nice I like them
Add Reply
Sign In To Reply
