Thank you Peter!
Andy


|
|
Thank you Peter!
Andy
Andy,
I've been waiting for this. You provided a lot of great information and we get to see your wonderful layout. I really appreciate how you have done the research and thought out what you wanted. I definitely can take a cue from you on that. It would not be as easy for me to describe my layout, lol.
Looks like you have your work cut out for you but the projects will undoubtedly make the layout even better. Thanks for sharing. You have a lot to be proud of my friend.
Dave
Hi Everyone,
Here are a couple of shots of some scenery work I recently completed on the layout. Check out my layout update page and YouTube for more photos and videos of the work. Just click on the links below the photos.
Thanks,
Dave


@Steamfan77 posted:Nice work all around guys!
I made a video overview of my layout. I Hope this provides more insight to folks following along. Thanks for watching.
Andy
Looks great Andy! Love to see trains running next time.
Question- is this strictly a point to point layout to match the OB Branch, or can you sit back and let a train run a loop on the hidden tracks.
Bob
Dave, that looks real. Excellent job!
I have been trying to play catch up when it comes to putting down more ballast around my renovations.


Thanks for the kind words Dave, it means a lot.
Dave, your scenery gives your layout such depth and visual interest. I often go back again and again and still discover new details. Outstanding work and gives me something to strive for.
Bob, the layout is point-to-loop at best. I need to pay attention for sure. But I enjoy that aspect, and of course the switching opportunities too. I will post a video of some running trains next time.
Andy
WOW guys I have to say you all have been doing outstanding work!
@luvindemtrains Dave great work on your corner section!
@RSJB18, Bob that is quite the undertaking, sometimes I wish I knew more about engine electronics but then again that could make me dangerous! LOL
@Steamfan77, Great video and love the size of your layout. Looks very well thought out!
@Bill Sherry Jp, that is just amazing! I get tired when I do maybe 10 LED's LOL My hat is off to you!
@NS1975 the ballast looks great!
@Mark Boyce Mark I hope you didnt think I forgot you! Your walls, windows, and doors look great! I cant wait to see it all glued together!
Well guys I haven't done much. I have been working on getting the Lionel 682 running and it runs great now, but the tender whistle needs some work. Maybe tomorrow I can take a video and someone can tell me whats going on with it.
I also have a lionel track cleaning car to figure out why its not running, all in good time!
I hope you all had a great weekend and fun with your layouts and trains!
What did I do? I refer you here.....![]()
Bob
Trainmaster04 -Thats a great start on the scenery. Hope you continue to post some progress pics.
Thank you Mike!
Bob, holy cow, you’re not fooling around! Wow.
Andy
Great work going on everywhere. @Steamfan77: Andy, very nice job on the layout overview, very cool that you're able to model actual towns, scenes and industries right there on L.I. @luvindemtrains, Dave love the scenery, the rock work and trees are exceptional.
I got my Menard's illuminated vehicles on Friday, cut all the plugs off mounted two of them in the tunnel next to the LCL warehouse. I am supplying power with a DC/DC buck converter set at 3 volts/DC. Also managed to finish scratch building the roof drain down spouts, weathered them to look mimic the turquoise green color of oxidized exposed copper, and installed 3 of them on the front wall.
Going to clean up and just run some trains tonight.


@chris a posted:Great work going on everywhere. @Steamfan77: Andy, very nice job on the layout overview, very cool that you're able to model actual towns, scenes and industries right there on L.I. @luvindemtrains, Dave love the scenery, the rock work and trees are exceptional.
I got my Menard's illuminated vehicles on Friday, cut all the plugs off mounted two of them in the tunnel next to the LCL warehouse. I am supplying power with a DC/DC buck converter set at 3 volts/DC. Also managed to finish scratch building the roof drain down spouts, weathered them to look mimic the turquoise green color of oxidized exposed copper, and installed 3 of them on the front wall.
Going to clean up and just run some trains tonight.
Beautiful work, the interiors are the perfect touch.
Thank you Chris. I will go back over your latest project. Modeling at its best, I thoroughly enjoy your work.
Andy
As usual, excellent job with the detailing. That’s a very innovative approach with the plug-ins.
@Steamfan77 posted:Nice work all around guys!
I made a video overview of my layout. I Hope this provides more insight to folks following along. Thanks for watching.
Nice work Andy. Really enjoyed the backround info with your video. ![]()
Train show pictures in Cincinnati, Ohio.
Dave,
That looks fantastic. You've got some talent there. Keep up the great work. JP
Chris-The entire scene is turning out great. The cars really are a nice touch in the tunnel.
JP-I really appreciate it.
@Dallas Joseph posted:Nice work Andy. Really enjoyed the backround info with your video.
Thank you Dallas!
Andy
Great work everybody. I was 3 pages behind!
All caught up. With the scenery, buildings and videos you guys get my brain going into overdrive. Which is good
Nice work everyone. Finally got around to opening up my Z4000. As I suspected the right handle was not returning to zero so I was getting a fault light. The gears are now re-aligned so time to put it back in service.
Meanwhile I was using a Z750 and a Z1000 to run a short Milwaukee Road K-Line F3 ABA consist with 3 passenger cars to check my re-worked track section. Found a dip next to the finished section and was able to shim under the track. The Z750 would run for a while and then trip out, the Z1000 had no issues. I know that ABA pulls around 5 amps with no lighted cars, so I suspect the Z750 was at its current limit.
Hi Guys, hope you all had a wonderful Sunday!
@chris a Chris Outstanding scene! I love the headlights in the tunnel! Really adds realism to your project!
@ScoutingDad Jeff I am glad you got your Z4000 figured out! I knew you would. Maybe you can tell me what's going on here! LOL
Hi guys, I was able to get the Lionel track cleaning car working this morning. I took it apart, cleaned everything, and lubed it. But it's making a god awful noise. The train tender makes the same type of noise.
Here is a video of it.
I was also able to get the bump and go track inspection car to work, but wont move. The drive gear is dished, so I think it needs a new drive gear. Here it is pictured with the track cleaning car!

I hope you all have had a great weekend!

New track plan until I build my layout.

@Brooklyn Corey posted:New track plan until I build my layout.
Corey;
Nice design. The addition of the switches and the second loop definitely add opportunities and interest. So does loving subways… when I was in college/starting my first full-time job, I lived near the Ave. M station on the Brighton Line and road the M & D trains a lot. At Ave. M, it was elevated… by Newkirk Ave. the line was in the cut… and at Prospect Park, it went underground. With the size of the room you show, you could have a really nice triple-decker layout ![]()
![]()
@mike g. posted:But it's making a god awful noise. The train tender makes the same type of noise.
Here is a video of it.
........nice video Mike.
The little guy doesn't make as much noise as I did when I used to try to clean the track by hand in my tunnels.
@Apples55 posted:Corey;
Nice design. The addition of the switches and the second loop definitely add opportunities and interest. So does loving subways… when I was in college/starting my first full-time job, I lived near the Ave. M station on the Brighton Line and road the M & D trains a lot. At Ave. M, it was elevated… by Newkirk Ave. the line was in the cut… and at Prospect Park, it went underground. With the size of the room you show, you could have a really nice triple-decker layout

Thanks, I know all of the train lines you mentioned. Triple deck sounds like a great idea.
@mike g. posted:Hi Guys, hope you all had a wonderful Sunday!
@chris a Chris Outstanding scene! I love the headlights in the tunnel! Really adds realism to your project!
@ScoutingDad Jeff I am glad you got your Z4000 figured out! I knew you would. Maybe you can tell me what's going on here! LOL
Hi guys, I was able to get the Lionel track cleaning car working this morning. I took it apart, cleaned everything, and lubed it. But it's making a god awful noise. The train tender makes the same type of noise.
Here is a video of it.
I was also able to get the bump and go track inspection car to work, but wont move. The drive gear is dished, so I think it needs a new drive gear. Here it is pictured with the track cleaning car!
I hope you all have had a great weekend!
My track cleaner car is loud also.
Work continued on the F3 upgrade. With GRJ's advice, I found a way to fit everything in the well between the motors. I had to make a bracket to hold the main board on top, and the speaker and railsounds board will fit underneath. I've tested everything and we are good to go. I shot a video but the file was too big to share here. I will see if I can edit it down to fit later. Guess it's time to create a Youtube channel.


The mounting hub for the e-unit came in handy.


Bob


Morning guys, thanks for the input on the track cleaning car! I was just wondering because I watched a few videos and Thay don't make as much noise as mine.
@Brooklyn Corey Cory nice looking layout plan! One piece of advice, I switched a lot of my cars over to Kadee couplers and they don't like anything under a 072 curve, so if that is in your future plan take warning!
@RSJB18 Bob, way to build your own mounting platform! John always comes up with great ideas!
Well I hope you all have a great Monday! Don't forget to try and find time for your layout and trains! Most of all have some fun!
Don,
Good luck with the house sale and move.
I hope that you've found a great new train room, that just so happens to have living quarters above it, to move to.
I added the video here.
Bob
I have a large factory structure which I named Connecticut Hard Rubber Corp. It was in New Haven Connecticut and my father-in -law was the head of Quality Control. The building will have a separate boiler plant in a small separate building and will have two boilers and a feedwater tank, This is very fitting for a fellow with 40 plus years in the industrial boiler business. I have finished one of the boilers with the other in progress. Since we are about 1950, the boilers will be coal fired and like many larger factories/boiler plants, they had a siding with a coal dump/bin for coal storage. Here is one of the boilers fully assembled with some decent detail. These units are Crow River Products and come in a kit form. The instructions were quite well done and give step by step assembly illustrations. The pieces needed the usual painting and for mortor between the bricks I used called Roberts brick and mortar formula. This will make and interesting add to the factory building. Bill")
")
")
")
")
")
")
")
")
")
Bill,
Very nice. It sounds like one of those places that you may want to gulp fresh air before passing by?
Tom
@Bill Park posted:I have a large factory structure which I named Connecticut Hard Rubber Corp. It was in New Haven Connecticut and my father-in -law was the head of Quality Control. The building will have a separate boiler plant in a small separate building and will have two boilers and a feedwater tank, This is very fitting for a fellow with 40 plus years in the industrial boiler business. I have finished one of the boilers with the other in progress. Since we are about 1950, the boilers will be coal fired and like many larger factories/boiler plants, they had a siding with a coal dump/bin for coal storage. Here is one of the boilers fully assembled with some decent detail. These units are Crow River Products and come in a kit form. The instructions were quite well done and give step by step assembly illustrations. The pieces needed the usual painting and for mortor between the bricks I used called Roberts brick and mortar formula. This will make and interesting add to the factory building. Bill
Very nice work Bill. Did you say industrial boilers? I had two 600 HP Compak's and one 400 HP CB in our power plant. All three are gone now and have been replaced by a 2.0 MW co-gen and 4- 200 HP semi-condensing boilers.

Bob

Nice job on the boiler Bill, great detail.
Hi Bob, Those are very familiar manufacturers names to me. I represented another boiler company in East Stroudsburg where the International Boiler Company was located, They went out of business sometime in the early eighties I think. Some of their engineering staff went to the company I sold for named Patterson Kelley. They too were in East Stroudsburg. As far as Cleaver Brooks, I started with the Cleaver agent in Albany and worked there selling boilers for 10 years before starting my own company. It;s a small world isn't it. Bill
@Lionelski posted:Don,
Good luck with the house sale and move.
I hope that you've found a great new train room, that just so happens to have living quarters above it, to move to.
I wish. Moving to San Diego, no basements ![]() Looking for a 3 car garage - 2 for cars, 1 for trains. Or a really big spare bedroom - 10x12 won't work for me.
Looking for a 3 car garage - 2 for cars, 1 for trains. Or a really big spare bedroom - 10x12 won't work for me.
62 degrees, mostly sunny and minimal wind........
It's outdoor painting weather in Central Virginia, everyone!
Pictures and details, soon....
Peter
@dmestan posted:Started packing it up to get the house ready for sale
. Not sure if I would call it a "layout", it was just several loops of track in the basement. Still have a lot more to box up.
Don
Don, in San Diego you won't want to be all boxed up in a basement/storm cellar! I am a Californian, Silicon Valley, and I love San Diego. With the weather you'll want to be outside most of the time, maybe a garden railroad is in order???!!! Anyway, good luck with the move, I think you'll like SD a lot. Also, a fun place to railfan, BNSF goes right through Downtown!
I photographed someone fishing today as the train passed a beautiful lake landscape.

I finally extended my RR crossing on my 8" layout extension. It's been like this for about 5 months!!
Because part of the crossing is on a curve I was trying to figure out the best method between rails when "@chris a" showed his layout and he used cork road bed, although his was concrete. So I went out to the hobby store and bought some HO scale roadbed, 1/8" thick. It bends really easy with the curve, how simple is that! Then on either side for the track I used cork cabinet contact sheets 2' x 8' that can be had at Homey Depot or Lowes. Con-tact Brand as you can see in the photo. The contact cork is around 3/32" think.

Photo of HO scale roadbed and Contact cork.

Then a little Woodland Scenics Asphalt paint.
In order to get the thickness I needed for the rail height, I precut 3 Contact pieces and stacked them using just the contact adhesive. Then I marked all the curves with a compass, following the outside rail, and cut to the required length with a box cutter with a fresh blade. Then I painted them before installing. Underneath the cork is a wood plank that goes from ballast to ballast, then the cork is applied to that. I used super glue for the cork between the rails and the wood planks between the ballast
Here's the results. I think I'll do a little weathering before calling it finished. Plus, I need to add some dirt on the left side for the railroad service vehicles can get to the trackside service area. I used the roadbed cork to build it up, then I'll apply the dirt with some white glue.
The other two roads just in front of the SP GS were done the had way, with Woodland Scenics Fine Cinder ballast and white glue mixture.
I'll post another photo when I finish the dirt work and add a few more bushes. Now there's a road out of town, although that last step is a doozy!


@BAR GP7 #63 posted:I photographed someone fishing today as the train passed a beautiful lake landscape.
I hope the train noise didn't scare the fish away.....😂
Hi guys, I hope your all having a great day!
@dmestan Don, good luck on the move and your future layout! Scott is correct you will love SD!
@randr Looks like a nice little layout! I know I have one in my future with all the free track and rolling stock I got last weekend!
@RSJB18 Bob, outstanding work, sounds are great! Next project is to get it to move!![]()
@Bill Park Bill wonderful work on the boiler building! I love the details!
@BAR GP7 #63 Johan, I always love your scenery! I could see myself going there to do some fishing and train watching!
@WesternPacific2217 Scott Wonderful job on the road and crossing! I too will be using @chris a Method!
Well guys I didn't get much done today, but I did go out and cleaned the armature and brushes on my new to me tender and it sounds a lot better. While I was at it I noticed the wires going to the pickups were frayed and exposed wires, so I took the time to replace them also!
I do have a question as I am new to prewar stuff, what cause sparking at the wheels and pickup rollers?
I hope you all have a wonderful safe day! I also hope you found time for your layout and trains, if anything even just to sit back and run trains!
@BAR GP7 #63 posted:I photographed someone fishing today as the train passed a beautiful lake landscape.
When I first saw this post I thought it was a railfan photo of the real thing! But then I realized I know that guy on the caboose. ;-)
Bar GP7 #63-That was a great area to "rail fan". The backdrop really brings out your wonderful scenery work.
Scott-You did a wonderful job on the grade crossing. It looks very well thought out and displays some very neat work. What do you plan to do for signals?
Dave
@BAR GP7 #63 Great photo - wow - nice sun bleached orange on that IC caboose.
Finally starting to have time on the layout, but now am getting ready to post some passenger sets and engines for sale. Here is a short clip of the new MTH Railking RS-1 Alco in Grand Trunk and Western livery. Seems like I've forgotten how to take clean video. The GT boxcar was a special run from Berwyn's.

@BAR GP7 #63 posted:I photographed someone fishing today as the train passed a beautiful lake landscape.
What did they catch?
@BAR GP7 #63 posted:I photographed someone fishing today as the train passed a beautiful lake landscape.
I'm still having difficulty trying to figure out where your modeling and your backdrop begin and end.
Nice Johan.
@ScoutingDad posted:Finally starting to have time on the layout, but now am getting ready to post some passenger sets and engines for sale. Here is a short clip of the new MTH Railking RS-1 Alco in Grand Trunk and Western livery. Seems like I've forgotten how to take clean video. The GT boxcar was a special run from Berwyn's.
A real nice ' feel ' to this scene with your lighting SD ![]()
................ Thanks for sharing guys .............
Hello everyone! Work on the mountain truss supports are finished. I was able to work on it this past Saturday and finished it this evening. Next, I will run a few trains and check spacing and if all goes well start to add paper “buns” and plaster. It should be downhill from there with the familiar saga of purchasing trees and foliage. Thanks for reading!


 Getting some Work done around the TT area. I’ve been slack on working on it, finally in the mood to do it.
Work has been moving along on the wreck trains. 
@RSJB18 posted:I hope the train noise didn't scare the fish away.....😂
Bob,
I think the fish are mostly used to passing trains. 😄
Johan
@mike g. posted:Hi guys, I hope your all having a great day!
@dmestan Don, good luck on the move and your future layout! Scott is correct you will love SD!
@randr Looks like a nice little layout! I know I have one in my future with all the free track and rolling stock I got last weekend!
@RSJB18 Bob, outstanding work, sounds are great! Next project is to get it to move!
@Bill Park Bill wonderful work on the boiler building! I love the details!
@BAR GP7 #63 Johan, I always love your scenery! I could see myself going there to do some fishing and train watching!@WesternPacific2217 Scott Wonderful job on the road and crossing! I too will be using @chris a Method!
Well guys I didn't get much done today, but I did go out and cleaned the armature and brushes on my new to me tender and it sounds a lot better. While I was at it I noticed the wires going to the pickups were frayed and exposed wires, so I took the time to replace them also!
I do have a question as I am new to prewar stuff, what cause sparking at the wheels and pickup rollers?
I hope you all have a wonderful safe day! I also hope you found time for your layout and trains, if anything even just to sit back and run trains!
Mike G,
Thank you very much. Fishing and watching the trains are both very relaxing things for me too. 🤝
Johan
@luvindemtrains posted:Bar GP7 #63-That was a great area to "rail fan". The backdrop really brings out your wonderful scenery work.
Scott-You did a wonderful job on the grade crossing. It looks very well thought out and displays some very neat work. What do you plan to do for signals?
Dave
Dave,
Thank you very much. The installation of the grass is still going on and it feels like the details can be added almost endlessly.
Johan
@ScoutingDad posted:@BAR GP7 #63 Great photo - wow - nice sun bleached orange on that IC caboose.
Finally starting to have time on the layout, but now am getting ready to post some passenger sets and engines for sale. Here is a short clip of the new MTH Railking RS-1 Alco in Grand Trunk and Western livery. Seems like I've forgotten how to take clean video. The GT boxcar was a special run from Berwyn's.
ScoutingDad,
Thank you. Your scenery and GT train looking good too. 🤝
Johan
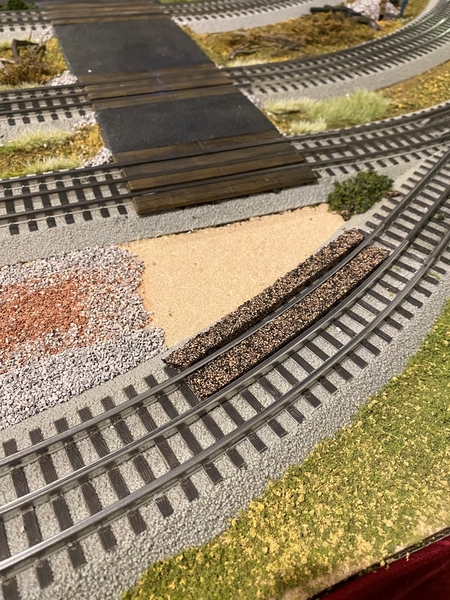
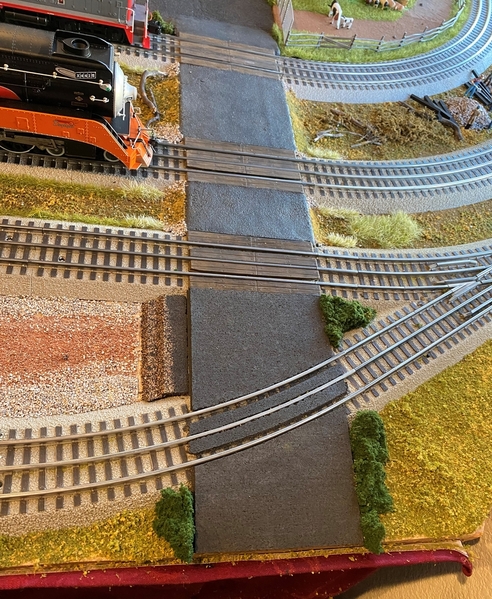
@WesternPacific2217 posted:I finally extended my RR crossing on my 8" layout extension. It's been like this for about 5 months!!
Because part of the crossing is on a curve I was trying to figure out the best method between rails when "@chris a" showed his layout and he used cork road bed, although his was concrete. So I went out to the hobby store and bought some HO scale roadbed, 1/8" thick. It bends really easy with the curve, how simple is that! Then on either side for the track I used cork cabinet contact sheets 2' x 8' that can be had at Homey Depot or Lowes. Con-tact Brand as you can see in the photo. The contact cork is around 3/32" think.
Photo of HO scale roadbed and Contact cork.
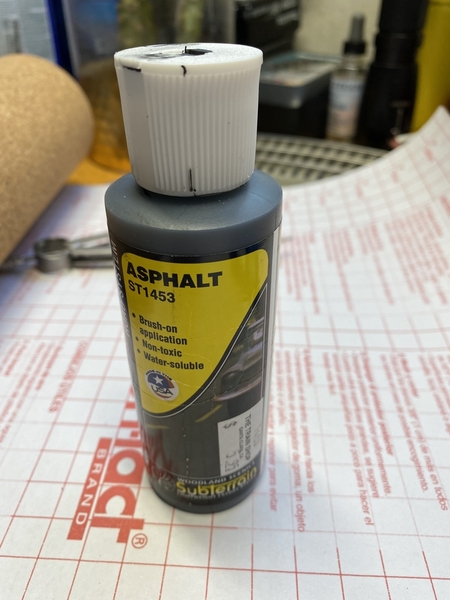
Then a little Woodland Scenics Asphalt paint.
In order to get the thickness I needed for the rail height, I precut 3 Contact pieces and stacked them using just the contact adhesive. Then I marked all the curves with a compass, following the outside rail, and cut to the required length with a box cutter with a fresh blade. Then I painted them before installing. Underneath the cork is a wood plank that goes from ballast to ballast, then the cork is applied to that. I used super glue for the cork between the rails and the wood planks between the ballast
Here's the results. I think I'll do a little weathering before calling it finished. Plus, I need to add some dirt on the left side for the railroad service vehicles can get to the trackside service area. I used the roadbed cork to build it up, then I'll apply the dirt with some white glue.
The other two roads just in front of the SP GS were done the had way, with Woodland Scenics Fine Cinder ballast and white glue mixture.
I'll post another photo when I finish the dirt work and add a few more bushes. Now there's a road out of town, although that last step is a doozy!
Scott,
Nice work. A few weeks ago, I installed three level crossings with a wooden deck on my own layout.
Johan
@Apple & Orange Line posted:What did they catch?
Apple & Orange Line,
A couple of trout rose from there. 🤝
Johan
@Dallas Joseph posted:I'm still having difficulty trying to figure out where your modeling and your backdrop begin and end.
Nice Johan.
A real nice ' feel ' to this scene with your lighting SD
................ Thanks for sharing guys .............
Dallas,
Thank you very much. 😄
Johan
The day the gauge changed:
@luvindemtrains posted:Bar GP7 #63-That was a great area to "rail fan". The backdrop really brings out your wonderful scenery work.
Scott-You did a wonderful job on the grade crossing. It looks very well thought out and displays some very neat work. What do you plan to do for signals?
Dave
Hi Dave, many thanks for the kind words. I do watch your channel on YouTube, so I'm familiar with your layout and your talents as a model builder. As a matter of fact, I still chuckle when I think of the water tower episode blooper when the tree falls over!!!
Yes I would like to install some signals, preferably just the flashing lights, no gates. Or maybe some wigwags with flashing lights! Any suggestions for a brand or supplier? I also need to add the RR crossing lines on the asphalt and some lines need to be done at all my internecions too. I haven't figured that out yet, I'm going to work on the weathering first.
Stupid people and trains:

Some of those folks are way beyond stupid!
OBX, Great job on the control tower, Really nice detail along with good paint color and weathering. Bill
Ran some trains ![]()
@samparfitt : Could not believe that video...Wow the dumb things people do that risk lives and damage even to themselves. Einstein was once quoted as saying..."The difference between genius and stupidity is that genius has limits".
Don
@Bill Park posted:OBX, Great job on the control tower, Really nice detail along with good paint color and weathering. Bill
Thank you sir. I'm not quite finished with it yet. Im trying to find a gen-set on a trailer so they can power their welder. Still some scenic stuff to put down also.I also want to change the placard on the tower to Port Amhearst.
@dmestan posted:I wish. Moving to San Diego, no basements
Moving to San Diego! You are one lucky guy. It has the perfect climate (best in the USA) and great museums in Balboa Park including the Model Railroad Museum. Also you have to check out the Old Town Train Depot, it's all Lionel, you won't be disappointed. Good luck with your move and welcome to California.
Step one
@Tom M posted:Spent yesterday evening cleaning the layout. I bought this organizer and gathered up parts and pieces littered all over the place.
Now I have so much more room for activities! Plus all my bits and bobs are all in one(or two...) places.
Sure, but can you find any of the parts you stuffed in those drawers? ![]()
![]()
@gunrunnerjohn posted:Sure, but can you find any of the parts you stuffed in those drawers?
I got 3 of those size drawer units and 3 bigger ones in the garage. I got 5 of those flat briefcase style lift up top compartment units on top of my workbench in the house, and it's still not enough for everything! One for house electrical, one for screws, nuts, machine screws, bolts, one for LED's and resistors, one for other train related electronics like AC-DC buck converters, DC Adjustable buck converters, relays, solderless crimp connectors, etc, and one for Arduino components, but I need to get better at doing coding to make that stuff work. Right now I would rather get all my track down, wired up, and operating correctly before I add other things in, I did plan for isolated rails connections, wired to underneath barrier strips and labeled for Track road crossings, uncoupling track pieces, switches ,and track feeders as I progress.

Step two
@Richard Cuozzo posted:Step two
Makin' the popcorn.....😁😁
@gunrunnerjohn posted:Sure, but can you find any of the parts you stuffed in those drawers?
I always find it. Within 30 tries or so...
@WesternPacific2217 posted:Hi Dave, many thanks for the kind words. I do watch your channel on YouTube, so I'm familiar with your layout and your talents as a model builder. As a matter of fact, I still chuckle when I think of the water tower episode blooper when the tree falls over!!!
Yes I would like to install some signals, preferably just the flashing lights, no gates. Or maybe some wigwags with flashing lights! Any suggestions for a brand or supplier? I also need to add the RR crossing lines on the asphalt and some lines need to be done at all my internecions too. I haven't figured that out yet, I'm going to work on the weathering first.
Scott- I started replying the other day and thought I hit send. I found a pair of lighted crossbucks from Model Power that were pretty cheap. They came with a random flashing relay which I removed and put a Circutron FL-2 flashing relay in. I also got an isolated rail relay from GRJ for activating the signals. The ice cube relay I used originally would chatter and was driving me nuts so it was replaced.


Not much to report. I've been busy this week. I did get the red/green LED's for the F3's yesterday so I did a test fit last night. I also glued a LED to the back of the headlight lens. The holes have not come out as I had hoped. I need to figure out a solution.


Some painting pics.....glad I used the nice weather Mon-Weds.......it's a deluge out there today.....


Peter
@gunrunnerjohn posted:Sure, but can you find any of the parts you stuffed in those drawers?
@Tom M posted:I always find it. Within 30 tries or so...
It's interesting when you first set up something like thisthat it does take some kind of labelstofind something...........but.........after you have the system up and running for awhile, it's like using the DCS remote..........you go to the right area without the nuisance of thinking ![]()
New deliveries:
@RSJB18 posted:
Bob, fill with some vinyl sparkling compound and you should be able to color match with a dab or two of craft modeling paint. PS: I aways start with a small bit and increase or file bigger to make it fit. Good luck!
Cheers, Dave
@darlander posted:Bob, fill with some vinyl sparkling compound and you should be able to color match with a dab or two of craft modeling paint. PS: I aways start with a small bit and increase or file bigger to make it fit. Good luck!
Cheers, Dave
I started with a 1/16th bit and then worked up a 1/16th at a time. The shell was softer than I expected and one of the bits ran through on one side. I've since went to the Dermel with a milling bit and gotten the back side where I need it. Once I get the LED situated I will repair the OOPS.....😁
Thanks Dave.
@RSJB18 posted:Scott- I started replying the other day and thought I hit send. I found a pair of lighted crossbucks from Model Power that were pretty cheap. They came with a random flashing relay which I removed and put a Circutron FL-2 flashing relay in. I also got an isolated rail relay from GRJ for activating the signals. The ice cube relay I used originally would chatter and was driving me nuts so it was replaced.
Hey Bob, thanks for the info! I'll look into this, looks like a nice setup. That is a beast of a relay! ;-)
@WesternPacific2217 posted:Hey Bob, thanks for the info! I'll look into this, looks like a nice setup. That is a beast of a relay! ;-)
Yea it is. I scrounged it out of an old HVAC controller. It's on the shelf now.
Mr. Putnam Division, That is a great looking model. Buildings like that make a layout. I thought I would offer a suggestion. If you are going to fill in the mortar lines on the brick, take a look a product named Roberts Brick Mortar Formula. For years and many brick buildings later using dry wall mud, and spending hours working for the right amount in the mortar lines, I discovered this product in a jar recently at my hobby shop. On a whim I bought a jar and used it immediately on a new Ameritown building. I couldn't believe how easy it was to apply with a paint brush and after it dries,(maybe a half hour) you can rub the surface and the excess comes right off. Rubbing it further will take a little off and you can actually get the amount of white you want for the appearance you want. If you have used dry wall cement before, you will find this much easier and a better looking building in my opinion. You can goggle Roberts Brick Mortar and it will come up. Hope this makes that very handsome building look even better. Bill
There are just so many great projects here. I threw out a lot of 'Likes' since I was so far behind reading.
I finished assembling the walls of the station kit. The kit had one piece of heavy stock for the gabled roof and thin pieces of cardboard for the hip roof. I used the cardboard pieces as templates for heavy pieces similar to the one that was in the kit. The instructions are sketchy, and don't mention the roof at all other than shingling, so I really don't know the kit maker's intent. I'm going to add some wood bracing for the two roof sections that I can remove them to install lighting and some interior detail later. I have also picked out some peal and stick shingles to represent a slate roof better than the thin paper shingles that came with the kit.
Here are a couple of photographs of the station with the walls assembled.


@Mark Boyce posted:There are just so many great projects here. I threw out a lot of 'Likes' since I was so far behind reading.
I finished assembling the walls of the station kit. The kit had one piece of heavy stock for the gabled roof and thin pieces of cardboard for the hip roof. I used the cardboard pieces as templates for heavy pieces similar to the one that was in the kit. The instructions are sketchy, and don't mention the roof at all other than shingling, so I really don't know the kit maker's intent. I'm going to add some wood bracing for the two roof sections that I can remove them to install lighting and some interior detail later. I have also picked out some peal and stick shingles to represent a slate roof better than the thin paper shingles that came with the kit.
Here are a couple of photographs of the station with the walls assembled.
Looks good Mark. I agree with keeping the roof removable for future access.
Bob
Lots of great projects and work on display!
I've been working on lighting. Shown in pictures: Just finished getting my four Miller Engineering signs off battery power and put a row of leds in an MTH bus. Not shown: finished installing a Lionel double-track bridge. Got both signals working, however the green light doesn't always go out when train is in block. I think it has something to do with the wheels on each car - for some the green light is out completely and red lit, others the green light flickers.


Steve: remember that some of the lower cost cars (MPC, LTI) etc have plastic wheels even though the axles may be metal. Perhaps that has something to do with the problem. Check the car in the block when the light flickers. Metal wheels are available from Lionel or I see them often on E-bay. Another possible test to see if its the cars, try a train with only Lionel Postwar cars for example...all those wheels were steel.
Great looking layout by the way...
Don
I made and installed a few trees and shrubs.

Thanks Don, I'll check out all the cars on both tracks. Was thinking perhaps the wheels needed cleaning.
Morning guys, its been about a week from my last visit. There sure has been some wonderful work being done from Bob's Led light to Peters red building! I would like to comment on everyone but I have limited time.
Just a little advice to you all, I am sure some of you already know. But when your old rain gear wears out, don't rush out and buy a new set! The CEO already has me doing projects to get ready for summer and I tell her its raining outside! She states that's why we bought you new rain gear last year when your old stuff got holes in them! LOL
I hope your all having a great weekend and finding time to have fun with your layout and trains!
@mike g. posted:Morning guys, its been about a week from my last visit. There sure has been some wonderful work being done from Bob's Led light to Peters red building! I would like to comment on everyone but I have limited time.
Just a little advice to you all, I am sure some of you already know. But when your old rain gear wears out, don't rush out and buy a new set! The CEO already has me doing projects to get ready for summer and I tell her its raining outside! She states that's why we bought you new rain gear last year when your old stuff got holes in them! LOL
I hope your all having a great weekend and finding time to have fun with your layout and trains!
I guess that comes with life in the Pacific Northwest Mike. Around here, rain time = train time. ![]()
Bob
@RSJB18 posted:I guess that comes with life in the Pacific Northwest Mike. Around here, rain time = train time.
Bob
![]() .........oh yea.
.........oh yea.
@mike g. posted:Just a little advice to you all, I am sure some of you already know. But when your old rain gear wears out, don't rush out and buy a new set! The CEO already has me doing projects to get ready for summer and I tell her its raining outside! She states that's why we bought you new rain gear last year when your old stuff got holes in them! LOL
I hope your all having a great weekend and finding time to have fun with your layout and trains!
You have a great weekend too Mike.
( I don't like rain gear Mike. Many years riding the MC in the rain convinced me that sweating in it was just about as bad as not wearing it. That sweating alone might make you catch a cold ![]()
![]() )
)
@WesternPacific2217 posted:Hi Dave, many thanks for the kind words. I do watch your channel on YouTube, so I'm familiar with your layout and your talents as a model builder. As a matter of fact, I still chuckle when I think of the water tower episode blooper when the tree falls over!!!
Yes I would like to install some signals, preferably just the flashing lights, no gates. Or maybe some wigwags with flashing lights! Any suggestions for a brand or supplier? I also need to add the RR crossing lines on the asphalt and some lines need to be done at all my internecions too. I haven't figured that out yet, I'm going to work on the weathering first.
Hey Scott,
Thanks for the compliment. Speaking of my YouTube channel, in my last video I installed a grade crossing in a corner of the layout. I used some flashers from Tomar but it took me almost a year to get them after some serious hunting. I know that MTH makes some flashers as well. Also if you could find some that were made by Right of Way Industries or NJ International they are nice. They are both out of business but sometimes they will come up on the bay and are good products. Let me know if you have any luck with getting some.
Dave
Access to this requires an OGR Forum Supporting Membership


