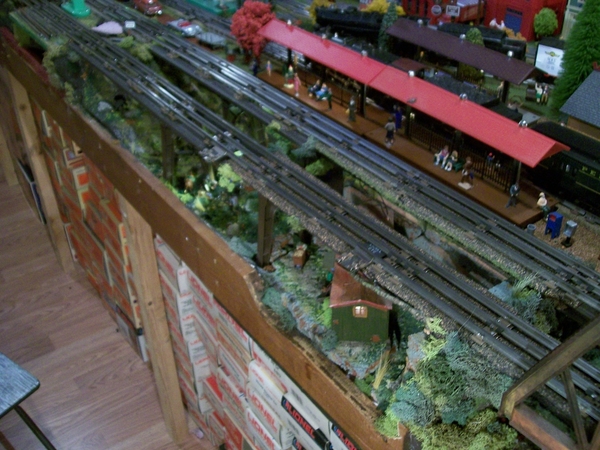
I am slowly finding detail to add to the annex including trees from the local hardware store.
John


|
|
I am slowly finding detail to add to the annex including trees from the local hardware store.
John
Morning guys, sorry I didn't check in here yesterday. I just ran out of time between working on the layout, keeping the new inspector busy and eating dinner there just wasn't enough time.
@trestleking Look close, but I am glad you have room for all your cars! I sure hope that isn't a loadbearing 2X4 LOL![]()
@Stevemny Steve WOW $60! I have been just looking for the passenger cars for my steam engine and everything I find is over @$100! What a great neighbor!
@Trainmaster04 Now that is a wonderful looking engine! I am just wondering how long it will be before you have on permanent on your layout! LOL
@RSJB18 Bob wonderful video of your layout at night! Your train is running so smooth that I am thinking it gave you time to have an adult beverage while running your empire! I am jealous! LOL ![]()
@Fendermain John, great work on your addition to the layout, and the detail you're doing just brings it to life! Again, great work!
Well guys as for me yesterday was spent dismantling the switch panel to make room for the new location where the bridge will rest. I tell you this next time around I am going to have to try something different as you will see the wire mess I came out with! LOL
First the dismantle:

Next the construction begins on the new location for the free end of the bridge. I think I have it all figured out; I just have to figure where I am going to repurpose some more plywood! I know I have enough here in the train room, just where to rob Peter to pay Paul! LOL

I hope you are all having a great weekend and fun with your layout and trains!
Thank you, Mike. I really like your revamp and the lift bridge is most impressive.
John
Mike, the progress is looking good.
Andy
Not so much of what I did on the layout, but rather what I did under the layout.
My layout is 8' x 20' and has been up for c. 12-15 years. Earlier this year I put wheels under my layout. I had been considering buying these wheel sets, which I saw on-line and this past spring, while walking through Menards, I saw exactly what I was looking for, so I purchased enough for the layout.
These worked out well, especially in June when I had to replace my HVAC system and roll the layout away from the wall, where the breaker box is. However, as you can see, there is no bracing for the legs and I was very careful in moving the layout. I finally got around to adding some bracing to the legs.
My first thought was to integrate the transformer table into the layout, so that the transformers and associated wiring would move along with the layout.
This worked out and I liked it. I also added bracing from the front to the back of the layout on each set of legs. I knew I needed to add braces between each of the front to back legs, similar to on the front of the transformer area. As I thought about how much storage I would be losing by adding the braces, I thought why not add a low level shelf along the front of the layout. So this came about.
The end of the layout not showing, has a notch, so that one can walk to the other end of the room and I was previously storing a mini photo studio under this end on a portable table. I realized I had to incorporate this table into the layout also, so this is the result of that.
The layout is now very stable and rolls much better.
I still have some bracing to add in a few places, including under the plywood shelf at the front of the layout and at the rear of the layout. I am very happy with the results so far.
NWL
Hi guys thanks for all the nice words! I got a little time out in the train room today and got the free end of the bridge support built. The bad thing was I found out the outside edge of the layout was sagging 3/4"! I had to jack it up with a bottle jack and add 2 legs! Here are a couple photos.

Now when I get some.more cork I can move forward. First I have to clean up this dang mess! 😆
Nation Wide, that sure is a boat load of wheels, I sure hope it work out the way you want it too!
@Dallas Joseph, @pennsyfan, @Fendermain,
Thanks guys. John- the lighting was easy. I had the lights over the layout off and the one behind me on. When the train came out of the corner the light hit them just right. The new wing on the layout is looking great.
@mike g.- more progress.......![]()
Bob
Great updates everyone! Thanks for sharing.
-Greg
@Mark Boyce posted:Mike, The bridge installation looks great! Yours as mine sure went faster the second go round!
Hi Mark, this time it was easy, I had to move the table to line it up with the new plan so I left the bridge in place all attached and just cut to table at the correct angle to line up! LOL So I might be a little lazy!![]()
Mike and Nationwide, rollers, bridges, and level or the lack thereof were topics here Saturday afternoon when Paula’s contractor brothers discussed our layout. One has helped extensively with building it and enjoyed telling tales about the uneven floor, the battle for level, and the use of rollers in helping to solve the problem.
Later the conversation turned to the addition of another bridge and the need to power it and an existing one. They want to see the solution.
Rich was here Saturday AM and he, Paula, and I, hung two pictures, a 611 shaped plaque, and N and W and Virginian round plaques that we had acquired from Don Jones.
Engines and rolling stock in the pictures appear on nearby shelves and visitors can enjoy seeing the things come to life.


@Mikeg, Mike, Wow, from tear down to building back, it’s looking good, you seem to have a good plan, your lift bridges are amazing, @RSJB18, Bob, that’s a great night picture of your cool layout, and the Reading train runs so smoothly, SIRT, wow, welcome back and you have a really cool layout, a fun to run model railroad, @Fendermain, wow, very nice layout, very nice scenery, great placement of novel Lionel accessories, beautiful job, @Nation Wide Lines, now that’s very creative, a layout that’s easy to roll around, great idea, today I gave a new diesel a run around the lower level of the layout, and soon it will be programmed to TR 34, and assigned a long freight train. Happy Railroading Everyone 


Wow. Larry those Santa Fe units look great. Trains are so much fun . A few more pics of my latest project which is my old homestead scene. 


@farmerjohn posted:Wow. Larry those Santa Fe units look great. Trains are so much fun . A few more pics of my latest project which is my old homestead scene.
John:
That is a GREAT scene! Are the buildings scratch-built? The scenery is excellent. With the speed at which you completed this scene, you are making the rest of us look to be slow and lazy. It seems as if it were only last week that you were showing us the bare, wooden substructure of the area of your great layout. Bravo on another of your awe-inspiring works of model railroading art!
Merry Christmas and Happy New Year to you and yours.
@mike g. posted:Hi Mark, this time it was easy, I had to move the table to line it up with the new plan so I left the bridge in place all attached and just cut to table at the correct angle to line up! LOL So I might be a little lazy!
Mike, work smarter not harder.
@pennsyfan posted:Mike, work smarter not harder.
I try, sometimes it backfires on me!LOL
@Randy Harrison posted:John:
That is a GREAT scene! Are the buildings scratch-built? The scenery is excellent. With the speed at which you completed this scene, you are making the rest of us look to be slow and lazy. It seems as if it were only last week that you were showing us the bare, wooden substructure of the area of your great layout. Bravo on another of your awe-inspiring works of model railroading art!
Merry Christmas and Happy New Year to you and yours.
Boy Randy , ALL OF YOU make ME look slow and lazy . ![]()
Definitly agree with you on John's art Randy. ![]()
Hi guys, the wife was so nice to watch the inspector today so I had some undisturbed time in the train room.
First thing in order was to get some cleaning done, then I marked out the inner loop from the double bridge, and last but not least all the bridges are mounted and line up. Here are a couple photos. 


@mike g. posted:Hi guys, the wife was so nice to watch the inspector today so I had some undisturbed time in the train room.
First thing in order was to get some cleaning done, then I marked out the inner loop from the double bridge, and last but not least all the bridges are mounted and line up. Here are a couple photos.
Mike, I’ve been following your rebuild and absolutely love what you’ve done. Great job!
@Strap Hanger posted:Mike, I’ve been following your rebuild and absolutely love what you’ve done. Great job!
Thank you, got cork order today so hope to get some more track laid tomorrow.
A little layout work tonight. I cut in the lake and riverbed, landscaped behind the lake, put the waves in and ran electric to the billboard.


 Once the glue dries I’ll paint the riverbed and lake. Add stones and fill it with a water like acrylic clear coat.
@farmerjohn, thank you for the kind words on the Sante Fe yellow bonnet diesels. Your new addition is coming along just fine and as all of your other projects its going to be a crowd pleaser as is your whole layout. It’s a Wow. Today I programmed the ABBA into TR34 and it actually worked. Happy Railroading Everyone 


Got the ground cover finished up and the tunnel for the Christmas layout and placed back on the layout. Very happy how my first venture into the world of foam scenery turned out, was a lot of fun experimenting with new techniques.
Wired up the police car as well so they could respond to a reindeer on the loose.
Big thanks to the forum for all the inspiration.


Morning guys not much today just fixed a little dip in the ramp coming down from the upper loop that @leapinlarry seen in one of the photos I posted! I just love how they guys her are not afraid to step up and point out something! Sure, makes it easier to fix it now then later!
@DrSteveDC Wow that area sure is coming along! I think the lake and river are going to be a great addition! I plan on trying to put one on my layout rebuild! I will keep watching your progress!
@leapinlarry Larry those sure are some sharp looking Santa Fe engines! They will really bring out the quality of your layout as they run the lines! But I still would have to say side by side the BNSF still win my heart! ![]()
@chabs Jon, good job on the ground cover and tunnel! That is absolutely an outstanding job for your first venture! I wish I would have done that good! Maybe next time! LOL
Well guys I don't know if I will get anything else done in the train room today but If I do I will keep you updated!
I hope you all stay safe and warm! Oh and dont forget to try and have fun on your layout and with your trains!
@Nation Wide Lines posted:Not so much of what I did on the layout, but rather what I did under the layout.
My layout is 8' x 20' and has been up for c. 12-15 years. Earlier this year I put wheels under my layout. I had been considering buying these wheel sets, which I saw on-line and this past spring, while walking through Menards, I saw exactly what I was looking for, so I purchased enough for the layout.
These worked out well, especially in June when I had to replace my HVAC system and roll the layout away from the wall, where the breaker box is. However, as you can see, there is no bracing for the legs and I was very careful in moving the layout. I finally got around to adding some bracing to the legs.
My first thought was to integrate the transformer table into the layout, so that the transformers and associated wiring would move along with the layout.
This worked out and I liked it. I also added bracing from the front to the back of the layout on each set of legs. I knew I needed to add braces between each of the front to back legs, similar to on the front of the transformer area. As I thought about how much storage I would be losing by adding the braces, I thought why not add a low level shelf along the front of the layout. So this came about.
The end of the layout not showing, has a notch, so that one can walk to the other end of the room and I was previously storing a mini photo studio under this end on a portable table. I realized I had to incorporate this table into the layout also, so this is the result of that.
The layout is now very stable and rolls much better.
I still have some bracing to add in a few places, including under the plywood shelf at the front of the layout and at the rear of the layout. I am very happy with the results so far.
NWL
Thanks for all of the likes on the original post. Here are photos showing the mostly finished bracing. All that is left is to add supports under the plywood, between the front to back braces.
I found that the combination of the 1' x 4' braces going from front to back and the plywood going from side to side created a very stiff and stable table that moves very easy.
Here is the area where the layout is notched. I may add some plywood to this area at a later date, but it represents only 1 leg and is very stable when combined with the rest of the layout.
Here is a view of the underside, with plywood along the front and rear of the layout.
Here is a view of the top of the layout.
Happy Holidays
NWL
Wow NWL what a project!! Great work!
Best Wishes and Happy Holidays
Don
@Nation Wide Lines posted:Not so much of what I did on the layout, but rather what I did under the layout.
My layout is 8' x 20' and has been up for c. 12-15 years. Earlier this year I put wheels under my layout. I had been considering buying these wheel sets, which I saw on-line and this past spring, while walking through Menards, I saw exactly what I was looking for, so I purchased enough for the layout.
These worked out well, especially in June when I had to replace my HVAC system and roll the layout away from the wall, where the breaker box is. However, as you can see, there is no bracing for the legs and I was very careful in moving the layout. I finally got around to adding some bracing to the legs.
My first thought was to integrate the transformer table into the layout, so that the transformers and associated wiring would move along with the layout.
This worked out and I liked it. I also added bracing from the front to the back of the layout on each set of legs. I knew I needed to add braces between each of the front to back legs, similar to on the front of the transformer area. As I thought about how much storage I would be losing by adding the braces, I thought why not add a low level shelf along the front of the layout. So this came about.
The end of the layout not showing, has a notch, so that one can walk to the other end of the room and I was previously storing a mini photo studio under this end on a portable table. I realized I had to incorporate this table into the layout also, so this is the result of that.
The layout is now very stable and rolls much better.
I still have some bracing to add in a few places, including under the plywood shelf at the front of the layout and at the rear of the layout. I am very happy with the results so far.
NWL
NWL, this looks great! Do you happen to have a link to find those wheel sets that you used? I looked on Menards website but haven't been able to find that product.
@Canes RR posted:NWL, this looks great! Do you happen to have a link to find those wheel sets that you used? I looked on Menards website but haven't been able to find that product.
I tried to find more of them on Menards website and could not find them either. It appears that they were more of a one-time special at Menards.
I had originally found them on Amazon and then happened to see a box of them in Menards.
Search for "steel tri-dolly"
NWL
Found it on Amazon...thank U!
Hello everyone! With Christmas only a few days away I decided I would produce a Christmas video. It is not a very long video but I did add a few audio touches that bring the video together. The video will be released to the public on Saturday at 12:00 pm CST. Thanks for reading and Merry Christmas!

@mike g. posted:Great projects everyone!
@p51 Lee I really love the B/W photo and the story to go with it!
@trestleking Looking good! I wish I had a room to bust into! LOL
Well guys it has been a busy day today. I was able to get the rest of the upper grade outer loop laid and the main level outer loop laid to where the bridge is going. The hard part is getting the angle cut on the decking that the bridge is attached to. I am getting close and will work on it again tomorrow.
There really is no hurry right now as I have no more cork, but then again, I still have a lot of tracks to still take up and clean. I just want to get this end of the room track laid so I can move everything under the layout on the other end! LOL
Here are a couple photos of today's work. I know it doesn't look like much but the angle for the bridge decking is kicking my rear! LOL
I hope you all have a wonderful weekend and find time to have fun with your trains and layout!
A monumental task.....well done! It takes courage to tear up and start over. Bravo! This is inspirational to all of us!
Peter
Great work everyone......Merry Christmas and Happy Holidays to all!
From my separate layout build thread.......this week, some of the modular group guys came over and helped cutting the track on the lift gate and we took out my Ross Transfer Table and "brainstormed" its installation.....


Have a great weekend, folks! Safe travels to all!
Peter
Really enjoy all the postings. The move to the new house has set me back a wee bit. Unfortunately, the train room has to include a workshop and storage. My solution for storage (except my trains of course) is - if it has to be stored it needs to be tossed!
I did manage to build a few L girders and expect to get the legs done today. The open gridwork is totally new to me. Much different that slapping a sheet of plywood on a deck. So, much more thought required and I want to build the rough grids to "see" how it will work. Still planning a lower level passenger terminal, which is complicating matters due to the long run needed to get a reasonable grade. I do not see a reasonable way to get a lift out worked into the plan so the dreaded duck-under is in the works. Now a matter of "how high" off the floor. My grandson approved a stand to use to play with the railroad. BTW - Most of the boxes are "train" stuff.


@ScoutingDad posted:Really enjoy all the postings. The move to the new house has set me back a wee bit. Unfortunately, the train room has to include a workshop and storage. My solution for storage (except my trains of course) is - if it has to be stored it needs to be tossed!
I did manage to build a few L girders and expect to get the legs done today. The open gridwork is totally new to me. Much different that slapping a sheet of plywood on a deck. So, much more thought required and I want to build the rough grids to "see" how it will work. Still planning a lower level passenger terminal, which is complicating matters due to the long run needed to get a reasonable grade. I do not see a reasonable way to get a lift out worked into the plan so the dreaded duck-under is in the works. Now a matter of "how high" off the floor. My grandson approved a stand to use to play with the railroad. BTW - Most of the boxes are "train" stuff.
I think your plan is wise - to construct a few rough grids first. I am still trying to wrap my head around how L-girders are an "easier way". Looking forward to what you come up with. I guess it's like most stuff, once you do a few, it's less daunting.
@trestleking thanks for the note. Another mind bender is the statement that this kind of construction is easier to disassemble and move around. That one is a head scratcher. I have a feeling while this is the geographical area we want to be, the house may not be. So I am planning as best I can to be able to disassemble as in modular construction. Maybe two do not mix, but Wescott says yes. I suppose he means the legs can be detached from the L Girders and all that can be moved. Now its a matter of connecting modules based on the L Girders. Good thing this house has a walk out basement.
I can say screwing plywood down from the top and then adding another layer is a mistake - way way too hard to make changes and fix problems. When I took down TPRR1, the problem areas were where I had screwed down the decking and could not find the screw heads due to layers of scenery.
"If it has to be stored (except for trains......." love it Scoutingdad .. I have another project going long this year in the Gee-Rage. Management said if she can't organize the Holiday Boxes while they are still in the attic above the garage, she is putting up a borrowed tree and that's that. Well, being a plan B layout guy, I entlisted the help of 7 and 10 year old grandkids and rope ladder. (Muscle car restoration under the drop down ladder. Awaiting parts) lol.
We strung up the outside lights and fetched enough track for two carpet - under - tree - layouts. Those grand kids made us proud....
Soooo, here is a "What did you do on your layout today", a rebuilt 623 that runs smooooooth. (i diy.... "Even a blind pig will find an acorn now and then")
Thanks for letting me hang out with the "COOL KIDS", I really enjoy catching up on all yall's projects.

@ScoutingDad posted:@trestleking thanks for the note. Another mind bender is the statement that this kind of construction is easier to disassemble and move around. That one is a head scratcher. I have a feeling while this is the geographical area we want to be, the house may not be. So I am planning as best I can to be able to disassemble as in modular construction. Maybe two do not mix, but Wescott says yes. I suppose he means the legs can be detached from the L Girders and all that can be moved. Now its a matter of connecting modules based on the L Girders. Good thing this house has a walk out basement.
I can say screwing plywood down from the top and then adding another layer is a mistake - way way too hard to make changes and fix problems. When I took down TPRR1, the problem areas were where I had screwed down the decking and could not find the screw heads due to layers of scenery.
Jeff- if you are going the open frame route, check out a pocket screw jig from Kreg.
You will thank me later.....😃😃

I did a big wainscott project in my house several years ago and used them for the first time. Never going back to conventional fastener methods for this type of construction.
Bob


I have been pulling out my bus line wire and finding some cross hookups that were trouble for my running MTH DCS System. I got a load of bus line wire 12 gauge that I've prepared to trash and re-install a smaller gauge to create a web to a base of 50-1014 terminal blocks, myself my train guys are with their relatives enjoying Christmas away. I'm looking forward to this project myself. that's what I have been doing this weekend.
@RSJB18 Bob, if you machined all those rails and styles you really did not need to use screws to hold them together, there is plenty of glue surface. I made raised panel doors for a custom book case and glue worked fine. On the other hand I've made other items using a basic Kreg tool with great results ... I agree no reason to use anything else on certain joints. Where did you see using them on the open frame? The way Westcott describes it, there is no need for these kind of joints, unless you do away with the blocks. I did use a few on TPRR1.
Bob, Your wainscotting work looks great. Based on what you said, did you lay in the detail trim or did you do the router/shaper work to get the profiles. Did you make panels or did you just lay the rails and styles over the drywall.
BTW - I work reasonably well by hashing out an idea and then letting it stew in the back of my head for a while. I think I have a workable approach for the multilevel layout using the open frame method. I just need to mull things over for a while. Jeff
@Putnam Division posted:A monumental task.....well done! It takes courage to tear up and start over. Bravo! This is inspirational to all of us!
Peter
Definitely inspirational Peter...........I don't have the ability at this time to achieve such a task though ![]() .
. ![]() ...........but its great to watch this activity of such craftsmen
...........but its great to watch this activity of such craftsmen ![]()
A painted BLACK ceiling over a layout in a train room presents an opportunity for a spectacular "scenic effect;" i.e., install twinkling Christmas tree lights (all clear bulbs) at the ceiling to simulate a starry sky. For astronomy-aware buffs, arrange a few lights in the pattern of a constellation -- Polaris and the big Dipper would be recognized by many visitors as a "gee whiz" feature. Tip: use light strings that stay lit even if one (or more) light bulbs burn out.
The next best "starry sky effect" is to install a star projector pointed to the ceiling; most such units have built-in constellations for realism. Tip: hide the projector behind layout scenery - a mountain or a building.
Keep looking up ...
Mike Mottler LCCA 12394
Made a change on my gold miner's camp area, 1st photo prior the rest after the changes.


@ScoutingDad posted:@RSJB18 Bob, if you machined all those rails and styles you really did not need to use screws to hold them together, there is plenty of glue surface. I made raised panel doors for a custom book case and glue worked fine. On the other hand I've made other items using a basic Kreg tool with great results ... I agree no reason to use anything else on certain joints. Where did you see using them on the open frame? The way Westcott describes it, there is no need for these kind of joints, unless you do away with the blocks. I did use a few on TPRR1.
Bob, Your wainscotting work looks great. Based on what you said, did you lay in the detail trim or did you do the router/shaper work to get the profiles. Did you make panels or did you just lay the rails and styles over the drywall.
BTW - I work reasonably well by hashing out an idea and then letting it stew in the back of my head for a while. I think I have a workable approach for the multilevel layout using the open frame method. I just need to mull things over for a while. Jeff
Jeff- I'm with you, sometimes it's best to let an idea percolate for a while.
I built the 1x frames and applied them over drywall. I added several different trims to get to the finished product. I didn't want to have a lot of nail holes to fill and the pocket screws ( I also glued the joints during assembly), made for a strong joint and a cleaner finished product. I also used construction adhesive the hold the frames to the drywall so that I could hide the few nails behind the top and bottom moldings. I did the room 5 years ago and not a single joint has moved/ cracked the paint. Don't ask me to paint it again, my knees are still recovering.....![]()
Bob
There been a lot of great work being posted this holiday season. I started my layout in 2019. Worked fairly steady on it until the end of 2020 when the wife and I retired. Due to health issues for her and being overwhelmed with other tasks, I haven't really done much except build structures for future areas of the planned layout. Now that things have become more manageable I've been inspired to shift my original plans to at least get trains running around the layout. I finished joining the two side of my layout so now my passenger loop is complete with a swing down bridge to gain access to the center of the layout. Next is to finish out the bridge with some deck girder sides and the get the freight loop connected with another bridge across the great void. Happy Holidays to all.
Scott


Amazing Scott, Thanks for taking the time to share!!
Well I was cutting roadbed with my trusty old Craftsman jigsaw when it locked up. No jigsaws to be found locally so I’ll have to order one online & maybe upgrade to a Bosch. In the meantime I laid out some track for a reality check on spacing, so far - so good.
Got the last of the Christmas decorations done. 


Bob


Hey Bob, nice Christmas decorations on you layout!! Enjoyed them. How illuminating an experience for the holidays!
have a good one.
leroof.
@Leroof posted:Hey Bob, nice Christmas decorations on you layout!! Enjoyed them. How illuminating an experience for the holidays!
have a good one.leroof.
Thanks Pierre.
The lights are from Evans Designs if interested. They both have battery packs for power. The set on the station roof is 12 light (2- AAA), and the tree is 24 light (2-AA).
Bob
B&O Fan, your progress since 2019 is an inspiration. I'm glad to have some time off for the holidays. Been working on adding my outer loop (Atlas track with RCS switches). Today got the truss bridge level at least, still have to stain and secure it. I like how the tracks make a shadow on the embankments. Merry Christmas to all.


My Granddaughter left Elfie to watch over me on Christmas while my daughter’s family went on a cruise. So I took him with me the clubhouse for my shift at the layout.

Hello everyone! Here is the Christmas video I produced earlier this week. I hope you all enjoy it and Merry Christmas!
No work today, just running. 2 Legacy, 1 LC+ and 2 LC. No switching or changing tracks, just have the five running with the lights dim with Christmas songs playing on the Lionel Bluetooth radio tower. Three of the trains are Christmas related. Polar express, the reindeer cars behind the LC+ engine and a cheep Christmas express set.
@pennsyfan posted:My Granddaughter left Elfie to watch over me on Christmas while my daughter’s family went on a cruise. So I took him with me the clubhouse for my shift at the layout.
WTG Bob Have a Merry Christmas! Mark

@B&O Fan, wow what a nice layout you have, thanks for posting pictures, I love the background buildings, the colorful B&O passenger train, Wow, snd RSJB18, Bob, your Christmas train and decorations are beautiful, @samparfitt, thanks for the beautiful Christmas Greeting Card picture, its very nice, @pennsyfan, very interesting video, really nice, that’s a beautiful layout, @Trainmaster 04, your Christmas train video is really neat, the music is beautiful and the trains do their job, I see the smoking, Wow. Happy Railroading Everyone, it’s Christmas Eve….. 


Thanks, my Son in Laws nephew studied film making. I think he used it towards his Masters.
I enjoyed your photos especially “church street”.
@RSJB18 posted:Thanks Pierre.
The lights are from Evans Designs if interested. They both have battery packs for power. The set on the station roof is 12 light (2- AAA), and the tree is 24 light (2-AA).
Bob
Yes, great holiday lighting, Bob! Do the lights come in "strings" from EvanDesigns or do you have to solder them together? I'm considering using some of their LED's to replace the crummy incandescents on a few of my locos, but your holiday decorations have me inspired to do the same for some trees on my coffee table PE setup.
@Bill Swatos posted:Yes, great holiday lighting, Bob! Do the lights come in "strings" from EvanDesigns or do you have to solder them together? I'm considering using some of their LED's to replace the crummy incandescents on a few of my locos, but your holiday decorations have me inspired to do the same for some trees on my coffee table PE setup.
Bill- they are strings. Very delicate but they are about as plug (insert batteries), and play as you can get. I added the battery packs and switches since they are only used occasionally.
https://evandesigns.com/collec...natures-and-dioramas
I've used many of their products. Great stuff and great people at the company.
Thanks.
Merry Christmas
First off Merry Christmas Everyone!
This maybe a little long, but I have been away from the forum for about a week! LOL
@Putnam Division Peter thank you so much for your comments! To be honest it is amazing layout builders like you that give me inspiration to make changes to my layout! So thank you so much!
@ScoutingDad Jeff looks like you have yourself a nice space there! I look at it this way, getting a few L girders built is in the right direction! Nothing but forward from here!
@DrSteveDC Steve the river and lake look Outstanding! Was wondering what your going to use for the clear coat?
@SitkaThe cut in your facia board for the terrain really makes the scene stand out! Great work!
@B&O Fan Scott looks great and I really love the touch of your amazing backdrops!
@RSJB18 Bob, wonderful work on the Christmas lights! Maybe next year I can get you to make a trip to Washington State to do mine! LOL
@Mick60Mick good looking work on the truss bridge and I really love the folks in the river below!
@Trainmaster04 What a wonderful video you put together for this time of year! Thank you so much for sharing it with the rest of us!
@leapinlarry Larry Merry Christmas and man do I love all the photos of your wonderful layout! Sure, makes the one really dream big!
Well guys as for me I was able to get the track laid to the redo of my layout to the left side of the doorway. My next task is to relocate the control station and start wiring that section while there is nothing under the layout. I ordered new wire and have to set up my Z4000, TIU and a new to me AIU. This will be the slow part for me as I am not great at electrical! Here are a couple photos as you all know if there is no pictures it didn't happen! LOL


I hope you all are having a wonderful Christmas and plan on a great New Years! Oh and don't forget to share your layouts with your family and friends!
@@mike g. - Thanks, I’ve been following Marlin of Sweden on YouTube. He recommends a water base high gloss clear coat (the type you would use on hardwood floors). I’m probably going to give it a shot tonight once I wake up from my food coma.
@DrSteveDC posted:@@mike g. - Thanks, I’ve been following Marlin of Sweden on YouTube. He recommends a water base high gloss clear coat (the type you would use on hardwood floors). I’m probably going to give it a shot tonight once I wake up from my food coma.
If you like the results please let us know.
I ran some trains for my 7 month old grandson. Don’t have a video, but his eyes followed the train around the whole layout. What a great time we had watching his face. I look forward to many more sessions with him.
Andy
DrSteve did you use the toilet paper method to create the ripples/waves before painting? Can’t wait to see your finished water. Paula just said, “This is how we can do the Hatteras sand flat/clam bed.
Andy you are starting him young. Wait until he can walk!
Merry Christmas all.
@mike g. posted:
Thanks Mike that insulation board is great to work with, your layout is coming along nice wish I had more room for a bigger layout. God Speed! Mark
After blowing snow outside this morning, I managed to cut some lumber for my 1st framework section. Thought I may as well paint the legs while they’re handy. My in-stock paint choices were flat black, chili red or jungle green,… flat black got the nod. (No pics).
Rich in SD
Now that ballasting has essentially been completed I attacked a base layer of scenery in two of the last 3 hard to reach places that need to get done prior to bringing out a lot of trains. First up, the easy one - adding a fence around the brewery:

I will still need to detail with vegetation and add signs but the fence is in, which was the 'hard' part.
Second, I covered a hillside with vegetation:

I still need to work on the ground level vegetation at the bottom and add some around the rocks but it's a good start, imho.
This is my busiest time of year at work, so I will be doing some incremental detailing the next 2-3 weeks before making roads.
I hope everyone had a great Holiday regardless of which one you celebrate and I really enjoy seeing and reading about everyone's progress!
-Greg
Lots of great work going on here. The creativity is amazing. Hopefully the dr will take me off the DL this week, and I’ll get back to it. in the meantime I ran some trains this morning.
Afternoon guys I hope you all had a wonderful holiday!
@DrSteveDC Steve looking good and thank you for turning me onto Marklin of Sweden! Great video to watch and I can see lots to learn from him!
@Greg Houser Greg the fence turned out looking great and the work you're doing on the hillside looks to be top notch! I bet it will be outstanding when you're done!
@pennsyfan Bob take the time and take it easy! There is nothing wrong with just running trains!![]()
Well guys I was able to get to the train room this morning and worked on my new control station. I used an old rolling cabinet I had in the training room thinking it would be easier to wire things up if I just rolled it out to work on it! LOL
I was able to get my Z4000, TIU and AIU mounted along with a power bar and my 10-amp breakers between the Z4000 and TIU. I still have to hook up the GRJ watchdog system, I just don't remember how! LOL Here are a couple photos!


I hope you all are doing well and would like your comments if you have any!
But most of all I hope you're having fun with your layout and trains!
Thanks Mike.
On to your work. Could you elaborate for this old dog. “GRJ watchdog system” ??
@pennsyfan posted:Thanks Mike.
On to your work. Could you elaborate for this old dog. “GRJ watchdog system” ??
Hi Bob, Gun Runner John here on the forum builds a board that you can hook up to your DCS system that is always putting out the watch dog signal so when you power up a section of track like in a yard or a siding the engine doesn't just take off and run away!
@mike g. Thank-you for the kind words! I do like the idea of using a rolling cabinet for your control station. Really wish I would have thought of that myself! ![]()
-Greg
@mike g. posted:First off Merry Christmas Everyone!
This maybe a little long, but I have been away from the forum for about a week! LOL
@RSJB18 Bob, wonderful work on the Christmas lights! Maybe next year I can get you to make a trip to Washington State to do mine! LOL
Well guys as for me I was able to get the track laid to the redo of my layout to the left side of the doorway. My next task is to relocate the control station and start wiring that section while there is nothing under the layout. I ordered new wire and have to set up my Z4000, TIU and a new to me AIU. This will be the slow part for me as I am not great at electrical! Here are a couple photos as you all know if there is no pictures it didn't happen! LOL
I hope you all are having a wonderful Christmas and plan on a great New Years! Oh and don't forget to share your layouts with your family and friends!
Actually Mike, the lights on the layout almost outdid what I put on the house this year. We just had the house re-sided and I was in no mood to start stringing lights this year. A wreath on the door and a spot light were about it. ![]()
Next year will be back to normal, maybe......![]()
Bob
@Greg Houser posted:@mike g. Thank-you for the kind words! I do like the idea of using a rolling cabinet for your control station. Really wish I would have thought of that myself!
-Greg
Thanks Greg, I hope.it works out as planned.
@RSJB18 posted:Actually Mike, the lights on the layout almost outdid what I put on the house this year. We just had the house re-sided and I was in no mood to start stringing lights this year. A wreath on the door and a spot light were about it.
Next year will be back to normal, maybe......
Bob
Sounds like a good plan for me next year! LOL
@DrSteveDC posted:@@Bill Webb - yes, toilet paper and glue, here are one pics with one coat of poly. I am going to dry brush some white to the peaks of the waves after the second coat of poly.
Great whitewater! I'm gettin' my rubber raft ready!
@OhB1 posted:I’ve been making great progress with my son in law helping!
Next is building the ramps.
Looks great OhB1, looking forward to more updates.
One area that might be of concern for you to consider at this stage - access to derailments on the tracks under the upper level on the right.
Since i like to model just a few lines, wanted a C&NW culvert car. Took a Menards car and a ramp that i got from a donor car that I picked up at a local train show, now I have one.

@Lionelski posted:Looks great OhB1, looking forward to more updates.
One area that might be of concern for you to consider at this stage - access to derailments on the tracks under the upper level on the right.
Right you are, I'd give that some thought before chiseling this one in stone! Not only derailments, but if you ever have to work on those hidden switches... OUCH!
@gunrunnerjohn posted:Right you are, I'd give that some thought before chiseling this one in stone! Not only derailments, but if you ever have to work on those hidden switches... OUCH!
@Lionelski and @gunrunnerjohn It’s a good thing I thought of that already. You can’t see them but there are two access hole underneath. One in the front and one in the back. I plan on additional one on top because of the mountain that will be on top. Obviously lined up with the back one below.
Askin what I've done today, we I have the MTH DCS to decide In no longer want to use the older pattern of bus line around the perimeter of the layout. the design that MTH DCS has written to make a star pattern place instead. It's taking the old wiring out of labeling the drops that tie in onto the bus line—that day and a half of removing 12-gauge stranded wire.
That's how my day went.
Didn't actually do anything on the layout, but I did score a screaming deal on a Lionel FARR3 set on Ebay.
@OhB1 posted:@Lionelski and @gunrunnerjohn It’s a good thing I thought of that already. You can’t see them but there are two access hole underneath. One in the front and one in the back. I plan on additional one on top because of the mountain that will be on top. Obviously lined up with the back one below.
Just remember, working through a hole with a 6" ceiling isn't the same as having ready access. ![]() I have some access holes in my layout as well, and it's a trick to use them.
I have some access holes in my layout as well, and it's a trick to use them. ![]()
@mike g. posted:Hi Bob, Gun Runner John here on the forum builds a board that you can hook up to your DCS system that is always putting out the watch dog signal so when you power up a section of track like in a yard or a siding the engine doesn't just take off and run away!
Mike G, just reach out and contact Gunrunnerjohn, I'm sure he'll walk you right through it how to hook it up the right way.
@Chuck Guajardo posted:Askin what I've done today, we I have the MTH DCS to decide In no longer want to use the older pattern of bus line around the perimeter of the layout. the design that MTH DCS has written to make a star pattern place instead. It's taking the old wiring out of labeling the drops that tie in onto the bus line—that day and a half of removing 12-gauge stranded wire.
That's how my day went.
Hi Chuck, just curious, what drove your decision to rewire your DCS ? Thks,
Rich in SD
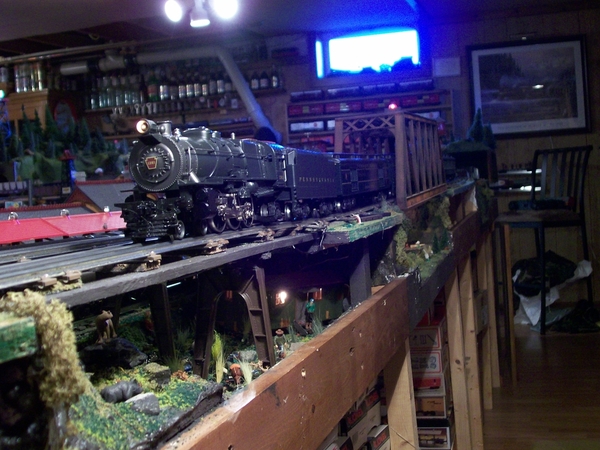
A test fitting. Looking to add a small storage yard, think I found the best location to tie into existing track. For now, just seeing what it might look like, how long and deep to make it, what it does to access, and what additional track I'll need -- need to find some switches for example. Current thought is to add a switch off outer mainline just about where the current station annex is.


Dr Steve, that water looks great. Next time I will scenic then finish the water last, oh well. Here's my finished curved trestle on the outer loop. The "jacobean" stain dried yesterday, and the basic scenic turf and shrubs are still drying today. Call this scene done, on to putting down more track.

I'm putting Woodland Scenics just plug lights in my buildings. Doing the switch tower, it was letting light through the plastic, so I had to do some extra work. I painted it inside and out added stairs and a second floor with controls train orders and a chair. The first floor has a bathroom, desk and bed. I can and will dim the lights when everything is hooked up.


@SIRT posted:Let it snow - revisited
Had to reduce the layout to fit in half of the Florida garage by attaching the curves together. Transitioned 2 of the 4 seasons using the bridge and truck.
Have a few more adjustments to make.
Steve, good to see your settled in and posting. I hope you like your new home.
@SIRT posted:Let it snow - revisited
This makes me feel like getting bundled up Sreve. Beautifully executed. ![]()
Dave...Love the rusted-out Studebaker.
P51...Great scenery.
Rich and I have readied 8 Tortoise turnout motors and mounted them along with two Ross 4-way turnouts on levels 2 and 3. We still have to power and label the turnouts, add 8 indicator lights, program the handhelds, and update our backup computer info.
When complete, we are ready to begin tunnel and remaining retaining wall construction.
No photos, just drudgery at this unappreciated but key part of model railroading.
In the new year, after completing the turnouts, we plan to add retaining walls, construct 8 tunnels, and turn Paula’s scenery crew loose. Bridge construction, completion of level 2 and 3 trackwork, highway/road and significant city construction is planned to begin in the second half of the year. This will include terrain (including Mountain and water) modifications between Bluefield, Roanoke, and Tidewater, Virginia.
Additional manpower is welcome.
Access to this requires an OGR Forum Supporting Membership


