@luvindemtrains posted:Good Day Everyone,
I just completed a few details on a couple of buildings I am working on. Remember, it's all in the details. The last photo poses a bit of a problem...
Dave


Super real detail, Dave. Bravo!
Peter


|
|
@luvindemtrains posted:Good Day Everyone,
I just completed a few details on a couple of buildings I am working on. Remember, it's all in the details. The last photo poses a bit of a problem...
Dave
Super real detail, Dave. Bravo!
Peter
I continue my plan to try and see if I can repurpose old built kits from previous layouts. This is a Walthers dairy kit from the 90s. Hmmmm, maybe here....


Here it is on the 1993-2003 layout.....a picture from September 2002.

I plan to use the Walthers water tank, too........just have to find the right spot in my enginge servicing area.....
Peter
Morning guys I love all the projects you're doing! Some provide problem solving and some just sit back and relax!
@luvindemtrains Dave the details you put on your buildings and layout is just amazing! All I can think of is maybe some hinges on the window grate and a small move of the fire escape. I know it is not the greatest idea but, but only one I can think of. Good Luck!
@WesternPacific2217 Scott That sure is some Outstanding work and looks to be factory made! Very Nice!
@Putnam Division Peter great looking building, but I am sure you have a lot of them. It is a good thing you have such a big, wonderful layout to spread them around. I know you will find the proper place for each and every one of them! Good luck!
As for me I did get out and got a little start on the rest of the upper level. I am trying to use all the old plywood I saved from the previous layout, so it is taking a little time getting things to fit together.
Today I hope to get the 072-loop figured out with the big plywood I already have cut in that shape. I hope I can get it to fit without a lot of cutting.
I will check back in later; I also have the mechanic coming to fix my truck breaks. so, it will be in and out on the layout.
I hope you all have a great weekend and find time to have fun with your layouts and trains!![]()
@Putnam Division posted:Super real detail, Dave. Bravo!
Peter
Thank you Peter! I'm looking forward to seeing how you utilize some of your stash (buildings) from past layouts. Overall, I'm really enjoying your new builds and building placement.
Dave
@mike g. posted:Morning guys I love all the projects you're doing! Some provide problem solving and some just sit back and relax!
@luvindemtrains Dave the details you put on your buildings and layout is just amazing! All I can think of is maybe some hinges on the window grate and a small move of the fire escape. I know it is not the greatest idea but, but only one I can think of. Good Luck!
Mike,
Thank you. That's an idea. I will try and figure something out.
Dave
Dave, I’m with Peter. Great details make great models. Well done.
Andy
Thank you Andy. I think of it as the stage for these wonderful trains (actors) we have.
Dave
@mike g. posted:As for me I did get out and got a little start on the rest of the upper level. I am trying to use all the old plywood I saved from the previous layout, so it is taking a little time getting things to fit together.
Today I hope to get the 072-loop figured out with the big plywood I already have cut in that shape. I hope I can get it to fit without a lot of cutting.
I will check back in later; I also have the mechanic coming to fix my truck breaks. so, it will be in and out on the layout.
I hope you all have a great weekend and find time to have fun with your layouts and trains!
Mike, yes, reusing plywood, and dimensional lumber for that matter, can be like working a puzzle not only to save cuts, but to make the most of what I have. I’m done some creative work on my rework. 😊
I’m glad you are getting the brakes fixed. I had to get all 4 done on the 2003 Hyundai a couple months ago when the brake pedal got stuck as I braked to turn the corner to go down a steep hill. By the time I realized what happened and found a place to pull over, they were done for. Crazy problems driving a 20-year old car. 😄
@luvindemtrains posted:The last photo poses a bit of a problem...
Oh, no problem -- just create a swing grate to cover the staircase opening until the occupants can get out of the window . . . and make sure the bars over the window can be opened from the inside! 😳
@Steve Tyler posted:Oh, no problem -- just create a swing grate to cover the staircase opening until the occupants can get out of the window . . . and make sure the bars over the window can be opened from the inside! 😳
Sounds like a plan Steve!
Dave
@SIRT posted:Moving on to the next section...
Uhh . . . before you move on, anything you might have forgotten or omitted? 🤪
[sorry/not sorry!]
I’m still having some issues with WiFi-DCS. The system works great with the handheld remote but it still takes several attempts to connect with my Apple iPhone 11 and iPad. Will have a PC tech visit in the coming months to look over my options and help upgrade the system if need be.
Most recent project has been constructing coal loads for my Lionel L.V. 2500 and 64361 coal hoppers. I have the platforms ready and painted and now I’m waiting for an order of #2 anthracite coal to arrive from Brennan’s Model RR. Made the platforms by splitting 1’ styrofoam, cut to shape and added some relief with papier-mâché. Painted them black and added a strip of 1/8” oak on the back side to keep them rigid.


Still putting off the process of weathering my fleet. Waiting for the spring thaw so I can work in the garage with the airbrush.
Also added a new sign that was a gift from a friend who recently experienced a round trip on the California Zephyr and a RR museum visit.

Always fun to follow all the great project posts. Thanks to all for sharing! This forum is a great resource.
Cheers, Dave
Always fun to share and run trains!


Very nice layout Dave.
Dave, that's an outstanding layout. Thanks for posting the videos.
Dave,
Love the videos, and the details. Thanks for sharing.
Dave
I got my new DC lighting power supply set up. I had to move my Base 1L to make room so that was added to the new board as well. The HO transformer is set for about 10 vdc and the buck-converter at 3.5 vdc.
This one is for my Menards trucks, I will add others as time and motivation permits.


The trucks look much better too.
The tail lights on the REA truck will need some local intervention so that the crew doesn't go blind.


Bob


Nice work everyone. Love the buildings Dave.
“This one is for my Menards trucks, I will add others as time and motivation permits.”
Bob,
How many vehicles can be connected to that one circuit; or do you have to add more Buck converters?
@pennsyfan posted:“This one is for my Menards trucks, I will add others as time and motivation permits.”
Bob,
How many vehicles can be connected to that one circuit; or do you have to add more Buck converters?
They are rated for 3VA output. It would take A LOT of LED's to hit 3 A. The only restriction is the voltage. The buildings and street lights I have on the layout are at 6vdc so I will need to add one for the higher voltage.
Bob
@RSJB18 posted:I got my new DC lighting power supply set up. I had to move my Base 1L to make room so that was added to the new board as well. The HO transformer is set for about 10 vdc and the buck-converter at 3.5 vdc.
This one is for my Menards trucks, I will add others as time and motivation permits.The trucks look much better too.
The tail lights on the REA truck will need some local intervention so that the crew doesn't go blind.
@RSJB18, looks great so far ! I am not buck converter savvy, why would you not just turn your DC HO transformer down to the vdc that you need ? Thks, Rich
Bob
@trestleking posted:
Cause.....voltage.........![]()
In an ideal world...all of our "stuff" would run at a standard voltage. Many things are rated for higher or lower voltages so having a constant higher voltage source that can be "dialed in" to the needed output is best.
On the wall-wart thread, it was mentioned that Miller signs run fine at 4.5 vdc, but you will blow them up at 5 vdc.
In the AC world, the buildings at the College I work for range from 120/208, 277/ 480, to 13.2KV 3-phase from the utility.
Then we have a co-gen system that puts out 4160v that we step up to 13.2Kv......
Then residential services are typically 120/240 vac single phase......
If you really want to get in the weeds, one of our old buildings has an old 2 phase-5 wire system that will blow the average electrician's mind......![]()
Then there's the solar PV systems that put out 50-75 vdc that is stepped up and converted to AC......
And they wonder why Edison and Tesla were adversaries.....
Oh- and the US uses AC at 60hz, Europe and much of the world uses AC at 50hz.......
we now return you to your regularly scheduled program......
Bob
WOW! For ALL the great pics from everyone, what inspirational posts, tremendous talent and vision from everyone on here! There are sooooo many ideas, I know I will run out of time before I get to even .00001% of them! Here is what I did today, and the past couple of days. Getting track put down on layout without elevations. Just on the plywood base for now to visually see in real life what the scarm drawing has on the computer. This I hope, will help me make the layout more interesting, functional and I'll draw lines for any cookie cutter needs. Which brings me to another little 3D project. I have made track spacers for 4.5" center line spacing and 3.5" center line spacing. Now I have designed a pencil holder that will be adjustable on the two spacers to mark the cut lines for cookie cutter tasks. Also there is a single track model that will also be printed.
I am short three switch tracks which I have ordered, two will arrive Tuesday and the other I will pick up at the York show from Ross Switches along with some long ties and track spikes.
Here are a couple of pics showing the progress to date.

I was trying to fix a spot on a short road and the paint and plaster didn't get along. I ripped it out, it'll be better next time LOL.


Scott, nice work on the name change, looks great.
Peter, I have the same building, yours will look good wherever you place it.
Outstanding layout Dave! Thanks for the videos, and the how-to on the coal loads.
Bob, nice neat work on the lighting power supply.
Steve, nice shots of your layout, lots to see, great job.
Aegis, track work looks good, you’re moving along nicely.
Andy
Got most of the road and parking down in my city area. Still need to stripe, but getting there
Finished up this rendition of the New Haven RR freight house that was in Uxbridge MA. Built in the 1800s it survived until the 2000s relatively intact and occupied by a propane company. Sadly its since been torn down. The circa 1935 B&W photo was the inspiration (its from an old postcard i purchased yrs ago). I kitbashed an Atlas Fairview station by relocating some doors, getting rid of the operator station/ticket window, relocating the chimney and toning down the colors. The type of siding changed over the years so i went with wainscoting even tho its not depicted in the b&w pic. The loading dock will be the next project...perhaps i'll work on it while the upcoming "nor'easter" strikes.


My yesterday ( Sunday ) project:
In preparation for doing some major modifications to the western portion of my layout, I have to clear space under my layout, as I've been using this space to store some of my empty train boxes.
Before beginning the project yesterday I went to the train room with a cup of coffee. As I ran some trains while sipping the coffee I did some internal reasoning. My thought process went like this:
I decided that getting rid of most of the freight car boxes is really the only option I have because other storage areas in my home are already full of train boxes .. lol! Yes the cars will loose some value when they are sold, however, the cost of renting a storage unit would cost much more over the years than the the loss of value on 50 - 60 freight cars without boxes. Besides, I bought my trains as an investment in my happiness not to as a financial investment like stocks and bonds. So if not keeping boxes will decrease the car's value by a few bucks so be it. It was worth the few bucks to have played with and enjoyed the use of that car for however long I've owned it. If I've owned a freight car for 20 years and it's finally sold without a box for ten bucks less than the car's value with a box .. the use of the car cost me 50 cents a year plus whatever I originally paid for the car. I can live with that .. even if it were much more than 50 cents a year lol!
Once I came to that conclusion, I crawled under the table and began the process of getting rid of freight car boxes and even some passenger car boxes as well. Of course I'm keeping all locomotive boxes. I wound up with a big pile of boxes that spilled out the door of my train room. In chucking out all those boxes, I created a great amount of space under that table for which to now work.
Another part of my train room project yesterday was to run engines that have not been run for a long time. I wanted to make sure their motors didn't seize up from non - use. I also lubed those engines.
The next part of yesterdays project was to haul out from under the table buildings/structures that I want to sell. I have several of those items. I will be posting them on the OGR Forum For Sale thread in the coming weeks .. got to take pics before doing so. After making decisions on rolling stock which I want to depart with and some locomotives too, I began testing those locomotives making sure they are functioning properly.
It was a long day in the train room yesterday, and a good productive day. I have so much stuff in my train room and making these decsions to release some of these items for sale and to actually throw out the selected rolling stock boxes feels really good to me!
Patrick-I know you must have thought about this but perhaps you could flatten the boxes rather than throw then out. I have done that with trains in my collection and it results is a much much smaller storage space.
Don
Today I drove to a scheduled TCA meet. But it turned out I was the only one there. Guess they must have cancelled it.
@Don McErlean posted:Patrick-I know you must have thought about this but perhaps you could flatten the boxes rather than throw then out. I have done that with trains in my collection and it results is a much much smaller storage space.
Don
Thanks Don! Actually I didn't think of flattening the boxes. What did you do with the foam/plastic inserts that cradle the rolling stock?
@Don McErlean posted:Patrick-I know you must have thought about this but perhaps you could flatten the boxes rather than throw then out. I have done that with trains in my collection and it results is a much much smaller storage space.
Don
Great idea @Don McErlean, about flattening the boxes, and they help greatly when you are selling those items. I keep all my boxes in a controlled environment… Have a great day everyone…
@trumpettrain posted:Thanks Don! Actually I didn't think of flattening the boxes. What did you do with the foam/plastic inserts that cradle the rolling stock?
Personally, if i were to buy used trains from someone i would like the original box but could do with out the inserts as long as the item were sufficiently wrapped up in bubble or paper and slid back into the box. The manufacturer inserts (recent stuff anyways) are always so tight you have to pry the item out and i always feel like i will break some detail part off. Shipping it is another story and the insert material would be a must have in my opinion. So while it is a space hog, it all depends on what you think will happen to your trains in the future. I also doubt "original box" will mean anything to collectability with most modern production trains. We'll be lucky if they run after 10 yrs never mind 50+ like the pre and post war stuff given all the new computer stuff in them.
@trumpettrain- Patrick. Thanks for your interest in my solution. Candidly if the insert is foam or plastic I tend to discard it ( usually after an initial period of time) if the insert is the more traditional cardboard I carefully flatten that much like the outer box and store both pieces together. Like others have said I tend to keep locomotive boxes as they are usually heavier cardboard intact - besides there are far fewer of them ( in my layout anyway)! Good luck with whatever solution you come up with. Remember if it wasn’t for all those boxes you wouldn’t have those wonderful trains!!
Don
I'm with Patrick @trumpettrain. While I have all the boxes for what I bought with them, they are taking up an enormous amount of space in my attic. I would toss the freight car boxes, think harder about the passenger cars, and definitely keep the engine boxes.
The bigger question that no one has asked......SO WHAT ARE THE PLANNED RENOVATIONS TO YOUR BEAUTIFUL LAYOUT!!!!! ![]()
Bob
Many of us are in the same boat. I recently took advantage of the mild weather here in the East and cleaned up my garage attic. I posted here https://ogrforum.ogaugerr.com/...7#172048746193059757
I had the space and the shelves were used for the trains when we first moved in in 2014. The shelves were in the center of the two bay garage. I gradually emptied them by putting the collection on the wall and runners on shelves under the table. I also sold a bit.
If I run out of room on the shelves I think the first to go will be MTH freight boxes. I won’t buy more shelves. I would never spend money on a controlled environment for train boxes.
My .02.
I echo Bob! What’s in store!
@BobRoyals posted:Good Day,
What are you using for your blacktop?
Regards,
-Bob
Bob, i used 3M Safety Walk Tread. They are 6 inches wide, so 24 feet scale feet wide. They come in a roll of 30 feet. In this section i used 4 strips, or 96 feet wide. There is asphalt behind and to the side of the buildings. For a single road it works very well. It is peel and stick but it was nice to have my wife help as working with 20 foot long strips would have been a pain alone.
@Tony H posted:Bob, i used 3M Safety Walk Tread. They are 6 inches wide, so 24 feet scale feet wide. They come in a roll of 30 feet. In this section i used 4 strips, or 96 feet wide. There is asphalt behind and to the side of the buildings. For a single road it works very well. It is peel and stick but it was nice to have my wife help as working with 20 foot long strips would have been a pain alone.
Truly excellent, sir!
Not a "what I did", but more of a "what I got" post.
I visited @leapinlarry today, and ended up taking home two whole boxes full of scenery parts including rock molds, ground cover, ballast, and other odds and ends. It is always a good time at the Looney Lines, we had a ton of fun!
Above those boxes is a Millhouse River Studio 34" turntable! This was a gift to me from the Crossville Model Railroad Club, my local club in Crossville Tennessee. I joined back in January, but sadly we have to relocate right now. In the midst of the fast-paced tear down, the O gauge coordinator handed me the turntable and said "Here, take this. We don't have a place to store it, and you can probably put it to better use than we can". I was also told it came off of a beautiful layout, and was a gift to the CMRC some time ago. If anyone knows something about that, I would love to learn the history of it. Right now, I don't have a spot for it on the track plan. However the turntable itself has a few missing/broken pieces, so it's not ready for installation yet.
Layouts are looking good y'all! I'll check back in very soon with some table progress!


Painted and weathered 36' of track, ties, rails, and switches.
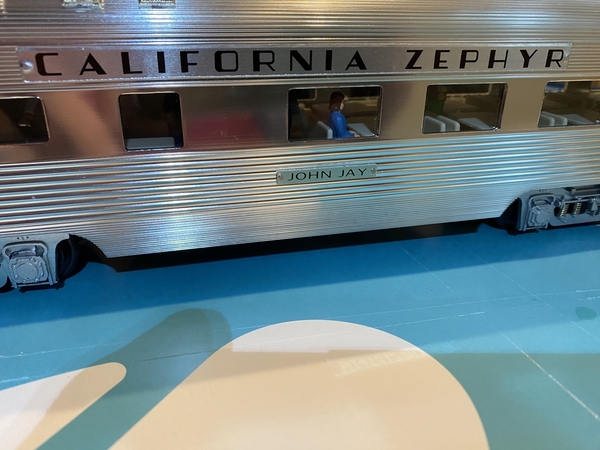
@WesternPacific2217 posted:I spent a few hours working on my K-Line 15" aluminum California Zephyr passenger cars. Here's a little background on why I'm renaming 3 of the aluminum passenger cars. Originally I purchased a NIB K-Line aluminum Western Pacific California Zephyr (CZ for short) passenger cars in a set of 4, these were all dome cars. Then I found the matching WP CZ baggage car. I felt the consist wasn't complete, so I went on a search for a diner car and a standard coach. Unfortunately K-Line never made said passenger cars in CZ, but they did make a New York Central Diner and an Empire Express Coach. So I found and purchased 2 NYC Diners and 1 Empire Express Coach with the plan of changing the names. I finally found some time to work on the passenger cars. Here's some photos of the transition.
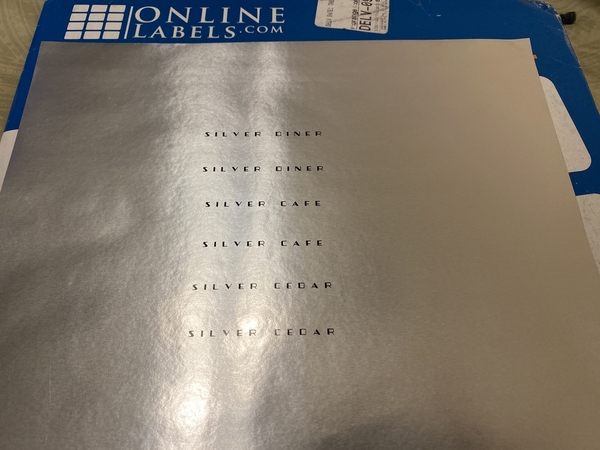
I used the following to make the new nameplates:
California Zephyr Font from RailFonts.com
Chrome label stock from OnlineLabels.com
Microsoft PowerPoint to create the fonts and print them out on a Canon Pixma Photo Printer.
Empire State Express Diner. Note: that's my red T shirt reflection in this photo. Changed angles for the rest of the photos.
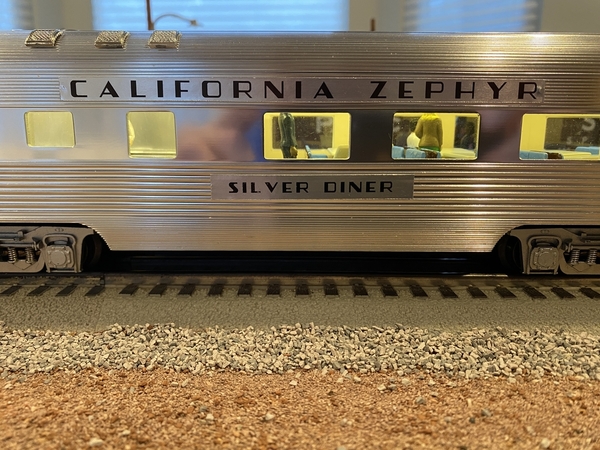
converted to CZ Diner, just need to change the coach name to SILVER CAFE.
New York Central Coach Thomas E. Dewey
converted to CZ Coach, need to change the Coach name to SILVER CEDAR.
Here's the print out of the coach names, all I need to do is cut them to size and apply.
Here's the CZ Coach SILVER CEDAR with name plate on the rails.
Fun little project!
Here's an update with the coach names installed on all 3 of the CZ coaches. I reprinted the coach names with a larger font in bold and changed the spacing in between the letters. All in all the project turned out pretty good, not perfect.

One more thing to do to the SILVER CAFE dining car, finish painting the interior!

And here they are in action with my full WP CZ consist. Also, the WP F7 ABBA set has borrowed power from Denver & Rio Grande Western. I love the way it looks! After all, the California Zephyr was operated by 3 railroads, Chicago, Burlington & Quincy (CB&Q), Denver & Rio Grande Western (D&RGW) and Western Pacific (WP).
Happy Railroading!!!


@Western Pacific 2217
Looking good Scott, it’s whole lot more than pretty good!
Don McErlean, Pennsyfan - Bob, Farmall-Joe, RSJB - Bob, -
I greatly appreciate your thoughtful responses to my train boxes situation. Thank you all!
Your comments helped me come to a solution that works for me. I decided to fold and keep all the MTH Premier, Lionel Scale, and Atlas O boxes ... discarding the inserts. As for MTH Railking and Weaver boxes I've chosen to get rid of those. As a matter of fact they were just picked up along with my regular recycling material about an hour ago. Needless to say I keep all locomotive boxes and their inserts as is the same with passenger car and operating freight car boxes.
To answer RSJB - Bob's question regarding renovation of the western side of my layout: I'm extending the existing elevated trolley line which now begins under Mt. Randolph and extends to a bumper just about mid way across my layout. When completed this elevated line will run the entire length of my layout from under Mt. Randolph to the Westend neighborhood. ( Btw - The citizens of Westend are very excited to be getting this new trolley service ! )
Renovations also include:
1.) Relocation of existing sidings and creation of new sidings to serve industries in the Brewtown section of Patsburg.
2.) Relocation of some buildings and providing power for lighting those buildings.
3.) Relocation of streets.
4.) Adding more track power connections to both the outer and inner mainlines of the entire layout. As it is there is only one track power connection for the inner loop and two on the outer loop. That said, the Mountain Division on the eastern part of the layout has 4 track power connections which is the perfect amount for that loop and siding. Oddly, as I run both TMCC and conventionally, I have no problems on either of the main lines. The reason for adding the extra track power connections is for future DCS installation.
5.) Westend Neighborhood improvements: Westend Neighborhood actually sits on a shelf at the farthest western portion my layout. The shelf is elevated and extended one foot beyond the end of the benchwork. This shelf extension is 1x4 ft. Improvements are: Add street lights and light existing buidlings, relocate the Mary Merry Christmas Shoppe as it will now become a year round retail establishment, add more mirrors at the end of roadways which end at a wall ... to create the illusion of a larger Westend.
As with any renovation/improvement project, be it in the real world or our little model worlds, there will be unaccounted for obstacles. Finding creative ways to deal with these "pop up" problems is half the fun ... Wait! ... Did I say "fun"?
I'll keep everyone posted on the progress. And once again thank you guys for your thoughtful responses to my box dilemma.
Well, more "under" than "on" the layout.
In anticipation of good hunting at York, I looked for and found space under part of my control panel for train purchases by building this swinging (for access) display shelf unit.
Before:

After:


After taking these pics I fixed the inward lean.
Sam, the gift of the turntable is great! You will be able to use it for many years to come! Larry came up my way last summer, and I spent the afternoon with him. Needless to say, any time with Larry is a fast-paced adventure! ![]() I'm sure a visit with him and his layout is a great time!
I'm sure a visit with him and his layout is a great time!
Scott, those are really handsome cars.
John, that is a really nice looking swing out shelving unit!
Pat, those are big plans for your West End renovation! Yes, the obstacles aren't always as fun as we may say, but the results are worth it!
As for obstacles, my project with relocating two inclined tracks to convert my layout from a twice around over and under to a high line and low line with inclines in opposite directions for trains to travel anywhere has been filled with obstacles. The first incline went fairly smoothly, while the second incline has been a trip! I had to increase the grade to make it all fit, and have now done it three times to get the grade not too steep in one place. ![]() I'll get some photographs when I get the lower end cleaned up. You can't see the work for all the tools and extra track sections.
I'll get some photographs when I get the lower end cleaned up. You can't see the work for all the tools and extra track sections. ![]()
@Lionelski posted:Well, more "under" than "on" the layout.
In anticipation of good hunting at York, I looked for and found space under part of my control panel for train purchases by building this swinging (for access) display shelf unit.
Before:
After:
After taking these pics I fixed the inward lean.
Way to go John, thinking ahead.
Jay
@pennsyfan posted:@Western Pacific 2217
Looking good Scott, it’s whole lot more than pretty good!
Thanks for the encouragement Bob, it was a fun project!
 Taking Arnold Cribari’s advice, I ran an engine that has been stored awhile. This is a Lionel TM with a Custom Trains shell - in my favorite Reading scheme.
Unfortunately the layout will be coming down as we’re moving back east ! Too much winter for the CEO & I. The train room development will be a priority in whatever basement we buy back east !
Rich in SD awhile longer
You guys are making me antsy to get back to the layout when I'm allowed.
Nice projects on the layouts gang.![]()
Hi their guys I hope your all doing well! If you're on the east coast, I hope your all making it through your Norester and fun snow! For the guys in California, I hope you don't float away!
It has been a couple of day since I posted and commented last. But I have been busy trying to fit used plywood from the old layout to the new. It is coming along, but more on that later!
@darlanderDave nice work on the coal loads! I really like the Brennan's Model RR products and their great staff!
@RSJB18 Bob That is so much nicer than mine, but then again with the rebuild I have a second chance to redo it also. On my old layout I had 4 buck converters for all the lights on the layout. Buildings, car, anything that had a light in it! LOL
@DrSteveDC Steve All I can says is WOW the industrial area is fantastic! I can't wait to see what you do with main street!
@Aegis21 Looks like you have a great start! I also like to layout the track to make sure everything is as SCARM says it is! LOL
@Dave Ripp. Dave sorry the paint and plaster didn't work well together! If it was me I would be looking for a new street paving boss! LOL But I am sure you already know someone that can take care of it!
@Tony H Tony great job on the roads and parking area!
@Farmall-JoeJoe wonderful job on the NHRR freight house! Looks really cool!
@trumpettrain Patrick I am glad you were able to make room to work, but also to let go of some of the boxes! Due to lack of knowledge I threw away most of my rolling stock boxes when I opened them. I kept all the engine boxes. But then again, I don't care because I plan on keeping everything and when it is time to sell, I will be 6' under! LOL![]()
@Sams Trains Sam that sure is a great haul indeed! Larry sure comes across as a wonderful guy and his gift to you shows it more than most people will know! I like how he is helping build the younger generation for the next 50 more years of model RR! It sure is nice to belong to a RR club and with that gift now you also have to find a place for a TT! Good luck and I will be checking in!
@WesternPacific2217 Scott Outstanding work and a wonderful video!
@Lionelski John, what a great idea! I just took down shelves in the train room as I would have had to climb on the layout to get to them!
Ok guys I know I said a lot, but you all deserve to be recognized! One time someone asked me why I try to comment on all the projects, my answer was because they are taking the time to share it with me, which in return I am learning so much as I am a picture person not really a book person. And for a person getting into model trains at the age of 50 when I started I was already behind!
I will post tomorrow what I have been up to and hope to put a smile on your face as you all put a smile on my face!
I sure hope you all find time to have fun with your layout and trains!
@mike g. posted:
..........@Lionelski John, what a great idea! I just took down shelves in the train room as I would have had to climb on the layout to get to them!
I sure hope you all find time to have fun with your layout and trains!
Hi Mike,
I have shelves on the wall behind my layout too - unreachable except at one end. I load them up by putting a car on the shelf track and pushing it along with another - So on and so on. They couple so I can pull them back the same way.
Stay safe!
Had to go back and read 3 or 4 pages to get caught up. All the projects and photos are much appreciated, it's great to see folks layouts and projects evolve on this thread.
I have made significant progress on the viaduct project since I last posted. Progress has been slow, but, nothing is level in this scene, by design. Managed to get the elevations and slopes figured out and cut up and texture all the 2.5 inch thick foam pieces I am using for "scenery base" material. Also managed to actually apply the paint, glue and scenic materials to the left side of the creek bed.
Just took some photos of the carved textured foam before I go down and prime it with flat latex paint tonight so you can see what it looks like before and after. Decided to use the foam for a couple of reasons, it's compressible and can be bent so it conforms to openings that aren't perfectly straight. Also I can remove it, paint it and glue all the dirt, grass and weeds to it, then put it back in place without the danger of making a mess and ruining all the paint and weathering work I did previously on the viaduct....


Did some work on the tables today, any guesses what it’s for or why I did this? More coming soon!
While you’re here, enjoy this photo I took of a CSX engine waiting for a western Maryland M.O.W. train to pass on the mainline of @leapinlarry’s layout


@Sams Trains posted:Did some work on the tables today, any guesses what it’s for or why I did this? More coming soon!
While you’re here, enjoy this photo I took of a CSX engine waiting for a western Maryland M.O.W. train to pass on the mainline of @leapinlarry’s layout
Looks like someone is making room for a big turntable.......![]()
@RSJB18 posted:Looks like someone is making room for a big turntable.......
Good guess, but not quite! I am drafting plans for where I want to put it, but that's going to be an expansion from this table. Small hint: if you know Eric Siegel's layout well, he has an issue with part of his main table due to how it was constructed years and years ago. While my purpose is different from what his was going to be, the design is still the same. I am taking a slightly different route so I won't encounter the same issue
@Sams Trains Is it a subway line? I remember Eric talking about how he tried to make one on his main table but abandoned it. Now he has sagging issues and has to use car jacks to support the upper level.
Also, your layout is looking great! Definitely a layout any modeler would be envious about.
@Trainmaster04 posted:@Sams Trains Is it a subway line? I remember Eric talking about how he tried to make one on his main table but abandoned it. Now he has sagging issues and has to use car jacks to support the upper level.
Also, your layout is looking great! Definitely a layout any modeler would be envious about.
Close. I am building an upper level that comes over what is cut out, but instead of doing what Eric did and building a table over a table, I'm going to be securing the table directly to the supports below it for maximum stability. This also eliminates a chance for the boards below to bend. Any tracks I run below it I will just place boards for. That also means I have more maneuverability and less of a chance to hit my head under the layout when I am getting freight cars out
Thank you! Just watched your video on the Dollywood express. My layout is about a bit north from Pigeon forge, about an hour or so. Feel free to email me via the email in my bio if you every have the time to stop by!
@Sams Trains posted:Close. I am building an upper level that comes over what is cut out, but instead of doing what Eric did and building a table over a table, I'm going to be securing the table directly to the supports below it for maximum stability. This also eliminates a chance for the boards below to bend. Any tracks I run below it I will just place boards for. That also means I have more maneuverability and less of a chance to hit my head under the layout when I am getting freight cars out
Thank you! Just watched your video on the Dollywood express. My layout is about a bit north from Pigeon forge, about an hour or so. Feel free to email me via the email in my bio if you every have the time to stop by!
Cool! Cannot wait to see more progress.
I will definitely consider your offer! I am back in Texas and the next time I will be up that way is in July. After that I do not know when I will be back since I will be starting college this fall semester.
@Trainmaster04 posted:Cool! Cannot wait to see more progress.
I will definitely consider your offer! I am back in Texas and the next time I will be up that way is in July. After that I do not know when I will be back since I will be starting college this fall semester
July would work well for me, as my layout has to be operational by July 15th for a special showing to the LOTS convention. Keep me posted, and feel free to bring a train or two if you want!
@WesternPacific2217 posted:Here's an update with the coach names installed on all 3 of the CZ coaches. I reprinted the coach names with a larger font in bold and changed the spacing in between the letters. All in all the project turned out pretty good, not perfect.
One more thing to do to the SILVER CAFE dining car, finish painting the interior!
And here they are in action with my full WP CZ consist. Also, the WP F7 ABBA set has borrowed power from Denver & Rio Grande Western. I love the way it looks! After all, the California Zephyr was operated by 3 railroads, Chicago, Burlington & Quincy (CB&Q), Denver & Rio Grande Western (D&RGW) and Western Pacific (WP).
Happy Railroading!!!
Those are some great looking cars. Some day I'd like to find some 21" cars and make up a train.
Morning guys it's another beautiful day, no sg and maybe there would not be so much at one time.
@chris a Chris looking great, and I love the idea of getting most of the grass, shrubs and paint in place before you just drop it into place!
@Sams Trains Sam that sure is a lot of work and a huge layout! Question, how come all your plywood is all green? Also wonderful photo from @leapinlarry layout! You are so lucky to live so close to such a great guy and layout!
Well as for me guy I have been cutting sections of plywood to try and get enough for the upper level, I think I might have it but not for sure yet. I start putting things up and then remember I have to do this and that so then it comes back down. Like painting the sky-blue paint under the upper level so its all black. Then put up the sheet of plywood and remember you didn't paint the support blocks, then remembering you didn't cut access hole in the lower level to get to main level tracks. LOL If it isn't one thing it's another. But I just keep plugging forward!
Here is a couple video's of where I stand right now, I had to build the military train so I could get the shelves off the wall.
I hope this works! I will check in later after some train room time and some CEO time!
I hope you all have a wonderful day and find time to have fun with your layouts and trains!
@mike g. posted:@Sams Trains Sam that sure is a lot of work and a huge layout! Question, how come all your plywood is all green?
Hey Mike, thank you! I have painted all of the plywood green. The paint acts as a sealant for the wood when we start to glue stuff down, and it looks nicer than just bare plywood


@mike g. posted:Here is a couple video's of where I stand right now, I had to build the military train so I could get the shelves off the wall.
Hey mike, have you checked the clearances to the parallel track? At 24 sec on your video it looks like UP engine pilot would swipe anything on the next track. Just wondering.
Joe
Not layout work but clearing up old projects. Bought 5 flatcar bodies at a train show who know how long ago. Another someday project. Two have been painted, trucks added, still need to be weathered and weighted a bit. It feels good to clear up old projects.
@mike g. posted:Here is a couple video's of where I stand right now, I had to build the military train so I could get the shelves off the wall
Nice military train, Mike! Are you planning to incorporate a military base in your layout rebuild?
@DrSteveDC posted:Project red light green light complete thanks to a 24vac relay and some simple wiring.
Nice Steve, I thought that I’d show my application of stopping the trains when the bridge is up. On one end I used a Pennsy signal bridge. The flickering blue light is a welders torch. He is working on the bridge. On the other end I used a wigwag signal. I got the idea when I used to pass a lift bridge adjacent to truck 1&9 in NJ. They had a smash board that was vertical and would drop down when the bridge was going up. I was going to use an HO crossing gate to model it; but then decided on the wigwag.


@pennsyfan. Great use of a wig wag signal - never thought of using it that way.
Evening guys I hope you all had a great day!
So I spent a good amount of the day in the train room today, I worked on the upper level, until I read the comment fr9om Farmall-Joe. But it was still train related! LOL
@Sams Trains Same thanks for letting me know you do indeed paint them, I was worried my eyesight was getting worse than I thought! LOL![]()
@Farmall-Joe Joe, thanks for catching that! I completely forgot to do a test run and you were spot on with the clearance problem! Thanks again!
@Strap Hanger I am not sure about a military base, I built the train when I was still stuck in my office in the house with no layout! But I am sure I will have room somewhere for something military.
@pennsyfan Bob, Great warning system at each end of the bridge! I never thought of putting something like that up for my lift bridge!
Well guys as I said I did get some work done in the train room today, I got some pop out hatches made, laid some more cork and track for the upper level , fixed the clearance problem that Joe found. It is was a easy fix, I took out the 072 curve and replaced it with a 080 curve to force it out further and then because it was flex track I just pushed that out a little more. It is not the prettiest but most of it will be under the upper level. and then I worked on my lighting for under the upper level.
Here is a short video and some photos.
Clearance fix.


And then my lighting project, I had a choice between Green, Red, and Blue. I really like the blue for inside the tunnel. You can see the white LED housing for the new lights.


Give me your thoughts!
I hope you all have a good night and take sometime to dream about your layouts and trains! LOL![]()
Nothing today, too tired.
That's the beauty of hobbies
@mike g. posted:Evening guys I hope you all had a great day!
@pennsyfan Bob, Great warning system at each end of the bridge! I never thought of putting something like that up for my lift bridge!
Well guys as I said I did get some work done in the train room today, I got some pop out hatches made, laid some more cork and track for the upper level , fixed the clearance problem that Joe found. It is was a easy fix, I took out the 072 curve and replaced it with a 080 curve to force it out further and then because it was flex track I just pushed that out a little more. It is not the prettiest but most of it will be under the upper level. and then I worked on my lighting for under the upper level.
Here is a short video and some photos.
Clearance fix.
And then my lighting project, I had a choice between Green, Red, and Blue. I really like the blue for inside the tunnel. You can see the white LED housing for the new lights.
Give me your thoughts!
I hope you all have a good night and take sometime to dream about your layouts and trains! LOL
Thanks Mike,
Just wondering if there will ever be 72’ passenger cars on that inner track? If so I suggest putting one of them in the curve. Also how about using another large engine in both directions and maybe a caboose with lanterns. What I’m getting at is, that gondola is slim compared to other equipment.
Keep moving forward laying that track.
@mike g. posted:Evening guys I hope you all had a great day!
So I spent a good amount of the day in the train room today, I worked on the upper level, until I read the comment fr9om Farmall-Joe. But it was still train related! LOL
Well guys as I said I did get some work done in the train room today, I got some pop out hatches made, laid some more cork and track for the upper level , fixed the clearance problem that Joe found. It is was a easy fix, I took out the 072 curve and replaced it with a 080 curve to force it out further and then because it was flex track I just pushed that out a little more. It is not the prettiest but most of it will be under the upper level. and then I worked on my lighting for under the upper level.Here is a short video and some photos.
Clearance fix.
And then my lighting project, I had a choice between Green, Red, and Blue. I really like the blue for inside the tunnel. You can see the white LED housing for the new lights.
Give me your thoughts!
I hope you all have a good night and take sometime to dream about your layouts and trains! LOL
Mike- I'd put some of of your Husky stacks on the other track and check the clearances. Put your biggest next to your biggest and check. Run both ways and forward and reverse too. IIRC you have some long BNSF diesels too. Check one of them next to the steamer.
The blue LED's look great!
Bob
Morninng Bob's, I have a bunch of 21" passenger cars, I will put a couple of them on there and see what happens! Thanks for the heads up, I don't think its going to be a problem as the inner loops curve starts further back into the layout.
I guess I will be under the layout looking for long cars and another big engine! LOL![]()
Hi guys just an update, I went out and pulled out the biggest engine and longest cars I have and you guys were correct! I pulled up the track and was able to get the cork back up without destroying it. The cork is back down with new track plan and once it sets up a little I will put the new track back down and try again! LOL![]()
Photos later today and maybe even a video!
@mike g. posted:Hi guys just an update, I went out and pulled out the biggest engine and longest cars I have and you guys were correct! I pulled up the track and was able to get the cork back up without destroying it. The cork is back down with new track plan and once it sets up a little I will put the new track back down and try again! LOL
Photos later today and maybe even a video!
Excited to see it Mike! Would love to see some trains running on it too if you feel like uploading a video
Populated the action accessory spur.....

Peter
Nice Peter, and very smart of you to put these accessories in the front for easy access, for both operation and repair/adjustment reasons.
I have most of mine in a harder to reach spot, and regret it.
Morning guys Happy Friday!
@Putnam Division Peter wow your moving right along! Things are looking great!\
Well guys as I said I was able to get the clearance problem taken care of and here is a photo and a short video to prove it should work! LOL


Once I got that taken care of I was able to get back to the upper level. fitting the next scetion of plywood, matching up the access hole with the bottom one and laying out some track.

I don't think there will be any train room today as I have to replace the stabilizer jacks on the used RV we bought, the previous owner thought they were used to level it and bent the **** out of them. I couldn't fix them so time to put in some new ones!
I hope you all have a great weekend and find time to have fun with your layout and trains!


Good job Mike! I hope a photog doesn’t stick his head out a window for a picture. 🤪
I have made some progress on my mainline tracks around the layout. I am currently about half way around the layout and it takes almost 2 minutes to travel the distance with a BigBoy running at a moderate speed. I have included a video to share with everyone my progress.
Here is the link: https://youtu.be/I7AWjSLamOk
Image of part of the layout.

Thanks;
idea-thinker
Lionel REALLY should have offered a small Southern Pacific diesel to go with all those SP cabooses. Too bad the Espee didn't own any FAs. They might have looked like this.

Decals are a combination of Microscale, Des Plaines Hobbies (S scale), and K4. Even with many gloss coatings before application there was some silvering of the road name as soon as the Dullcote hit it, so I will probably add another light gloss coat.


@Sams Trains posted:@mike g. awesome! Thanks for the video, kinda jealous of your SD80 there, I like all things NS ...snip...
My least favorite rr; and its "R" line is only 350 feet from my back door! Just behind these trees:


@Sams Trains, Wow, your curtain is beautiful and your layouts coming along nicely. It’s a Wow. Yesterday, our small train group went to Bob Irshmers for a fun train day. Here are some pictures of his amazing work. Happy Railroading Everyone 


No pix yet, but I ran a train around the inner main line of the layout that I started constructing two years ago, for the first time. As you might expect, two wiring errors and various spots of dirty track needed attention before success was achieved! And the Lionel NYC Mohawk 3005 leading the first train had no problem with the 3% grades, though steady attention to the throttle was necessary. Now to fabricate the block disconnect switch panel, terminate all the wiring, and fabricate the power pack support board. Hoping to have the double-track main, reverse loop, yard, and arrival/departure tracks functional by 1 April.
@leapinlarry wonderful photos of the layout. I do not remember seeing those views of your layout. The detail on the 4449 is awesome. I assume it neither MTH nor Lionel? I have an MTH Premier PS3 version, really nice, but...
Also I was curious about your arch under. I am planning something similar for an entry point to my under construction layout. Scratch built or some sort of kit? I have not seen any commercial O scale bridges that are suitable.
The Trackside Tavern is an inspiration. I have an unopened kit waiting for the completion of the layout rebuild.
Thanks for any insights. Jeff
@ScoutingDad, thank you for the kind words, however, the pictures that I listed are of Bob Irmscher’s beautiful layout located near Louisville Kentucky. They are all of his layout. Happy Railroading Everyone 
@ENichter posted:Finished up 2 buildings named for 2 of the grand kids. Completely disassembled, repainted and relite using Led's.
The buildings look great and that is such a unique idea to put the photos in the shop windows. Well done!
Jay
I was working on my layout today and thought I’d share an idea that was somewhat inspired by Mr Barrett - he had made some of his layout movable so that he could reach otherwise inaccessible areas. I have a finicky switch back in an otherwise inaccessbile part of the layout and I may need to access it, hopefully infrequently. To do so, I have installed a base of wood scraps that either are or will be covered by moveable scenery. When removed, I access that part of the layout by laying plywood on the base and over the track work.
The first photo shows the removable scenery in place. In photo 2, that scenery piece has been removed and you can see how I added the bushes to cover its perimeter which helps to disguise the seams. The third photo shows the hollowed out bottom. Next, you can see the 2x2 which is the base and over which the scenery section resides. The 2x2 is permanent in order to hold the scenery in place. The plywood ‘bridge’ laid on the 2x2 is then shown and that is what I used for access to the other scenery work I was doing. Finally, you can see the scenery piece reinstalled.
I intend to replace, install and cover some other of the pieces that I used for the base - they will possibly be covered with a scale lumber pile, fence or the like. On the list a few projects from now, the lower level will have a small farm which will also have some removable pieces. I hope not to have to use this method often, but I know that it is there if and when I would need to do so.


I’m getting ready to do some upgrading to my turntable, it’s been on the layout for 20 plus years, it’s a modified Bowser 32 inch turntable, with O scale pit-rail, and a PTC 3 NYRS indexing system complete with a high torque stepper motor, and allows 99 tracks to be memorized by the system, head end and tail end. The bridge fence on the deck is the one in the original package, however, CSX Al sold me the parts he uses on the famous Millhouse turntable to make the guard rails/fence much more realistic. This is a work in progress. A new shaft collar is being designed, the one picture is one with 2 set screws, one with 3 set screws is on order. When I go to see layouts, Farmerjohns, Dr. Jack Fishers, Bob Irmshires, (all with 34 inch Millhouse turntables) I always go with brainstorming ideas, so now’s the time. Happy Railroading Everyone 


Ran trains for a bit, then rearranged things and made a wall mount/legs to put my small prewar OO layout above my loop of postwar Lionel. Still need to run power feeders from my type R to the OO loop. 
GNRW operating session:
Sometimes the projects are not very obvious, or particularly photogenic . . .
A few weeks ago, I re-posted a video I'd done some time back, using a vintage GoPro camera taped on top of a gondola car and run through the layout. One of the obvious shortcomings of the video was the transit of the tunnel along the back of the layout -- I had hoped at the time that the trains' headlights and the illuminated passenger cars on an adjoining track would provide enough light to see glimpses of the inside of the tunnel, but it was pretty dark. So, I put adding some sort of interior illumination for the tunnel on the long-term to-do list.
Recently, I bought several batches of LEDs, and the re-posting of the video got me thinking about finally installing some interior tunnel lighting. My first attempt kinda-sorta worked, but eventually I scrapped that design for one that I knew would be a lot more work to fabricate and install, but ultimately would be more reliable. Basically, I just spliced a series of 5mm LEDs across the conductors in a length of some left-over WS Just Plug wire -- actually, sections of wire, with an offset between the ends of the conductors, with conductors and LED leads soldered together and covered with shrink wrap tubes -- with LEDs every 9 inches or so, then spliced a 330 ohm current-limiting resistor into the "hot" conductor and terminated the string with a Menards Plug & Play-type connector. I built a Y-adapter out of three more connectors, which I used to tap into the 4.5 volt power I'd already installed for an existing lighted vehicle above the tunnel.
To make an already long story a bit shorter, it all worked as planned! Before installation, I gave each of the eight LEDs two coats of Tamiya orange transparent paint, to moderate the bluish LED appearance into more of an incandescent glow, and stapled the string to the underside of the tunnel roof, routing the power tap wires behind the textured foam board panels at one end of the tunnel, out of sight but accessible if necessary. Looking down the tunnel, the effect is pretty much the lights-passing-in-the-subway-tunnel effect I was shooting for, though I haven't actually re-shot the video yet. I also plan to create a peek-hole at one end of the tunnel, so the grand-kids can see the two trains rushing toward them, periodically lit by the new ceiling lights! ![]()
Access to this requires an OGR Forum Supporting Membership