


Albert, have you checked the clearence of your longest piece of rolling stock and your biggest engins? Some of the photos make it look like you have some tight clearence areas.
Did a bit of work to my New Haven EF-4; bolted the little speaker to the underside fuel tank in an effort to get a bit more resonance out of the somewhat anemic horn. It IS a tad louder, now... ![]()
Had the Zeppelin Train on display Friday evening and the gi-raffes on display Sunday evening at a comics/cartoon critter convention in Memphis to much d'awwing and "ain't that cute!" The con's theme next year will be railroads, so shall have much more running then! ![]()
Mitch
This morning I didn't plan to play with trains, however, it just happened ... go figure![]()
I had a ball running trains this morning!!!
I fixed a Weaver trailer on flat car ... so now the car and trailer are back in service. I also did a bit of organization in the train room ... but mostly just ran trains ... changing some cars in and out of the various freight trains ... and changing engines. Loved every moment of it!!!![]()
![]() Got to love this hobby!!!!
Got to love this hobby!!!!
At the moment, I'm making preparations for the upcoming holiday season...

Just HOW I'm gonna get this past the bluenoses at the Children's Christmas Train, I dunno... ![]()
Mitch
Attachments
Images (1)
Jon was supposed to come over today, but he had to cancel. Yesterday I was doing some prep work to do more fascia on the upper deck. I've also started cleaning so I can run trains for company tomorrow.
When we built this section of the benchwork, I just grabbed some cutoff pieces with a 48" radius, even though the track is more like 072. I took the saber saw and re-shaped it to follow the track.

While I was there with the drop cloth and the vacuum, I drilled some holes to get the feeder wires from the hump, through the plywood deck.

I removed all the old daisy chain wires from the relay socket strips, and cleared off the table so I can start building the second turnout relay panel. Sitting on the floor to do the first one wasn't that bad, but working at the table should be better.

Finally, I started the reconstruction of the CMR/I - relay power panel by removing a bunch of unnecessary components. In the process, I discovered that I have a couple of smashed capacitors on that small board that will have to be replaced. My problem is I can't read the values, nor have I had any luck finding the parts list. I thought it said .1Z MEXICO. Is that supposed to be .1u?![]()
I'll keep looking. I want to fix it before I hang the panel.

Attachments
Images (4)
Originally Posted by M. Mitchell Marmel:
At the moment, I'm making preparations for the upcoming holiday season...
Just HOW I'm gonna get this past the bluenoses at the Children's Christmas Train, I dunno... ![]()
Mitch
Mitch - Got to love your spirit Bro!! Its never too early to get ready for Christmas. Very nice ornaments!!!![]() Is her name Mary Christmas?
Is her name Mary Christmas?
Originally Posted by trumptrain:
Mitch - Got to love your spirit Bro!! Its never too early to get ready for Christmas. Very nice ornaments!!! Is her name Mary Christmas?
Hee! As good a name as any... ![]()
Mitch
John D.
Don't be in a big hurry to box your layout. Eighteen months ago I thought I had my house sold and dismantled my layout, then the buyer backed out at the last minute. I have a new buyer but they can't get their house sold. To make matters worse I had to undergo cancer treatments over the winter and really missed having my layout. With another winter coming on I am feeling the layout blues every time I go into the basement and see all those train boxes.
Today It was my turn to host the local train club I am in. We meet once a month at each others houses. Spent the day tidying up for the boys. For most it had been last year since they saw the layout and they all were quite amazed at all the work I had completed since then. And to top it off everything ran without a hitch and none of those little gremlins showed up. As fun as it was I am glad to get back to working on the layout......Paul
Originally Posted by M. Mitchell Marmel:
At the moment, I'm making preparations for the upcoming holiday season...
Just HOW I'm gonna get this past the bluenoses at the Children's Christmas Train, I dunno... ![]()
Mitch
And a hearty Merry Christmas to you, sir. ![]()


JM
My layout is set up for O72 min radius and for motive power the largest loco I have now is a CPR 2-10-4 and a GN S2 Northern. I do intend to pickup a GN R2 2-8-8-2 in the near future. I know I will need to tweak things a little here and there as I have had to carve out some clearances on curves for my 70' passenger cars.
My main concern so far are my grades with all the CPR brass steam I have. I'm sure I will need to add weight to all of them in order to pull atleast a 5 car passenger train up the hills. I realize there is no way a Big Boy or NP Z6 will negotiate the clearances as their boilers are just too long.
The layout due to size constraints already has had to have compromises considered and implemented. But I think that's part of th fun lol.
Hope get some test trains running to see what lenght of freights I can pull.
The longest siding is good for atleast an ABA plus 4 maybe 5 70' passenger cars.
I will keep updates coming as I progress.
Al


Attachments
Images (3)

Today, in floated brass loco bells (too late, my lack of patience had me scrounge a zamac cast one out of a Walthers kit), and Micro-Mark rivets. I hope these rivets are an improvement over what I was getting punching sheet styrene with a finishing nail.
(the straight line you punched on the back, was not necessarily carried through to the
front!) Also did paint testing, trying to get a darker green, over spraying a green on flat black. on a wooden test sheet (this can be dangerous due to lack of different brand paint capability, but this seems to work). And fabricated racks for bell and domed end fuel tanks (3) that go on the roof of this LaBelle kit for an Oneida D&RGW gas electric. I have the enclosed, ventilated "boxes" that sling the motors under the car painted and ready to mount. Nothing accomplished yesteday due to non-train
problems to work.
I accumulated several Lionel 2400 series silver passenger cars lately, at bargain prices so cleaned them up, fixed the lights, etc. Had 3 dome cars, 3 observation cars and 3 coaches so I have reworked a few. One coach, a 2405, was in nice shape but bare-no lights or frosted strips in the windows so I gutted the ugliest of the observation cars and put the nice coach shell over observation guts. I now have a pretty nice passenger consist of 3 domes, 2 coaches and one observ. car. The extra coach was a remake I did some time ago and has a wooden roof I made plus an extra observ. car. Will have to test the consist with my GG1 and diesels.
I've been building my Tombstone Southwest Railroad for a while now and today I decided to open up a bit more real estate. I have a fort, Fort Hauchuka on the edge of the layout and it was taking up a lot of space between a couple of mountains I built. I built the fort from scratch and it is quite large (as a good fort should be, I guess).
I have a narrow path behind my framework used for maintenance but the corner was just wasted space. So today I build little table top and inserted it with brackets attached to the framework and behind it. Pulled out Fort Hauchuka and moved it back against the wall. After filling in with some small rock I had a much roomier area for my train to run through. Before it passed behind the fort. Here are some pictures to show start to finish.


The last picture shows my happy Lincoln round the bend.
Hope you enjoyed the journey. Thanks for viewing. More details about the relocation is on my blog.
Tombstone Southwest Railroad
GOOD NEWS FROM PATSBURG!!!! Tom, my repairman, came over this morning and fixed the MTH Western Maryland BL2. I'm happy to report that the BL2 is up and running fantastic!!! She's pulling a 12 car freight like a champ!
Tom's a super great repairman and a super great person as well!!!![]() He made a house call to correct a repair that was left off for him, by me, at a train shop. ( He repairs as a sub contractor for this particular shop) Upon my picking up the repaired loco last Friday and bringing it home to my layout, I found the loco was not working right... even though he tested it before leaving his shop ... the loco was having a new set of problems. I called Tom for advice ... and he offered to come to my place and fix the loco on my layout ... he wanted to see how the loco functioned on my layout..... now this AMAZING customer service!!!! We in the central Maryland area are extremely lucky to have Tom!!!!
He made a house call to correct a repair that was left off for him, by me, at a train shop. ( He repairs as a sub contractor for this particular shop) Upon my picking up the repaired loco last Friday and bringing it home to my layout, I found the loco was not working right... even though he tested it before leaving his shop ... the loco was having a new set of problems. I called Tom for advice ... and he offered to come to my place and fix the loco on my layout ... he wanted to see how the loco functioned on my layout..... now this AMAZING customer service!!!! We in the central Maryland area are extremely lucky to have Tom!!!!![]()
I've had this BL2 locomotive sitting on a shelf now for a couple years, thinking that it had a blown board... and the replacement cost was something that I did not want to deal with until the $$ was right. Much to my surprise it didn't have a blown board, just a short and needed a new pair of pick up rollers. Since this loco has been a shelf queen for 2 years, I now feel as if I have a new locomotive on the layout!!!!!![]()
![]()
I sent Tom back home to his shop with a MTH GP 9 and my new DCS system, which I got at a local train show for a song and a dance. He's going to upgrade the DCS system and check out why the GP9 is not running.
Patrick,
Im glad Tom got the BL2 working correctly!
I added two Fastrack operating tracks and two lit bumpers on my two track yard. I then tested an operating log dump car and a unloading boxcar. I'll try my other operating cars later. This is all a first for me. We didn't have cool stuff like this in HO.
WTG, Mark! The beauty of 3 rail is automation.
Bruce
Just got this chalkboard, new. for my train bulletin board:
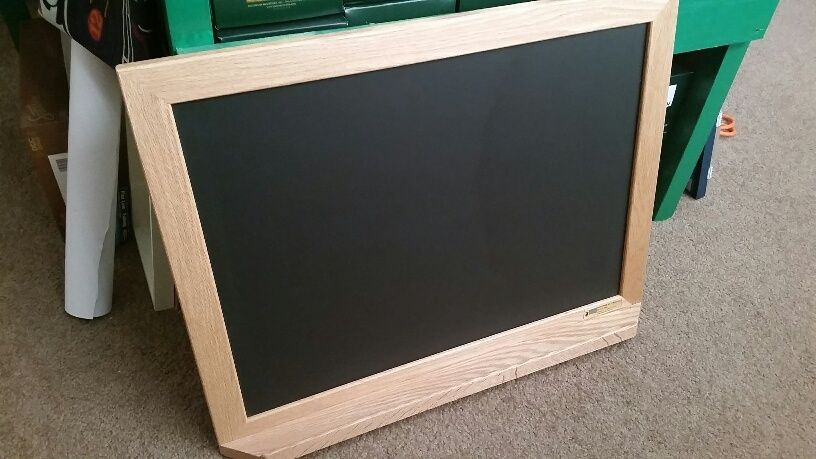
More on that, here: https://ogrforum.ogaugerr.com/t...-in-your-layout-room
My plan is hand-paint the lettering over the weekend.
Originally Posted by Mark Boyce:
Patrick,
Im glad Tom got the BL2 working correctly!
Thanks so much Mark!!
I ran trains this morning first thing before leaving for work and ran them a bit last night just before bed![]()
Took delivery of the Marx windup train this afternoon! After a bit of oiling, it runs just peachy!
Cute, ain't it?
Mitch
Attachments
Videos (1)

looks great Mitch.
Put the decking on Module #1 of the Corner Switching Layout this evening since the weather cooled off slightly. The material is called "Soundchoice" Sound Board and sells for about $12 for a 4x8 1/2" thick sheet at Home Depot. It cuts with a utility knife and will take screws. It's light weight and because it's thin insulation material, it's not something I'd use as load bearing without a lot of bracing underneath. For what I'm doing with it (supporting buildings) it will do just fine. The track will be supported by the strip of OSB running down the middle.
Before:

After:

Attachments
Images (3)


After some 4 to 6 months of inactivity on the layout, I went down to run a few trains. What the heck?? Lot's of problems with electrical continuity between the track and the train. Stopping, dropping out of contact, lights flickering, all pointed up that my track was, indeed, dirty. So I've been spending a few days, moving equipment and running my little MTH S-2 switcher (which has four pick-up rollers) pulling my track cleaning car(s) around the layout. What a difference? I guess that you've pretty much got to take care of maintenance, every once in a while.
Paul Fischer
I just finished a partial restore on a Lionel Postwar 2360. Besides getting it running well, I added side herald decals and 5 stripe decals (to replace the original faded ones). Replacing the stripes ended up being more work than I thought it would be, but I'm pleased with the results. If that didn't work out, I was going to send it out for repaint, but that won't be necessary. I also added big chip LEDs behind both headlight lenses (visible in the short video).
Roger


Attachments
Images (3)
Videos (1)

Went for drive to pick up the new Lionel Catalog, 2015 Volume 2
At my LHS (Local Hobby Shop) - Wild Bill's Trains - Clinton Twp., Michigan
Across the street is a White Castle Restaurant, Guess what, order the house special.
No place like this close to my train room.
If I remember correctly, Bert said, "Orders are due in by October 7th"
Also made a purchase, RailKing rolling stock.
Gary - Cheers from The Detroit and Mackinac Railway - Click photo to enlarge.

Attachments
Images (1)


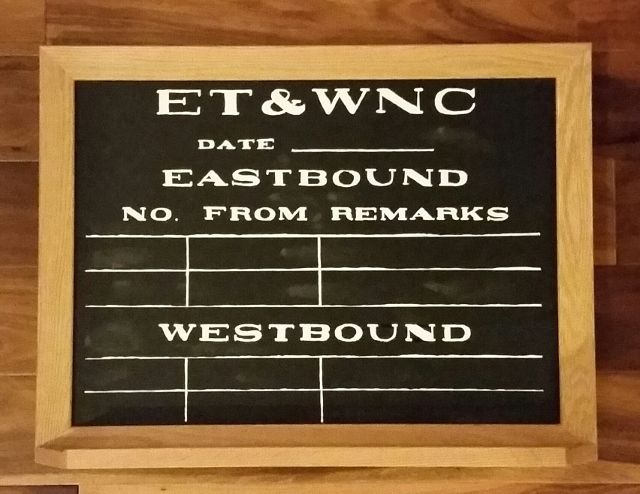
Got my train/crew board finished for the layout room. I hand painted all the lettering...
Today I oiled and greased the engines on the mainlines. Then I just enjoyed running them...........Paul
After the "AGHR Kids" literally ran trains all day, giving the adults a break on a very humid day, AGHRHowie and I did some work cleaning up the farm scene area on the club layout as it has deteriorated over time. Basically, we removed the foam bases and the barn area. For now, the farmhouse is sitting on its foam base (shown sitting on the tracks while we worked), but we're going to construct another one that's more subtle. In the mean time, we put replacement ground cover down. We should get it finished Wednesday evening.


Originally Posted by Big_Boy_4005:
Jon was supposed to come over today, but he had to cancel. Yesterday I was doing some prep work to do more fascia on the upper deck. I've also started cleaning so I can run trains for company tomorrow.
When we built this section of the benchwork, I just grabbed some cutoff pieces with a 48" radius, even though the track is more like 072. I took the saber saw and re-shaped it to follow the track.
While I was there with the drop cloth and the vacuum, I drilled some holes to get the feeder wires from the hump, through the plywood deck.
I removed all the old daisy chain wires from the relay socket strips, and cleared off the table so I can start building the second turnout relay panel. Sitting on the floor to do the first one wasn't that bad, but working at the table should be better.
Finally, I started the reconstruction of the CMR/I - relay power panel by removing a bunch of unnecessary components. In the process, I discovered that I have a couple of smashed capacitors on that small board that will have to be replaced. My problem is I can't read the values, nor have I had any luck finding the parts list. I thought it said .1Z MEXICO. Is that supposed to be .1u?![]()
I'll keep looking. I want to fix it before I hang the panel.
Elliot,
Send a photo of the board to gunrunnerjohn. Where it is and what is around it will help him give you a good guess. Something that small would be used to keep some noise\ripple out of the current.
I tried some Spanish translators, but no luck on finding the electronic symbol reference.
Ordered some 1/8" plugs and sockets; I'm going to rig the Marx layout so that the lights plug in and run from the accessory terminals, rather than run off track power... ![]()
Mitch
Today was spent shuffling boxes around under the table. I opened up the first area where I have a storage door in the wall. One of three. Now had I been smart when I started with the upper mainlines first that is when I should of cut the doors so I could get in there. So now that is what my project is for the week. In the pic I have the line drawn where I will cut across the door. Bought extra hinges to attach to them. Of course while I was working on this I had trains running...............Paul

Attachments
Images (1)
Originally Posted by Moonman:
Originally Posted by Big_Boy_4005:
Finally, I started the reconstruction of the CMR/I - relay power panel by removing a bunch of unnecessary components. In the process, I discovered that I have a couple of smashed capacitors on that small board that will have to be replaced. My problem is I can't read the values, nor have I had any luck finding the parts list. I thought it said .1Z MEXICO. Is that supposed to be .1u?
I'll keep looking. I want to fix it before I hang the panel.
Elliot,
Send a photo of the board to gunrunnerjohn. Where it is and what is around it will help him give you a good guess. Something that small would be used to keep some noise\ripple out of the current.
I tried some Spanish translators, but no luck on finding the electronic symbol reference.
Thanks Carl, but I found out what they are. I was able to go to Chubb's website and see the parts list for a similar card. This card converts RS-232 to RS-422, which is out dated. New ones are 232 to 485, but these capacitors appear to be the same. They are a .1uF 50V monolithic, which is slightly different from a straight ceramic. Chubb is the engineer, I just try to follow the recipe.![]()
So far, I've found some monolithics with the same value, but a different style package. Now that I know what to look for, it's just a simple hunt.
I'm probably going to have to install the panel and just fix these later. I won't need this part for quite a while anyway.
Originally Posted by paul 2:
Today was spent shuffling boxes around under the table. I opened up the first area where I have a storage door in the wall. One of three. Now had I been smart when I started with the upper mainlines first that is when I should of cut the doors so I could get in there. So now that is what my project is for the week. In the pic I have the line drawn where I will cut across the door. Bought extra hinges to attach to them. Of course while I was working on this I had trains running...............Paul
Paul, Had to laugh when I saw this......I did the same thing myself......too big of a hurry to run my elevated line. Said to myself....."will have to take care of that tomorrow." Well...kept on working and ignored it till I had t get some stuff out.....did the same thing as you are going to do....cut a dutch door after the fact!
-Pete
Got up this morning. ( Any day I get up on this side of the dirt is a good day![]()
![]()
![]() Went down stairs, made coffee and fixed breakfast. Poured a second cup of coffee and went to Patsburg where I stayed pretty much all day photographing trains. Here is a couple videos I took. I apologize if there is no to little sound, somehow the sound portion did not seem to be at all loud or it did not come thru at all
Went down stairs, made coffee and fixed breakfast. Poured a second cup of coffee and went to Patsburg where I stayed pretty much all day photographing trains. Here is a couple videos I took. I apologize if there is no to little sound, somehow the sound portion did not seem to be at all loud or it did not come thru at all ![]()
Attachments
Videos (2)


Originally Posted by trumptrain:
I apologize if there is no to little sound, somehow the sound portion did not seem to be at all loud or it did not come thru at all ![]()
Sound is loud and clear to me! ![]()
Mitch
Originally Posted by M. Mitchell Marmel:
Originally Posted by trumptrain:
I apologize if there is no to little sound, somehow the sound portion did not seem to be at all loud or it did not come thru at all ![]()
Sound is loud and clear to me! ![]()
Mitch
Great to hear! ( no pun intended ) Thanks so much for the feedback Mitch!!
A little progress on details on the Oneida gas electric.....fabricated, installed, and painted the roof racks and mounts for the fuel tanks and bell. Still using filler to
try to get the fuel tanks' shapes right. Also put in a vinyl subframe under the
chassis, and mounted the engine carrier boxes. Picked up queenposts and turnbuckles
for the trussrods at the Indy O scale show, and the subframe will provide a mount for them. I also finished putting all the decal rivets (a lot!) on the buffer plates on the
front of the rail car.
I added a grain elevator.

Attachments
Images (1)
Finished my iron ore load upgrades.
Attachments
Images (1)

Got a few holes drilled for a saw blade and the hinge screwed on. Tomorrow I'll cut the door and that should take care of that one. I may have gotten distracted a few times running trains.................Paul
September has been pretty slow so far, I've taken a bunch of days off. Couldn't sleep last night, so I got busy on the second turnout relay panel.
This is how it looked when I started this morning.

And here's how it looks now.

All of my helpers have been busy, so it's just me working. Maybe Patrick on Friday. Fingers crossed.![]()
Attachments
Images (2)
Clean up only......my wife has 2 dinner parties coming up and the layout and the should not look like an endless "work in progress".....I want to show off what I have accomplished so far.
I am not starting any new projects on the layout. I have my notebook out and am doing planning......uncouplers and control rail hook up is next.....along with a few more accessories. I have some building that are half done....that could be finished.
I picked 2 trains to run on the mains.....My MTH N&W Pocohantas and a military consist pulled by Legacy Geeps. The 2 subway trains will be running.
Peter
Originally Posted by Putnam Division:
Clean up only......my wife has 2 dinner parties coming up and the layout and the should not look like an endless "work in progress".....I want to show off what I have accomplished so far.
I am not starting any new projects on the layout. I have my notebook out and am doing planning......uncouplers and control rail hook up is next.....along with a few more accessories. I have some building that are half done....that could be finished.
I picked 2 trains to run on the mains.....My MTH N&W Pocohantas and a military consist pulled by Legacy Geeps. The 2 subway trains will be running.
Peter
Peter, I feel your pain. Story of my layout too.![]()
Lubed my MTH B&O docksider and put it back in service on the Mountain Division. Changed the train on the Mountain Division to a vat car and White Apple Juice reffer ... since its now almost fall and the crops are being harvested up there in the hills![]()
Ran freight trains on the lower level mains adding and subtracting cars here and there. Organized some of my tools and took a few minutes to organized some items in the train room.
I just love running my trains!!!![]() .... they are way cool!!
.... they are way cool!!![]()
Installed a Lionel soundboard and speaker into my K-Line powered RDC!
Had to mount the board on the ceiling of the car using mounting tape, but I'm used to putting the good ol' 600-81-52050 boards into unlikely spots where they really have no place being. ![]() The speaker's magnet was sufficiently massive to hold itself in place atop the sheet metal weight.
The speaker's magnet was sufficiently massive to hold itself in place atop the sheet metal weight.

It did occur to me, afterwards, that I coulda mounted the horn in one of the trailer cars, but, oh well... ![]()

For some obscure reason, this car has the red leads going to ground and the black leads going to the third rail. Thinking like this is probably what put K-Line into receivership in the first place. Since I'm not a big fan of running the horn off the bell button, I had to reopen and resolder:

Naturally, no repair is complete without Shop Supervisor Norma Bates Kitteh, aka "Inspected By Number 12"...


Norma has learned to close her eyes when the camera is pointed at her, not wanting to be dazzled by the flash:

And here's the finished RDC, happily honking about my layout!
Mitch
Attachments
Images (8)
Videos (1)

BTW: Does anyone have a spare pair of K-Line RDC horns knocking about? I really can't justify spending $7 apiece plus postage online... ![]()
Mitch
Got one door done today to the storage spaces in the attic. How amazing it is with 11 or 12 years passing the human body does not want conform to small working areas anymore. Now I'll rest on my laurels or better yet sore muscles. Tomorrow I'll vacuum the area out and store things in there. I will make sure to write down what I put in there. Pics of progress. I had never been in that cubicle before. Guess the people before us left stuff in there. A couple of pics............Paul


Attachments
Images (2)
The Great Northeastern Railway (GNR) announces that the foundation for its 7 stall, to-be-scratch-built roundhouse house has been cut and temporarily fitted to is final resting place. This will be the main shops and storage for the GNR's impressive fleet of steam locomotives. In addition to the seven stalls, there will be 4 outdoor stub tracks for engine storage plus two additional tracks for the sanding tower and coaling tower. Until construction of the round house is finished, all steam engine storage will be outdoors. More photos will follow as progress is made.

Attachments
Images (1)
Originally Posted by paul 2:
Got one door done today to the storage spaces in the attic. How amazing it is with 11 or 12 years passing the human body does not want conform to small working areas anymore. Now I'll rest on my laurels or better yet sore muscles. Tomorrow I'll vacuum the area out and store things in there. I will make sure to write down what I put in there. Pics of progress. I had never been in that cubicle before. Guess the people before us left stuff in there. A couple of pics............Paul
By the time I had finished filling a similar storage area, there was a strong temptation to just nail all access permanently shut. Out of sight and eventually out of mind. ![]()
Originally Posted by Randy Harrison:
The Great Northeastern Railway (GNR) announces that the foundation for its 7 stall, to-be-scratch-built roundhouse house has been cut and temporarily fitted to is final resting place. This will be the main shops and storage for the GNR's impressive fleet of steam locomotives. In addition to the seven stalls, there will be 4 outdoor stub tracks for engine storage plus two additional tracks for the sanding tower and coaling tower. Until construction of the round house is finished, all steam engine storage will be outdoors. More photos will follow as progress is made.
Looks great Randy!! Congratulations on the progress!! I can't wait to see the completed roundhouse!!
OK.... the roof contractors finished up today after almost two weeks work. Have to admit, the Spanish tile style roof compliments the stonework of our house. I was able to find time for working on the layout, did a little on extension and cleared off two mainlines for running. Warmed up the Atlas Erie Built St Fe ABA #90-92, the MTH Big Boy I rebuilt with ERR TMCC/RS 4.0, the Lionel/K Line SD75 with Digital Dynamics TMCC/RS 4.0 I installed, K Line Rock Island E8 AA with TMCC/RS and K Line Union Pacific E8 ABA with TMCC/RS. It has been a couple months since I ran anything, being busy with taking care of storm damages... still. Glad I did. Found a problem with a K Line Super Track 072 RH turnout, need to find rebuild instructions for the 2001 model ZW on the loose handles and low wattage output. Post A only had 15 w and D post only 13-14 watts. I remember they published rebuild instructions to tighten them up, just to find them and go from there. Using two 180 bricks, each split between two circuits. Do have 4 135 bricks, but only 2 reverse polarity adapters for the miss-wired
brick plug female receivers on the ZW. Something else I need to work on when taking the ZW apart.
On another note, moving boxes around today under the layout and found two clockwork trains I was looking for. One is an American Flyer Prewar set, the other a 50/60s Marx "mechanical train" as the set box calls it.


Attachments
Images (2)


Almost, except maybe for touch-up, have the roof with its bell, fuel tanks, and green
"glass" clerestory windows done. Also have queenposts, truss roads, and turnbuckles,
and a brake cylinder in place and painted under the frame. Paint is drying on the body, and I went through my castings stash looking for appropriate gas electric pilots,
which are going to be difficult with the large couplers on the power chassis. Body will
have to be decalled, dull-coated, and have windows installed.
here is what I have done over the past few weeks not a lot of time to work on it or finish the scenes but got them in there places.


I have had something else taking up my time. when I was 17 still in high school I worked for a boat company building sunsation boats well I have always wanted to buy one that I had built as a kid so I was on the hunt for one for awhile I didn't want a loan to get it either so it had to be in a good price range. and living in ga I knew there was going to be a road trip involved since not many are in ga. so I found one in Michigan and bought it did a 26hr marathon drive to Michigan left Friday night at 8pm drove to Michigan arrived at the boat at 7:45 the guy met us at 8:15 bought the boat and had breakfast and drove back to Ga. was home again at 10pm on Saturday night.
I knew the motor was bad the guy said oil came out the dipstick tube and it seized up. well when I got it home removed the engine. tore it down yea he ran it with no oil. 6 out of 8 rods were spun main are not in great shape either so block, crank and rods are out getting reworked. should have the parts back by this weekend.


![20150907_173736[1]](https://ogrforum.ogaugerr.com/fileSendAction/fcType/0/fcOid/12129987997660671/filePointer/44088306247274833/fodoid/44088306247274826/imageType/LARGE/inlineImage/true/20150907_173736%255B1%255D.jpg "20150907_173736[1]")


Attachments
Images (14)
![20150907_173736[1]](https://ogrforum.ogaugerr.com/fileSendAction/fcType/0/fcOid/12129987997660671/filePointer/44088306247274833/fodoid/44088306247274826/imageType/LARGE/inlineImage/true/20150907_173736%5B1%5D.jpg "20150907_173736[1]")
Originally Posted by texastrain:
On another note, moving boxes around today under the layout and found two clockwork trains I was looking for. One is an American Flyer Prewar set, the other a 50/60s Marx "mechanical train" as the set box calls it.
Ectually, that AF set is postwar. WWI, that is... ;-) I have a couple of those semaphores, and they date to ca. 1918 or so.
The Marx set you have is interesting, in that I have the same windup loco and consist, only mine is plastic and the gondola is dated 1972...
Mitch
I also rebuilt the legs on my daughters layout she hasn't done much with the layout. so I cleaned up the track fixed the legs and ran some trains.
Originally Posted by Jhainer:
I have had something else taking up my time. when I was 17 still in high school I worked for a boat company building sunsation boats well I have always wanted to buy one that I had built as a kid so I was on the hunt for one for awhile I didn't want a loan to get it either so it had to be in a good price range. and living in ga I knew there was going to be a road trip involved since not many are in ga. so I found one in Michigan and bought it did a 26hr marathon drive to Michigan left Friday night at 8pm drove to Michigan arrived at the boat at 7:45 the guy met us at 8:15 bought the boat and had breakfast and drove back to Ga. was home again at 10pm on Saturday night.
I knew the motor was bad the guy said oil came out the dipstick tube and it seized up. well when I got it home removed the engine. tore it down yea he ran it with no oil. 6 out of 8 rods were spun main are not in great shape either so block, crank and rods are out getting reworked. should have the parts back by this weekend.
I'm surprised half your layout isnt "glass"![]() Where did you pick it up?
Where did you pick it up?
You really should have visited The Herny Ford Museum, or Greenfeild Village if you were on the east side of Mi. & north of Monroe ![]()
Waterford Is where I picked it up the boat was used on Cass Lake
Originally Posted by Adriatic:
Originally Posted by Jhainer:
I have had something else taking up my time. when I was 17 still in high school I worked for a boat company building sunsation boats well I have always wanted to buy one that I had built as a kid so I was on the hunt for one for awhile I didn't want a loan to get it either so it had to be in a good price range. and living in ga I knew there was going to be a road trip involved since not many are in ga. so I found one in Michigan and bought it did a 26hr marathon drive to Michigan left Friday night at 8pm drove to Michigan arrived at the boat at 7:45 the guy met us at 8:15 bought the boat and had breakfast and drove back to Ga. was home again at 10pm on Saturday night.
I knew the motor was bad the guy said oil came out the dipstick tube and it seized up. well when I got it home removed the engine. tore it down yea he ran it with no oil. 6 out of 8 rods were spun main are not in great shape either so block, crank and rods are out getting reworked. should have the parts back by this weekend.
I'm surprised half your layout isnt "glass"![]() Where did you pick it up?
Where did you pick it up?
You really should have visited The Herny Ford Museum, or Greenfeild Village if you were on the east side of Mi. & north of Monroe ![]()
Originally Posted by trumptrain:
Originally Posted by Randy Harrison:
The Great Northeastern Railway (GNR) announces that the foundation for its 7 stall, to-be-scratch-built roundhouse house has been cut and temporarily fitted to is final resting place. This will be the main shops and storage for the GNR's impressive fleet of steam locomotives. In addition to the seven stalls, there will be 4 outdoor stub tracks for engine storage plus two additional tracks for the sanding tower and coaling tower. Until construction of the round house is finished, all steam engine storage will be outdoors. More photos will follow as progress is made.
Looks great Randy!! Congratulations on the progress!! I can't wait to see the completed roundhouse!!
Pat: Thanks. I am eager to see it, too. But, it will take some serious time.
Yep, you messed up just a bit![]() .
.
You drove right past me, and a few others![]() .
.
You were on the dooorstep of a few train "private dealers" too.
Did you at least spot the abandonded downtown Mich. Central Station from I-75?
If there is anything around here to see, its the HF/GV. A whole weekend is better, but half a day looking around might have brought you back![]()
I think that guy may have tried swapping me for a dunebuggy I sold in spring.
Those arent exactly found in every marina.
(I cant do boats & buggies anymore)
Originally Posted by Adriatic:
Yep, you messed up just a bit![]() .
.
You drove right past me, and a few others![]() .
.
You were on the dooorstep of a few train "private dealers" too.
Did you at least spot the abandonded downtown Mich. Central Station from I-75?
If there is anything around here to see, its the HF/GV. A whole weekend is better, but half a day looking around might have brought you back![]()
I think that guy may have tried swapping me for a dunebuggy I sold in spring.
Those arent exactly found in every marina.
(I cant do boats & buggies anymore)
I use to live in Michigan New Baltimore to be exact basically 23 mile rd and Jefferson area. right on lake St Clair we were within 5 miles of my aunts house when I Picked up the boat and we drove by My dads house where he grew up. I watched a few trains running beside 285 on my way out of town.
AAHHHRRRGHH!! What did I do WRONG on my layout today? I found the thinnest
styrene sheet I could for the bufferplates on the front sides of this Oneida gas electric,
and, after laboriously applying rows and rows and columns and columns of rived decals to the cut out "plates" cemented them to the scribed wood sides with Testor's plastic cement. Bad idea! The cement softened the styrene and carried the wood scribing through to the front of the "riveted" "plates". Fall back and regroup! To the rear, march! Stripped off the styrene, found some thin sheet brass in my materials stash, cut brass plates to match the styrene ones and am now gluing them on (and the car had been painted and dull-coated, too, so I get to do that over, as well as replace all
the decal rivet patterns)


Picked up/purchased 12 Lionel postwar 11" flats from The Whistle Stop in OKC for a very reasonable price. They will be getting painted olive green and decals for Transportation Corps US Army. I have a lot of 1/48 tanks, jeeps, halftracks, cannon, trucks, etc., etc.to be loads. Also have the Menards truck/trailer to add, along with Weaver WWII style Army cars. Should make a nice 40s period style train, the flats will all get wooden floors and more detailing with chains, blocks, etc. When complete, will post pics. For others doing so, or anything alike, have seen on WWII videos of military trains the use of gondolas, with ends removed, to transport trucks, jeeps, trailers, etc.
They easily roll on/off with steel plates placed between the cars for continuous moving. Note on the pic of aft tank tie-down, use of turnbuckles made from brass tubing and stock. Used tap and die for operational turnbuckles for tie-down in the test samples.


Attachments
Images (3)


Hmmmm, MkIV and I think an AMX, not your usual loading for the US Army!
I picked up two sets of 042 0 gauge switches to go in the cabinet for use on the layout when its time... making headway!
Ran trains for 10 minutes today. Thats all I had time for and I enjoyed every minute ![]()
Spent an amusing evening piloting an itty bitty train through an enormous, exquisite layout...
http://hograils.com/thesierralinesartcunningham.htm
Distressing lack of gi-raffes, alas.
Mitch
Originally Posted by midnightwrecking:
Hmmmm, MkIV and I think an AMX, not your usual loading for the US Army!
After the wall came down and most of the former West German Army's equipment was shipped back to the Port of Baltimore and onto Aberdeen Proving Ground in Maryland, then loaded onto the rail head and shipped to The NTC in California. You would have seen loads like this as well as an ATSF train in Maryland with a caboose attached at the end. Same thing with the stuff that was brought out of Iraq and Afghanistan.
Daniel,
You are so correct. Wanted to check things out before making use of the M-10s, Shermans, half tracks, etc. I consider then as "war trophy" status and on their way to Aberdeen for testing. Also have done some sample shots of US equipment on redecorated flats, before the Transportation Corpse decals.


Attachments
Images (9)


Having stripped the styrene buffer panels off the LaBelle model of an D&RGW gas electric conversion, I replaced them with very thin brass, and then redid all the
rivet decals. Grrr! Then began and finished installing all the handrails, grab irons,
and steps. Found I had omitted an underframe gas tank and brake cylinder, so have
shaped the tank. Need to repaint the whole body and decal it. There is light at the
end of the tunnel.
Today I started doing some scenery work on the two trestle sides at the entrance to the train shed. The Pratt truss bridge "drops" in between the wooden trestles. Now I will finally get to adding ground cover, bushes, ballast, and installing the trees more permanently on the entire layout and making more trees.
John


John


Attachments
Images (2)

Former Member
I haven't posted any progress in a long time, because I haven't done anything in months. Business is slow at the real job, so my seniority sucks, even after 19 years. My free time has been all over the place, except on the layout. However, my Dad has been busy working on his own, trying to get "the other side" of the layout going.
1st layers of texture going down to cover up the plywood, bridge work, hills, track planning for the 2 industries, figuring where to cut the access holes etc etc.
Oh and...we finally have come up with a NAME for the layout. Stayed tuned for a new video update where we will announce the name...FINALLY!


The bridge girder is even long enough to put the name of the RR across the panels ![]()
The biggest thing that reaches out to me and slaps me right in the face is all that shiny track. Man I have a lot of track painting to do.....and ballast work. Where's Dennis Brennan anyway? ![]()
Attachments
Images (8)
L.O.S.; Amazing looking hi-rail layout. I wish I had 1/2 your talents.
Originally Posted by Laidoffsick:
...My free time has been all over the place, except on the layout. However, my Dad has been busy working on his own, trying to get "the other side" of the layout going.
1st layers of texture going down to cover up the plywood, bridge work, hills, track planning for the 2 industries, figuring where to cut the access holes etc etc.
...
...
Somebody has oneheckofa good eye for panorama and planning, configuration, and controlling the viewer's eye. Wow. Really nice. And exciting to imagine the possibilities that lie ahead.![]()
LOS, great to see more photos of your extraordinary layout. Hope to see more, soon!
Doug,
I agree with Spence, Moonson, and Carl, you have an excellent eye and talent! I really like the backdrops and am glad to see the photo that shows this area in relationship to your engine service facility. Also, I really liked your video 6 that I viewed a while back!


Doug your Dad's work really looks great. Spectacular view and fits well with the backdrop. Glad to hear that you are getting back to work. Have missed your updates; they are always interesting.
Want to see the name.
Steve, nice job on the conveyor. Did you build it?
Originally Posted by Bill Webb:
Steve, nice job on the conveyor. Did you build it?
No. It is a built-up. I got it indirectly, but I think it is from Crescent Locomotive Works: http://locomotiveworksinc.com/Coaling.html
Originally Posted by swise:
Installed my new ash/cinder conveyor!

That's a very sharp facility and a very sharp overall vista. I can just imagine how really good it is going to look once you have completed all the ground-coverings and ballasting. Wow. And that steam locomotive, its tender, and that single coal-hopper look excellent as an ensemble. They remind me, clearly, of scenes I saw like that when I was a boy in Pittsburgh, circa 1950's. Very cool, Steve.
What I've been working on this month just doesn't compare to some of the beautiful stuff that some of you have posted recently. I also seriously doubt that anyone here needs anything like what I'm building.
On the other hand, others have posted pictures of some good looking wiring. Wiring is one of those under appreciated and oft dreaded aspects of the hobby.
I'm pretty sure I explained what this is on a previous page, but now this one is nearly finished, so I thought I would explain it again.It might make a little more sense now.
This is a turnout relay panel. I will have two of these on my layout. This one will control the 48 turnouts in the south half of the room. There is actually room for up to 60 relays, but the last 12 aren't fully wired. The north panel will control 56 turnouts (4 spares) and is currently mounted to the layout, but isn't quite as far along as this one. I think when I finish this one, I'll take the other one off and bring it to the table to finish it. It's easier to work on that way.

I know this looks complicated but, each of the white relay sockets is wired exactly the same, 48 times here. The relay just flips the polarity for the Tortoise.

This bank of terminals connects directly to the Tortoise, 2 wires to power the motor. The terminals at the bottom of the panel (photo 1) will be where the control wires connect, one per relay. In phase one, a micro switch on a temporary control panel will throw the relay. In phase two, the control panels will be removed, and a computer running JMRI software connected to CMR/I hardware will throw the relays. The whole mainline will operate under CTC.

I managed to hang this panel today. It contains the relay power supply, the RS-232 to RS-422 adapter for serial communication with CMR/I, and a CMR/I mother board with its 5V power supply. Output cards will plug onto the motherboard and control the switches for this half of the room, as well as signals for this peninsula.

Here are the two panels in their closed positions, the unpainted one being the the turnout relay panel.

Time for bed, Matt and Jon are coming over in the morning.
Attachments
Images (5)
Elliot; the wiring looks amazing & so well organized. It puts me to shame. ![]()
I ran trains last night for about a half hour before bed. Fun times!! After a small derailment, my Lionel TMCC 0-8-0 switcher needed reprogramming .... which brought the operating session to a close at 1 a.m. this morning .... I took the reprogramming issue as a sign to stop the trains and go to bed![]()
![]()
Originally Posted by Spence:
Elliot; the wiring looks amazing & so well organized. It puts me to shame. ![]()
Thanks Spence. I picked this up from an electrical engineer years ago. It's all about the zip ties. Tie 'em close and keep 'em tight.
Originally Posted by Big_Boy_4005:
This is a turnout relay panel. I will have two of these on my layout. This one will control the 48 turnouts in the south half of the room. There is actually room for up to 60 relays, but the last 12 aren't fully wired. The north panel will control 56 turnouts (4 spares) and is currently mounted to the layout, but isn't quite as far along as this one. I think when I finish this one, I'll take the other one off and bring it to the table to finish it. It's easier to work on that way.
And here *I* was feeling all accomplished over finishing three FastTrack power cables! ![]()

Did a little modding on my trusty Weller soldering iron:

With that collar off, it now fits into the stock wire holder on my Radio Shack iron base (itself modded; after the original iron burned out, I put a socket onto the cord and now I can plug any soldering iron I like into it!).
I'd never taken apart the 2466WX tender that came with my 1666 loco. Apparently, it was just a EENTSY bit overdue:![]()

Got most of the mildew out with a dish brush and Top Job cleanser...
After cleaning the commutator, brushes and holder, I fitted a new third rail pickup onto the rear truck:

Now the tender goes around WITHOUT throwing a shower of sparks when I blow the whistle! Nice and loud whistle it is, too! ![]()
Mitch
Attachments
Images (4)
Elliot,
nice job wiring. My club is in the middle of a major track change that caused me to remake the control panel. I understand the work involved in your project. I used a circuit card with 4 relays to control a 4 way switch with 3 motors with a rotary switch.


Attachments
Images (3)
Thanks Pat. That's a pretty interesting design there with the double doors. Never seen that before.
I have one of those 4 ways, and added 2 more switches to make my 6 track hump yard. I plan to use a diode matrix to do the route selection.
Still working on under the tables. Just about got the first storage closet cleaned out. Took a break from that and went to the Firelands train show in Mansfield OH Saturday. Nice little show. Second time there. Seemed a bit smaller then the spring show. But always a nice short trip from the Cuyahoga falls. A few more trains shows here to got to. Then York. After lunch I'll start storing trains in there. No pics this time. Who wants to see clean up anyways...........Paul
Matt and Jon were here, as advertised, working on there regular projects.
Matt finished off the last of the manual throws in the Northtown engine service area. These two access the diesel and sanding tracks.

Matt likes getting credit for navigating all the obstacles as he installs these.

The simple clean look of the finished product. I'll come back this week and give everything a fresh coat of flat black.

I think the count is down to 39 of these remaining. Next time, a new challenge - a crossover (two switches) controlled by a single knob. There's also another 3 way to be done. One thing about this task is he doesn't get bored. There are always new challenges.

Jon hung 40 more feet of fascia over in aisle one. Once again, it's a matter of staying ahead of Matt so he can do the next throws. You can just make out that 3 way between the two light bulbs on the right.

With the completion of this section, the upper deck fascia is about 75% done. There are some small areas with more complicated cuts that still need to be done. We'll leave those for later. Next up, get going on the lower deck, again to stay ahead of Matt.

Attachments
Images (6)
Have had a repeating paint problem on one of the buffer plates on this LaBelle model
of a D&RGW gas electric, so have done several repaints, which take a while to dry.
To accomplish something, I disassembled and started repainting the Hallmark 1935
Ford pickup model that came in. I pulled up an actual pickup that was painted red
when new and have painted cab and bed red. Since my grandfather's 1937 Chevy
pickup was red with black fenders, a common paint treatement of the period, I
have painted chassis and fenders black. Removing the Christmas packages from the
floor of the bed, with sanding, made the "wooden" floor of the bed looked used. I
have another, the 1940 Ford Hallmark pickup coming in, at a much cheaper price than
the $40 I see a lot of, and this is bundled with a 1963 Thunderbird which is for sale.
(I have not seen either yet so cannot describe)
Edits in red below.
I've tried posting this three times unsuccessfully(3 days).
While cleaning (and running trains more), I got distracted by whistling while I was working![]() .
.
I have been accumulating trains without whistles. Enough I twice have recently assembled 4 trains at a time, and to not been able to blow a whistle on one "in celebration".
The fabricating flu struck me as I looked into a box. I had two gift alarm clocks with crossbucks and lights. I've had a half dozen over the years. They spend more of their lives in boxes, than on shelves as knick knacks, so I decided to make them into stationary layout accessories.

I removed the electronics from one, and inserted them, and the silicone the speaker into a Pringles can and added a tiny temp on button.
I had heard about folks doing the can trick for MP3/ipod use, and always wanted to hear the difference.
Well, it is a huge improvement.
It sounds great compared to it being in its factory enclosure. "Tin like" sound is gone and mid.s and bass jumped sky high.
Its loud enough to easily be heard over 6 engines (4 trains, 35-45 cars).
Just "toy sounds", whistle, then chug, then warning bells, etc.
"very fake" but clearer than the old talking stations that play records, so I'm good with it![]() .
.
Wiring the second one I was thinking more, and jumped the activation switch input, putting the button on the power leads instead.
This way the sounds stop playing as the button is let go of, and I can blow the whistle in an almost proper way (only one length of horn blast, not short, not long, but a "medium"). Held down, it plays the whole effect track, looping non stop.
I kept the next one in the base seen next to Puppy, and below, because the Pringles can is too loud, and lasts too long playing the whole thing, for prudent late night running.
I removed the crossbuck post so its base would be small enough to fit on the shelf near the controls and used that area to mount a temp on type rocker switch on it.
(The can of chips is under the layout till I can fit it a tunnel, topside).

Fabrication flu's fever, was almost normal again, till I picked up the pole![]() .
.
I suddenly saw something.
I took off the zebra stripe clock board, and the cross bucks, moved the light bar further up the pole and screwed it into place. I popped out the red lenses, and swapped in two 14v 100ma bulbs. The aim looking awkward, I heated each lights mount, and turn them away from each other 30-40°, and then angled them down some.
The pole was hollow plastic. I open up the hole drilling out the pole bottom, and it now fits snugly over a small terminal finger nut.
I still need to give it "real" wiring.
But I am very pleased with the mock up.
How did I test it?![]()


Attachments
Images (6)
Add Reply
Sign In To Reply
