
Lew, Nice way to hide the winch! Good thinking~!

David, nice little video & have lots of fun at the club!

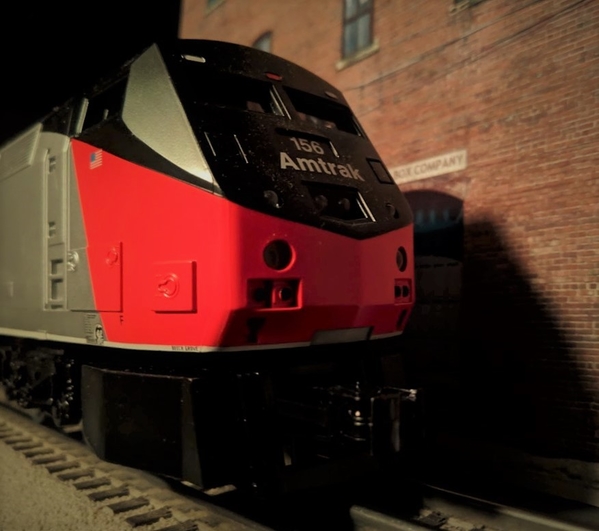
Superchief, looks like you have a good start there! Keep us posted!

Ray, Your coming right along! Looks Amazing!

Kevin, great way to spend the weekend, plus it give you time to think about whats next!

Lee, couple of great videos! Thanks for sharing!

Dennis, your bridge area is looking wonderful, I really like the bridge!

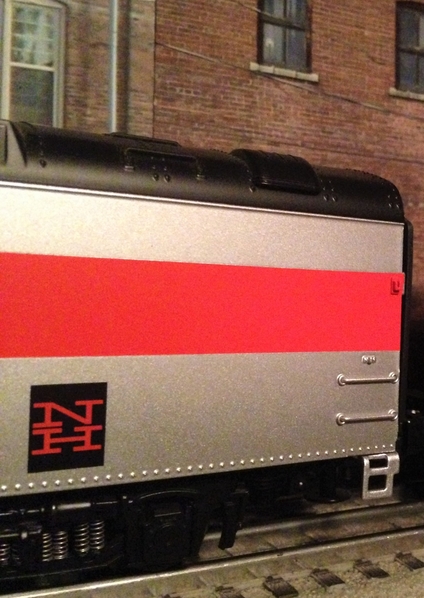
Yesterday I spent the day in the train room working on getting the new to me New Haven switcher running. The rear motor was binding up but with help from a couple of wonderful forum members I got it going again. It appears that the grease had started to set up in the truck, by turning the top of the motor I got it freed up and running smoothly.

I also spent some time weighting some of my new rolling stock, its amazing how well cars run on the layout when they are the right weight! Here are a couple of photos and video so Lew knows I did it!

Also I did a little head scratching on a new to me crane, still working on that one! LOLIMG_20200120_130042015IMG_20200120_130035977IMG_20200120_130049285_HDRIMG_20200120_143654078

I hope everyone has a great day and finds time for there trains and layouts!

Attachments

Images (4)
  • IMG_20200120_130042015
  • IMG_20200120_130035977
  • IMG_20200120_130049285_HDR
  • IMG_20200120_143654078
Videos (1)
VID_20200120_103732501_Trim_Trim


                           getting ready for the new arrival Mike...


           as  #3505 is finishing it's last day working in the intermodal yard here,


             crews will be getting it ready for a long westbound trip to Washington...


Attachments

Images (5)
  • mceclip0
  • mceclip0
  • mceclip0
  • mceclip0
  • mceclip1
Last edited by briansilvermustang

Ray, The picture of the hotel shows me much better what it looked like in its heyday!  I lick it!

Kevin, I agree with Mike that your time was well spent planning the future.

Dennis, That bridge is excellent!  It will look even better when the scenery is done.

Lee, Your videos are great!

Mike, it looks to me like the NH switcher is running nicely.  That is smart weighing the cars as they should.  I know the weights of my cars are all over the place!


Brian, The switcher will fit right in.

Mitch, Norma appears to be right at the controls while you take care of sad business.

Yesterday I did a little sorting of all the paper things I brought back from my Mum and Dad's house.  Stay with me, this is train related as the photograph I posted yesterday shows, I can't get at any layout building materials until I find a place for all their mementos, high school and college yearbooks, photographs, funeral documents, cards, etc.  They are all organized in piles, but I'm not sure where I'm going to put them yet.  Some of them still smell like mothballs since Dad must have had some of his fly tying treated pelts and whatever you call game bird 'pelts' in the plastic bin I found all these paper things in.  If I can smell mothballs, my wife certainly will smell it much stronger. 

Brian, I cant wait to see the BNSF working out west here!

Mark, I know what your talking about, when we moved my mom in with my brother the rest of my 5 siblings and I had to clean out her house for sale. It took us a full week to go threw everything!

Mitch, Norma is just trying to help out by keeping an eye on things!

Johan, what a wonderful job on the box car! Your work still amazes me!

Well don't tell the CEO, but before I start work on the house I went out to the train room and moved my crane out to the closest track near the edge of the table per the suggestion of Dave AKA Darlander! I have to admit it looks a lot better there. I still have to get the travel motor hooked back up so I can be like Lew! LOLIMG_20200121_071702580IMG_20200121_071710648

Attachments

Images (2)
  • IMG_20200121_071702580
  • IMG_20200121_071710648

I did a tiny bit of work on the Winch Shed:

        IMG_0187

I'm thinking about what to do with that giant-sized stack.

        IMG_0184 [1)

Also what color it should be. I think the same as the Crane cabin which brings me to another subject. These PW Gantry Crane cabins are ridiculously out-of-scale and sooner-or-later Ima' do something about that....The whole thing is pretty much imaginary because I don't think anyone ever built gantry cranes of this sort/size. It's a matter of making the caricature work and for me that means the crane cabin needs to at least be large enough to fit an operator. 

Attachments

Images (2)
  • IMG_0187
  • IMG_0184 (1)

Johan, very nice job on that boxcar.

Mike g, Layout is looking good and that was a great video.

This morning since I had the area cleaned up I started placing the different buildings to see what will look good. I found out quickly after laying down some track that I did now have the open space I hoped for so this is going to take awhile. Looks like I have to place another order with Ross for a cuple of more switches. Plus I still have to figure out what backdrop buildings to use to finish off the backdrop. Pics..............Paul 2

DSCN0009DSCN0011DSCN0012DSCN0013DSCN0014

Attachments

Images (5)
  • DSCN0009
  • DSCN0011
  • DSCN0012
  • DSCN0013
  • DSCN0014

A couple details regarding the Gantry Crane project.

The newly modified control panel:

        IMG_0188

The left-most momentary center-off toggle switch raises/lowers the electromagnet and rotates the Crain. The red slide-switch operates the clutch-solenoid such that switch down (off) causes the Crane to rotate with activation of the left-hand toggle switch and slide-switch up (on) causes the winch cable to lower or raise when the motor is activated. The right-hand momentary center-off toggle switch moves side-to-side, causing the winch-motor to run which traverses the Crane left or right. The right-hand slide switch activated the electromagnet. Having motorized traverse-movement brings a lot of reality to the caricature because control panel actions cause the Crane to perform all of the actions a prototype crane would. It definitely adds fun&satisfaction to operation.


I rummaged in the sewing room and found heavy-duty carpet thread:

        IMG_0189

The winch-cable almost disappears from view now.

Attachments

Images (2)
  • IMG_0188
  • IMG_0189
mike g. posted:

Brian, I cant wait to see the BNSF working out west here!

Mark, I know what your talking about, when we moved my mom in with my brother the rest of my 5 siblings and I had to clean out her house for sale. It took us a full week to go threw everything!

Mitch, Norma is just trying to help out by keeping an eye on things!

Johan, what a wonderful job on the box car! Your work still amazes me!

Well don't tell the CEO, but before I start work on the house I went out to the train room and moved my crane out to the closest track near the edge of the table per the suggestion of Dave AKA Darlander! I have to admit it looks a lot better there. I still have to get the travel motor hooked back up so I can be like Lew! LOLIMG_20200121_071702580IMG_20200121_071710648

Mike. Thank you Sir. I am glad you dont fill boring. 😂  🤝

Johan

paul 2 posted:

Johan, very nice job on that boxcar.

Mike g, Layout is looking good and that was a great video.

This morning since I had the area cleaned up I started placing the different buildings to see what will look good. I found out quickly after laying down some track that I did now have the open space I hoped for so this is going to take awhile. Looks like I have to place another order with Ross for a cuple of more switches. Plus I still have to figure out what backdrop buildings to use to finish off the backdrop. Pics..............Paul 2

DSCN0009DSCN0011DSCN0012DSCN0013DSCN0014

Paul. Thank you. I like your layout, many place's where can switching cars. 👍

Johan

geysergazer posted:

I did a tiny bit of work on the Winch Shed:


I'm thinking about what to do with that giant-sized stack.

        IMG_0184 [1)

Also what color it should be. I think the same as the Crane cabin which brings me to another subject. These PW Gantry Crane cabins are ridiculously out-of-scale and sooner-or-later Ima' do something about that....The whole thing is pretty much imaginary because I don't think anyone ever built gantry cranes of this sort/size. It's a matter of making the caricature work and for me that means the crane cabin needs to at least be large enough to fit an operator. 

Lew- how about an old caboose or boxcar for a shed? Would be more in scale next to the tracks.

M. Mitchell Marmel posted:

Mark, this may help get rid of the mothball odor:  

https://www.organiclesson.com/...d-of-mothball-smell/

There is a rude joke about "smelling mothballs", but since this is a family-oriented forum,  I shan't repeat it here. 

Mitch 

Mitch, I looked over the information on the link.  It is very informative.  Reading it I must happily say that it isn't so bad that the odor fills the room.  I think airing things out is the answer.  Light paper items don't have the smell anymore.  Now it is mainly when I open up a yearbook, I can smell it.  I think sitting the book upright opened as much as possible to let individual pages to the air may solve the problem.

Mike, The crane looks much better out front!!

Johan, that speeder boxcar is excellent!!

Lew, the added controls look good.  I agree with Bob that an old boxcar would work out better.

Paul, You just keep finding more places for switching cars to industries.  That's good.

Dave, It is hard to give up the layout, but with new construction on the horizon, I'm sure you are wanting to start.

RSJB18 posted:
geysergazer posted:

I did a tiny bit of work on the Winch Shed:


I'm thinking about what to do with that giant-sized stack.

        IMG_0184 [1)

Also what color it should be. I think the same as the Crane cabin which brings me to another subject. These PW Gantry Crane cabins are ridiculously out-of-scale and sooner-or-later Ima' do something about that....The whole thing is pretty much imaginary because I don't think anyone ever built gantry cranes of this sort/size. It's a matter of making the caricature work and for me that means the crane cabin needs to at least be large enough to fit an operator. 

Lew- how about an old caboose or boxcar for a shed? Would be more in scale next to the tracks.

There isn't really enough room. The winch-drum had to be aligned to produce a straight pull on the Crane feet so it is pretty close to the track:

                       IMG_0175

        IMG_0172

Attachments

Images (2)
  • IMG_0172
  • IMG_0175
geysergazer posted:
RSJB18 posted:
geysergazer posted:

I did a tiny bit of work on the Winch Shed:


I'm thinking about what to do with that giant-sized stack.

        IMG_0184 [1)

Also what color it should be. I think the same as the Crane cabin which brings me to another subject. These PW Gantry Crane cabins are ridiculously out-of-scale and sooner-or-later Ima' do something about that....The whole thing is pretty much imaginary because I don't think anyone ever built gantry cranes of this sort/size. It's a matter of making the caricature work and for me that means the crane cabin needs to at least be large enough to fit an operator. 

Lew- how about an old caboose or boxcar for a shed? Would be more in scale next to the tracks.

There isn't really enough room. The winch-drum had to be aligned to produce a straight pull on the Crane feet so it is pretty close to the track:

                       IMG_0175

        IMG_0172

Lew, 

   It was a tough day crawling on and under the layout.  My Father will come to the mountain tomorrow to run trains.  Last time my milk can launcher didn't work.  It has been rewired and joined by a 1952 version plus new milk cans.  I installed a Lionel #445 switch tower.  Next, a #195 light tower was given access to 10.5 VAC.  All pieces of "action track" are working.  I lined up a Breakfast Express, milk, chicken, and ham destined for Birmingham. There will also be a passenger train bound for Tuscaloosa.   I relocated lumber left from the recent track upgrade.  I even took out the garbage.  I hope we will have a fun day with few derailments.

Bill 

Sounds like progress is being made on many railroads. It is fun to see,

I started painting the Union Pacific Challenger Dome Coach #7014 from the 1927060 2-pack.

As I wait for some new paint and figures for the Santa Fe Baggage Car, I shifted to what I could accomplish: painting and detailing the 2nd 2-pack Challenger Dome Coach.  The painting is done and I am looking at photos of my other Challenger Domes to make sure I change the placement of people in this car to avoid duplicating the seating arrangement.

The painting took four coats of paint and then some touch-up. The mold release oil caused the first and then second coats to be very thin with lots of show through of the plastic seats.  It took over eight hours of painting in the last two days, starting last night.  The work doesn't look like much without people, but a good paint job is necessary since the LEDs brightly light the inside so flaws can be seen.

Tomorrow I will be grinding the figures and placing them throughout the car.

Sincerely, John Rowlen

Attachments

Images (6)
  • IMG_1312
  • IMG_1313
  • IMG_1314
  • IMG_1315
  • IMG_1316
  • IMG_1317
Mark Boyce posted:

Mike, The crane looks much better out front!!

Johan, that speeder boxcar is excellent!!

Lew, the added controls look good.  I agree with Bob that an old boxcar would work out better.

Paul, You just keep finding more places for switching cars to industries.  That's good.

Dave, It is hard to give up the layout, but with new construction on the horizon, I'm sure you are wanting to start.

Mark. Thank you. 🤝

Johan

The PER crew had their [switching] work cut out for them this AM at the East End. Three set-outs:

        IMG_0199

and four pick-ups, including the covered hopper under the tipple:

       IMG_0195 [1)


On Edit: Ghaa! Forgot to say the purpose of this post was to show how inconspicuous the Winch-Shed is in the overall scheme of the East End industrial area.

Attachments

Images (2)
  • IMG_0199
  • IMG_0195 (1)
Last edited by geysergazer

We started to work on structural support for Scenery on the layout. Styrofoam is an excellent material since it is lightweight and can be formed easily. A source of white Styrofoam pieces is packing in boxes for different goods and appliances we buy. A lot of these pieces can be used as is to form the structure for terrain. Cutting these does make a mess with the charged particles that result.

Here is some work we have done at one end of the layout where there is a tunnel portal .

IMG_4954

on the back side of the upper level bridge crossing the duckunder

IMG_4958

on the left side of the portal

IMG_4955;and the right side. Here I used some pink foam board which makes a wall from the upper level to the lower level

IMG_4956

And an overall view. All the Styrofoam has been glued with white clue to the wood table and to each other. When the Glue dries this will be a pretty rigid and lightweight structure to support the Woodland scenic plaster cloth to form the terrain. 

IMG_4959

Attachments

Images (5)
  • IMG_4954
  • IMG_4958
  • IMG_4955
  • IMG_4956
  • IMG_4959
LIRR Steamer posted:

We started to work on structural support for Scenery on the layout. Styrofoam is an excellent material since it is lightweight and can be formed easily. A source of white Styrofoam pieces is packing in boxes for different goods and appliances we buy. A lot of these pieces can be used as is to form the structure for terrain. Cutting these does make a mess with the charged particles that result.

Here is some work we have done at one end of the layout where there is a tunnel portal .

IMG_4954

on the back side of the upper level bridge crossing the duckunder

IMG_4958

on the left side of the portal

IMG_4955;and the right side. Here I used some pink foam board which makes a wall from the upper level to the lower level

IMG_4956

And an overall view. All the Styrofoam has been glued with white clue to the wood table and to each other. When the Glue dries this will be a pretty rigid and lightweight structure to support the Woodland scenic plaster cloth to form the terrain. 

IMG_4959

Your description and pictures are very helpful as I consider doing something very similar in the corner of my layout, which has one main line elevated with a bridge and one running parallel below it. Thank you!

CoastsideKevin posted:
LIRR Steamer posted:

We started to work on structural support for Scenery on the layout. Styrofoam is an excellent material since it is lightweight and can be formed easily. A source of white Styrofoam pieces is packing in boxes for different goods and appliances we buy. A lot of these pieces can be used as is to form the structure for terrain. Cutting these does make a mess with the charged particles that result.

Here is some work we have done at one end of the layout where there is a tunnel portal .

IMG_4954

on the back side of the upper level bridge crossing the duckunder

IMG_4958

on the left side of the portal

IMG_4955;and the right side. Here I used some pink foam board which makes a wall from the upper level to the lower level

IMG_4956

And an overall view. All the Styrofoam has been glued with white clue to the wood table and to each other. When the Glue dries this will be a pretty rigid and lightweight structure to support the Woodland scenic plaster cloth to form the terrain. 

IMG_4959

Your description and pictures are very helpful as I consider doing something very similar in the corner of my layout, which has one main line elevated with a bridge and one running parallel below it. Thank you!

will be doing some plaster cloth later so we can continue to follow the process.

Thank you for your comment. I try and use material on the layout that are readily available and can be repurposed rather than disposed of. 

Over the past couple of days I have completely torn down my table for my Train Layout. Since our basement is being waterproofed so that will be good in the long term. It is essentially phase one of basement work. I am going to look at getting more modular bench work this time around, that way when I am able to finally finish my basement it will be a heck of a lot easier to break it down and and store it. That way I don't need to spend a long time completely breaking everything down to have any work done.

tcochran posted:

Over the past couple of days I have completely torn down my table for my Train Layout. Since our basement is being waterproofed so that will be good in the long term. It is essentially phase one of basement work. I am going to look at getting more modular bench work this time around, that way when I am able to finally finish my basement it will be a heck of a lot easier to break it down and and store it. That way I don't need to spend a long time completely breaking everything down to have any work done.

Good idea Tcochran

Add Reply

Post

OGR Publishing, Inc., 1310 Eastside Centre Ct, Suite 6, Mountain Home, AR 72653
800-980-OGRR (6477)
www.ogaugerr.com

×
×
×
×
Link copied to your clipboard.
×
×