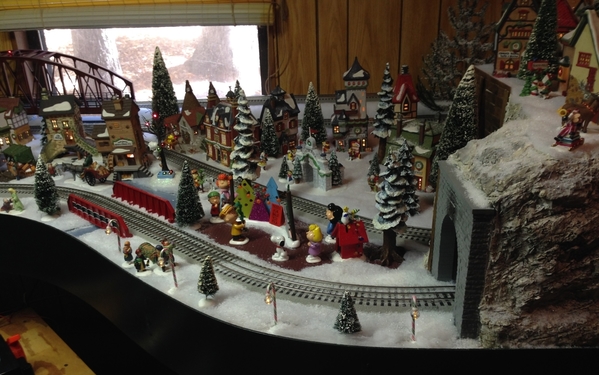
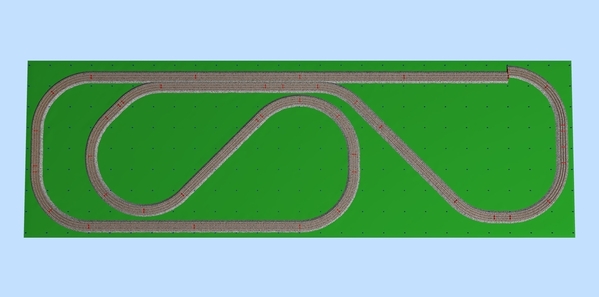
My Christmas layout season begins every year on Veteran's weekend. I posted some differerent designs in previous posts but this is what I'm moving forward with
Replies sorted oldest to newest
Looking forward to your progress!
Peter
Looks great Garrett, look forward to seeing the final set up with all the deco. Post updates. Nick T.
always enjoy these posts..keep up the good work!
Since I'm placing the plywood directly on the table, there will be cutouts in various places for Dept 56 building power cords to pass under the tracks. I totally forgot to mark these areas before I disassembled the track and put the wood and tables up for the evening. I had to put everything back together this morning and mark the wood
Attachments
Love it. Looks great. Will be a fun Christmas.
I use Fastrack myself and think it is great but, screwed directly to plywood and sitting on those tables the racket will be overwhelming. You might want to think about putting a piece of inexpensive carpet between the plywood and the track.
Agreed. I have cheap carpet pad that I bought off Amazon and green indoor/outdoor carpet that they sell by the foot at Lowe's/HD. It makes a big difference. Before I built my layout, I was really concerned about FasTrack noise. The pad and carpet deadens the sound so much that I don't even think about it.
And I should have mentioned, this is a cool plan. It'll be fun to see.
From concept to creation, very cool to see.
What's not to like. Keep up with the photos.
Thanks for posting - I love seeing folks' Holiday layouts, especially Christmas. Can't wait to see the finished product!
- Neal
Hi G,
Always nice to see each year's creation. Here's some changes I made to your original plan for fitment. I used the FasTrack combo chart to get the straights to fit.
EDIT![]() oops! I missed the 48" wide part- this just makes it -check the attachments - they have been replaced.
oops! I missed the 48" wide part- this just makes it -check the attachments - they have been replaced.
Attachments
Very nice plan. Will you try something white for snow on the layout and under the tracks? Looking forward to more images!
For years I would set up three separate Dept 56 villages (Christmas in the City, Dickens' Village, and North Pole) and drill holes in the plywood bases to conceal the wiring. When I built my permanent layout with all three villages I found an easy way to save time and not drill or cut the wood base for the wires.
I placed all of the buildings where I wanted them and used white duct tape to tape the wires to the top of the wood base. If you can replace the single wires with Dept 56 multiple bulb wire strings (still available on e-bay) you will save even more time. Add roads, paths, water, ice features as needed and then cover all of the wires and other "ground" areas with sheets of white polyester quilt batting available at discount and fabric stores (sold in rolls). Cover wires from the base to a building with torn pieces of batting. 
Run the batting under the fastrack as well (this is a bit time consuming and you will need to slit the batting to allow for any track feeder wires). Add trees, streetlights, people, cars, etc. and sprinkle Dept 56 snow around the layout on top of the batting material and you are done.
I hope that the attached photos help to explain this process.
Attachments
looks great so far - can hardly wait to see the finished product.
Danr posted:I use Fastrack myself and think it is great but, screwed directly to plywood and sitting on those tables the racket will be overwhelming. You might want to think about putting a piece of inexpensive carpet between the plywood and the track.
That is true about the noise. I like the look of the "snow blanket" based on previous years' projects and will probably consider adding flooring underlayment below that
Moonman posted:Hi G,
Always nice to see each year's creation. Here's some changes I made to your original plan for fitment. I used the FasTrack combo chart to get the straights to fit.
EDIT
oops! I missed the 48" wide part- this just makes it -check the attachments - they have been replaced.
Thanks. I will have to take a closer look. I can say that anytime I have pieced together track based on a SCARM design, it was always off by a little a bit
BobbyD posted:Very nice plan. Will you try something white for snow on the layout and under the tracks? Looking forward to more images!
I like the white "snow blanket" look. In the past, if I used two layers of snow blanket, it was enough to disguise unpainted wood. I was considering going with that approach again but I may do something different this time
HMorgan125 posted:For years I would set up three separate Dept 56 villages (Christmas in the City, Dickens' Village, and North Pole) and drill holes in the plywood bases to conceal the wiring. When I built my permanent layout with all three villages I found an easy way to save time and not drill or cut the wood base for the wires.
I placed all of the buildings where I wanted them and used white duct tape to tape the wires to the top of the wood base. If you can replace the single wires with Dept 56 multiple bulb wire strings (still available on e-bay) you will save even more time. Add roads, paths, water, ice features as needed and then cover all of the wires and other "ground" areas with sheets of white polyester quilt batting available at discount and fabric stores (sold in rolls). Cover wires from the base to a building with torn pieces of batting.
Run the batting under the fastrack as well (this is a bit time consuming and you will need to slit the batting to allow for any track feeder wires). Add trees, streetlights, people, cars, etc. and sprinkle Dept 56 snow around the layout on top of the batting material and you are done.
I hope that the attached photos help to explain this process.
Thanks for the tips. Very nice pics of your layout. I am in a different house this year so my layout will be much bigger than in years past (search youtube for us98na to see previous layouts). I figure I will be able to fit in 12-14 Dept 56 houses and still have room left over for lots of accessories and scenery elements. Always nice to gain inspiration from others' layouts!
Everything is looking great, Garrett real nice layout, are you moving it inside or are you doing a outside layout this year?
Thanksgiving I will start to add to the Pine Creek Railroad Train Room again, have not had the time to even do any engineering for this years Christmas expansion.
All the best gentlemen
PCRR/Dave
Attachments
Pine Creek Railroad posted:Everything is looking great, Garrett real nice layout, are you moving it inside or are you doing a outside layout this year?
Thanksgiving I will start to add to the Pine Creek Railroad Train Room again, have not had the time to even do any engineering for this years Christmas expansion.
All the best gentlemen
PCRR/Dave
Dave, the driveway is just for cutting the plywood and doing the initial track fitment. I will be moving everything inside this week. My room is 13' 5" wide and my layout is cut to 13' 2". I am considering different solutions to slide or roll the table out from the wall because I can't lean over far enough to reach the back side.
Garrett76 posted:Moonman posted:Hi G,
Always nice to see each year's creation. Here's some changes I made to your original plan for fitment. I used the FasTrack combo chart to get the straights to fit.
EDIT
oops! I missed the 48" wide part- this just makes it -check the attachments - they have been replaced.
Thanks. I will have to take a closer look. I can say that anytime I have pieced together track based on a SCARM design, it was always off by a little a bit
Check in the Tools>Settings>Edit>Tolerances. I use .079 do not have fitment issues with track plans.
Awesome Garrett76, I like the track plan and I agree with how easier it is with the folding tables.
The snow fabric is transparent and I'm not a big fan of painting, so I decided to place two twin sheets on the wood under the snow fabric. One sheet is a fitted one which I cut off the elastic edge. They work fine as a substitute for painting the plywood
Attachments
tonight was supposed to be track assembly but surprise surprise Murphy had other plans. I am doing a "floating" track setup and planned to use these binder clips to hold the track together. Turns out, 3/4" is too tall and the track does not lay flat. Need to get 1/2" tomorrow
Attachments
I thought I was the only one who had Murphys help. Do you really need the clips under the fastrack. I always had good luck with the track staying together. looking forward to seeing all the buildings and lights. Nick
Garrett76 posted:
Found that out the same way - my Christmas trolley line is in an area where I can't screw any track down. 1 straight and the bumpers kept coming loose.
As far as the layout (17' x 15" -L-shaped), mine is on the white poly felt from JoAnn. I have only had one track joint try to get loose. I replaced it with another the fit tighter. No screws.
However, an ounce of prevention...
t8afao posted:I thought I was the only one who had Murphys help. Do you really need the clips under the fastrack. I always had good luck with the track staying together. looking forward to seeing all the buildings and lights. Nick
Yes, clips are absolutely needed. Found out when I pieced the Fastrack together at the outset of this to ensure that my SCARM plan fit on the wood I cut. Seemed that every time I tried to connect two pieces together, two other pieces would separate no matter how securely they appeared to be connected. I don't want to screw the track down because as soon as I do that, Murphy will give me a need to move the track around. I started thinking about ways to hold the track together and found an OGRR forum post from May 2016 about binder clips: https://ogrforum.ogaugerr.com/topic/fastrack-clips
Moonman posted:Garrett76 posted:Found that out the same way - my Christmas trolley line is in an area where I can't screw any track down. 1 straight and the bumpers kept coming loose.
As far as the layout (17' x 15" -L-shaped), mine is on the white poly felt from JoAnn. I have only had one track joint try to get loose. I replaced it with another the fit tighter. No screws.
However, an ounce of prevention...
Good info. I am considering a trolley line on another layout in a different room. I will get to that after this layout is finished and start a new/separate post for that layout
now that I have the correct clips, time to assemble the track. when I got to the last piece of O31 curve track, it had the regular tab and a broken tab in the middle rail slot. there is no way that I was going to disassemble everything and look for another piece (with missing tab) that would fit. So... I grabbed some pliers and broke off the tab from the adjacent track. There were other pieces with broken or missing tabs. Big question - would the electricity flow uninterrupted and would the train move when powered up???


