
I'm performing my first PS3 upgrade of a 3rd rail 4-8-2 N&W engine (came with conventional control).  The existing flywheel is 38mm.  Do I just use the largest 33.7mm tach tape strip that was included, or do I need to make something custom?  I'm not planning to do lashups with this one, just would like the scale speed to be within 2-5 scale MPH if that's easy enough to accomplish.  Thanks!

Original Post

Replies sorted oldest to newest

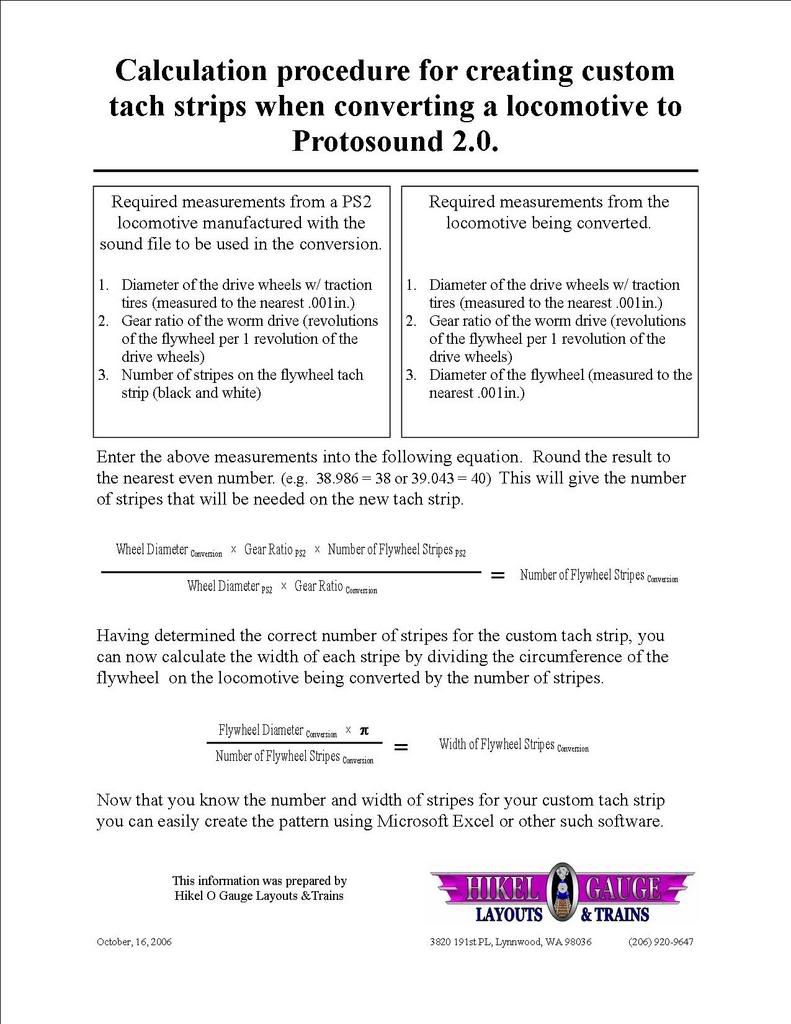
I usually start with some tape and then speed match with another stock engine to get an idea of how far off it is. I get a rough percentage calculated and then adjust the number of stripes accordingly. I may just blacken in a single stripe gap (or two spread out) if the speed is very close. Most times I print a custom tape.

There were many posted tach tapes shared here over the years to print out. GRJ shared some here on the forum.

Now for others doing this, there are problems with this method. If you're too far off for example, the engine may stop and shut down. It knows that something is off too far as it applies voltage to the motor(s). I've learned to watch closely and figure out what's happening. I've upgraded a good amount of engines on my own.

You may have the gap off on the tach to flywheel and that also causes issues. Too big and it will miss counts. I've even had 3 stock MTH one gauge diesel engines run too fast until I closed the gap. 1 was PS2 and 2 were PS3, all brand new!

I could move the tach closer and watch the motors slow down.

All this is just my novice opinion! I am not a tech, as some here will point out.

Last edited by Engineer-Joe

Along with the number of stripes and spacing, the loco's gear ratio and driving wheel diameter factors into the speed calculation.  If possible, try to choose a sound / "personality" file that comes close to matching your Water Buffalo's number of motor revolutions per inch.

I think that loco predates 3rd Rail's use of "Quiet Drive."  For the record, what is your gear ratio?  You can find it out: turn the flywheel slowly by hand.  Count how many turns are required to achieve one complete revolution of a driving wheel.  You won't hurt the loco by doing this, and it's a good way to check for binds in the drivetrain.  If you find out and post it, I'll recommend an MTH loco that comes close.

This is an oldie but goodie posted years ago.  There are tach tape images with all different widths.  There's also an instruction sheet that goes into how to compute the number of stripes.  In truth, I usually just slap a tape on, and then compute what the difference between the commanded MPH and the actual MPH is, and then adjust the number of stripes to match as close as possible.  You'll find that the 44:1 gearboxes result in only ten or twelve stripes on the tape to properly match the speed.

Custom Tach Strips for PS2-PS3.zip

Attachments

Must be an echo in here.

Thanks for all your replies!  My gear ratio is about 18.5, this is belt driven, is that what is known as "quiet drive?"

Looks like the standard 3rd Rail belt drive, you should be fairly close with the 24 stripes, I suggest using that and trying is, then adjusting one or two stripes if necessary to zero in on the actual scale MPH.  Obviously, right around 24 strips, each strip plus or minus will change the speed about 4% up or down.  So, if you're 2% or less off in scale MPH, you're as good as it gets.

Must be an echo in here.

Looks like the standard 3rd Rail belt drive, you should be fairly close with the 24 stripes, I suggest using that and trying is, then adjusting one or two stripes if necessary to zero in on the actual scale MPH.  Obviously, right around 24 strips, each strip plus or minus will change the speed about 4% up or down.  So, if you're 2% or less off in scale MPH, you're as good as it gets.

Thanks John!  Do you mean the 24 stripe sticker that is included in the PS3 upgrade kit, or one of the custom ones from the bundle you sent?

Thanks John!  Do you mean the 24 stripe sticker that is included in the PS3 upgrade kit, or one of the custom ones from the bundle you sent?

It depends on the diameter of the flywheel.  If the flywheel diameter matches one of the standard PS/3 tapes, start with that and see how close the speed is.  18:1 is right around where many MTH steamers are, so you may work out with the first tape.

The flywheel is 38mm, so larger than any of the tapes.

In that case, look through the custom tapes and find one that has 24 stripes in 119.38mm (or close) and use that.  I print them on half-page gummed shipping labels using the LABEL paper type of my laser printer.  You can also print them on an inkjet using the correct paper and paper type.  After testing with that tape, you know if you are good or have to go up or down in stripe count.

Thanks, will do.  Question, do I need to re-use the constant lighting board from the 3rd rail engine?

You can use the constant lighting board, truthfully I rarely do.  I want the headlight command controlled, and I usually tie any class lights in with the headlight.  The standard steam upgrade kit has headlight control, and that is easily capable of driving the class lights as well, you'll just need a resistor around 220 ohms for the class lights if they're the standard LED's.  Of course, I normally use an amber LED for the headlight since I like bright headlights in my upgrades, not the wimpy 6V bulbs that the upgrade kit uses.   I also use a 220 ohm resistor for the headlight from the headlight feed from the PS/3 upgrade kit.

In that case, look through the custom tapes and find one that has 24 stripes in 119.38mm (or close) and use that.  I print them on half-page gummed shipping labels using the LABEL paper type of my laser printer.  You can also print them on an inkjet using the correct paper and paper type.  After testing with that tape, you know if you are good or have to go up or down in stripe count.

You can use the constant lighting board, truthfully I rarely do.  I want the headlight command controlled, and I usually tie any class lights in with the headlight.  The standard steam upgrade kit has headlight control, and that is easily capable of driving the class lights as well, you'll just need a resistor around 220 ohms for the class lights if they're the standard LED's.  Of course, I normally use an amber LED for the headlight since I like bright headlights in my upgrades, not the wimpy 6V bulbs that the upgrade kit uses.   I also use a 220 ohm resistor for the headlight from the headlight feed from the PS/3 upgrade kit.

Thanks so much!

Thanks for all your replies!  My gear ratio is about 18.5, this is belt driven, is that what is known as "quiet drive?"  

Yes!  I guess this was one of the first locos 3rd Rail made with that feature.  Almost all that I have personally measured have a 12-tooth pulley on the motor shaft, and a 14-tooth pulley on the lower shaft.  This, combined with a two-start worm and 31-tooth worm wheel on the axle work out to 18.08 to 1.

31/2 = 15.5 to 1 in the gearbox, times (14/12) = 18.08

As John mentioned, this ratio is very close to what's used in many MTH locos.  However the driving wheel diameter also factors into the speed calculation.  In real life, the Water Buffalos had 63" diameter drivers.  So you'll want to source the sound / personality file from something that has medium-sized driving wheels; probably a Mikado, or one of the hefty H9 2-8-0 Consolidations.

Since your flywheel is larger than what MTH typically uses, you should follow John's advice about the tape.  When you get it all together, please let us know how close we came to giving you an accurate scale speed

Hi guys,


RJR,


Follow the instructions on the sheet below to calculate the correct number of stripes and their width.  To calculate the gear ratio use the method John described in his early post.  For now, ignore the number of chuffs per driver rev.  We have to correct the speed map first.


If you don't know the numbers off of the stock MTH PS2 engine for which the sound file was designed, send me an e-mail with its product number.  I have a list from MTH that gives the numbers for most of the locomotives they've ever produced.


Once you have determined the correct stripe size you can print it out on Avery adhesive backed label paper using the files attached to this post.  This is a completely reliable medium for making tach strips.  There are literally hundreds of PS2 locomotives running around with Avery label tach strips.  The attached files are pdf's with every possible strip size in .001" increments from .050" to .169."  Stripes smaller than .050" cannot reliably be read by the tach reader.  If you need something smaller than .050" you will either have to live with an inaccurate speed map or select a different sound file.  Double check your printer setting to make sure any auto scaling features are turned off.  You want to print the files at 100% to get accurate results.  Some printers use ink or toner that is too porous for the tach reader to read reliably.  If the engine takes off at full speed with the new tach tape trace over the black stripes with a black ballpoint pen.  The pen ink is much denser and will be read reliably.

Dave


www.HikelTrains.com

Attachments

Hide

In that case, look through the custom tapes and find one that has 24 stripes in 119.38mm (or close) and use that.  I print them on half-page gummed shipping labels using the LABEL paper type of my laser printer.  You can also print them on an inkjet using the correct paper and paper type.  After testing with that tape, you know if you are good or have to go up or down in stripe count.

You can use the constant lighting board, truthfully I rarely do.  I want the headlight command controlled, and I usually tie any class lights in with the headlight.  The standard steam upgrade kit has headlight control, and that is easily capable of driving the class lights as well, you'll just need a resistor around 220 ohms for the class lights if they're the standard LED's.  Of course, I normally use an amber LED for the headlight since I like bright headlights in my upgrades, not the wimpy 6V bulbs that the upgrade kit uses.   I also use a 220 ohm resistor for the headlight from the headlight feed from the PS/3 upgrade kit.

Do I need 3 resistors to run the marker LEDs off of the headlight feed, as in one for the headlight, and one for each marker?

Do I need 3 resistors to run the marker LEDs off of the headlight feed, as in one for the headlight, and one for each marker?

You just need one resistor for the class lights, they're wired together.  Then you have a separate resistor the the headlight.  220 ohms for each of those will be fine.  If the class lights are too bright, just increase the size of the resistor to say 680 ohms or even 1K ohms.

You just need one resistor for the class lights, they're wired together.  Then you have a separate resistor the the headlight.  220 ohms for each of those will be fine.  If the class lights are too bright, just increase the size of the resistor to say 680 ohms or even 1K ohms.

IMG_1162I received some resistors along with some LED’s that I purchased for a separate project.  Any way to translate what kind of resistors these actually are?

Attachments

Images (1)
  • IMG_1162

Add Reply

Post
The DCS Forum is sponsored by

OGR Publishing, Inc., 1310 Eastside Centre Ct, Suite 6, Mountain Home, AR 72653
800-980-OGRR (6477)
www.ogaugerr.com

×
×
×
×
Link copied to your clipboard.
×
×