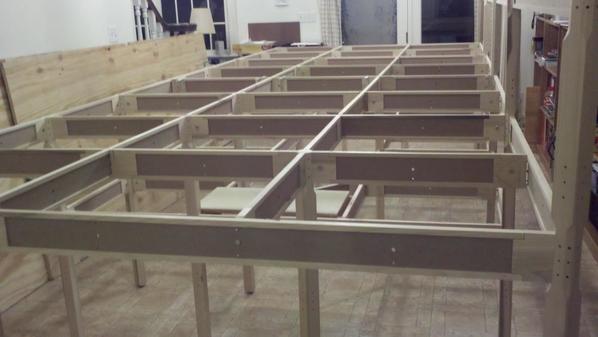
I decided to start a new thread since I've now settled on a basic design that was previewed at the end of the original thread here, though it has been modified a bit since then. To summarize, I've been patiently waiting for carpet to be replaced with simulated-wood porcelain tile throughout our home, including the back bedroom turned train/craft/sewing room. That day is almost here, the installation began on President’s Day and should be finished by week's end. So, it's time for me to button up the benchwork design and either prepare to measure/cut/assemble myself or contact Mianne to see how much they'd want for a custom kit. The layout is as yet unnamed, but since the primary reason is to display the Bedford Falls Christmas Village that was sold by Target years ago, I’m leaning toward something like “The DJ & BF Railway”. And, since all the village pieces are snow-covered and decorated for the holidays, the layout will pretty much contain winter and early spring landscaping, though I’m not sure yet how I’m going to accomplish that. Truth be told, I’ll be happy to get the track work done and that will be further than I’ve ever gotten before because of moves and a lack of time/money.

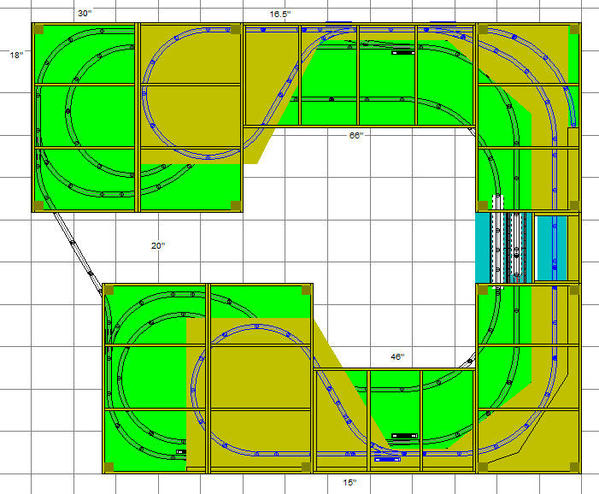
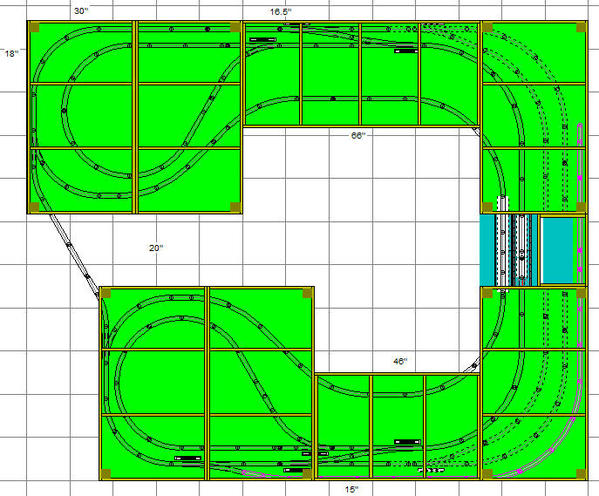
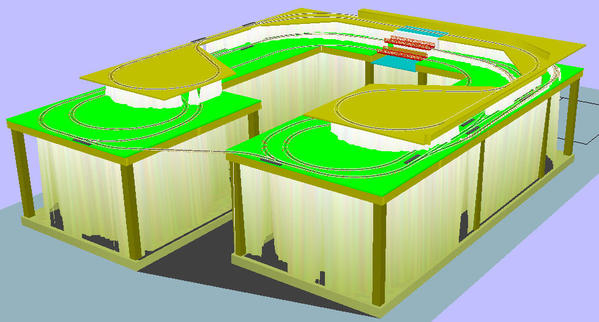
Anyway, I really need some help. Here is what the track plan looks like using Atlas O36/O54 and I’m in the process of converting it to ScaleTrax O31/O54. I recently added a grade around the right side and back of the horseshoe to a 2nd level. Generally, the bottom level will be desert landscaping with the top level being high desert, like that found around Flagstaff AZ. I know the track spacing is not quite right yet, but I intend to follow the basic outline and custom fit where needed. I'm still vacillating between Atlas and ScaleTrax, but both have flex track, so I'll make whatever adjustments/cuts are needed to make things fit as I lay track using sectional track for the curves and straights under 20”. The main thing I need now is for folks to point out any glaring errors that will affect the size or shape of the benchwork and tabletop. FWIW, the left side of the layout is now 13', the right side is 11' 4" and the back is 10' 8".

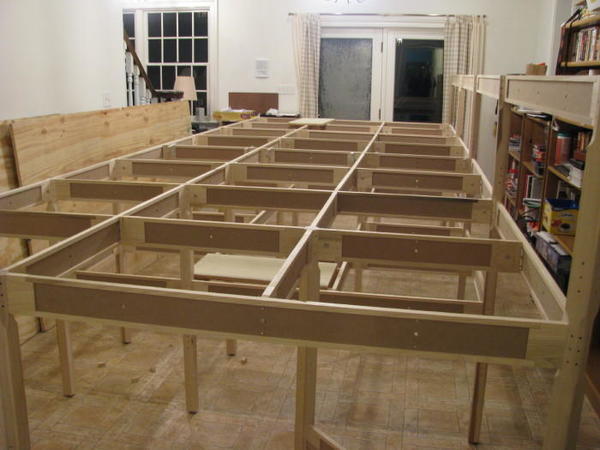
As you can see, after all the discussion about knee-walls, L-girder, etc., in the old thread, I’ve decided to construct the layout using simple 1x3 modules. All modules will be 30” wide and 6 modules will be 54” long while the other 2 will be 46” and 66” long. Cross-member spacing will vary from 15” to 18”. If I go the DIY route, one option is to rip 3/4" plywood into full 3" strips to use for both framing and L-shaped legs with a piece of 2x2 mounted at the bottom of the legs to attach leveling hardware. I’d place the L-shaped legs directly under the corners of the frame where the small dark squares are in the photo and use 9” L-shaped cleats to attach them to the framing. This way the weight of the layout would be on the wooden legs and not on the screws and  I think I can get by with just the 16 legs shown. Part of the reason for considering ripping plywood is because the shape of the benchwork doesn’t lend itself to cutting plywood for the tabletop very efficiently and I could use the waste for framing and legs.

Now, when it comes to benchwork, I’m still thinking about reducing the size of the benchwork so there’d be a 6” or so overhand around the front and center perimeter. I’d use 3/4 plywood throughout and the tabletop would then be cut shaped a jigsaw and edged with Masonite or something. The disadvantage to this is I’d lose space for landscaping, mostly buildings from the Bedford Falls collection.

Regardless of which brand track I end up with, my intent is to use FlexxBed and attach it to the plywood using double-sided carpet tape and then attach the track the same way. I’ll be stopping at High Country Hobbies in Enterprise AL next month to compare Atlas and ScaleTrax, particularly their respective flex tracks. As RTR12 suggested, I might buy an oval of each because once I get the benchwork done and the tabletop installed for the bottom level, my plan is to lay down what RealTrax I have and the 2 ovals so I can compare them. I may even try the tape to see if it really works. I’ll be passing near Enterprise again in late July, so if I decide to use ScaleTrax, I’ll be able to buy what I need if they have it in stock and their price is reasonable. I’m not in any great hurry because I won’t be able to lay any permanent track until September anyway, too busy over the summer.

One thing you might notice is an absence of spurs and a yard. Other than the hidden siding and reversing loops, I have little interest in operating a realistic railroad. I am content with driving trains around the track as long as I can run every train on every track. I have no interest in collecting engines and rolling stock that won’t be on the layout at all times, the exception being the 2012 MTH Christmas train. If I had more room, I could probably get interested in the operation side of the hobby, but I feel my space is too limited for anything I’d be content with. I could find that I’m wrong, but I have other interests besides trains, so limiting myself to a running/display layout is a risk I’m willing to take. Part of my desire to use tape though is to make it easier to redo if I find I’m not content.

One note on the 2nd level is that even though the photo shows a sub-roadbed under the reversing loops, my plan is for those to be open and only supported by pylons. Since the layout is fairly small, I don’t want to cover that much and I’ll need some access to the 2 hidden switches on the bottom level (see photo with top level removed). Parts of the tunnel will be removable for access and the entire top level will be modular so parts of it can be removed too.

The section in blue is a waterfall. The bottom part of the river will be attached to the framing from underneath, 3” below the track. The white waterfall will be part of a small module to join the 2 sides together. I haven’t quite worked out how I’m going to deal with the top part of the river, but chances are I’ll simply raise the track an inch in that area to go over a very low bridge. The center bridge is also raised 3” for no particular reason other then I wanted a different level for better visibility. The size of this part of the layout will depend on how the other modules fit in the room when the 2 sides are attached. I plan to construct both “sides” of the layout and then custom build the “river” to connect them together. Along with using flex track, this will allow me to deal with any miscalculations on my part. Right now that area is 20” wide, but it could end up being only 18” or 19” wide. And since my wife and I love fountains, I might even make a real waterfall, though I’m sure there are reasons not to.

My final comment is that the grade between levels is 3.3%, but the grade for the 3” rise across the center bridge is 4.8% on both sides. I can change this by lowering the bridge, but my trains will only be 5-7 cars long and I think even longer trains will be able to climb the grade. I currently have the one MTH 4-6-0 Christmas steamer and plan to buy 2 diesels and another small steamer, a 4-4-0 or 4-6-0 with the same type of exaggerated smoke stack. It will be my Old West passenger train. All will be RailKing capable of negotiating O31 curves/switches.

atlas1

atlas2

atlas3d


Attachments

Images (3)
  • atlas1
  • atlas2
  • atlas3d
Files (1)
Last edited by DoubleDAZ
Original Post

Replies sorted oldest to newest

I think the track plan looks good to me. I think the link between levels at 3.3% would be fine. The 4.8% might be a little steep, but I will let others with more experience comment on that one as I have not had much experience with grades. That is one thing I need to add to my layout somehow is another level, I think that adds a lot. 

I do think some spurs or sidings would add interest to the layout. Even if you do not do any operations I think a few spurs with a car or two on them might make things look more interesting. With my own layouts I usually tend to over-do-it with track though, and end up with little room for anything else which is not a good thing to do. Sampling the different track is good too and possibly the best way to decide which one you prefer. Nothing like first hand experience. I like the idea of double sided carpet tape for trial of the track and roadbed, may be fine for final installation too?   

I don't see anything wrong with the overhang if you use 3/4" plywood. I would think that would handle a few inches of overhang with no problem. The 3/4" plywood will strengthen the whole layout when added, but I am wondering if the upper 66" section and the lower 46" section might need a couple of added legs? It may be fine with the top on, but from the picture it looks like those could possibly be weak points? Maybe where the center modules join the end modules? It could be just fine as it is, especially if no one will ever be climbing on it?

I'm no expert here, but that is about all I can think of? I may have even thought of a thing or two that didn't need to be thought about?

rtr12 posted:

I think the track plan looks good to me. I think the link between levels at 3.3% would be fine. The 4.8% might be a little steep, but I will let others with more experience comment on that one as I have not had much experience with grades. That is one thing I need to add to my layout somehow is another level, I think that adds a lot. 

I do think some spurs or sidings would add interest to the layout. Even if you do not do any operations I think a few spurs with a car or two on them might make things look more interesting. With my own layouts I usually tend to over-do-it with track though, and end up with little room for anything else which is not a good thing to do. Sampling the different track is good too and possibly the best way to decide which one you prefer. Nothing like first hand experience. I like the idea of double sided carpet tape for trial of the track and roadbed, may be fine for final installation too?   

I don't see anything wrong with the overhang if you use 3/4" plywood. I would think that would handle a few inches of overhang with no problem. The 3/4" plywood will strengthen the whole layout when added, but I am wondering if the upper 66" section and the lower 46" section might need a couple of added legs? It may be fine with the top on, but from the picture it looks like those could possibly be weak points? Maybe where the center modules join the end modules? It could be just fine as it is, especially if no one will ever be climbing on it?

I'm no expert here, but that is about all I can think of? I may have even thought of a thing or two that didn't need to be thought about?

Thanks for the comments.

I'm concerned about the 4.8% grade too. Now that tiling is done, I'm going to set my RealTrax on the floor and run some tests with some scrap wood I have. My wife decided she wants to do some painting in the other areas that were tiled before we moved things back, so things have been delayed. Another reason to really consider Mianne?

I have tentative plans to add some spurs for interest once I lay down an outline of the benchwork and track using tape. I'll then get out the Bedford Falls buildings to see how spacing might work. I had actually added some spurs to this version, but took them out until I see how things look. I completely agree that just having some cars sitting would add visual interest.

And I agree there might be too much track and I'm considering taking out the hidden siding. I mainly put that in when I didn't see a way to connect the runs or the 2nd level. Now that I can run trains on all tracks, the hidden siding is less important to me and I'd love to get rid of the hidden switches.

I'm glad you mentioned the legs because even though no one will be climbing on it, I now agree there aren't enough. I think I need to add 1 in the center of the double 54x60 modules and 1 to the inside corners of both the 46" and 66" modules. I may need to add 2 in the middle of the 66" module, but I'll wait until I assemble that module to see. I suspect that is how Mianne would do things.

I took a look at wood at Lowe's today and was not happy with any of it. The best 3/4" plywood was some pretty lousy 5-layer stuff priced at $50/sheet. I'll check HD next, but may have to consider a lumber yard. If I go with this plan, I don't think I'll do any overhang. That was more an option if I decided to angle the corners and round off the curves.

Thanks again for the comments. With 98 views and only 1 comment, I was losing hope.

Double D, It's a lot farther then I have gotten. Still not finished with my basement and can't for the life of me decide on a track plan I'm happy with for an 8x18 sized layout. I like your plan and your table. keep up the posts as you go. I like the approach your taking. Don't get frustrated and sail smooth. You are going to be very happy with that beautiful plan you got there.

DoubleDAZ posted:
rtr12 posted:

I think the track plan looks good to me. I think the link between levels at 3.3% would be fine. The 4.8% might be a little steep, but I will let others with more experience comment on that one as I have not had much experience with grades. That is one thing I need to add to my layout somehow is another level, I think that adds a lot. 

I do think some spurs or sidings would add interest to the layout. Even if you do not do any operations I think a few spurs with a car or two on them might make things look more interesting. With my own layouts I usually tend to over-do-it with track though, and end up with little room for anything else which is not a good thing to do. Sampling the different track is good too and possibly the best way to decide which one you prefer. Nothing like first hand experience. I like the idea of double sided carpet tape for trial of the track and roadbed, may be fine for final installation too?   

I don't see anything wrong with the overhang if you use 3/4" plywood. I would think that would handle a few inches of overhang with no problem. The 3/4" plywood will strengthen the whole layout when added, but I am wondering if the upper 66" section and the lower 46" section might need a couple of added legs? It may be fine with the top on, but from the picture it looks like those could possibly be weak points? Maybe where the center modules join the end modules? It could be just fine as it is, especially if no one will ever be climbing on it?

I'm no expert here, but that is about all I can think of? I may have even thought of a thing or two that didn't need to be thought about?

Thanks for the comments.

I'm concerned about the 4.8% grade too. Now that tiling is done, I'm going to set my RealTrax on the floor and run some tests with some scrap wood I have. My wife decided she wants to do some painting in the other areas that were tiled before we moved things back, so things have been delayed. Another reason to really consider Mianne?

I have tentative plans to add some spurs for interest once I lay down an outline of the benchwork and track using tape. I'll then get out the Bedford Falls buildings to see how spacing might work. I had actually added some spurs to this version, but took them out until I see how things look. I completely agree that just having some cars sitting would add visual interest.

And I agree there might be too much track and I'm considering taking out the hidden siding. I mainly put that in when I didn't see a way to connect the runs or the 2nd level. Now that I can run trains on all tracks, the hidden siding is less important to me and I'd love to get rid of the hidden switches.

I'm glad you mentioned the legs because even though no one will be climbing on it, I now agree there aren't enough. I think I need to add 1 in the center of the double 54x60 modules and 1 to the inside corners of both the 46" and 66" modules. I may need to add 2 in the middle of the 66" module, but I'll wait until I assemble that module to see. I suspect that is how Mianne would do things.

I took a look at wood at Lowe's today and was not happy with any of it. The best 3/4" plywood was some pretty lousy 5-layer stuff priced at $50/sheet. I'll check HD next, but may have to consider a lumber yard. If I go with this plan, I don't think I'll do any overhang. That was more an option if I decided to angle the corners and round off the curves.

Thanks again for the comments. With 98 views and only 1 comment, I was losing hope.

Dave........the worst mistake I made was getting regular grade plywood that warped.......spend extra $ for your table tops and get the best you can....you won't be sorry.

Peter

Thanks E-UNIT-79. I started out with an irregular room 10x21 that gave me space for some nice long runs around the room with a yard and a purpose. Then my wife lowered the boom and I had to compromise. I know I could build a nice operational layout in my new space, but IMHO I'd have to give up too much of the running part that I enjoy the most. Hopefully, I'll be able to add some spurs like RTR12 suggested once I can "see" how this is going to go. I will post photos as I go, but I think I'm going to contact Mianne next week to see what they say.

Putnam Division posted:

Dave........the worst mistake I made was getting regular grade plywood that warped.......spend extra $ for your table tops and get the best you can....you won't be sorry.

Peter

I hear you, Peter. I've all but given up on 1/2" plywood, but after seeing what Lowe's had to offer, I'm not sure I even want plywood anymore. Moonman was right when he told me to be careful when looking at plywood. Maybe I was being too critical, but when I see small holes along the edges, it makes me wonder what the inside looks like. Even the cabinet grade stuff looked bad, so I'll look some more and then check a yard. I think I know where one is, but I've never been. I miss the Payless that used to be right next to our credit union and is now a charter school. I assume you use 3/4" plywood. Maybe I need to make a truck run to Prescott or something where they might know what a good grade of wood looks like.

Ken M posted:

Go to a lumber dealer & ask for 3\4 plywood 9 ply finished on one side.  I found it a much better grade & not anymore expensive than the box stores.

Ken M

I will try that Ken, I'm just not familiar with lumber yards around here. Everyone has convinced me that a minimum 7-ply 3/4" is the way to go even though Jim Barrett and Mianne say 1/2" will work ok. Of course, Jim uses 16" bracing throughout.

Putnam Division posted:

I used regular issue 5/8" and wish I used cabinet grade stuff....

I had to use extra bracing everywhere.....

Peter

That is one point Jim Barrett made in his series. He uses 1/2" plywood with 16" bracing throughout. He says it's to reduce vibrations, and I believe it is, but I've got to believe that's also why he's able to use 1/2". I see so many layouts with wider spacing, but it seems they all use 7-ply 3/4" plywood.

Dave;

I used the 1/2 in. version of the product mentioned by Moonman. Also got it from Home Depot. The 1/2 in. version was much easier to handle. There are absolutely no voids in the edges and the top/bottom veneers certainly look cabinet grade. They've been down in my basement for 6 months with no warping issues. I topped the plywood with 1/2 in. Homasote, also from HD.

http://www.homedepot.com/p/Col...nel-833185/100020218

Last edited by Apples55

Peter, I just noticed that my spacing (15", 16.5" and 18") is pretty close to Jim Barrett's suggested 16". For some reason I thought it was much wider, I guess because I was concentrating on the 30" width for the modules. How wide was your spacing to begin with and what did you end up with? Have you ever wished you had gone with 3/4" like so many suggest should be used?

I ask because I think the price difference is about $10/sheet. I think I added it up and I'd need about 8 sheets if I rip plywood for the framing and don't use Mianne or buy 1x3s/1x4s. My justification for ripping plywood is that I'd rip off the 30" sections for the module tops and that would leave 18" for ripping into the 3" strips for framing. From what I see, that would leave very little waste and very little piecing together the module tops. Using just 30"x54" sections would result in a lot of plywood left over from each sheet and I'd like to avoid using smaller pieces to cover the benchwork in a piecemeal fashion, fewer joints and all that.

Based on the responses so far it appears that no one has a serious problem with my layout design or the benchwork sizing/configuration. So I'm going to go with the benchwork and contact Mianne. I think the cost of their framing alone is going to be about double what it will cost for those 8 sheets of plywood and maybe something like 1/3rd more, or maybe even less, if I buy 1x4s instead of ripping plywood.

Apples55 posted:

Dave;

I used the 1/2 in. version of the product mentioned by Moonman. Also got it from Home Depot. The 1/2 in. version was much easier to handle. There are absolutely no voids in the edges and the top/bottom veneers certainly look cabinet grade. They've been down in my basement for 6 months with no warping issues. I topped the plywood with 1/2 in. Homasote, also from HD.

http://www.homedepot.com/p/Col...nel-833185/100020218

I will certainly look at that because my preference is to use 1/2" plywood, but I don't intend to add the Homasote. The main reason I'm considering the 3/4" is because I'd need to use that to rip the 3" strips for framing and I honestly didn't realize my spacing was that close to Jim Barrett's.....and he doesn't use Homasote either. I guess I still don't see why so many push the more expensive 3/4" plywood and solid wood 1x4 framing when many others have success using 1/2" and ripped plywood. I assume you used 1x4s for your framing? Poplar?

As you can see, I'm still having a hard time deciding between 1/2" and 3/4" and many of those same questions keep me from deciding between Atlas and ScaleTrax. I want to use 1/2" and ScaleTrax and I think the visit to the hobby shop in Alabama next month will settle the track decision, but so many warn against 1/2" and I still don't know why. I've yet to see anyone refute Jim Barrett's system.

Thinking about it just now though, I really wouldn't have much to lose by buying a sheet of each, ripping the 3/4" to make the framing for a module and covering it with the 1/2" to see what I think. I can always find a use for scrap 1/2" around the house if I don't like the results. I could probably get HD to rip the 3/4" into 3" strips and make the 30" cut on the 1/2" to save myself the headache, especially since I can't get to my tools at the moment. We moved so much into the garage for the tile installation and now my wife wants to paint before we put it all back. If I do this, I could also see if I really want to check with Mianne. Sounds like a plan, doesn't it?

Ken M posted:

I used 24" spacing on my 2x4 that is why I used 3/4 material.  Solid as a rock

Ken M

Thanks, Ken, I appreciate the added feedback. If I were using wider spacing, 3/4" would be a no-brainer. I look at the size of my layout and compare it to the modular systems I've seen at club meets, etc. Those are all built for light weight and they seem to hold up for years. I ask myself why something lightweight and cheaper can't work for me if it works for them.......and Jim Barrett?

Dave, I just picked up some 3/4 birch from HD 2 days ago it's 5 ply but seems very good 39.95 a sheet very smooth finish and cuts well. Splinters are something you must deal with. When cutting, a finer blade saw and some masking tape works great. Drilling is a problem though always seems to "rip" the other side but I'm very happy with it.

E-UNIT-79 posted:

Dave, I just picked up some 3/4 birch from HD 2 days ago it's 5 ply but seems very good 39.95 a sheet very smooth finish and cuts well. Splinters are something you must deal with. When cutting, a finer blade saw and some masking tape works great. Drilling is a problem though always seems to "rip" the other side but I'm very happy with it.

Thanks, I'll look at it too, but 5-ply was what I was disappointed by at Lowe's. It was Maple and Oak though, not Birch. Maybe I was being too critical though based on all the comments I've read about plywood. Either way, I'm convinced that although I like Lowe's for many things and it's closer, when it comes to big box, HD is where I should look for wood.

E-UNIT-79 posted:

for what it's worth heres a pic of the one I cut.

Thanks. Just got back from HD and saw what you're talking about. Bear in mind though that I want to also use it for framing. Anyway, they still do cutting (first 2 cuts free), so as soon as we get most of our house put back together, I'm going to pick up a sheet and have it cut into 3" strips. I'll either pick up a 2nd sheet and have it cut 30" or try the 1/2".

DoubleDAZ posted:

Peter, I just noticed that my spacing (15", 16.5" and 18") is pretty close to Jim Barrett's suggested 16". For some reason I thought it was much wider, I guess because I was concentrating on the 30" width for the modules. How wide was your spacing to begin with and what did you end up with? Have you ever wished you had gone with 3/4" like so many suggest should be used?

I ask because I think the price difference is about $10/sheet. I think I added it up and I'd need about 8 sheets if I rip plywood for the framing and don't use Mianne or buy 1x3s/1x4s. My justification for ripping plywood is that I'd rip off the 30" sections for the module tops and that would leave 18" for ripping into the 3" strips for framing. From what I see, that would leave very little waste and very little piecing together the module tops. Using just 30"x54" sections would result in a lot of plywood left over from each sheet and I'd like to avoid using smaller pieces to cover the benchwork in a piecemeal fashion, fewer joints and all that.

Based on the responses so far it appears that no one has a serious problem with my layout design or the benchwork sizing/configuration. So I'm going to go with the benchwork and contact Mianne. I think the cost of their framing alone is going to be about double what it will cost for those 8 sheets of plywood and maybe something like 1/3rd more, or maybe even less, if I buy 1x4s instead of ripping plywood.

Dave......I'm a carpentry moron....it's whatever Mianne is.....looks like 2x2 squares.IMG_3187IMG_3188IMG_3191IMG_ogr0001IMG_31962011-04-02_20-46-23_5192011-04-02_20-46-23_5192011-04-02_20-46-23_519

Peter

Attachments

Images (8)
  • IMG_3187
  • IMG_3188
  • IMG_3191
  • IMG_ogr0001
  • IMG_3196
  • 2011-04-02_20-46-23_519
  • 2011-04-02_20-46-23_519
  • 2011-04-02_20-46-23_519
E-UNIT-79 posted:

Just remember if you're going to screw through the side you got to pre drill first or it will split.

Yeah, I remember, but thanks for the reminder. Still not convinced this is the way I want to go and after I saw Peter's Mianne setup, I'm even less convinced, Mianne looks so darned good.

Last edited by DoubleDAZ

Peter, thanks for the photos, they answered several questions I had. I also watched the 4x8 assembly video again and got some more answers just from that. I had watched it before, but it was more to see what Mianne was all about before I was actually considering it, so I didn't pay close attention and had forgotten it was on their website.

Your benchwork sure looks nice and as much as I'd like to build my own, I wouldn't mind assembling a kit either, actually looks like fun. I'd still be building it, just not doing all the measuring and cutting.

Like I said, since I haven't gotten any negative feedback regarding the size of my layout, I'm going to mark it out on the floor with tape tomorrow and then contact Mianne to see what they come up with. I did note that I might need to adjust the 46" module because of the extra 1 3/4" needed for the legs. That will also affect the width of the river section, but the river is already flexible. Basically I'd be ordering 2 separate kits, one 54"x156", the other 54"x136", and linking them together.

As I'm composing this, I just happened to think that rather that tape off the benchwork outline, I'm going to tape together some newspaper in the shape of my 30"x54", 30"x46" and 30"x66" modules. That way I'll be able to envision the tabletops that much better. I'll take those in place and then use them with my RealTrax to see how the curves, etc., look. I could be wrong, but I think RealTrax has the same "track" footprint as ScaleTrax, just with the plastic roadbed added.

Anyway, this has been another good discuss and has raised my confidence level a lot.

BTW, my engine hasn't run in over a year. I assume I should oil it before I start running it again?

Well, I've been thinking a lot about benchwork since I last posted. I did send off my layout design to Mianne last weekend, but haven't heard a word back yet. Unfortunately, after looking through Mianne's catalog, I think they're going to come back with an estimate over $1,000 and I don't think I'm willing to pay that much. That said, I'm leaning toward ripping 3/4" plywood into 3" or 3 1/2" strips (not sure the extra 1/2" is needed) and then trying my hand at pocket hole joinery using my Shop Smith rather than glue.

I also worked on some wiring diagrams. The 1st photo shows the basic hardware configuration up to terminal blocks. It shows four Z1000 transformers, but that's only because I currently have a Z1000 that came with my Christmas set. My plan has been to buy a Z4000, but since I really don't need the controller parts, I may opt for 3 more individual transformers to save a few dollars. If the new Lionel PH-180 is ready by the time I need to buy, I would opt for those rather than more Z1000s because they have more power for a similar price. The point is I need 4 power sources. The Z4000 has a slight advantage in that 3 of those are in one case; two 10 amp transformers for the 2 fixed channels and 14v to power the TIU. With it I could still run some engines conventional if the DCS remote failed. Radio Shack no longer sells the 18v-24v adapter Barry mentioned in his book, so I've pretty much decided to just use another transformer to power the TIU. It could also be used as a backup if another transform went out. AFAIK, the Z1000's 5.5 amps is enough to power 3-4 trains, so 1 would be enough for each TIU channel and that would leave my current Z1000 for the switches. I don't plan on any other accessories.

The 2nd photo shows power blocks, isolation points and accessories (switches) for level 1. There is a marker missing for a switch in the upper right. Also, the actual number of power blocks will depend on the final number of joints. I haven't substituted longer straights for the 10" pieces yet, so the actual number of joints will decease and that will affect the number of blocks I need. 

The 3rd photo shows the same for level 2.

The 4th photo shows the power wiring for both levels from the terminal blocks to each power block. Each line represents an equal length pair of common and hot.

I don't have an AIU yet, so I just glanced at it in Barry's book. So far it looks like I would run a wire from the Common on the transformer to the IN on the AIU and daisy-chain the IN connections on the AIU. I'd use bus wiring from the transformer to each switch for Hot and then run individual pairs of 1-2 wires to each switch.

wiring-hardware

wiring 1

wiring 2

wiring-power


Attachments

Images (4)
  • wiring-hardware
  • wiring 1
  • wiring 2
  • wiring-power

After reviewing your wiring layout, you may have too many drops on the lower level from the red TIU channel. On my layout, I experienced significant signal strength degradation when I had too many track sections (wires from a single distribution block) feeding off of one TIU channel. 13 sections may be OK, however I try to keep the maximum number of sections to 8 or 10. You may not have this issue, however if you do, you will only need to run wires from the blue TIU channel to the track sections nearest to the blue distribution block that you currently have on your red channel.

There is no need to have only one TIU channel powering the lower level, it can be 2 channels. If you have problems you can simply add another TIU channel, or just share the extra capacity on the upper level channel with the lower level.

I have 4 channels working on my layout, with about 8-10 drops per channel. When you wire the layout and perform the DCS signal strength test, any signal strength issues will become obvious. If they occur on the bottom level, then simply disconnect some feeder wires and see if the strength improves on the remaining sections. If it does, then simply move some track connections from the red to blue channels.

good luck with your layout build,

Thanks, Joe. I believe Barry says to keep the number of blocks per TIU channel to 12-15, that's why I separated the channels by level. I knew I didn't need to limit the lower level to a single TIU channel, but your concerned is noted and it would be easy enough to do as you suggest if I experience any signal degradation.

FWIW, I'm fiddling with another design of the track for the lower level. I eliminated the hidden siding and turnouts. I then moved the 2 crossovers to the back of the layout and changed them from #5 turnouts to O72's because the #5's would no long fit. I was then able to raise the outer loop 3" in front of where the "river" is with a 3% grade instead of the 4.6% in the last design I posted.

track 1 alt


Attachments

Images (1)
  • track 1 alt

Thanks, Mike. It's slower than I'd like, but slow is my middle name these days. Once I get the benchwork and decking done, I'm still going to live with the bottom level bare until next year. I got my first response back from Mianne and needed to answer some questions and lay out the new plan to let the decking overhang. That will let them design benchwork using a more standard approach and should lower the estimate. I still think it's going to be more than I want to pay, but I'm not going to start building until we get back in April, so I might as well see what they have to say. Any comment on the design with the crossovers moved? I might add some spurs to that version.

Still playing with designs. Here's one with cross-overs moved and the reversing loops removed. I thought this would free up some space for a couple of spurs, but I think the space is just too small. I kind of like not having the reversing loops though. There are still 2 on the upper level, so I can still turn trains.

no rev loops


Attachments

Images (1)
  • no rev loops

Dave,

I had a thought about your "bridge" across the aisle.  Move the upper left switch one curve section counterclockwise.  This should move the point where the track reaches the bottom table away from the table corner.  This ought to make the design of your "bridge" easier.

Jan


There is certainly a lot of good careful planning going in to this project. If I may offer a couple thoughts:

I don't see that the bridge across the aisle really enhances the track plan. It's just a short cut in the outer loop. I suspect you would probably leave the bridge open most of the time for access. The walk-in arrangement is excellent because it gives good access without any duck-unders on the main routes.

It's easy to end up with more trains than will fit on the layout. Consider fitting in a long siding somewhere (hidden, maybe) to park another train. It might be one real long siding around the back that can give "serial staging" for two trains, with just two switches. I get more variety with my layouts just by having different trains available to run, alternately.

Last edited by Ace

Ace, thanks for the comments. The bridge is simply a way for me to run 2 trains on the outer track and be able to have one pass the other. I'm still debating whether or not I'll actually put it in because it might be more trouble than it's worth.  Leaving it out would certainly save some money and be fewer tight turnouts to navigate.

Since I moved the crossovers to the back, I've kind of lost the place where my "river" and other bridges were going. I still want a bridge, but I don't want 4 bridges and I don't want them that close to turnouts, so I'm not sure what to do.

And FWIW, I actually plan to remain outside most of the time while running trains. That may be wishful thinking, but I'm more into watching trains run. I've never been into role-playing, so "operating" a railroad is not for me.

As for storage, I WILL NOT end up with more trains or rolling stock than will fit the layout. I'm not a collector or a spur of the moment buyer. The only exception to this will be the Christmas train passenger cars I have now, I will only be running those during the holidays. I will probably add a spur somewhere to park the Christmas engine and tender, but I haven't decided where yet. I can't go around the back because that's where the grade goes up to a 2nd level that will mimic trainroomgary's shelf design. My earlier designs have a hidden siding around the back, but the crossovers were on either side, not together. The inner track was a loop2loop, but I thought it was all too crowded with so many turnouts close together, so I worked this up to clear some of that clutter.

I like this design better. The original reason for the "river" in the center of the back was because I wasn't sure how all this was going to fit in the room and I was going to custom build that section once I got everything else up. Now I'm considering making it 20" and doing something with the long benchwork along the top to add a dry riverbed and some bridges there instead.

I just noticed I never posted the latest benchwork plan, so I've added a photo of that. As you can see, I'm planning for a ~3" overhang and there is a 78" long section along the top. Dividing that into 3 sections (32-14-32) would give me a 14" section in the middle that I could lower to make room for the riverbed. Or I could make it 32-32-14 and lower the middle 32" section to allow for a diagonal riverbed that might provide more visual interest and stagger the 4 bridges that would be needed.

I don't really like the idea of 4 bridges though and I'm still not sold on connecting the 2 levels either. I like the idea of being able to run all the trains on all the tracks, but the hidden grade could also be more trouble than it's worth.  trainroomgary didn't connect his shelves and that allowed him to raise the 2nd level higher to provide room for more landscaping ideas on the lower level. This latest design was done on a whim and I haven't given it that much thought yet. If I don't connect the levels, I could put my hidden siding back in where the grade would have gone. I was going to hide both tracks so I could have a train go in and another train come out. I still really like that idea, so I might just give up on connecting the levels. I added that when I added/moved the crossovers, so I never considered how much it actually adds. The upper level is still going to be Main Street Bedford Falls, so the passenger train running loop2loop might be all I need. 

tabletop


Attachments

Images (1)
  • tabletop

And here's one with the reversing loops back and some sidings.

EDIT: I redid the earlier version. This one:
- moves the turnouts around the corners.
- uses O36 curves for the hidden siding.
- changes the turnouts for the spurs to O54 shorts.
- changes the curves around the center to O36.
- moves the lower large section 2" to left. 

sidings


Attachments

Images (1)
  • sidings
Last edited by DoubleDAZ

I really like the last version with the loop-to-loop inside the outer dogbone. I would favor stretching the siding out longer across the top if it could fit, to handle a longer train or two shorter trains.

Are you still considering an upper level, maybe to add on later? You were concerned about grades. I have a long 8% grade to connect a flat floor layout with a flat table layout. Point being, a steep grade is OK on a secondary route, and you can have fun with "doubling the hill" as necessary.

100_4160

Attachments

Images (1)
  • 100_4160
Last edited by Ace

Ace, there will be a 2nd level on a shelf and it will be separate unless I can find a way to get up to it. If you look at the photo of Gary's shelf railroad, you can see that the mainlines are on shelves and the reversing loops are open extensions held up by custom supports. This is what I intend to do whether or not I find a way to get up to it. The idea for the upper level is to have track along the back wall fronted by buildings from the Bedford Falls collection Target sold years ago. I'm hoping I can make my shelves "floating" so there will be no brackets to deal with. It will also wrap around so the loops will be above the loops on the lower level.

The problem is I have no idea where I could add another turnout and line going up. The tracks along the top/bottom are only ~3.75" away from the walls as it is, so I don't know how much adjusting I'll need to do as I lay track. I haven't measured the overhang of my 4-6-0 steamer and RealTrax O31 curves yet, but that should tell me what kind of clearance I need. Like I said, they will be 2 RailKing diesels and a RailKing 4-4-0, so I think the 4-6-0 will have the most overhang. One thing I suppose I could do is bite the bullet and use more O36 curves, O31 if I go with ScaleTrax. My engines will all run O31 curves and my trains will normally only be 5-7 cars long. I know it sounds crazy, but my trains and rolling stock will mostly be used every day. That's why there's no yard for storage or changing consists.

I'm open to suggestions, but my main goal is to be able to run at least 3 trains unattended and a 4th that I'd control by crossing from inside to outside and using the hidden siding.

gary


Attachments

Images (1)
  • gary

I started entering this in SCARM and this is how it looks so far. As you can see I elevated some of the lower level track and hid the siding in a tunnel. I also decided not to try connecting the 2 levels. Right now the design calls for the upper level train to go behind a row of buildings, but I haven't decided if I'll change it so the train goes in front of them. Thoughts?

I also reworked this with ScaleTrax and it came out pretty close. Obviously, the O31 curves and reversing loops are tighter, but I think I can live with either version once I make a decision on which brand track to use, Atlas or ScaleTrax.

layout-atlas


Attachments

Images (1)
  • layout-atlas

Dave I knew you were taking a vacation, but I was wondering where you had been on this project.  Now I just saw you started this new topic!!  I just skimmed through it, but I see Ace has suggested taking the aisle crossing bridge out.  Cleaner and easier.  I will have to review this topic before I comment further, but I see it is 1:00 so I will have to sign off and catch up with you later!  

Mark, you'll see I've really made some changes to both the layout and benchwork. After our tile was installed and I was able to tape the outline to the floor, I saw what I was working with and decided to concede defeat trying to connect the 2 levels. Instead, I connected the 2 runs on the lower level, was able to add my hidden siding back and I did take out the bridge across the entryway. It wasn't so much what Ace said, but after I figured out how to connect the 2 runs and the siding, I decided it just didn't add enough after that. With the double-crossover and hidden siding, I'll be able to run 3 trains over all the lower level track and I was to put 4 bridges elsewhere, as you'll see, because I moved my river and modified the benchwork. My source for FlexTrack fell through, so I'll try again at another hobby shop outside of Dallas on the way home in 3 weeks. However, I've pretty much decided to go with the latest design and use Atlas, availability of ScaleTrax is just too iffy.

I've also decided that I will add a loop2loop as a separate shelf layout next year and might use ScaleTrax for that if it's available when I'm ready. As you'll see, the concentric loops using O36/O45 look so much better than my other designs kludging O31/O54. I look forward to reading your comments when you catch up.


DoubleDAZ posted:

... I've really made some changes ... decided to concede defeat trying to connect the 2 levels ... I did take out the bridge across the entryway ... I've also decided that I will add a loop2loop as a separate shelf layout next year ... concentric loops using O36/O45 look so much better than my other designs kludging O31/O54 ... 

Dave, I gather that the upper level is scenically detached from the lower level because of limited table width. So the upper level needs adequate vertical separation for access to the lower level, which makes it more difficult to connect the different levels with a modest grade of manageable length. My thoughts are that the upper level reverse loops overshadow large parts of the lower level and limit your scenery options there. And the upper level is basically a one-train show with little variety of operation.

I like the general size and arrangement of the lower level. You have a good space to work with. Personally, I would want more yard and storage tracks for different trains that can be run alternately.

FWIW, some general thoughts and ideas about what I might do with that space myself :

* Build the basic plan to start on the main level, with allowance for future additions or modifications which can evolve over time within the same footprint.


* Plan places to add additional yard and layover tracks, which need not all be built right away. (trains tend to multiply, it seems). Extra-long sidings or reverse loops can provide "serial staging" with fewer switches required. Alternate routes can provide additional operational variety and double as layover tracks. Hidden layover tracks on a lower level won't crowd space on the main levels.


* Maybe use much tighter curves on the upper level loop-to-loop arrangement (O31 or O36), so the reverse loops don't overhang the lower level as much, and run smaller trains up there.

* Or, eliminate one or both upper level reverse loops, use the upper level for a long double-ended yard which provides train layover and display space, and connect to the lower level with a single track "mountain grade" which provides some operating challenge. The upper level should be within reasonable reach from the aisle, and narrow enough to not overshadow the lower level too much.

* Allow space for buildings and scenery. Avoid "implausible scenery" such as excessive numbers of tunnel portals, overly abrupt cliffs and ridges, long bridges on skewed angles, etc.

Don't be in a hurry to build "permanent" scenery until you've operated your core trackage for a while, and taken more time to figure what track additions will enhance basic operations. Rome wasn't built in a day!

These ideas reflect my own interests of mainline operation of different trains with minimum switching.

And try not to get overwhelmed with too much input from the forum!

Last edited by Ace
Kunde posted:

I like your plan.  Here is my track plan.

I like yours too. I assume that's 16x16 and I just don't have that much space, so I have to minimize the things I'm not that interest in, that means limited spurs. All buildings will be static stuff from "It's A Wonderful Life". It's a display layout for my wife with some tracks for me.

Ace posted:
DoubleDAZ posted:

... I've really made some changes ... decided to concede defeat trying to connect the 2 levels ... I did take out the bridge across the entryway ... I've also decided that I will add a loop2loop as a separate shelf layout next year ... concentric loops using O36/O45 look so much better than my other designs kludging O31/O54 ... 

Dave, I gather that the upper level is scenically detached from the lower level because of limited table width. So the upper level needs adequate vertical separation for access to the lower level, which makes it more difficult to connect the different levels with a modest grade of manageable length. My thoughts are that the upper level reverse loops overshadow large parts of the lower level and limit your scenery options there. And the upper level is basically a one-train show with little variety of operation.
Yes, they are completely separate, but both will have buildings from our "It's a Wonderful Life" collection. The vertical separation is 14" on the drawing, but that may change. The top level will start out as a display shelf and the layout part will be added next year or so. The upper level is primarily a year-round Christmas display for the lighted buildings with a train. I understand the elevated tracks will block some of the lower view, but that's just the way it has to be, at least until I build the lower level and do some testing. It's fashioned after trainroomgary's shelf layouts. 

I like the general size and arrangement of the lower level. You have a good space to work with. Personally, I would want more yard and storage tracks for different trains that can be run alternately.
I completely understand and if I had more room or a greater desire to "operate" a railroad, I would too. As it is, my enjoyment comes from running trains through the routes for a bit now and then.

FWIW, some general thoughts and ideas about what I might do with that space myself :

* Build the basic plan to start on the main level, with allowance for future additions or modifications which can evolve over time within the same footprint.
I've drafted so many plans, I'm out of ideas.

* Plan places to add additional yard and layover tracks, which need not all be built right away. (trains tend to multiply, it seems). Extra-long sidings or reverse loops can provide "serial staging" with fewer switches required. Alternate routes can provide additional operational variety and double as layover tracks. Hidden layover tracks on a lower level won't crowd space on the main levels.
There will NOT be more that 4 engines or more rolling stock than will fit on the layout as designed. I am not a collector nor am I an impulse buyer because something new comes out. I just want to run 3-4 trains for 30 minutes or so a few times a week and that's it.

* Maybe use much tighter curves on the upper level loop-to-loop arrangement (O31 or O36), so the reverse loops don't overhang the lower level as much, and run smaller trains up there.
The loops are already O36 with O45 in the corners to provide space for buildings. I haven't decided yet how far out the loops will actually come and will be on some kind of see-thru roadbed. All trains will routinely have only 4-5 cars plus engine (and tender). I've seen plenty of multi-level layouts here that are crammed with stuff blocking views. Again, I'll play with that after the lower level is done and then decide. I haven't even decided how high the lower level will be until I build the sections and then play with the length of the legs. I'm actually think about legs that can be raised and lowered.

* Or, eliminate one or both upper level reverse loops, use the upper level for a long double-ended yard which provides train layover and display space, and connect to the lower level with a single track "mountain grade" which provides some operating challenge. The upper level should be within reasonable reach from the aisle, and narrow enough to not overshadow the lower level too much.
While I would like to connect the upper and lower levels, it simply doesn't meet my goals. I already have a design that connects them levels, but it forces me to take out too much of what I want on the lower level and it's just not worth it to me. Again, this is not an "operation" layout. I hear what you're saying, it's just not for me in this small space. When I thought I was going to have to whole room, I had a logging operation theme between Flagstaff and Phoenix, but that doesn't interest me in the space I'm left with and I'm left with a display layout.

* Allow space for buildings and scenery. Avoid "implausible scenery" such as excessive numbers of tunnel portals, overly abrupt cliffs and ridges, long bridges on skewed angles, etc.
Truth be told I have no idea when I'll add landscaping. There are going to be the 4 tunnel portals for the hidden siding and that's it. If I don't do anything more that set some Bedford Falls buildings around the lower level, I'll still be happy with it. For me it's not unlike building a permanent Christmas display layout.

Don't be in a hurry to build "permanent" scenery until you've operated your core trackage for a while, and taken more time to figure what track additions will enhance basic operations. Rome wasn't built in a day!
I do plan to live with just the track minimally tacked in place for quite awhile, though not to find things to enhance "operations". My idea of operation is turning on the power and running trains. The only switching I'll do is to switch from outside to inside and the play with the hidden siding when I have visitors. Interesting for most of you? Probably not, but good enough for me for now. In a way, I look at the layout as a track for slots cars, just going in loops until I get tired. It's like watching a TV show simply as a guilty pleasure, nothing more. And I'll be the first to say you told me so if I find out it's not enough. Though, I will say that right now we travel a lot and if that changes, I'll need something to fill more of my time. That's when I might get interested in operation.

These ideas reflect my own interests of mainline operation of different trains with minimum switching.
I get it and I'm saving your comments in case I find out I do want more and decide to scrap this at some point. I just don't have to time to devote to operating a model railroad as opposed to watching some trains go round and round for a bit while I read a book or watch TV, etc.

And try not to get overwhelmed with too much input from the forum!
Too late for that. Trying to decipher things has been hard, especially when it comes to figuring out what's NEEDED and what people just plain PREFER. Professional builders tend to overbuild benchwork and electronics so their customers don't have problems. There's nothing wrong with that, but as Jim Barrett has shown, not every layout has to be built to withstand an earthquake or use overly expensive wood, etc.

With that in mind, I'm not sure how things are going to fit. The only thing I am sure of is the benchwork layout. No matter what I end up doing, it will have to fit in that footprint. I'm already a little disillusioned by how little space that really is when laid out with tape.  Just laying down the 6'x10' RealTrax oval I have was a shock and I almost decided to scrub the whole thing. We shall see. No matter what happens, it'll be a learning experience and I'll have fun.


Finally found a hobby shop along a route we can take home from Georgia in 2 weeks who says they have ScaleTrax, including FlexTrack, in stock for me to take a look at. So, come April 11, I should finally be able to buy an oval of ScaleTrax and some FlexTrack to play with when I get back to Phoenix. Then I'll be able to finalize what brand of track I'm going to use. I may even go ahead and buy enough for my loop-2-loop shelf layout even though I don't plan to build that just yet. Either way, I'll be glad to get this decision behind me and get on with the build.

Ace, as soon as I get back and get a couple of doctor appointments out of the way, construction on the benchwork modules will begin. I have a few other things to do at the same time and it's starting to get warm in Phoenix, so don't expect a lot of progress in a short time. I'll be building the modules in the garage and then bolting them together in the train room.

I also just found out that Ross doesn't make O36 switches, so I'll need to see if I can make O42s work in a few places if I decide to go with ScaleTrax. I may use Atlas on the main layout and ScaleTrax on the shelf layout by simply changing the shelf to use O31 switches. And depending on how much space I have on the shelf, the loop-2-loop might turn into a dogbone with no switches so I can run 2 trains up there and have them pass each other coming and going. I've got some cardboard to cut out so I can see how wide I can make the shelf and still see the main layout below.

I did make a bit of a faux pas when I answered one of your earlier questions. I said I wasn't sure how far out the upper loops would come, but they have to come out as far as the layout below for the supports and so they don't interfere with the center operation area.

I will certainly post my impressions of the track though as soon as I get home. The hobby shop has an in-store layout with both Atlas and ScaleTrax, so I should be able to get quite a bit of information and a good side-by-side comparison. Hopefully they'll let me take photos. It's a little out of our way and I don't relish going through Dallas, but we all have to make sacrifices, right?

DoubleDAZ posted:

Thanks, Mike. I look forward to making some, but I don't want to raise expectations. I'm a novice at this, so I plan to take my time and I'll be trying different techniques that I may or may not be able to get to work the way I want. But that's where the fun is, right?

Dave,

Lets remember I to am a novice .  I try different ideas, techniques, materials all the time. Our layout plan is from the atlas o scale book, because I didn't know about scram until you told me about it. That in itself has opened new ideas.  So I agree that is where the fun is , I also have a 12 yr old son with crazy ideas and I say that can't be done, then he says why not? 

Mike

Add Reply

Post
The Track Planning and Layout Design Forum is sponsored by

AN OGR FORUM CHARTER SPONSOR

OGR Publishing, Inc., 1310 Eastside Centre Ct, Suite 6, Mountain Home, AR 72653
800-980-OGRR (6477)
www.ogaugerr.com

×
×
×
×
Link copied to your clipboard.
×
×