Hi

Going to build a layout table but looking for suggestions on how to build it. Considering 8 x 18 layout in the garage. 

Is it advisable to build several 4 x 8 tables  connected or one large table?  Considering several tables  just because it is easier to build and handle when working alone. 

Is 1/2 inch or 3/4 inch plywood recommended for the top?

Should frame and legs be made from 2x 4s or is 2x3 lumber sufficent  for support?

Should foam board be applied on top of plywood to deaden sound? If so, is one inch thick  pink insulation board sold by Owens a good choice?  They cost about $18 for a 4 x 8 sheet. 

Any ideas on the height table should be  for an adult of average height to view? 

Any suggestions  would be greatly appreciated. 

Original Post

Replies sorted oldest to newest

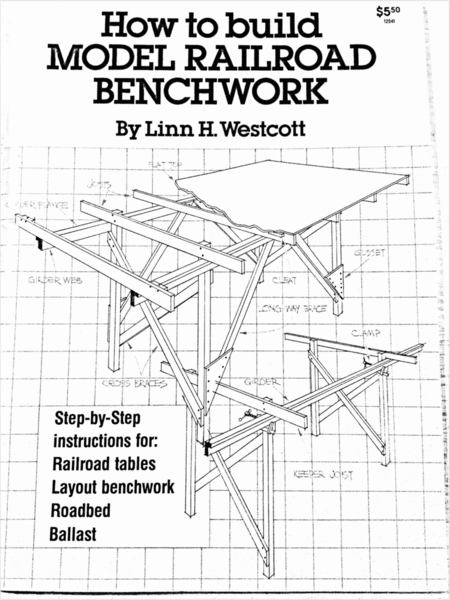
There will be many opinions with solutions to your questions.  I say, beg, borrow or steal(or buy) this book.  A great way to build safe, strong, benchwork, plus many other tips and techniques.  Using mostly 1” x 3” and 1” x 2” dimensional lumber.   There will many options put forward on decking also.  YMMV.

E2565520-AF0C-4A58-BB1D-7E8F5165A439

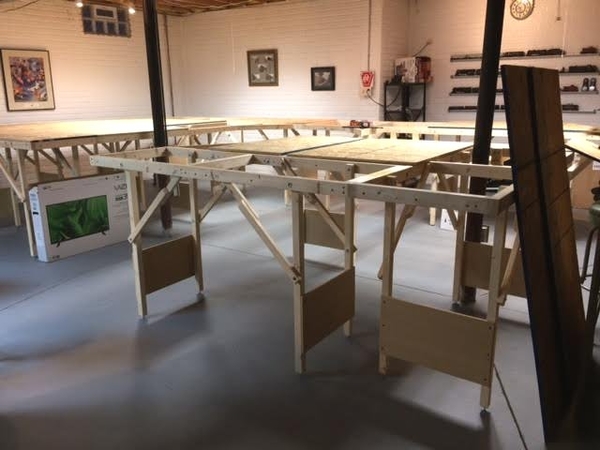
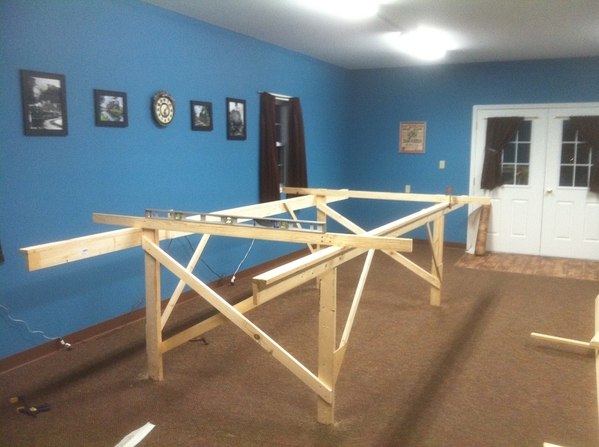
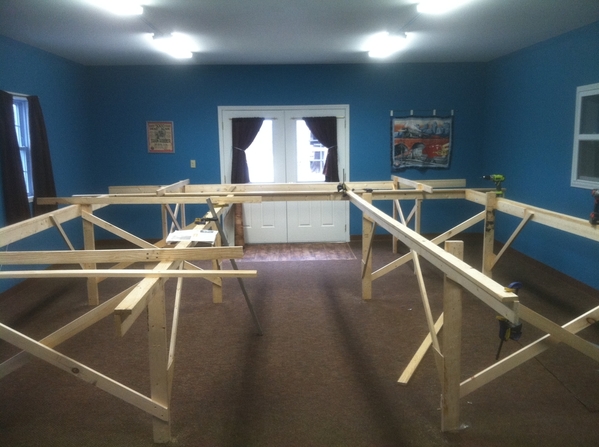
Here are real life photos of forum member JohnH’s layout build from 2015.

EC86038A-B3C5-48CC-876E-06C800F2736C

E6D6D238-76D3-4669-A55E-8407BC01F67A

E4F3B4CE-B6A6-4E3F-B0CF-CAAA58C48F60

01DF2B7F-B17E-49C1-AF26-484DB6E1FA65


Attachments

Images (5)
  • E2565520-AF0C-4A58-BB1D-7E8F5165A439
  • EC86038A-B3C5-48CC-876E-06C800F2736C
  • E6D6D238-76D3-4669-A55E-8407BC01F67A
  • E4F3B4CE-B6A6-4E3F-B0CF-CAAA58C48F60
  • 01DF2B7F-B17E-49C1-AF26-484DB6E1FA65
Last edited by TedW

Being a carpenter, I will always opt for the build it yourself mode.  The information Ted provided is the way I would do it.  "L" girder and "L" leg construction is the optimal method by far, in my opinion.

 1" x 4" lumber is much more stable and easier to work with than 2" x 4"s .

3/4" plywood or OSB for the table top would help in quieting some of the sound.  The thicker material is less likely to vibrate.

Use screws and glue where necessary to make the "L" girders and legs.  Remember, an "L" leg is actually more stable that a 2" x 4" leg and is lighter.  

To give an example of the use of lighter material when building something; metal studs with drywall attached to both sides is as stiff as a wood stud wall.  The advantage of metal studs is they're light weight and will not warp or twist.  Hence my point, mentioned earlier about 1 Xs as opposed to 2 Xs.  

-1 on the Westcott book. I guess one of my pet peeves with L girder construction is that it involves the use of 1x2's. I also don't like the extra thickness that it creates by stacking 1x4's on top of the girder or all of the leg angle bracing required. That makes working under the layout more difficult and storage of boxes less efficient too.

My guess is that you won't always have your layout in the garage. I would recommend that you just build simple frame style benchwork with plywood tops. It's a lot easier to disassemble when the time comes.

Made mine look like a 2x8  workbench.  2x4 and 1x4 lumber, open grid, plywood under track only, blue foam under everything else.  blue foam does not help with track noise. two shelfs under each bench. Legs where 8 foot 2x4 cut in half with a T nut and carriage bolt under each leg, 2x4 also used for the long sides of bench, 1x4 in L shape for cross members, so I could remove entire track sections if I needed too, wood screws from bottom up. The original benches are on there fourth layout and second basement. Foam under scenery is loose or lightly attached, I can move a whole section out to the garage and make the mess out there. then move the whole painted mountain back in. The town as heavy buildings so it is on plywood. I used 1/2 plywood not that stuff made out of chips or saw dust. Next time I will use a high quality 3/4" plywood. Homasote glued to plywood under tracks only.  

Just the way I did it.    Mine is a free standing island layout.  Around the room attached to wall can use less material and 1x4 framing.  I did move mine in the basement one time for expansion, opened it in half, then a bunch of guys came over and we pushed 36 feet of it, in one chunk to new location two feet away. just removed the trains.             This works for me.  Every layout is different. 

Clem

Last edited by clem k

Regarding the height of your layout:

The most important consideration here is how far you have to reach. You are proposing an 8 foot wide layout. That means a four-foot reach, assuming you have access to both sides. The only way to reach something four feet away is to lean your body out over the layout, so it needs to be no more than waist high--lower, unless you're svelte, and don't have to worry about your belly crushing something when you lean over it! Of course, if you lean more than half your body out there, you'll likely fall right onto your trains - so you will probably end up just crawling around on it when you need to reach the center. That means making it low enough to get on top of, and your benchwork stiff enough to support at your weight.

The trouble (aside from danger to your knees and your scenery) is that most people think their trains look better and more "real" the closer they are to eye level. If you can access the center of the layout in some other way -- an aisle down the middle, or an access hatch -- then you can make it taller because you won't have so far to reach. As an example, I am six feet tall, and my layout is 50" high. At this height, I can reach my arm out over the trains without it hitting anything, and still have a useful reach (i.e., not merely touching something, but being able to put my hand around it) of 30", and a little more if I stand on tip-toes. For things I still cannot reach, I have access hatches. Since the layout is pretty high, getting under it to use the hatches, while not exactly a joy, is not nearly as bad as it would be on a lower layout.

I built mine with 2x4s.  Used 2x3 for angle bracing.   1/2 plywood top.  Most of it has been put together and then taken apart twice.  I use decking screws and pre-drill all hole with a 1/8 bit.  Its a bit overkill but its as cheap or cheaper then anything else if you are building a flat layout or off of the flat deck of the table.  Some folks say that they can stand on their layout.   I've had 3 grown men on one section of mine!  Just added a 3x8 table to mine. Cut all the lumber and put it together in about 30 minutes.  6 legs but no angle bracing. 

Jim

I've seen a number of comments here that I disagree with already.

Glue, not for benchwork. I have been able to recycle some of my lumber multiple times over a 30 year period because I don't glue it. That saves money and time in the long run. If you just assemble it with simple drywall screws, that's plenty, especially when you get the top screwed down. Yes, drywall screws are brittle, but they are still pretty hard to break, though it does happen, most commonly by torquing the head off. Every once in a while it's necessary to snap one off when remodeling, so it can work both ways. Not a big deal.

Angle bracing really isn't necessary, if you can anchor your benchwork to a wall. Angle braces are only to prevent lateral movement. The more points you can anchor, the less you'll need, and they don't need to be huge like in the photos above. About 12" is enough if you even need any. The point is to keep the leg vertical. Just a couple over a 24' run is more than enough.

Lumber: I use 1x4's for all my framing, and 2x4's for legs. Open frame style is really easy to build. For a 4x8 you don't even need to cut the long rails. The end rails and all the intermediate supports are cut to 46-1/2". It doesn't get much easier. I put the intermediate supports every 24". When you join two of these frames, you will end up with a double 1x4 but it isn't really that big of an expense. For decking, I use 3/4" BC plywood. I'm not a fan of OSB for decking, nor do I like thinner material.

Height and reach: One thing that people often overlook when choosing a layout height is the ability to comfortably do work under it. Personally, I find 42"to be a nice height, that's to the top of the deck, because you have 4-1/4" benchwork thickness, which leaves you 37-3/4" clear. I'm 6'-1", and I find this height comfortable, no hunching end minimal reaching overhead. So how does all that translate to working up top? You may need a small step stool at this height to get maximum reach, when working. Generally, 3' is best as a maximum, though 4' is possible. Whe you use the construction methods I've described, you'll have no problem walking on your benchwork. One thing I would try to avoid at all costs, is placing track beyond your ability to reach. Scenery is less critical, but you still have to get up there to do it, unless you create access hatches or holes.

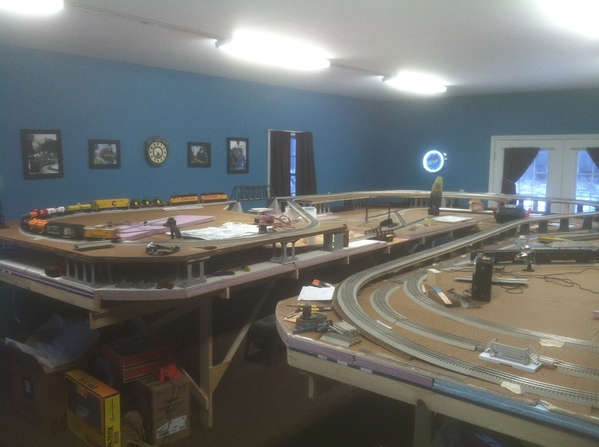
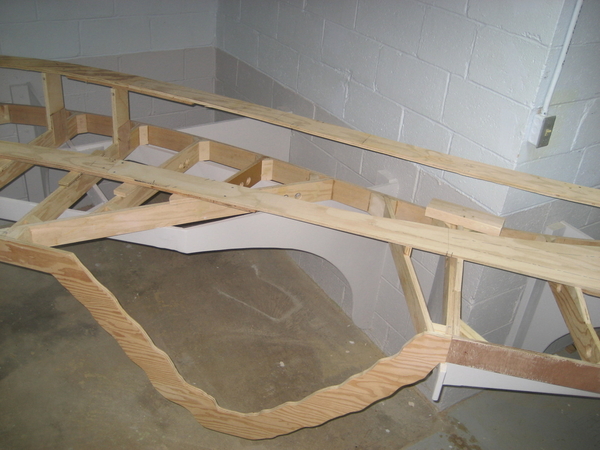
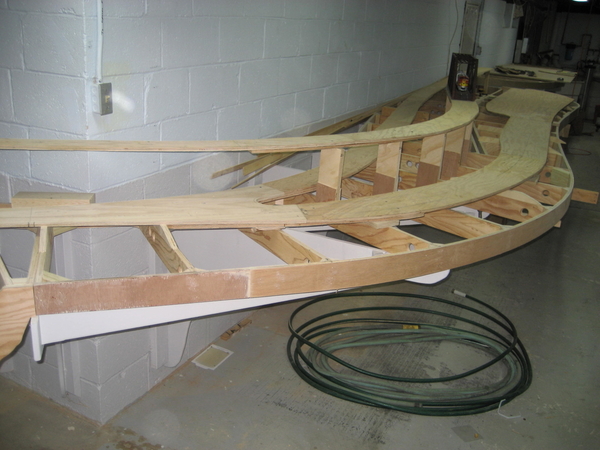
I had to go use the "way back machine" to dig up pictures of my benchwork. Here you can see down to the concrete floor. My layout design includes a 12" raised platform in the aisles, which helps the reach situation. This is not a technique for most people, but it works great for my multi deck layout.

IMG_7366

None of this would be possible L girder. There are sections that use a variation of the frame style. The upper deck uses a cantilever design with 2x4 posts to carry the load, and long intermediate cross supports, with simple rails along both front edges.

train room - chicago 2012 2012-12-31 002

This is the foundation frame for an 8' diameter helix. Again, L girder wouldn't cut it here, because I still have crawl under 19-3/4" to get inside, and I need all of it.

2013-02-20 001 2013-02-20 007

This is an interesting section, because the supports don't go all the way to the floor, since there is a yard under there. There's a beam down the center of the yard, and the cross members of the main level rest on it. Again this design isn't something that most people would use, but it does show the versatility of frame style benchwork.

IMG_1171


Attachments

Images (4)
  • IMG_7366
  • train room - chicago 2012 2012-12-31 002
  • 2013-02-20 001 2013-02-20 007
  • IMG_1171
Big_Boy_4005 posted:

I've seen a number of comments here that I disagree with already.

Glue, not for benchwork. I have been able to recycle some of my lumber multiple times over a 30 year period because I don't glue it. That saves money and time in the long run. If you just assemble it with simple drywall screws, that's plenty, especially when you get the top screwed down. Yes, drywall screws are brittle, but they are still pretty hard to break, though it does happen, most commonly by torquing the head off. Every once in a while it's necessary to snap one off when remodeling, so it can work both ways. Not a big deal.

Angle bracing really isn't necessary, if you can anchor your benchwork to a wall. Angle braces are only to prevent lateral movement. The more points you can anchor, the less you'll need, and they don't need to be huge like in the photos above. About 12" is enough if you even need any. The point is to keep the leg vertical. Just a couple over a 24' run is more than enough.

Lumber: I use 1x4's for all my framing, and 2x4's for legs. Open frame style is really easy to build. For a 4x8 you don't even need to cut the long rails. The end rails and all the intermediate supports are cut to 46-1/2". It doesn't get much easier. I put the intermediate supports every 24". When you join two of these frames, you will end up with a double 1x4 but it isn't really that big of an expense. For decking, I use 3/4" BC plywood. I'm not a fan of OSB for decking, nor do I like thinner material.

Height and reach: One thing that people often overlook when choosing a layout height is the ability to comfortably do work under it. Personally, I find 42"to be a nice height, that's to the top of the deck, because you have 4-1/4" benchwork thickness, which leaves you 37-3/4" clear. I'm 6'-1", and I find this height comfortable, no hunching end minimal reaching overhead. So how does all that translate to working up top? You may need a small step stool at this height to get maximum reach, when working. Generally, 3' is best as a maximum, though 4' is possible. Whe you use the construction methods I've described, you'll have no problem walking on your benchwork. One thing I would try to avoid at all costs, is placing track beyond your ability to reach. Scenery is less critical, but you still have to get up there to do it, unless you create access hatches or holes.

I had to go use the "way back machine" to dig up pictures of my benchwork. Here you can see down to the concrete floor. My layout design includes a 12" raised platform in the aisles, which helps the reach situation. This is not a technique for most people, but it works great for my multi deck layout.

IMG_7366

None of this would be possible L girder. There are sections that use a variation of the frame style. The upper deck uses a cantilever design with 2x4 posts to carry the load, and long intermediate cross supports, with simple rails along both front edges.

train room - chicago 2012 2012-12-31 002

This is the foundation frame for an 8' diameter helix. Again, L girder wouldn't cut it here, because I still have crawl under 19-3/4" to get inside, and I need all of it.

2013-02-20 001 2013-02-20 007

This is an interesting section, because the supports don't go all the way to the floor, since there is a yard under there. There's a beam down the center of the yard, and the cross members of the main level rest on it. Again this design isn't something that most people would use, but it does show the versatility of frame style benchwork.

IMG_1171


Right on!  No glue and surely no drywall screws.   Maybe for screwing down the top.  I use grip right decking screws.   For me a flat top is fine.  Which is just personal preference.   Using 2x4s all the way cuts down the thickness of the table top also.  What is the widest area on your layout Elliot?   Mine has a 13 foot section that is 4ft.   Wife demanded that I leave it that way lol   

Jim

clem k posted:

NICKAIX..... each table is 2' wide 8' long, 48" tall legs. Plywood length cut in half, 2x4 length cut in half.

I think I corrected my post by inserting the word lumber.

Clem

Clem, sorry! I didn't mean for you to think I was replying to you! OP had said he was thinking about an 8 x 18 layout "table", and had asked, among other things, what height would be good.

John D. posted:

@Big_Boy_4005, if I'm understanding correctly, you use 1x4s on a 24" centers no more than 4 foot long and a 3/4 plywood top?  And you climb up on that?  

You used a lot of lumber (I've been following along).  Any issues with warped lumber or did you spend hours finding straight 1x4s?

Yup John, all 350 pounds of me, no problem. A 1x4 is really quite strong, especially when you apply a 3/4" deck. It is anchored to the wall wherever possible.

The lumber quality has been OK, I used to pick through the pile a little at Menards, and leave the worst ones behind. I was more concerned with knots, because large loose ones start to diminish the structural integrity. When I was doing benchwork, I always chose the best of what I bought to be the long rails. Once you start cutting them into shorter pieces, most crowning is negated. Because I needed pieces of all sizes, I was able to do strategic cutting on the worst ones I brought home. Some of the cantilever sections, I deliberately used crowned pieces, with the crown down, so that when they were under load, they would straighten a little. I didn't really waste much of what I brought home.

Any twisted pieces were easily straightened once they were assembled. I even made a tool of sorts to get twists into position to be screwed in place. A little persuasion with leverage does the trick.

I have recently completed the benchwork for a medium size layout compared to club layouts but large for me.

I wanted it to be strong enough to support my 250 lbs plus be able to operate standing or sitting for my 5'8" height.  Dont ask about my pants sizes!

I found 43" to be the optimum height to get uder and still operate standing and sitting.

I chose 2x4 construction for simplicity and strength and 1/2 plywood for the top.  I previously had added 2"foam but it was a hassle using long screws to connect the track through the 2"foam.  I used cork instead of the foam track bed because it was more consistent when I screwed it down.  I used Gargraves track and Ross switches.

Cutting and lifting the plywood is a nice way to make the grades for the upper level.

I like torx star bit screws even though they cost a little more.

I tried to make it easily accessible and on the part that is wide, just scenery and no track in the middle.

I was going to down load a few pictures but here are links to the entire tear down of old layout and rebuild of new.  If you care to look.

https://photos.app.goo.gl/dZeNuvSGZtj2ooSw9

https://photos.app.goo.gl/kap6Y1U62uHkMRJFA


Have  fun,


Mike


Many good variations on this post.

After  having experienced a move and having built a lot of Free-Mo modules I chose to approach my present RR a tad different.

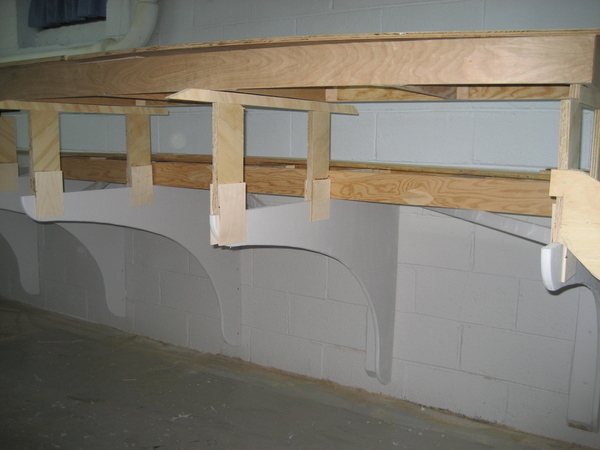
My RR  has only a few legs.  I mounted knees on a block wall and set module frames on the knees. 

unpretty construction photos Feb 11 001unpretty construction photos Feb 11 004

Next, a series of progress photos from above pic.   The module for the yard top right of above photo was flipped to allow for an aisle behind the yard.   Then, as extra track was planned to be added there would be a need for a passenger station and freight station foot print so Eminent Domaine was exercised by splicing in 1/2" plywood into the Homosote veneer.  The freight foot print had to be enlarged again with a deeper and longer base.   There is a series of bump out growths all over the layout due in part to the napkin based wet thump drafting department.  I initially had installed 110 outlets at the base of the fascia all around the layout but with all the bump out expansions many of them are now several inches behind the fascia. 

IMG_7122IMG_7575IMG_7691

Since this photo another TT was added to the guitar module to spin the yard goats. To gain perspective the distance from the line of clamps near bottom to the red pad of the Topside Creeper at top right is 40'.

unpretty construction photos Feb 11 006

The modules are units glued together and bolted to adjacent modules so portability is kind of in mind.  More for my executor than me.  My next move will be in a hearse.

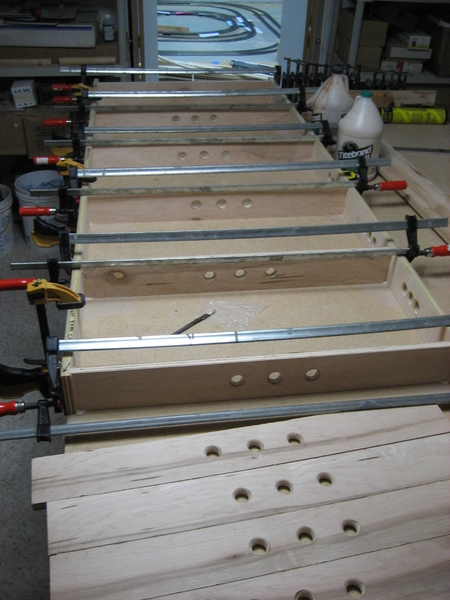
My frames, some of which were in my last layout were all glued and clamped together in approx. 3' X 6' to 8' lengths.  No screws.   I set them on the knees like a Domino game.  I  had to shuffle some of them to fit the new digs.  Actually turned some upside down to fit in a aisle.

Personally I find using all plywood construction to be more stable than dimensional lumber and revenue neutral.  I get thirteen 3.5" X 8' X 3/4" boards from an 4x8 of shop Birch.

I uses Titebond III for close surfaces and Loctite's premium urethane for irregular glued surfaces.

IMG_7814

A fellow 0 scaler who was transporting one of these modules at highway speeds had it fall out of his PU bed at 55 mph and it only got scratches.  We also did some destructive testing;  the glued joints did not fail but the plywood fractured.

Inital glue and clamping of right rear module 005

I used to use Titebond III by the gallon.


Attachments

Images (8)
  • unpretty construction photos Feb 11 001
  • unpretty construction photos Feb 11 004
  • unpretty construction photos Feb 11 006
  • IMG_7814
  • Inital glue and clamping of right rear module 005
  • IMG_7122
  • IMG_7575
  • IMG_7691
Last edited by Tom Tee

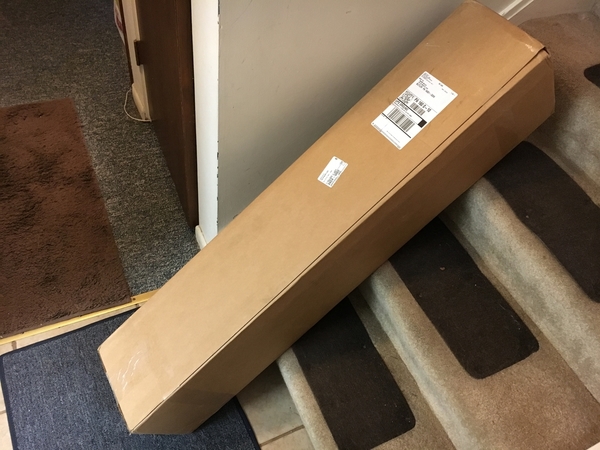
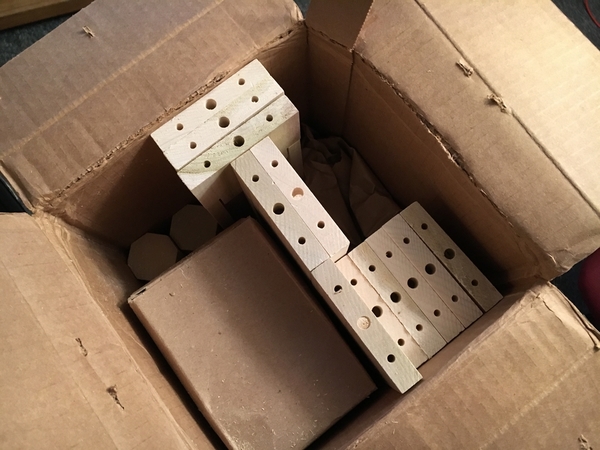
I have build layouts using the Lynn Westcott L-girder method like Ted showed.  I have also used an open grid like Mike did on his Google pictures links. Also, I have also built shelves on brackets like Tom showed.  They are all good methods, and probably each comes into it's own in certain situations.  None of my layouts were nearly as extensive as any of theirs.  I am building a walk around layout, and there will be no need to climb up on it, even thought I only weight 170.  I am not even close to being a carpenter and only have basic tools.  At this point in life (62) I would have no use for advanced power tools other than for building the layout.  So, I am going to try the commercial route.  I selected Mianne benchwork and received my first kit a week ago.  It really goes together quickly,.  My needs fit into their assortment of kits.  You have to order a custom build for odd shaped layouts.

2019-01-19 15.20.572019-01-19 15.26.102019-01-19 15.40.162019-01-19 20.10.542019-01-25 10.19.36

Yes, I have some stuff to move first, but I wanted to see how it goes.

Attachments

Images (5)
  • 2019-01-19 15.20.57
  • 2019-01-19 15.26.10
  • 2019-01-19 15.40.16
  • 2019-01-19 20.10.54
  • 2019-01-25 10.19.36

Thank you Elliot, but my secret is caulk, with 2 1/2" cut off the nipple.   Besides, my progress is so slow my benchwork may be visible for years.  Plus once the trains started to roll dust gathers on the stash of scenery supplies.

Mark, I did not notice at first, was that a Mianne pup?  Looks like the same color as the benchwork.

Last edited by Tom Tee

OK Tom, so you've confessed to bit of a cheat, but there's no getting around your beautiful flowing design. You are a master of curves, and that's pretty rare in this hobby. I can do curves, but not like you. Beside, you need your benchwork to be visible for years, it's too beautiful to cover.

It took about 5 years to go from this...

IMG_1171

to this.

fullsizeoutput_1804

Attachments

Images (2)
  • IMG_1171
  • fullsizeoutput_1804

Elliot,  Thank you or the kind words.  You and I are working different themes.

As a builder of mainlines your prototype usually projects a straight line from point A to point B and runs with it. 

My effort is branch line where low speed tracks weave around expensive obstacles seeking to touch base with RR dependant industries.  

Working in wood boat construction over the years we really never had much to do in the way of straight lines.  So it was only natural to bend, flex and steam my modules. 

Last edited by Tom Tee
yanksali posted:

Hi

Going to build a layout table but looking for suggestions on how to build it. Considering 8 x 18 layout in the garage. 

Is it advisable to build several 4 x 8 tables  connected or one large table?  Considering several tables  just because it is easier to build and handle when working alone. 

Is 1/2 inch or 3/4 inch plywood recommended for the top?

Should frame and legs be made from 2x 4s or is 2x3 lumber sufficent  for support?

Should foam board be applied on top of plywood to deaden sound? If so, is one inch thick  pink insulation board sold by Owens a good choice?  They cost about $18 for a 4 x 8 sheet. 

Any ideas on the height table should be  for an adult of average height to view? 

Any suggestions  would be greatly appreciated. 

As a relative newcomer to O-gauge, I wanted to get my trains up from the floor of my basement and on to a table.  I just wanted a fairly light-weight table to set up some track and run some trains.  Maybe throw a light amount of scenery on it in the future, but still somewhat of a temporary table top layout for the time being.  Nothing mind-bending for a track plan, just a couple of connected ovals, one inside the other, with reverse loops on the inner oval.

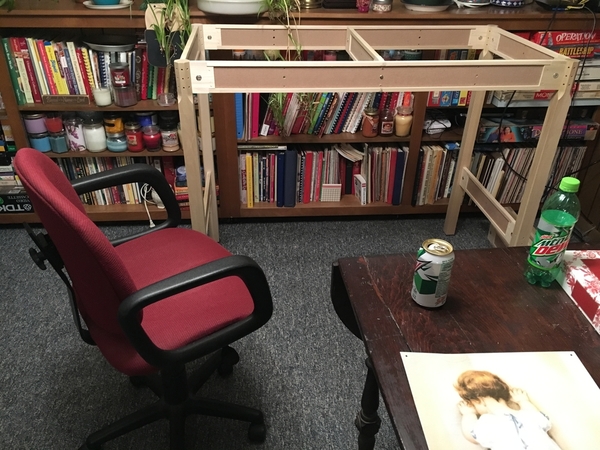
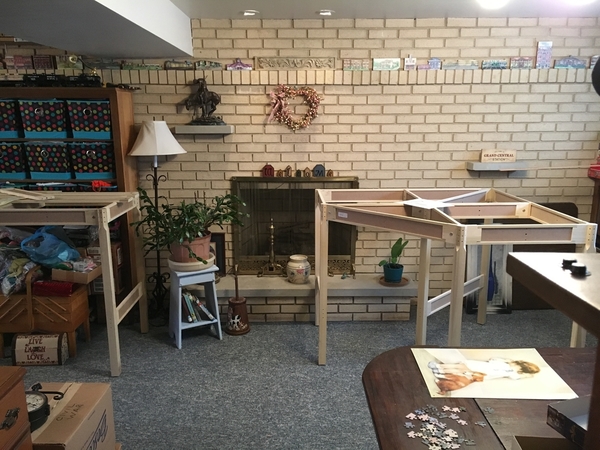
I ended up building two completely independent table frames.  Each a nominal 6' x 8', then bolting them together to form a larger table measuring 6' x 16'.  Each frame has 4 legs, made of 2 x 2? treated deck spindles (actual size 1-5/16" square).  I covered them with 1/2" plywood (4 sheets of 4' x 8's cut down to 4' x 6').  Since I needed the tables to be easily movable due to the somewhat cramped room available, I added a swivel caster to the bottom of each leg.  Each leg also has a diagonal brace in two directions.  Braces made of 1/2" nominal diameter plastic PVC pipe.  Usually I use 1/2" dia. metal conduit for diagonal braces, but I just so happened to have some PVC laying around.  Each 10' length of pipe yields 3 braces at 3'-4" long.  I made the top of the tables at 40" above floor height (personal preference, yours may vary).

EACH table frame is constructed of two 1 x 4's x 8' long.  Then four 1 x 4 cross members x 6' long and one 2 x 4 cross member x 6' long.  Spaced at 2' on center.  The 2 x 4 goes at the half way point (where the two sheets of the plywood tops meet so they have an adequate edge to rest on and screw down to).  No glue was used in construction, just deck screws in a few different lengths, and some pan head phillips sheet metal screws to attach the diagonal bracing.  1/4" dia. hex head bolts, nuts, and flat washers tied the two table frames together.

I pre-drilled holes in the frame members accidentally on the wrong side of the cross members where the legs attach, so I ended up using some 2 x 4 spacers for the diagonal braces.  I probably could have gotten by without the spacers, but I had some material available after cutting the 2 x 4 cross members down to 6'.  You can see these spacers in the pictures.

Once again, this layout table was designed and built to be fairly lightweight, rigid, and movable in any direction on a smooth concrete floor.  Not meant to be walked upon or laid upon by persons of rather,.......... ahem (cough, cough), shall we say, "husky" stature (like myself!).  At 6'-2", I can reach everywhere on top of the table, and still sit under the table for wiring and soldering work.  No one style of table or construction may suit every situation, but in this case, this worked out for me. 


Some early train stuff on the floor:

142


Completed table frames during table construction:

144145146147148

 Most, if not all, materials courtesy of (who else?)........................ Menard's!

Attachments

Images (6)
  • 144
  • 145
  • 146
  • 147
  • 148
  • 142
Mark Boyce posted:

Paul,  That looks like it will serve your purposes well!  Lightweight for easy movement and rigid so it won't wobble.  It gets your trains up off the floor.  I don't know about you, but I'm getting too old for on the floor, especially concrete!  

You, me, and probably most of the other folks on this fine forum, I'm sure!!!  

OK- I'll weigh in.  Not that I am RIGHT, or that anybody really cares, but...

All of the aforementioned ways to build benchwork do a good job.  As for me- I have done FIVE layouts:  #1 a standard 2X4 frame/ cross member w/ 5/8" plywood top, HO scale, assembled w/ drywall screws, and using the "cookiecutter" method to make grades.  It never ran, because my family needed the 1/4 of a basement train room before my trains could run =  teardown #1.

Tear down #2 was a "shelf-style" HO switching layout at one end of the laundry / utility room.   Plywood framed in 2X4, and mounted to the block walls mounted to block using shelf brackets. Never ran.  We moved. 

# 3 was 1/2 of a basement plus 2 feet.  Built using the Westcott L-Girder method.  Never ran, after a year+ of work on the benchwork, I started on the sub-roadbed- right before the divorce. 

#4 was in my new bachelor condo- another HO layout.  Completed the benchwork, AND the sub-roadbed, as well as the Homosote.  I was getting pretty good at it, but the trackwork - I just could never get it right.  Wobble wobble down the track, then derail.

Here is what I have learned:

1.  Time- working on trains needs something around a 2-3 hour window minimum- 45 minutes to figure out where you left off three weeks earlier, 2 hours of work, and the rest before bed is cleanup.

2.  Difficulty- it is not really difficult, but what is easiest is to get all tied up in details, and never have trains running, no fun.  Unless your real hobby is crappy woodworking.

3.  Wood- it is hard to find decent, straight lumber.  So, you either have to buy "cabinet grade" wood, or pick through the junk at a big box store, then quickly cover it up so your visitors don't think you used old pallets.

4.  HO-  "fiddly".  Your bench-work, roadbed, and track-work better be top rate- or you have a crummy running layout.

SO:  for layout #5: I decided I wanted Lionel and O Gauge.   They run.  They run most of the time.  They can be worked on using 70 year old eyes.  I decided I didn't want to be a crummy woodworker.  I also decided I wanted to use pre-made commercial track w/ roadbed (vs. "flex track"), and chose FasTrack. 

I had the hobby shop draw up a track plan (the plan is least important part IMO-  ANY decent track plan, that fits your space, is a good one.) They ALL will be boring eventually and what is fun becomes scenery, buildings, etc. anyway.

I sent the track plan to Matt Hewitt, Benchridge Benchworkshttps://www.benchridge.com/

He designed a set of modular tables, most of them 2' X  4' size, bolted together using 5/16" cap screws, with reinforced leg sets made of 2 X 2 legs, then the leg sets braced w/ 3/4 " masonite, glued and screwed.  All wood filled and sanded.  And he cuts his own wood, so it's straight, even pretty.  Of 26 sets of legs- TWO had to be re-leveled when set up. 1/2" flat tops.  A 12 X 20 set of tables- delivered, and set up in 3-1/2 hours for a 12 x 20 layout.  Trains were running within 3 weeks.  Cost was equal to a commercial modular table, BUT I didn't have to assemble it- Matt did.

I am too old for carpentry!!
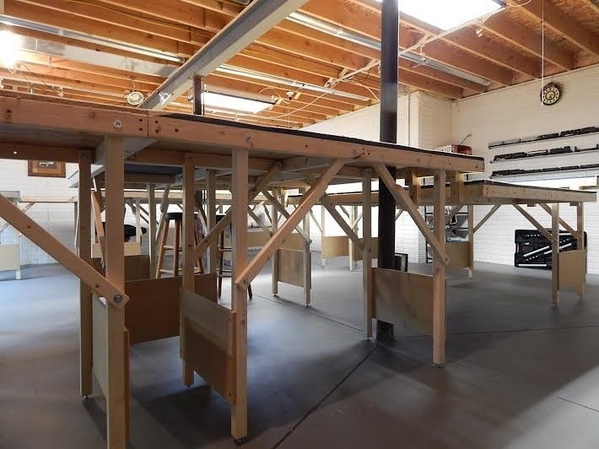
Benchwork 5

Benchwork 1

Attachments

Images (4)
  • Benchwork 1
  • Benchwork 2
  • Benchwork 4
  • Benchwork 5
Last edited by Mike Wyatt

Paul, I like your simple approach, we tend to overbuild benchwork. I had a similar idea, but wasn't sure it would be sturdy enough. The only real difference is 3 cross members and 2 rails would be different lengths to support some overhang. The black dots are leg locations and I might use plywood triangle  plates instead of braces. I plan to rip 3/4" plywood into 3" strips for the framing and it will have 3 levels, so I might use L-shaped legs instead of the 2x2s. I plan to cover it with 3 sheets of plywood, but haven;t decided between 1/2" and 3/4", though I think 3/4" would be best because of the smaller upper levels. The risers would be placed on top of the cross members to minimize sagging, so 1/2" might work okay. Decking will be covered with carpet padding or cork and white batting for a winter scene in Bedford Falls from the movie. May I ask why you added the 2x4 cross member to the module?

Capture 

Attachments

Images (1)
  • Capture

Thanks Dave, glad you liked it.  I was heavy into building and flying radio-controlled model airplanes back in the 90's and early 2000's, so I learned to build light, but strong.  Being involved in the N-Trak world for over the past decade, I have had time to hone my skills in the "light, but strong" department.  Or at least I hope so!
The 2 x 4 cross member x 6' long  (one on each table frame) was added at the half-way point on the 8' long side members simply to provide more surface area to screw down the 4' wide plywood table top sheets.  I probably could have gotten away with regular 1 x 4 framing at mid-point, but this would have only allowed 3/8' bearing for each sheet.  Adequate in a perfect world, but with the quality of the lumber in today's world - maybe not so good.

Material costs are another consideration.  If you can buy a 2 x 4 as cheap or cheaper than a 1 x 4, then why not?  If 2 x 4's are cheaper, then what the heck - use 2 x 4's!  Who cares?!?  Sometimes, I would really like to use 1 x 2's or 1 x 3's in place of 1 x 4's.  But when the smaller wood profiles cost as much or more than 1 x 4's, it's a no-brainer - I'll simply use 1 x 4's through-out.  Who cares?!?!?

For diagonal braces, keep in mind that the longer they are, the better they brace.  A 1' x 1' x 45 degree plywood triangular brace is not going to brace near as good as a 3'-4" long PVC pipe braces like I used.  The longer the brace, the sturdier the frame.

As stated earlier, I used 1/2" plywood for my table top instead of 3/4" plywood.  I do have a slight amount of sagging/deformation between joists in a spot or two, but VERY slight.  I knew this would be a possibility, but in my particular case, it is not detrimental at all.  If you absolutely have to have the flattest surface possible, then by all means go with 3/4" thick plywood.  And/or space your cross members closer than 2'-0" on center.  Once again, for me (insert Bronx cheer here), who cares?  I'm happy with what I got.  Works for me. 

Great thread and interesting ideas and approaches.  Relative to a flat surface, I had planned to use multi layer 1/ 2 (cabinet grade?) plywood for the surface but then I think years ago someone on the forum mentioned MDF and I used that. it is stable for sure.  Hemasote is on top of that.  I used a cross between what Paul and Mike (and a few others did (no glue- only screws and bolts / nuts) as you can figure out in this picture.  Mine is modular...to a point, maybe giving it credit as being half baked modular.

Still amazed at the scope of Elliot and Tom's work.  When I go through the downsize thing, depending on space, that Mianne  or modular like Matt Hewitt does looks pretty attractive As Elliot's signature says... no right answer but what makes you happy (plus fast and easy). 


100_4971.


Attachments

Images (1)
  • 100_4971

I only had 1 false start before I left California for Illinois, then Hawaii, etc., and the job took over my life. I tried getting into N scale when I retired, but found they were now too small. I thought about HO scale again, but procrastinated and eventually found O scale. I had smallish holiday layouts, but travel and medical issues once again have taken over, but I’m determined to  get my wife’s display layout built in the craft room before the holidays. I still haven’t ruled out Mianne, but it’s hard to justify the $1,000 or so price tag for a 4x8x12 layout.  It would takes 4x8 kit and a 4x6 add on as well as wheels, etc. I may contact Tim and see if he can put the parts together and hold shipment until we get back from Alaska/British Columbia in late July. I also need to find out if he can configure the legs so they allow easy access to the space underneath. Particularly bothersome to me are the legs he seems to add to the middle of the 4x4 sections. I prefer the configuration he shows in the video on his main page for the 4x8 kit he shows how to assemble.

Add Reply

Post
The Track Planning and Layout Design Forum is sponsored by

AN OGR FORUM CHARTER SPONSOR

OGR Publishing, Inc., 1310 Eastside Centre Ct, Suite 6, Mountain Home, AR 72653
800-980-OGRR (6477)
www.ogaugerr.com

×
×
×
×
Link copied to your clipboard.
×
×